
Administration Guide
Page 3
...Up Your Configuration 24 Upgrading the Firmware 24 Common Configuration Scenarios 25 Basic Network Configuration with Internet Access 26 Cisco Smart Business Communications System Configuration 28 Firewall for Controlling Inbound and Outbound Traffic 29 DMZ for Public Websites ...Web & Email Security 31 Site-to-Site Networking and Remote Access 31 Wireless Networking 35 Chapter 2: Networking 36 Configuring the WAN Connection 37 Viewing the WAN Status 39 Creating PPPoE Profiles 40 Configuring an IP Alias 41 Cisco SA500 Series Security Appliances Administration Guide 3
...Up Your Configuration 24 Upgrading the Firmware 24 Common Configuration Scenarios 25 Basic Network Configuration with Internet Access 26 Cisco Smart Business Communications System Configuration 28 Firewall for Controlling Inbound and Outbound Traffic 29 DMZ for Public Websites ...Web & Email Security 31 Site-to-Site Networking and Remote Access 31 Wireless Networking 35 Chapter 2: Networking 36 Configuring the WAN Connection 37 Viewing the WAN Status 39 Creating PPPoE Profiles 40 Configuring an IP Alias 41 Cisco SA500 Series Security Appliances Administration Guide 3
Administration Guide
Page 4
... 72 Traffic Selectors 73 LAN QoS 74 Enabling LAN QoS 74 Port CoS Mapping 75 Port DSCP Mapping 75 DSCP Remarking 75 Dynamic DNS 76 Cisco SA500 Series Security Appliances Administration Guide 4
... 72 Traffic Selectors 73 LAN QoS 74 Enabling LAN QoS 74 Port CoS Mapping 75 Port DSCP Mapping 75 DSCP Remarking 75 Dynamic DNS 76 Cisco SA500 Series Security Appliances Administration Guide 4
Administration Guide
Page 5
... 83 83 84 85 85 86 87 88 88 89 91 91 92 95 95 96 98 99 99 101 103 103 104 107 107 Cisco SA500 Series Security Appliances Administration Guide 5
... 83 83 84 85 85 86 87 88 88 89 91 91 92 95 95 96 98 99 99 101 103 103 104 107 107 Cisco SA500 Series Security Appliances Administration Guide 5

Administration Guide
Page 6
... 134 Chapter 6: Using Cisco ProtectLink Security Services 135 Chapter 7: Configuring VPN About VPN Configuring a Site-to-Site VPN Tunnel Configuring an IPsec VPN Tunnel for Remote Access with a VPN Client Configuring the User Database for the IPsec Remote Access VPN Advanced Configuration of IPsec VPN 136 136 137 139 142 144 Cisco SA500 Series Security Appliances Administration Guide 6
... 134 Chapter 6: Using Cisco ProtectLink Security Services 135 Chapter 7: Configuring VPN About VPN Configuring a Site-to-Site VPN Tunnel Configuring an IPsec VPN Tunnel for Remote Access with a VPN Client Configuring the User Database for the IPsec Remote Access VPN Advanced Configuration of IPsec VPN 136 136 137 139 142 144 Cisco SA500 Series Security Appliances Administration Guide 6

Administration Guide
Page 7
...Configuring the IPsec VPN Policies Configuring SSL VPN for Browser-Based Remote Access Access Options for SSL VPN Security Tips for SSL VPN Elements of the SSL VPN Scenario Step 1: Customizing the Portal Layout Scenario ...VeriSign™ Identity Protection configuration Configuring VeriSign Identity Protection Managing User Credentials for VeriSign Service Chapter 8: Administration Users Domains Groups Adding or Editing User Settings Adding or Editing User Login Policies Firmware and Configuration ... 176 176 178 180 180 182 184 185 Cisco SA500 Series Security Appliances Administration Guide 7
...Configuring the IPsec VPN Policies Configuring SSL VPN for Browser-Based Remote Access Access Options for SSL VPN Security Tips for SSL VPN Elements of the SSL VPN Scenario Step 1: Customizing the Portal Layout Scenario ...VeriSign™ Identity Protection configuration Configuring VeriSign Identity Protection Managing User Credentials for VeriSign Service Chapter 8: Administration Users Domains Groups Adding or Editing User Settings Adding or Editing User Login Policies Firmware and Configuration ... 176 176 178 180 180 182 184 185 Cisco SA500 Series Security Appliances Administration Guide 7

Administration Guide
Page 8
... Utilization Interface Statistics Port Statistics Wireless Statistics for the SA520W VPN Status IPsec VPN Status SSL VPN Status Quick VPN Status Active Users View Logs Cisco SA500 Series Security Appliances Administration Guide Contents 185 187 188 189 190 193 194 197 197 199 199 200 200 201 202 202 202 204 204 205 207 207 208...
... Utilization Interface Statistics Port Statistics Wireless Statistics for the SA520W VPN Status IPsec VPN Status SSL VPN Status Quick VPN Status Active Users View Logs Cisco SA500 Series Security Appliances Administration Guide Contents 185 187 188 189 190 193 194 197 197 199 199 200 200 201 202 202 202 204 204 205 207 207 208...

Administration Guide
Page 9
... Configuration Settings Appendix B: Standard Services Appendix C: Technical Specifications and Environmental Requirements Appendix D: Factory Default Settings General Settings Router Settings Wireless Settings Storage Security Settings Appendix E: Where to Go From Here 213 215 215 215 216 216 217 217 220 221 223 224 227 229 229 231 234 237 238 240 Cisco SA500 Series Security Appliances Administration Guide 9
... Configuration Settings Appendix B: Standard Services Appendix C: Technical Specifications and Environmental Requirements Appendix D: Factory Default Settings General Settings Router Settings Wireless Settings Storage Security Settings Appendix E: Where to Go From Here 213 215 215 215 216 216 217 217 220 221 223 224 227 229 229 231 234 237 238 240 Cisco SA500 Series Security Appliances Administration Guide 9
Administration Guide
Page 10
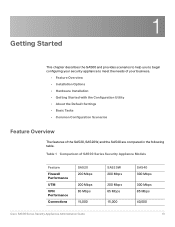
... the Default Settings • Basic Tasks • Common Configuration Scenarios Feature Overview The features of SA500 Series Security Appliance Models Feature Firewall Performance UTM VPN Performance Connections SA520 200 Mbps 200 Mbps 65 Mbps 15,000 Cisco SA500 Series Security Appliances Administration Guide SA520W 200 Mbps 200 Mbps 65 Mbps 15,000 SA540 300 Mbps 300 Mbps 85 Mbps 40...
... the Default Settings • Basic Tasks • Common Configuration Scenarios Feature Overview The features of SA500 Series Security Appliance Models Feature Firewall Performance UTM VPN Performance Connections SA520 200 Mbps 200 Mbps 65 Mbps 15,000 Cisco SA500 Series Security Appliances Administration Guide SA520W 200 Mbps 200 Mbps 65 Mbps 15,000 SA540 300 Mbps 300 Mbps 85 Mbps 40...
Administration Guide
Page 11
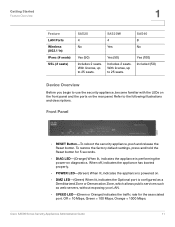
...Started Feature Overview 1 Feature LAN Ports Wireless (802.11n) IPsec (# seats) SSL (# seats) SA520 4 No SA520W 4 Yes SA540 8 No Yes (50) Includes 2 seats. Cisco SA500 Series Security Appliances Administration Guide 11 Yes (50) Includes 2 seats. With license, up to 25 seats. With license, ...up to 25 seats. Refer to use the security appliance, become familiar with the LEDs on the front panel and...
...Started Feature Overview 1 Feature LAN Ports Wireless (802.11n) IPsec (# seats) SSL (# seats) SA520 4 No SA520W 4 Yes SA540 8 No Yes (50) Includes 2 seats. Cisco SA500 Series Security Appliances Administration Guide 11 Yes (50) Includes 2 seats. With license, up to 25 seats. With license, ...up to 25 seats. Refer to use the security appliance, become familiar with the LEDs on the front panel and...
Administration Guide
Page 12
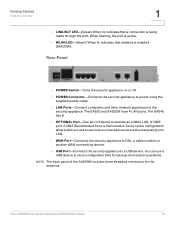
...(Demilitarized Zone or Demarcation Zone) can use a USB device to the security appliance. Rear Panel • POWER Switch-Turns the security appliance on or off. • POWER Connector-Connects the security appliance to power using the supplied power cable. • LAN Ports-Connect ... is active. • WLAN LED-(Green) When lit, indicates that a connection is enabled (SA520W). The SA520 and SA520W have 4 LAN ports. Cisco SA500 Series Security Appliances Administration Guide 12 You can be configured to a USB device. Getting Started Feature Overview 1 • LINK/ACT LED-(...
...(Demilitarized Zone or Demarcation Zone) can use a USB device to the security appliance. Rear Panel • POWER Switch-Turns the security appliance on or off. • POWER Connector-Connects the security appliance to power using the supplied power cable. • LAN Ports-Connect ... is active. • WLAN LED-(Green) When lit, indicates that a connection is enabled (SA520W). The SA520 and SA520W have 4 LAN ports. Cisco SA500 Series Security Appliances Administration Guide 12 You can be configured to a USB device. Getting Started Feature Overview 1 • LINK/ACT LED-(...

Administration Guide
Page 13
...; Hardware Installation, page 16 Installation Options You can place your security appliance. Place the device on a wall, or mount it in a rack. Cisco SA500 Series Security Appliances Administration Guide 13 Placement Tips • Ambient Temperature-To prevent the security appliance from overheating, do not operate it in an area that the security appliance is adequate air flow around the device. • Mechanical...
...; Hardware Installation, page 16 Installation Options You can place your security appliance. Place the device on a wall, or mount it in a rack. Cisco SA500 Series Security Appliances Administration Guide 13 Placement Tips • Ambient Temperature-To prevent the security appliance from overheating, do not operate it in an area that the security appliance is adequate air flow around the device. • Mechanical...

Administration Guide
Page 14
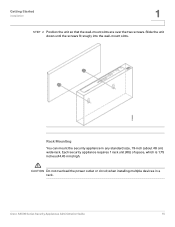
Cisco SA500 Series Security Appliances Administration Guide 14 Getting Started Installation 1 Wall Mounting STEP 1 Insert two 17 mm screws, with anchors, into the wall 15 cm apart (about 1/8 inch) of the head exposed. Leave 3-4 mm (about 5.9 inches).
Cisco SA500 Series Security Appliances Administration Guide 14 Getting Started Installation 1 Wall Mounting STEP 1 Insert two 17 mm screws, with anchors, into the wall 15 cm apart (about 1/8 inch) of the head exposed. Leave 3-4 mm (about 5.9 inches).
Administration Guide
Page 15
CAUTION Do not overload the power outlet or circuit when installing multiple devices in any standard size, 19-inch (about 48 cm) wide rack. Each security appliance requires 1 rack unit (RU) of space, which is 1.75 inches (44.45 mm) high. ! Cisco SA500 Series Security Appliances Administration Guide 15 Getting Started Installation 1 STEP 2 Position the unit so that the wall-mount slots are over the two screws. Rack Mounting You can mount the security appliance in a rack. Slide the unit down until the screws fit snugly into the wall-mount slots.
CAUTION Do not overload the power outlet or circuit when installing multiple devices in any standard size, 19-inch (about 48 cm) wide rack. Each security appliance requires 1 rack unit (RU) of space, which is 1.75 inches (44.45 mm) high. ! Cisco SA500 Series Security Appliances Administration Guide 15 Getting Started Installation 1 STEP 2 Position the unit so that the wall-mount slots are over the two screws. Rack Mounting You can mount the security appliance in a rack. Slide the unit down until the screws fit snugly into the wall-mount slots.

Administration Guide
Page 16
... on the back panel. NOTE If the screws are installing the SA520W, screw each antenna to the case without the spacer. Cisco strongly recommends using Cat5E or better cable. Cisco SA500 Series Security Appliances Administration Guide 16 Place a rack mount bracket next to the screw holes. STEP 4 For network devices, connect an Ethernet network cable from the...
... on the back panel. NOTE If the screws are installing the SA520W, screw each antenna to the case without the spacer. Cisco strongly recommends using Cat5E or better cable. Cisco SA500 Series Security Appliances Administration Guide 16 Place a rack mount bracket next to the screw holes. STEP 4 For network devices, connect an Ethernet network cable from the...

Administration Guide
Page 17
... the security appliance by using a UC500, connect an Ethernet network cable from your administration PC or laptop. Congratulations! The installation of the UC500 to show an active connection. Getting Started with the Configuration Utility 1 STEP 5 If you must be able to connect to provision the SA500 Series Security Appliances. STEP 6 Power on the connected devices. Cisco SA500 Series Security Appliances Administration Guide...
... the security appliance by using a UC500, connect an Ethernet network cable from your administration PC or laptop. Congratulations! The installation of the UC500 to show an active connection. Getting Started with the Configuration Utility 1 STEP 5 If you must be able to connect to provision the SA500 Series Security Appliances. STEP 6 Power on the connected devices. Cisco SA500 Series Security Appliances Administration Guide...

Administration Guide
Page 18
... 1 Connect your computer to an available LAN port on the back panel of the security appliance. The Getting Started (Basic) window opens. Cisco SA500 Series Security Appliances Administration Guide 18 Getting Started Getting Started with a CCA-supported device, such as the UC500. STEP 3 When the Security Alert appears, accept or install the certificate: • Internet Explorer: Click Yes to...
... 1 Connect your computer to an available LAN port on the back panel of the security appliance. The Getting Started (Basic) window opens. Cisco SA500 Series Security Appliances Administration Guide 18 Getting Started Getting Started with a CCA-supported device, such as the UC500. STEP 3 When the Security Alert appears, accept or install the certificate: • Internet Explorer: Click Yes to...

Administration Guide
Page 19
... Started (Basic) page at any time, click the Getting Started button in , check the Don't show this on start-up box. Getting Started (Basic) Page Cisco SA500 Series Security Appliances Administration Guide 19
... Started (Basic) page at any time, click the Getting Started button in , check the Don't show this on start-up box. Getting Started (Basic) Page Cisco SA500 Series Security Appliances Administration Guide 19

Administration Guide
Page 20
Getting Started Getting Started with the Configuration Utility Getting Started (Advanced) Page 1 Cisco SA500 Series Security Appliances Administration Guide 20
Getting Started Getting Started with the Configuration Utility Getting Started (Advanced) Page 1 Cisco SA500 Series Security Appliances Administration Guide 20

Administration Guide
Page 21
... Getting Started with the Configuration Utility 1 Navigating Through the Configuration Utility Use the menu bar and the navigation pane to perform tasks in this area. Cisco SA500 Series Security Appliances Administration Guide 21 Click a menu item to change to provide the subfeatures. Click on the title of the feature appears in the Configuration Utility.
... Getting Started with the Configuration Utility 1 Navigating Through the Configuration Utility Use the menu bar and the navigation pane to perform tasks in this area. Cisco SA500 Series Security Appliances Administration Guide 21 Click a menu item to change to provide the subfeatures. Click on the title of the feature appears in the Configuration Utility.

Administration Guide
Page 22
...ISP by using the device with minimal changes needed . About the Default Settings The SA500 Series Security Appliances are described below. Settings of the security appliance. See Configuring IPv6 Addressing, page 77. • WAN Configuration: By default, the security appliance is configured to act as a DHCP server. You can assign static IP addresses to ... DHCP and TCP/IP settings of these settings. However, you will need to enter the account information. See Scenario 1: Basic Network Configuration with Cisco SA500 Series Security Appliances Administration Guide 22
...ISP by using the device with minimal changes needed . About the Default Settings The SA500 Series Security Appliances are described below. Settings of the security appliance. See Configuring IPv6 Addressing, page 77. • WAN Configuration: By default, the security appliance is configured to act as a DHCP server. You can assign static IP addresses to ... DHCP and TCP/IP settings of these settings. However, you will need to enter the account information. See Scenario 1: Basic Network Configuration with Cisco SA500 Series Security Appliances Administration Guide 22