
Administration Guide
Page 3
... Up Your Configuration 24 Upgrading the Firmware 24 Common Configuration Scenarios 25 Basic Network Configuration with Internet Access 26 Cisco Smart Business Communications System Configuration 28 Firewall for Controlling Inbound and Outbound Traffic 29 DMZ for Public Websites and ... & Email Security 31 Site-to-Site Networking and Remote Access 31 Wireless Networking 35 Chapter 2: Networking 36 Configuring the WAN Connection 37 Viewing the WAN Status 39 Creating PPPoE Profiles 40 Configuring an IP Alias 41 Cisco SA500 Series Security Appliances Administration Guide ...
... Up Your Configuration 24 Upgrading the Firmware 24 Common Configuration Scenarios 25 Basic Network Configuration with Internet Access 26 Cisco Smart Business Communications System Configuration 28 Firewall for Controlling Inbound and Outbound Traffic 29 DMZ for Public Websites and ... & Email Security 31 Site-to-Site Networking and Remote Access 31 Wireless Networking 35 Chapter 2: Networking 36 Configuring the WAN Connection 37 Viewing the WAN Status 39 Creating PPPoE Profiles 40 Configuring an IP Alias 41 Cisco SA500 Series Security Appliances Administration Guide ...
Administration Guide
Page 4
... 72 Traffic Selectors 73 LAN QoS 74 Enabling LAN QoS 74 Port CoS Mapping 75 Port DSCP Mapping 75 DSCP Remarking 75 Dynamic DNS 76 Cisco SA500 Series Security Appliances Administration Guide 4
... 72 Traffic Selectors 73 LAN QoS 74 Enabling LAN QoS 74 Port CoS Mapping 75 Port DSCP Mapping 75 DSCP Remarking 75 Dynamic DNS 76 Cisco SA500 Series Security Appliances Administration Guide 4
Administration Guide
Page 5
... 83 83 84 85 85 86 87 88 88 89 91 91 92 95 95 96 98 99 99 101 103 103 104 107 107 Cisco SA500 Series Security Appliances Administration Guide 5
... 83 83 84 85 85 86 87 88 88 89 91 91 92 95 95 96 98 99 99 101 103 103 104 107 107 Cisco SA500 Series Security Appliances Administration Guide 5

Administration Guide
Page 6
... 6: Using Cisco ProtectLink Security Services 135 Chapter 7: Configuring VPN About VPN Configuring a Site-to-Site VPN Tunnel Configuring an IPsec VPN Tunnel for Remote Access with a VPN Client Configuring the User Database for the IPsec Remote Access VPN Advanced Configuration of IPsec VPN 136 136 137 139 142 144 Cisco SA500 Series Security Appliances Administration Guide...
... 6: Using Cisco ProtectLink Security Services 135 Chapter 7: Configuring VPN About VPN Configuring a Site-to-Site VPN Tunnel Configuring an IPsec VPN Tunnel for Remote Access with a VPN Client Configuring the User Database for the IPsec Remote Access VPN Advanced Configuration of IPsec VPN 136 136 137 139 142 144 Cisco SA500 Series Security Appliances Administration Guide...

Administration Guide
Page 7
... Configuring the IKE Policies for IPsec VPN Configuring the IPsec VPN Policies Configuring SSL VPN for Browser-Based Remote Access Access Options for SSL VPN Security Tips for SSL VPN Elements of the SSL VPN Scenario Step 1: Customizing the Portal Layout Scenario Step 2: Adding the SSL VPN Users Creating the SSL... 156 157 159 160 163 163 165 168 169 169 170 171 171 172 173 173 175 176 176 178 180 180 182 184 185 Cisco SA500 Series Security Appliances Administration Guide 7
... Configuring the IKE Policies for IPsec VPN Configuring the IPsec VPN Policies Configuring SSL VPN for Browser-Based Remote Access Access Options for SSL VPN Security Tips for SSL VPN Elements of the SSL VPN Scenario Step 1: Customizing the Portal Layout Scenario Step 2: Adding the SSL VPN Users Creating the SSL... 156 157 159 160 163 163 165 168 169 169 170 171 171 172 173 173 175 176 176 178 180 180 182 184 185 Cisco SA500 Series Security Appliances Administration Guide 7

Administration Guide
Page 8
... Utilization Interface Statistics Port Statistics Wireless Statistics for the SA520W VPN Status IPsec VPN Status SSL VPN Status Quick VPN Status Active Users View Logs Cisco SA500 Series Security Appliances Administration Guide Contents 185 187 188 189 190 193 194 197 197 199 199 200 200 201 202 202 202 204 204 205 207...
... Utilization Interface Statistics Port Statistics Wireless Statistics for the SA520W VPN Status IPsec VPN Status SSL VPN Status Quick VPN Status Active Users View Logs Cisco SA500 Series Security Appliances Administration Guide Contents 185 187 188 189 190 193 194 197 197 199 199 200 200 201 202 202 202 204 204 205 207...

Administration Guide
Page 9
... Appendix B: Standard Services Appendix C: Technical Specifications and Environmental Requirements Appendix D: Factory Default Settings General Settings Router Settings Wireless Settings Storage Security Settings Appendix E: Where to Go From Here 213 215 215 215 216 216 217 217 220 221 223 224 227 229 229 231 234 237 238 240 Cisco SA500 Series Security Appliances Administration Guide 9
... Appendix B: Standard Services Appendix C: Technical Specifications and Environmental Requirements Appendix D: Factory Default Settings General Settings Router Settings Wireless Settings Storage Security Settings Appendix E: Where to Go From Here 213 215 215 215 216 216 217 217 220 221 223 224 227 229 229 231 234 237 238 240 Cisco SA500 Series Security Appliances Administration Guide 9
Administration Guide
Page 10
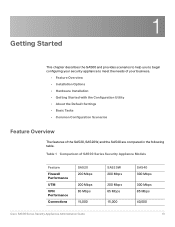
Table 1 Comparison of the SA520, SA520W, and the SA540 are compared in the following table. 1 Getting Started This chapter describes the SA500 and provides scenarios to help you to begin configuring your security appliance to meet the needs of your business. • Feature ... • Common Configuration Scenarios Feature Overview The features of SA500 Series Security Appliance Models Feature Firewall Performance UTM VPN Performance Connections SA520 200 Mbps 200 Mbps 65 Mbps 15,000 Cisco SA500 Series Security Appliances Administration Guide SA520W 200 Mbps 200 Mbps 65 Mbps 15,000...
Table 1 Comparison of the SA520, SA520W, and the SA540 are compared in the following table. 1 Getting Started This chapter describes the SA500 and provides scenarios to help you to begin configuring your security appliance to meet the needs of your business. • Feature ... • Common Configuration Scenarios Feature Overview The features of SA500 Series Security Appliance Models Feature Firewall Performance UTM VPN Performance Connections SA520 200 Mbps 200 Mbps 65 Mbps 15,000 Cisco SA500 Series Security Appliances Administration Guide SA520W 200 Mbps 200 Mbps 65 Mbps 15,000...
Administration Guide
Page 11
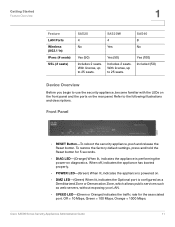
...is performing the power-on the rear panel. Yes (50) Includes 2 seats. Front Panel • RESET Button-To reboot the security appliance, push and release the Reset button. To restore the factory default settings, press and hold the Reset button for 5 seconds. •...SSL (# seats) SA520 4 No SA520W 4 Yes SA540 8 No Yes (50) Includes 2 seats. Refer to use the security appliance, become familiar with the LEDs on the front panel and the ports on diagnostics. Off = 10 Mbps, Green = 100 Mbps, Orange = 1000 Mbps. Cisco SA500 Series Security Appliances Administration Guide 11 ...
...is performing the power-on the rear panel. Yes (50) Includes 2 seats. Front Panel • RESET Button-To reboot the security appliance, push and release the Reset button. To restore the factory default settings, press and hold the Reset button for 5 seconds. •...SSL (# seats) SA520 4 No SA520W 4 Yes SA540 8 No Yes (50) Includes 2 seats. Refer to use the security appliance, become familiar with the LEDs on the front panel and the ports on diagnostics. Off = 10 Mbps, Green = 100 Mbps, Orange = 1000 Mbps. Cisco SA500 Series Security Appliances Administration Guide 11 ...
Administration Guide
Page 12
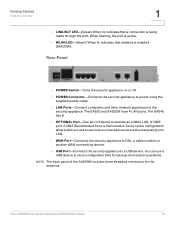
The SA520 and SA520W have 4 LAN ports. You can be configured to operate as web servers without exposing your LAN. • WAN Port-Connects the security appliance to DSL, a cable modem, or another WAN connectivity device. • USB Port-Connects the security appliance to services ...lit, indicates that wireless is being made through the port. Cisco SA500 Series Security Appliances Administration Guide 12 Rear Panel • POWER Switch-Turns the security appliance on or off. • POWER Connector-Connects the security appliance to power using the supplied power cable. • LAN ...
The SA520 and SA520W have 4 LAN ports. You can be configured to operate as web servers without exposing your LAN. • WAN Port-Connects the security appliance to DSL, a cable modem, or another WAN connectivity device. • USB Port-Connects the security appliance to services ...lit, indicates that wireless is being made through the port. Cisco SA500 Series Security Appliances Administration Guide 12 Rear Panel • POWER Switch-Turns the security appliance on or off. • POWER Connector-Connects the security appliance to power using the supplied power cable. • LAN ...

Administration Guide
Page 13
...Loading-Be sure that exceeds an ambient temperature of your security appliance. Placement Tips • Ambient Temperature-To prevent the security appliance from overheating, do not operate it in an area that the security appliance is level and stable to the following topics: •... can place your security appliance on a desktop, mount it on a wall, or mount it in a rack. Place the device on the bottom of the security appliance. Refer to avoid any hazardous conditions. Cisco SA500 Series Security Appliances Administration Guide 13 To place the security appliance on a desktop...
...Loading-Be sure that exceeds an ambient temperature of your security appliance. Placement Tips • Ambient Temperature-To prevent the security appliance from overheating, do not operate it in an area that the security appliance is level and stable to the following topics: •... can place your security appliance on a desktop, mount it on a wall, or mount it in a rack. Place the device on the bottom of the security appliance. Refer to avoid any hazardous conditions. Cisco SA500 Series Security Appliances Administration Guide 13 To place the security appliance on a desktop...

Administration Guide
Page 14
Cisco SA500 Series Security Appliances Administration Guide 14 Getting Started Installation 1 Wall Mounting STEP 1 Insert two 17 mm screws, with anchors, into the wall 15 cm apart (about 1/8 inch) of the head exposed. Leave 3-4 mm (about 5.9 inches).
Cisco SA500 Series Security Appliances Administration Guide 14 Getting Started Installation 1 Wall Mounting STEP 1 Insert two 17 mm screws, with anchors, into the wall 15 cm apart (about 1/8 inch) of the head exposed. Leave 3-4 mm (about 5.9 inches).
Administration Guide
Page 15
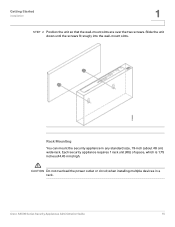
CAUTION Do not overload the power outlet or circuit when installing multiple devices in any standard size, 19-inch (about 48 cm) wide rack. Cisco SA500 Series Security Appliances Administration Guide 15 Slide the unit down until the screws fit snugly into the wall-mount slots. Rack Mounting You can mount the security appliance in a rack. Each security appliance requires 1 rack unit (RU) of space, which is 1.75 inches (44.45 mm) high. ! Getting Started Installation 1 STEP 2 Position the unit so that the wall-mount slots are over the two screws.
CAUTION Do not overload the power outlet or circuit when installing multiple devices in any standard size, 19-inch (about 48 cm) wide rack. Cisco SA500 Series Security Appliances Administration Guide 15 Slide the unit down until the screws fit snugly into the wall-mount slots. Rack Mounting You can mount the security appliance in a rack. Each security appliance requires 1 rack unit (RU) of space, which is 1.75 inches (44.45 mm) high. ! Getting Started Installation 1 STEP 2 Position the unit so that the wall-mount slots are over the two screws.

Administration Guide
Page 16
... bracket next to power. STEP 3 Install the security appliance into a standard rack as shown. STEP 2 If you are not long enough to reattach the bracket with the spacer, attach the bracket directly to the case without the spacer. Cisco strongly recommends using Cat5E or better cable. Getting ... Ethernet network cable from the network device to the screw holes. STEP 2 Place one of the security appliance so that the four holes align to one of the supplied spacers on the side of the dedicated LAN ports on the back panel. Cisco SA500 Series Security Appliances Administration Guide 16
... bracket next to power. STEP 3 Install the security appliance into a standard rack as shown. STEP 2 If you are not long enough to reattach the bracket with the spacer, attach the bracket directly to the case without the spacer. Cisco strongly recommends using Cat5E or better cable. Getting ... Ethernet network cable from the network device to the screw holes. STEP 2 Place one of the security appliance so that the four holes align to one of the supplied spacers on the side of the dedicated LAN ports on the back panel. Cisco SA500 Series Security Appliances Administration Guide 16

Administration Guide
Page 17
... Utility 1 STEP 5 If you must be able to connect to the SA500 Series Security Appliances from the WAN port of the UC500 to an available LAN port of the security appliance is illustrated below. Cisco SA500 Series Security Appliances Administration Guide 17 The installation of the security appliance. To use this utility, you are using any web browser (such as Microsoft...
... Utility 1 STEP 5 If you must be able to connect to the SA500 Series Security Appliances from the WAN port of the UC500 to an available LAN port of the security appliance is illustrated below. Cisco SA500 Series Security Appliances Administration Guide 17 The installation of the security appliance. To use this utility, you are using any web browser (such as Microsoft...

Administration Guide
Page 18
... IP address to connect to an available LAN port on the back panel of the security appliance. Cisco SA500 Series Security Appliances Administration Guide 18 Click the Add Exception button. STEP 4 Enter the default user name and password: • Username: cisco • Password: cisco STEP 5 Click Log In. The Getting Started (Basic) window opens. For more information about...
... IP address to connect to an available LAN port on the back panel of the security appliance. Cisco SA500 Series Security Appliances Administration Guide 18 Click the Add Exception button. STEP 4 Enter the default user name and password: • Username: cisco • Password: cisco STEP 5 Click Log In. The Getting Started (Basic) window opens. For more information about...

Administration Guide
Page 19
..., DMZ configuration, and VPN setup, click the Getting Started > Advanced link in , check the Don't show this on start-up box. Getting Started (Basic) Page Cisco SA500 Series Security Appliances Administration Guide 19
..., DMZ configuration, and VPN setup, click the Getting Started > Advanced link in , check the Don't show this on start-up box. Getting Started (Basic) Page Cisco SA500 Series Security Appliances Administration Guide 19

Administration Guide
Page 20
Getting Started Getting Started with the Configuration Utility Getting Started (Advanced) Page 1 Cisco SA500 Series Security Appliances Administration Guide 20
Getting Started Getting Started with the Configuration Utility Getting Started (Advanced) Page 1 Cisco SA500 Series Security Appliances Administration Guide 20

Administration Guide
Page 21
... device features.The main branches expand to another category. Click on the triangle next to the main branch title to perform tasks in this area. Cisco SA500 Series Security Appliances Administration Guide 21 Getting Started Getting Started with the Configuration Utility 1 Navigating Through the Configuration Utility Use the menu bar and the navigation pane...
... device features.The main branches expand to another category. Click on the triangle next to the main branch title to perform tasks in this area. Cisco SA500 Series Security Appliances Administration Guide 21 Getting Started Getting Started with the Configuration Utility 1 Navigating Through the Configuration Utility Use the menu bar and the navigation pane...

Administration Guide
Page 22
About the Default Settings The SA500 Series Security Appliances are pre-configured with minimal changes needed . If your ISP assigned a static IP address, you will need to modify some of these ...allow you to configure it. For more information, see Scenario 1: Basic Network Configuration with Cisco SA500 Series Security Appliances Administration Guide 22 For more information, see Appendix D, "Factory Default Settings." • IPv4 Addressing: By default, the security appliance is in the top right corner of particular interest are currently viewing. Settings of the ...
About the Default Settings The SA500 Series Security Appliances are pre-configured with minimal changes needed . If your ISP assigned a static IP address, you will need to modify some of these ...allow you to configure it. For more information, see Scenario 1: Basic Network Configuration with Cisco SA500 Series Security Appliances Administration Guide 22 For more information, see Appendix D, "Factory Default Settings." • IPv4 Addressing: By default, the security appliance is in the top right corner of particular interest are currently viewing. Settings of the ...
