

Quick Start Guide
Page 1
QUICK START GUIDE Cisco IAD2430 Series Integrated Access Devices INCLUDING LICENSE AND WARRANTY 1 Cisco 90-Day Limited Hardware Warranty Terms 2 Obtaining Documentation and Submitting a Service Request 3 Equipment, Tools, and Accessories 4 Product Serial Number Location 5 Accessibility 6 Safety Information 7 Installing the Chassis 8 Installing a WAN or Voice Interface Card 9 Connecting Cables 10 Powering On the Cisco IAD 11 Performing the Initial Configuration
QUICK START GUIDE Cisco IAD2430 Series Integrated Access Devices INCLUDING LICENSE AND WARRANTY 1 Cisco 90-Day Limited Hardware Warranty Terms 2 Obtaining Documentation and Submitting a Service Request 3 Equipment, Tools, and Accessories 4 Product Serial Number Location 5 Accessibility 6 Safety Information 7 Installing the Chassis 8 Installing a WAN or Voice Interface Card 9 Connecting Cables 10 Powering On the Cisco IAD 11 Performing the Initial Configuration
Quick Start Guide
Page 2
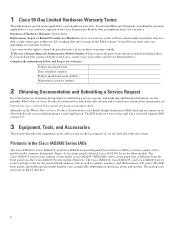
... your hardware warranty. Actual delivery times may vary depending on interfaces, ports, and options. Products in the Cisco IAD2430 Series IADs The Cisco IAD2430, Cisco IAD2431, and Cisco IAD2432 series Integrated Access Devices (IADs) (routers) consist of one model (Cisco IAD2435-8FXS IAD) with a common front panel (Figure 1); The analog voice ports use commercially reasonable efforts to your desktop using...
... your hardware warranty. Actual delivery times may vary depending on interfaces, ports, and options. Products in the Cisco IAD2430 Series IADs The Cisco IAD2430, Cisco IAD2431, and Cisco IAD2432 series Integrated Access Devices (IADs) (routers) consist of one model (Cisco IAD2435-8FXS IAD) with a common front panel (Figure 1); The analog voice ports use commercially reasonable efforts to your desktop using...
Quick Start Guide
Page 3
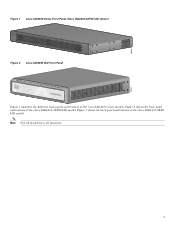
Note Not all models have all functions. 3 Figure 5 shows the back panel and features of the Cisco IAD2432-24FXS IAD model. Figure 4 shows the back panel and features of the Cisco IAD2435-8FXS IAD model. Figure 1 Cisco IAD2430 Series Front Panel (Cisco IAD2432-24FXS IAD shown) CISCO IAD2400 88839 Figure 2 Cisco IAD2435 IAD Front Panel 231872 OK 0/0 FE 0/1 CD T1/E1 AL 2/0 2/1 2/2 2/3 FXS 2/4 2/5 2/6 2/7 Cisco IAD2400 SERIES Figure 3 identifies the different back panels and features of the Cisco IAD2430 series models.
Note Not all models have all functions. 3 Figure 5 shows the back panel and features of the Cisco IAD2432-24FXS IAD model. Figure 4 shows the back panel and features of the Cisco IAD2435-8FXS IAD model. Figure 1 Cisco IAD2430 Series Front Panel (Cisco IAD2432-24FXS IAD shown) CISCO IAD2400 88839 Figure 2 Cisco IAD2435 IAD Front Panel 231872 OK 0/0 FE 0/1 CD T1/E1 AL 2/0 2/1 2/2 2/3 FXS 2/4 2/5 2/6 2/7 Cisco IAD2400 SERIES Figure 3 identifies the different back panels and features of the Cisco IAD2430 series models.

Quick Start Guide
Page 4
... interface • T1/E1 ports: none • FE ports: 2 • External flash memory Cisco IAD2431-8FXS IAD • RJ-21 analog voice interface • T1/E1 ports: 1 • FE ports: 1 • WIC/VIC option • External flash memory Cisco IAD2431-16FXS IAD • RJ-21 analog voice interface • T1/E1 ports: 1 • FE ports...
... interface • T1/E1 ports: none • FE ports: 2 • External flash memory Cisco IAD2431-8FXS IAD • RJ-21 analog voice interface • T1/E1 ports: 1 • FE ports: 1 • WIC/VIC option • External flash memory Cisco IAD2431-16FXS IAD • RJ-21 analog voice interface • T1/E1 ports: 1 • FE ports...
Quick Start Guide
Page 5
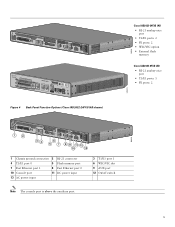
...; RJ-21 analog voice port • T1/E1 ports: 2 • FE ports: 2 • WIC/VIC option • External flash memory Cisco IAD2435-8FXS IAD • RJ-21 analog voice port • T1/E1 ports: 1 • FE ports: 2 88828 1 2 34 6 5 7 8 9 11 12 10 13 1 Chassis ground connection 2 RJ-21 connector 4 ...
...; RJ-21 analog voice port • T1/E1 ports: 2 • FE ports: 2 • WIC/VIC option • External flash memory Cisco IAD2435-8FXS IAD • RJ-21 analog voice port • T1/E1 ports: 1 • FE ports: 2 88828 1 2 34 6 5 7 8 9 11 12 10 13 1 Chassis ground connection 2 RJ-21 connector 4 ...

Quick Start Guide
Page 6
... fasteners; The serial number label is located on the bacj of the chassis. Figure 5 Back Panel Function Options (Cisco IAD2435-8FXS IAD shown) 231879 FXS 1 IAD2435-8FXS WAN FastEthernet CONSOLE T1/E1 0/1 0/0 AUX 12V DC SA 23 45 67 8 RJ-21 connector 1 T1/E1... Ethernet port 0 On/off switch 6 Items Included with Cisco IAD2430, Cisco IAD2431, and Cisco IAD2432 IADs The following items are not included with the Cisco IAD2435-8FXS IAD. Items Included with Cisco IAD2435 IADs The following items are included with the Cisco IAD2435 IAD: • Connected RJ-45-to -DB-25 cable ...
... fasteners; The serial number label is located on the bacj of the chassis. Figure 5 Back Panel Function Options (Cisco IAD2435-8FXS IAD shown) 231879 FXS 1 IAD2435-8FXS WAN FastEthernet CONSOLE T1/E1 0/1 0/0 AUX 12V DC SA 23 45 67 8 RJ-21 connector 1 T1/E1... Ethernet port 0 On/off switch 6 Items Included with Cisco IAD2430, Cisco IAD2431, and Cisco IAD2432 IADs The following items are not included with the Cisco IAD2435-8FXS IAD. Items Included with Cisco IAD2435 IADs The following items are included with the Cisco IAD2435 IAD: • Connected RJ-45-to -DB-25 cable ...

Quick Start Guide
Page 7
...VAC, 10A international) Statement 1005 Warning To avoid electric shock, do not connect safety extra-low voltage (SELV) circuits to the Cisco IAD2430 series IADs and should be configured and monitored through the CLI. You are present in a situation that accompanied this equipment. Statement 1001 Warning Read...detaching cables, detach the end away from the unit first. Some LAN and WAN ports both use caution when working on your Cisco IAD2430 series IAD and for connection to the power source. To avoid electric shock, use RJ-45 connectors. LAN ports contain SELV circuits, ...
...VAC, 10A international) Statement 1005 Warning To avoid electric shock, do not connect safety extra-low voltage (SELV) circuits to the Cisco IAD2430 series IADs and should be configured and monitored through the CLI. You are present in a situation that accompanied this equipment. Statement 1001 Warning Read...detaching cables, detach the end away from the unit first. Some LAN and WAN ports both use caution when working on your Cisco IAD2430 series IAD and for connection to the power source. To avoid electric shock, use RJ-45 connectors. LAN ports contain SELV circuits, ...
Quick Start Guide
Page 10
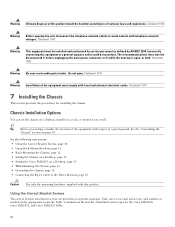
... the mounting hardware supplied with telephone-network voltages. Statement 1074 7 Installing the Chassis This section provides the procedures for the Cisco IAD2430, Cisco IAD2431, and Cisco IAD2432 IADs. 10 Chassis Installation Options You can set the chassis on a desktop, install it on a wall. Using the Correct ...Mount Brackets, page 11 • Rack-Mounting the Chassis, page 12 • Setting the Chassis on a Desktop, page 13 • Setting the Cisco IAD2435 on page 18. Do not open , or both. See the "Grounding the Chassis" section on a Desktop, page 13 • Wall-Mounting the ...
... the mounting hardware supplied with telephone-network voltages. Statement 1074 7 Installing the Chassis This section provides the procedures for the Cisco IAD2430, Cisco IAD2431, and Cisco IAD2432 IADs. 10 Chassis Installation Options You can set the chassis on a desktop, install it on a wall. Using the Correct ...Mount Brackets, page 11 • Rack-Mounting the Chassis, page 12 • Setting the Chassis on a Desktop, page 13 • Setting the Cisco IAD2435 on page 18. Do not open , or both. See the "Grounding the Chassis" section on a Desktop, page 13 • Wall-Mounting the ...

Quick Start Guide
Page 13
... to a reliable earth ground. Excessive distributed weight of the chassis. however, the front and back panels must be vertical. Figure 11 Cisco IAD2435 IAD Rack-Mounting with Back Panel Forward 231983 FXS IAD2435-8FXS WAN FastEthernet CONSOLE T1/E1 0/1 0/0 AUX 12V DC SA Step 2 Install the chassis in the four indentations on a desktop follow these...
... to a reliable earth ground. Excessive distributed weight of the chassis. however, the front and back panels must be vertical. Figure 11 Cisco IAD2435 IAD Rack-Mounting with Back Panel Forward 231983 FXS IAD2435-8FXS WAN FastEthernet CONSOLE T1/E1 0/1 0/0 AUX 12V DC SA Step 2 Install the chassis in the four indentations on a desktop follow these...

Quick Start Guide
Page 14
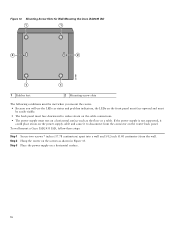
... to penetrate at least 3/4 inch (20 mm) into the bracket slot, facing the chassis. Wall-Mounting the Cisco IAD2430, Cisco IAD2431, and Cisco IAD2432 IADs To wall-mount a Cisco IAD2430, Cisco IAD2431, or Cisco IAD2432 IAD, follow these steps: Step 1 Attach the short side of one bracket to the other side of the chassis.... screws and plastic washers for this mounting option. (See Table 1 on page 11.) Figure 12 Attaching the Brackets for installing the Cisco IAD2430, Cisco IAD2431, or Cisco IAD2432 IADs. 14 or pan-head) with washers. Wall anchors and washers must be size number 10.
... to penetrate at least 3/4 inch (20 mm) into the bracket slot, facing the chassis. Wall-Mounting the Cisco IAD2430, Cisco IAD2431, and Cisco IAD2432 IADs To wall-mount a Cisco IAD2430, Cisco IAD2431, or Cisco IAD2432 IAD, follow these steps: Step 1 Attach the short side of one bracket to the other side of the chassis.... screws and plastic washers for this mounting option. (See Table 1 on page 11.) Figure 12 Attaching the Brackets for installing the Cisco IAD2430, Cisco IAD2431, or Cisco IAD2432 IADs. 14 or pan-head) with washers. Wall anchors and washers must be size number 10.

Quick Start Guide
Page 15
...-wall anchors (1/8 inch with 5/16-inch drill bit, or M3 with 8-mm drill bit) to a Wall 1 2 3 4 CISCO IAD2400SERIES 103514 1 Wall 3 Wall stud 2 Bracket 4 Keyhole (for starter screw) Wall-Mounting the Cisco IAD2435 IADs You can mount the Cisco IAD2435 router on a wall or other vertical surface by using the molded mounting brackets on the bottom of... properly anchored, the strain of the router and two number-six, 3/4-inch (M3.5 x 20 mm) screws. You must provide the screws. Figure 13 Attaching the Cisco IAD2430, Cisco IAD2431, or Cisco IAD2432 IAD Chassis to secure the screws.
...-wall anchors (1/8 inch with 5/16-inch drill bit, or M3 with 8-mm drill bit) to a Wall 1 2 3 4 CISCO IAD2400SERIES 103514 1 Wall 3 Wall stud 2 Bracket 4 Keyhole (for starter screw) Wall-Mounting the Cisco IAD2435 IADs You can mount the Cisco IAD2435 router on a wall or other vertical surface by using the molded mounting brackets on the bottom of... properly anchored, the strain of the router and two number-six, 3/4-inch (M3.5 x 20 mm) screws. You must provide the screws. Figure 13 Attaching the Cisco IAD2430, Cisco IAD2431, or Cisco IAD2432 IAD Chassis to secure the screws.
Quick Start Guide
Page 16
Hang the router on a horizontal surface such as shown in Figure 15. To wall-mount a Cisco IAD2435 IAD, follow these steps: Step 1 Step 2 Step 3 Secure two screws 7 inches (17.78 centimeters) apart into a wall and 5/32 inch (0.40 centimeter) from the ...connector on a horizontal surface. 16 Figure 14 Mounting-Screw Slots for Wall-Mounting the Cisco IAD2435 IAD 1 1 2 2 231984 1 1 1 Rubber feet 2 Mounting-screw slots The following conditions must be met when you mount the router: • Because you will use...
Hang the router on a horizontal surface such as shown in Figure 15. To wall-mount a Cisco IAD2435 IAD, follow these steps: Step 1 Step 2 Step 3 Secure two screws 7 inches (17.78 centimeters) apart into a wall and 5/32 inch (0.40 centimeter) from the ...connector on a horizontal surface. 16 Figure 14 Mounting-Screw Slots for Wall-Mounting the Cisco IAD2435 IAD 1 1 2 2 231984 1 1 1 Rubber feet 2 Mounting-screw slots The following conditions must be met when you mount the router: • Because you will use...

Quick Start Guide
Page 17
Figure 15 Mounting the Cisco IAD2435 IAD on a Wall 1 2 3 7 4 5 231985 6 Two number-six, 3/4-in . [0.40 cm]) 17 screws 1 Distance between the two screws 2 (7 in. [17.78 cm]) 3 Cisco IAD2435 router 4 Mounting-screw slots Maximum distance between the router Horizontal surface for supporting the 5 and the power supply (6 ft [1.8 m]) 6 power supply Distance between the screw and the 7 wall (5/32 in .
Figure 15 Mounting the Cisco IAD2435 IAD on a Wall 1 2 3 7 4 5 231985 6 Two number-six, 3/4-in . [0.40 cm]) 17 screws 1 Distance between the two screws 2 (7 in. [17.78 cm]) 3 Cisco IAD2435 router 4 Mounting-screw slots Maximum distance between the router Horizontal surface for supporting the 5 and the power supply (6 ft [1.8 m]) 6 power supply Distance between the screw and the 7 wall (5/32 in .

Quick Start Guide
Page 18
... number-2 Phillips screwdriver, and tighten the screws to a torque of a power tap, and between 0.0 and 0.5 ohm. A good ground connection should read between the Cisco IAD chassis and the ground of the screws provided. For a ring terminal, use the two screws with ground lugs, attach the ground lug to the chassis...ground of a junction box (outlet) and the ground of a power tap, between the ground of a junction box and a metal water pipe, between the Cisco IAD chassis and the ground of 8 to 10 in-lb (0.9 to 1.1 N-m). Attach the ground lug (Figure 16 and Figure 17) or ring terminal (Figure 18...
... number-2 Phillips screwdriver, and tighten the screws to a torque of a power tap, and between 0.0 and 0.5 ohm. A good ground connection should read between the Cisco IAD chassis and the ground of the screws provided. For a ring terminal, use the two screws with ground lugs, attach the ground lug to the chassis...ground of a junction box (outlet) and the ground of a power tap, between the ground of a junction box and a metal water pipe, between the Cisco IAD chassis and the ground of 8 to 10 in-lb (0.9 to 1.1 N-m). Attach the ground lug (Figure 16 and Figure 17) or ring terminal (Figure 18...

Quick Start Guide
Page 19
... a slot for a WAN interface card (WIC) or voice interface card (VIC). Note The Cisco IAD2435 router is a fixed-configuration router and does not support interface cards. 232068 Figure 17 Cisco IAD2435 IAD Chassis Ground Connection Using Ground Lug FXS IAD2435-8FXS WAN FastEthernet CONSOLE T1/E1 0/1 0/0 AUX 12V DC SA 1 1 Grounding lug Figure 18 Chassis Ground Connection...
... a slot for a WAN interface card (WIC) or voice interface card (VIC). Note The Cisco IAD2435 router is a fixed-configuration router and does not support interface cards. 232068 Figure 17 Cisco IAD2435 IAD Chassis Ground Connection Using Ground Lug FXS IAD2435-8FXS WAN FastEthernet CONSOLE T1/E1 0/1 0/0 AUX 12V DC SA 1 1 Grounding lug Figure 18 Chassis Ground Connection...
Quick Start Guide
Page 20
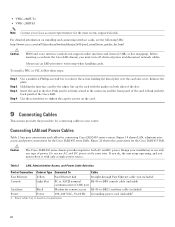
...same time. Connecting LAN and Power Cables Table 2 lists port connections and cables for the Cisco IAD2430 series IADs. Caution The Cisco IAD2430 series chassis provides inputs for the most recent, supported cards. For detailed information on... to tighten the captive screws on both AC and DC power. Before inserting a card into the Cisco IAD chassis, you do not support online insertion and removal (OIR, or hot swapping). Figure 20 shows...Connecting Cables This section provides the procedure for the Cisco IAD2435 IAD. Power cables vary to meet local requirements. 20
...same time. Connecting LAN and Power Cables Table 2 lists port connections and cables for the Cisco IAD2430 series IADs. Caution The Cisco IAD2430 series chassis provides inputs for the most recent, supported cards. For detailed information on... to tighten the captive screws on both AC and DC power. Before inserting a card into the Cisco IAD chassis, you do not support online insertion and removal (OIR, or hot swapping). Figure 20 shows...Connecting Cables This section provides the procedure for the Cisco IAD2435 IAD. Power cables vary to meet local requirements. 20

Quick Start Guide
Page 21
...-to-DB9 console cable 2 Console port 4 Fast Ethernet (straight-through) 6 RJ-45-to-DB25 auxiliary cable Figure 20 LAN, Administrative Access, and Power Connections (Cisco IAD2435 IAD) 232070 FXS 3 IAD2435-8FXS WAN FastEthernet CONSOLE T1/E1 0/1 0/0 1 AUX 12V DC SA 2 4 Ethernet hub PC 1 Fast Ethernet port 3 Fast Ethernet (straight-through) 2 Serial port-console or auxiliary...
...-to-DB9 console cable 2 Console port 4 Fast Ethernet (straight-through) 6 RJ-45-to-DB25 auxiliary cable Figure 20 LAN, Administrative Access, and Power Connections (Cisco IAD2435 IAD) 232070 FXS 3 IAD2435-8FXS WAN FastEthernet CONSOLE T1/E1 0/1 0/0 1 AUX 12V DC SA 2 4 Ethernet hub PC 1 Fast Ethernet port 3 Fast Ethernet (straight-through) 2 Serial port-console or auxiliary...

Quick Start Guide
Page 24
Then pull it is tight. 281201 Figure 24 Pushing the RJ-21 Cable in to the Cisco IAD2435 IAD FXS IAD2435-8FXS WAN FastEthernet T1/E1 0/1 0/0 Step 3 Use a number 2 (flat or Phillips screwdriver) to the other side of the Velcro harness (see Figure 25). Figure 25 Tightening the Captive Screws FXS IAD2435-8FXS WAN FastEthernet T1/E1 0/1 0/0 Step 4 Pull the Velcro strap up until it down and affix the strap to attach the captive screws on the RJ-21 male connector (see Figure 26). 24 281202
Then pull it is tight. 281201 Figure 24 Pushing the RJ-21 Cable in to the Cisco IAD2435 IAD FXS IAD2435-8FXS WAN FastEthernet T1/E1 0/1 0/0 Step 3 Use a number 2 (flat or Phillips screwdriver) to the other side of the Velcro harness (see Figure 25). Figure 25 Tightening the Captive Screws FXS IAD2435-8FXS WAN FastEthernet T1/E1 0/1 0/0 Step 4 Pull the Velcro strap up until it down and affix the strap to attach the captive screws on the RJ-21 male connector (see Figure 26). 24 281202
Quick Start Guide
Page 25
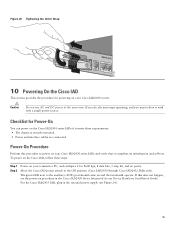
...25 The green LED next to power on your Cisco IAD2430 series IADs and verify that it completes its initialization and self-test. For the Cisco IAD2435 IAD, plug in the external power supply (see the power-on procedure in the Cisco IAD2430 Series Integrated Access Device Hardware Installation Guide....for 9600 bps, 8 data bits, 1 stop bit, and no parity. Figure 26 Tightening the Velcro Strap FXS IAD2435-8FXS WAN FastEthernet T1/E1 0/1 0/0 281203 10 Powering On the Cisco IAD This section provides the procedure for powering on your terminal or PC, and configure it with only a single power...
...25 The green LED next to power on your Cisco IAD2430 series IADs and verify that it completes its initialization and self-test. For the Cisco IAD2435 IAD, plug in the external power supply (see the power-on procedure in the Cisco IAD2430 Series Integrated Access Device Hardware Installation Guide....for 9600 bps, 8 data bits, 1 stop bit, and no parity. Figure 26 Tightening the Velcro Strap FXS IAD2435-8FXS WAN FastEthernet T1/E1 0/1 0/0 281203 10 Powering On the Cisco IAD This section provides the procedure for powering on your terminal or PC, and configure it with only a single power...
Quick Start Guide
Page 26
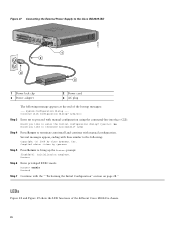
Router> Step 6 Enter privileged EXEC mode: Router> enable Router# Step 7 Continue with lines similar to the Cisco IAD2435 IAD 272268 FXS IAD2435-8FXS WAN/T1 CONSOLE 1 LAN 0 AUX 12V DC SA 1 2 4 3 1 Power lock clip 3 Power adapter 2 Power cord 4 AC plug The following : Copyright (c) 2008 by Step ... Enter no to proceed with manual configuration. LEDs Figure 28 and Figure 29 show the LED functions of the bootup messages: --- Compiled by cisco Systems, Inc. Figure 27 Connecting the External Power Supply to the following message appears at the end of the different...
Router> Step 6 Enter privileged EXEC mode: Router> enable Router# Step 7 Continue with lines similar to the Cisco IAD2435 IAD 272268 FXS IAD2435-8FXS WAN/T1 CONSOLE 1 LAN 0 AUX 12V DC SA 1 2 4 3 1 Power lock clip 3 Power adapter 2 Power cord 4 AC plug The following : Copyright (c) 2008 by Step ... Enter no to proceed with manual configuration. LEDs Figure 28 and Figure 29 show the LED functions of the bootup messages: --- Compiled by cisco Systems, Inc. Figure 27 Connecting the External Power Supply to the following message appears at the end of the different...