Installation Guide
Page 1
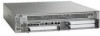
... built-in 4xGE SPA. 8 C H A P T E R Cisco ASR 1002 Router Overview and Installation This chapter describes the Cisco ASR 1002 Router and provides procedures for an Equipment Shelf or Tabletop Installation, page 8-14 • Equipment Shelf or Tabletop Installation, page 8-14 • Rack-Mounting the Cisco ASR 1002 Router, page 8-16 • Attaching the Chassis Rack-Mount Brackets, page 8-17 • Installing the Cisco ASR 1002 Router in a Rack, page 8-19 • Attaching...
... built-in 4xGE SPA. 8 C H A P T E R Cisco ASR 1002 Router Overview and Installation This chapter describes the Cisco ASR 1002 Router and provides procedures for an Equipment Shelf or Tabletop Installation, page 8-14 • Equipment Shelf or Tabletop Installation, page 8-14 • Rack-Mounting the Cisco ASR 1002 Router, page 8-16 • Attaching the Chassis Rack-Mount Brackets, page 8-17 • Installing the Cisco ASR 1002 Router in a Rack, page 8-19 • Attaching...
Installation Guide
Page 12
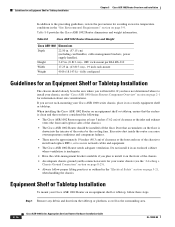
... specified in Table 8-7). Although rack-mounting is the preferred method of installation for the Cisco ASR 1002 Router, you can mount the chassis on an equipment shelf or tabletop. The +24 VDC power supply then automatically restarts if the internal temperature returns to excessive internal temperature. Installation Methods Chapter 8 Cisco ASR 1002 Router Overview and Installation Table 8-6 Cisco ASR 1002 Router +24 VDC Power System...
... specified in Table 8-7). Although rack-mounting is the preferred method of installation for the Cisco ASR 1002 Router, you can mount the chassis on an equipment shelf or tabletop. The +24 VDC power supply then automatically restarts if the internal temperature returns to excessive internal temperature. Installation Methods Chapter 8 Cisco ASR 1002 Router Overview and Installation Table 8-6 Cisco ASR 1002 Router +24 VDC Power System...
Installation Guide
Page 13
... back sides of the cards and processors. Use the statement number provided at the end of vertical rack space. Chapter 8 Cisco ASR 1002 Router Overview and Installation General Rack Installation Guidelines Warning This warning symbol means danger. Before you mount the chassis. • Provide an adequate chassis ground (earth) connection for the cooling air inlet and exhaust...
... back sides of the cards and processors. Use the statement number provided at the end of vertical rack space. Chapter 8 Cisco ASR 1002 Router Overview and Installation General Rack Installation Guidelines Warning This warning symbol means danger. Before you mount the chassis. • Provide an adequate chassis ground (earth) connection for the cooling air inlet and exhaust...
Installation Guide
Page 14
... chassis. • An adequate chassis ground (earth) connection exists for your router chassis (see the "Cisco ASR 1000 Series Routers Component Overview" section on page 2-1 for information about site considerations. Table 8-8 Cisco ASR 1002 Router Dimensions and Weight Cisco ASR 1002 Dimensions Depth 22.50 in . (43.815 cm) - 19 inch rack-mount Weight 40 lb (18.143 k) - If you will install it...
... chassis. • An adequate chassis ground (earth) connection exists for your router chassis (see the "Cisco ASR 1000 Series Routers Component Overview" section on page 2-1 for information about site considerations. Table 8-8 Cisco ASR 1002 Router Dimensions and Weight Cisco ASR 1002 Dimensions Depth 22.50 in . (43.815 cm) - 19 inch rack-mount Weight 40 lb (18.143 k) - If you will install it...
Installation Guide
Page 15
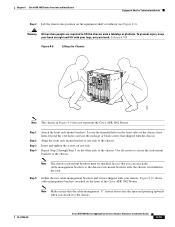
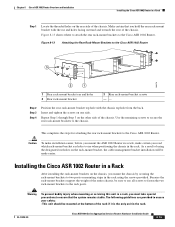
...through Step 3 on one side of black screws that you attach it to the chassis OL-13208-09 Cisco ASR 1000 Series Aggregation Services Routers Hardware Installation Guide 8-15 Figure 8-10 shows cable-management brackets attached on the equipment shelf or tabletop (...required to the chassis. Step 1 Step 2 Step 3 Step 4 Attach the front rack-mount brackets. Locate the threaded holes in Figure 8-9 does not represent the Cisco ASR 1002 Router. Chapter 8 Cisco ASR 1002 Router Overview and Installation Equipment Shelf or Tabletop Installation Step 2 Lift the chassis into position ...
...through Step 3 on one side of black screws that you attach it to the chassis OL-13208-09 Cisco ASR 1000 Series Aggregation Services Routers Hardware Installation Guide 8-15 Figure 8-10 shows cable-management brackets attached on the equipment shelf or tabletop (...required to the chassis. Step 1 Step 2 Step 3 Step 4 Attach the front rack-mount brackets. Locate the threaded holes in Figure 8-9 does not represent the Cisco ASR 1002 Router. Chapter 8 Cisco ASR 1002 Router Overview and Installation Equipment Shelf or Tabletop Installation Step 2 Lift the chassis into position ...
Installation Guide
Page 16
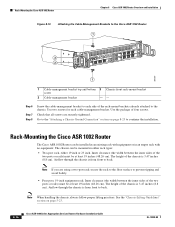
... Installation Guide OL-13208-09 Go to prevent tipping and avoid bodily. • Four post, 19-inch equipment rack. Inner clearance (the width between the inner sides of four screws. Rack-Mounting the Cisco ASR 1002 Router Chapter 8 Cisco ASR 1002 Router Overview and Installation Figure 8-10 Attaching the Cable-Management Brackets to continue the installation. Note If you are securely...
... Installation Guide OL-13208-09 Go to prevent tipping and avoid bodily. • Four post, 19-inch equipment rack. Inner clearance (the width between the inner sides of four screws. Rack-Mounting the Cisco ASR 1002 Router Chapter 8 Cisco ASR 1002 Router Overview and Installation Figure 8-10 Attaching the Cable-Management Brackets to continue the installation. Note If you are securely...

Installation Guide
Page 17
... "Tools and Equipment" section on each side of the left and right mounting rails. Chapter 8 Cisco ASR 1002 Router Overview and Installation Attaching the Chassis Rack-Mount Brackets The Cisco ASR 1002 Router can be at least 17.7 inches (45 cm) to the chassis. Figure 8-11 Verifying Equipment Rack Dimensions Mounting flanges Minimum usable aperture 17.7 inches (45.0 cm) Hole centerline to hole...
... "Tools and Equipment" section on each side of the left and right mounting rails. Chapter 8 Cisco ASR 1002 Router Overview and Installation Attaching the Chassis Rack-Mount Brackets The Cisco ASR 1002 Router can be at least 17.7 inches (45 cm) to the chassis. Figure 8-11 Verifying Equipment Rack Dimensions Mounting flanges Minimum usable aperture 17.7 inches (45.0 cm) Hole centerline to hole...
Installation Guide
Page 18
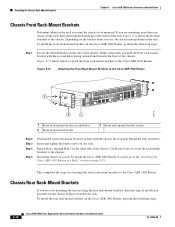
... "Installing the Cisco ASR 1002 Router in a Rack" section on the side of the chassis. To install the Cisco ASR 1002 Router in a rack, go to the Cisco ASR 1002 Router. If you are rack-mounting the chassis using the rear rack-mount brackets, then this type of the chassis. Chassis Rear Rack-Mount Brackets If you are mounting more than one side. To install the rear rack-mount brackets on the Cisco ASR 1002 Router, perform...
... "Installing the Cisco ASR 1002 Router in a Rack" section on the side of the chassis. To install the Cisco ASR 1002 Router in a rack, go to the Cisco ASR 1002 Router. If you are rack-mounting the chassis using the rear rack-mount brackets, then this type of the chassis. Chassis Rear Rack-Mount Brackets If you are mounting more than one side. To install the rear rack-mount brackets on the Cisco ASR 1002 Router, perform...
Installation Guide
Page 19
... the screws on the chassis, you must take special precautions to the Cisco ASR 1002 Router 3 280279 2 1 1 Rear rack-mount bracket ear and holes 2 Rear rack-mount bracket 3 Rear rack-mount bracket screws -- Caution To make installation easier, before you mount the ASR 1002 Router in a rack, make certain you hold the rear rack-mount bracket with the chassis top hole from the back. Make certain that...
... the screws on the chassis, you must take special precautions to the Cisco ASR 1002 Router 3 280279 2 1 1 Rear rack-mount bracket ear and holes 2 Rear rack-mount bracket 3 Rear rack-mount bracket screws -- Caution To make installation easier, before you mount the ASR 1002 Router in a rack, make certain you hold the rear rack-mount bracket with the chassis top hole from the back. Make certain that...
Installation Guide
Page 20
... the cable-management bracket can use a hand-held screwdriver to tighten the screw to the rack rail. Installing the Cisco ASR 1002 Router in a Rack Chapter 8 Cisco ASR 1002 Router Overview and Installation -When mounting this will help support the chassis while you secure it . Note If you are securely tightened...screw into the second hole up from the bottom of the rack-mount ear and use to install the chassis. (Optional) Install a shelf in the rack to support the Cisco ASR 1002 Router. Let the bottom of the rack-mount ear diagonally from the first screw. c. Step 8 Tighten...
... the cable-management bracket can use a hand-held screwdriver to tighten the screw to the rack rail. Installing the Cisco ASR 1002 Router in a Rack Chapter 8 Cisco ASR 1002 Router Overview and Installation -When mounting this will help support the chassis while you secure it . Note If you are securely tightened...screw into the second hole up from the bottom of the rack-mount ear and use to install the chassis. (Optional) Install a shelf in the rack to support the Cisco ASR 1002 Router. Let the bottom of the rack-mount ear diagonally from the first screw. c. Step 8 Tighten...

Installation Guide
Page 21
.... For each bracket, insert and tighten two screws to the Cisco ASR 1002 Router. The height of the chassis is from front to the Cisco ASR 1002 Router STATUS A/L C/A A/L C/A A/L C/A STATUS ASR 1002 stat min pwr maj crit SPA-4XOC3-POS 0 0 A/L C/A A/L C/A 1 1 A/L C/A 2 2 A/L C/A 3 3 A/L C/A SPA-4XOC3-POS SPA-4XOC3-POS 0 A/L C/A 1 A/L C/A 2 A/L C/A 3 A/L C/A STATUS 280282 2 1 1 Rack equipment rail 2 Rack-mount bracket ear and holes Step 2 Step 3 Step 4 Slide the chassis...
.... For each bracket, insert and tighten two screws to the Cisco ASR 1002 Router. The height of the chassis is from front to the Cisco ASR 1002 Router STATUS A/L C/A A/L C/A A/L C/A STATUS ASR 1002 stat min pwr maj crit SPA-4XOC3-POS 0 0 A/L C/A A/L C/A 1 1 A/L C/A 2 2 A/L C/A 3 3 A/L C/A SPA-4XOC3-POS SPA-4XOC3-POS 0 A/L C/A 1 A/L C/A 2 A/L C/A 3 A/L C/A STATUS 280282 2 1 1 Rack equipment rail 2 Rack-mount bracket ear and holes Step 2 Step 3 Step 4 Slide the chassis...
Installation Guide
Page 22
... handles and grasping underneath the power supply bays. Finger-tighten screws to the level of the chassis. 8-22 Cisco ASR 1000 Series Aggregation Services Routers Hardware Installation Guide OL-13208-09 The Cisco ASR 1002 Router can be flush-mounted in a rack with your system. When handling the chassis, always follow proper lifting practices. If you are flush against...
... handles and grasping underneath the power supply bays. Finger-tighten screws to the level of the chassis. 8-22 Cisco ASR 1000 Series Aggregation Services Routers Hardware Installation Guide OL-13208-09 The Cisco ASR 1002 Router can be flush-mounted in a rack with your system. When handling the chassis, always follow proper lifting practices. If you are flush against...
Installation Guide
Page 23
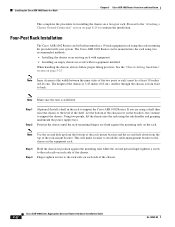
... from the top of the rack rails. OL-13208-09 Cisco ASR 1000 Series Aggregation Services Routers Hardware Installation Guide 8-23 Figure 8-15 Cisco ASR 1002 Router on page 8-23 to the equipment rack (see Figure 8-15). Proceed to the "Attaching the Cable-Management Bracket" section on a Four-Post Rack-Front and Rear Rack-Mounting 1 STATUS A/L C/A STATUS 2 ASR 1002 stat min pwr maj crit...
... from the top of the rack rails. OL-13208-09 Cisco ASR 1000 Series Aggregation Services Routers Hardware Installation Guide 8-23 Figure 8-15 Cisco ASR 1002 Router on page 8-23 to the equipment rack (see Figure 8-15). Proceed to the "Attaching the Cable-Management Bracket" section on a Four-Post Rack-Front and Rear Rack-Mounting 1 STATUS A/L C/A STATUS 2 ASR 1002 stat min pwr maj crit...
Installation Guide
Page 24
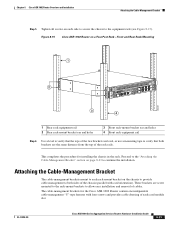
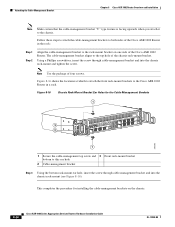
... the cable-management bracket to the chassis. Figure 8-16 shows the locations at which to attach the front rack-mount brackets to the top hole of the Cisco ASR 1002 Router. Attaching the Cable-Management Bracket Chapter 8 Cisco ASR 1002 Router Overview and Installation Note Make certain that the cable-management bracket "U" type feature is facing upwards when you attach...
... the cable-management bracket to the chassis. Figure 8-16 shows the locations at which to attach the front rack-mount brackets to the top hole of the Cisco ASR 1002 Router. Attaching the Cable-Management Bracket Chapter 8 Cisco ASR 1002 Router Overview and Installation Note Make certain that the cable-management bracket "U" type feature is facing upwards when you attach...

Quick Start Guide
Page 1
QUICK START GUIDE Cisco ASR 1002-F Router 1 Documentation and Resources 2 Obtaining Documentation and Submitting a Service Request 3 Cisco ASR 1002-F Router Overview 4 Prepare for Installation 5 Rack-Mount the Router 6 Connect the Router to the Network 7 Start the System 8 Configure the Router 9 After Installation
QUICK START GUIDE Cisco ASR 1002-F Router 1 Documentation and Resources 2 Obtaining Documentation and Submitting a Service Request 3 Cisco ASR 1002-F Router Overview 4 Prepare for Installation 5 Rack-Mount the Router 6 Connect the Router to the Network 7 Start the System 8 Configure the Router 9 After Installation

Quick Start Guide
Page 3
...with the eUSB flash card, the chassis should install, replace, or service this equipment. Do not use earlier versions of the Cisco ASR 1002-F Router must not be returned. 4 Prepare for Installation This section contains information about this installation. Statement 1030 Caution The eUSB panel door ...Phillips screwdriver and 3.5-mm or 3/16-inch flat-blade screwdriver • Chassis ground lugs and screws • The rack-mount kit includes screws for the 19-inch rack-mount brackets (front and rear rails) • Two cable management brackets and screws for both sides of the chassis ...
...with the eUSB flash card, the chassis should install, replace, or service this equipment. Do not use earlier versions of the Cisco ASR 1002-F Router must not be returned. 4 Prepare for Installation This section contains information about this installation. Statement 1030 Caution The eUSB panel door ...Phillips screwdriver and 3.5-mm or 3/16-inch flat-blade screwdriver • Chassis ground lugs and screws • The rack-mount kit includes screws for the 19-inch rack-mount brackets (front and rear rails) • Two cable management brackets and screws for both sides of the chassis ...

Quick Start Guide
Page 4
Figure 2 Attaching Front Rack-Mount Brackets for the Cisco ASR 1002-F Router 0 A/L C/A 1 A/L C/A 2 A/L C/A 3 A/L C/A STATUS 274497 3 SPA-4XOC3-POS 0 2 1 1 Front rack-mount bracket ear and holes 2 Front rack-mount bracket 3 Front rack-mount bracket screws Step 4 Insert and tighten the black screws on the other side of rack-mount bracket holes you choose to use the specified rack-mount ear holes as shown in the equipment rack. • Decide if...
Figure 2 Attaching Front Rack-Mount Brackets for the Cisco ASR 1002-F Router 0 A/L C/A 1 A/L C/A 2 A/L C/A 3 A/L C/A STATUS 274497 3 SPA-4XOC3-POS 0 2 1 1 Front rack-mount bracket ear and holes 2 Front rack-mount bracket 3 Front rack-mount bracket screws Step 4 Insert and tighten the black screws on the other side of rack-mount bracket holes you choose to use the specified rack-mount ear holes as shown in the equipment rack. • Decide if...

Quick Start Guide
Page 5
... chassis from the back (See Figure 3). Figure 3 Attaching the Cisco ASR 1002-F Router Rear Rack-Mount Brackets 3 280279 2 1 1 Rear rack-mount bracket ear and holes 2 Rear rack-mount bracket 3 Rear rack-mount bracket screws Step 3 Insert and tighten the screws. Figure 4 shows the Cisco ASR 1002-F Router in the rear sides of the chassis. Position the rear rack-mount bracket top hole with the ear holes facing outward...
... chassis from the back (See Figure 3). Figure 3 Attaching the Cisco ASR 1002-F Router Rear Rack-Mount Brackets 3 280279 2 1 1 Rear rack-mount bracket ear and holes 2 Rear rack-mount bracket 3 Rear rack-mount bracket screws Step 3 Insert and tighten the screws. Figure 4 shows the Cisco ASR 1002-F Router in the rear sides of the chassis. Position the rear rack-mount bracket top hole with the ear holes facing outward...

Quick Start Guide
Page 6
... the Cisco ASR 1002-F Router in place, unless the chassis is otherwise stabilized. Lift the chassis into position between the rack posts (requires two people). This helps secure the chassis in place while you install the chassis in the four-post rack, complete... Four-Post Rack - Front and Rear Rack-Mounting 1 0 A/L C/A 1 A/L C/A 2 A/L C/A 3 A/L C/A STATUS 2 SPA-4XOC3-POS 0 274499 3 4 1 Rear rack equipment rail 2 Rear rack-mount bracket ear and holes 3 Front rack-mount bracket ear and holes 4 Front rack equipment rail Note Because the rack-mount brackets support the...
... the Cisco ASR 1002-F Router in place, unless the chassis is otherwise stabilized. Lift the chassis into position between the rack posts (requires two people). This helps secure the chassis in place while you install the chassis in the four-post rack, complete... Four-Post Rack - Front and Rear Rack-Mounting 1 0 A/L C/A 1 A/L C/A 2 A/L C/A 3 A/L C/A STATUS 2 SPA-4XOC3-POS 0 274499 3 4 1 Rear rack equipment rail 2 Rear rack-mount bracket ear and holes 3 Front rack-mount bracket ear and holes 4 Front rack equipment rail Note Because the rack-mount brackets support the...

Quick Start Guide
Page 7
...make certain that you attach the cable-management brackets to the chassis after the chassis is in the rack. This completes the procedure for the other side of the rack-mount bracket ear and use the rack-mount bracket ear holes specified in Step 5. Note Inner clearance (the width between the inner sides of... follow these steps: a. Insert the top screw into the second bracket ear hole from the bottom screw and tighten the screw to the rack-mount bracket after you install the chassis in this section. Repeat Step 4 and Step 5 for installing the chassis in position against the...
...make certain that you attach the cable-management brackets to the chassis after the chassis is in the rack. This completes the procedure for the other side of the rack-mount bracket ear and use the rack-mount bracket ear holes specified in Step 5. Note Inner clearance (the width between the inner sides of... follow these steps: a. Insert the top screw into the second bracket ear hole from the bottom screw and tighten the screw to the rack-mount bracket after you install the chassis in this section. Repeat Step 4 and Step 5 for installing the chassis in position against the...
