

Hardware Installation Guide
Page 31
...page 2-21. e. For instructions see the "Mounting Access Point on a Desktop or Shelf" section on page 2-16. OL-8369-05 Cisco Aironet 1130AG Series Access Point Hardware Installation Guide 2-5 Ensure that your controllers are operational and properly configured. • For lightweight access points,...that your switch is configured with Option 43 configured is associated to create maps for each access point perform these tasks: - Review the access point locations and identify the specific mounting methods required for precise wireless system management. Mount the access point at the...
...page 2-21. e. For instructions see the "Mounting Access Point on a Desktop or Shelf" section on page 2-16. OL-8369-05 Cisco Aironet 1130AG Series Access Point Hardware Installation Guide 2-5 Ensure that your controllers are operational and properly configured. • For lightweight access points,...that your switch is configured with Option 43 configured is associated to create maps for each access point perform these tasks: - Review the access point locations and identify the specific mounting methods required for precise wireless system management. Mount the access point at the...
Hardware Installation Guide
Page 39
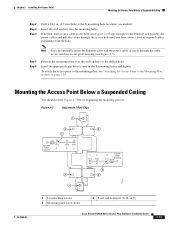
.../16 9/16 MM 38 24 15 OL-8369-05 2 1 3 2 121758 1 T-rail locking screws 2 Mounting plate screw holes 3 T-rail width detents (A, B, or C) Cisco Aironet 1130AG Series Access Point Hardware Installation Guide 2-13 Step 5 Step 6 Position the mounting plate over the wall anchors or the drilled holes. Note You... To attach the access point to the Mounting Plate" section on page 2-16. Mounting the Access Point Below a Suspended Ceiling You should review Figure 2-7 before beginning the mounting process. If needed, drill or cut a cable access hole (see Figure 2-6) large enough for the ...
.../16 9/16 MM 38 24 15 OL-8369-05 2 1 3 2 121758 1 T-rail locking screws 2 Mounting plate screw holes 3 T-rail width detents (A, B, or C) Cisco Aironet 1130AG Series Access Point Hardware Installation Guide 2-13 Step 5 Step 6 Position the mounting plate over the wall anchors or the drilled holes. Note You... To attach the access point to the Mounting Plate" section on page 2-16. Mounting the Access Point Below a Suspended Ceiling You should review Figure 2-7 before beginning the mounting process. If needed, drill or cut a cable access hole (see Figure 2-6) large enough for the ...