

Quick Start Guide
Page 1
Quick Start Guide Cisco PIX 515E Firewall 1 Check Items Included 2 Install the PIX 515E 3 Configure the PIX 515E 4 Example Configurations 5 Optional Maintenance and Upgrade Procedures
Quick Start Guide Cisco PIX 515E Firewall 1 Check Items Included 2 Install the PIX 515E 3 Configure the PIX 515E 4 Example Configurations 5 Optional Maintenance and Upgrade Procedures

Quick Start Guide
Page 5
... on the inside interface. Based on your network security policy, you should also consider configuring the PIX 515E to deny all inbound traffic through the PIX Firewall from the PIX 515E) or assign a static IP address to the outside interface. Refer to the Cisco PIX Firewall Command Reference. PDM includes a Startup Wizard for more information about the icmp...
... on the inside interface. Based on your network security policy, you should also consider configuring the PIX 515E to deny all inbound traffic through the PIX Firewall from the PIX 515E) or assign a static IP address to the outside interface. Refer to the Cisco PIX Firewall Command Reference. PDM includes a Startup Wizard for more information about the icmp...

Quick Start Guide
Page 6
...Internet. This public address allows external clients HTTP access to the DMZ server as needed. Note Remember to quickly configure your PIX 515E for secure communications between your Internet browser. HTTP clients from the inside network initiates HTTP communications with other communications...private network resources that are able to access the web server securely. Use these examples to set up your PIX 515E. for two common PIX 515E configuration scenarios: hosting a web server on the public Internet; In the illustration below shows a sample network topology ...
...Internet. This public address allows external clients HTTP access to the DMZ server as needed. Note Remember to quickly configure your PIX 515E for secure communications between your Internet browser. HTTP clients from the inside network initiates HTTP communications with other communications...private network resources that are able to access the web server securely. Use these examples to set up your PIX 515E. for two common PIX 515E configuration scenarios: hosting a web server on the public Internet; In the illustration below shows a sample network topology ...

Quick Start Guide
Page 7
... on the public network. Use PDM to manage IP pools efficiently and easily to communicate with any device on the Internet. b. Launch PDM. HTTP client PIX 515E Inside 10.10.10.0 Outside 209.165.156.10 10.10.10.10 DMZ 30.30.30.0 Internet HTTP client HTTP client 97999 Web server....10.10.10) to access the web server on the DMZ network (30.30.30.30), it is required for the DMZ interface. a. Click the Configuration button at the top of the PDM window. 7
... on the public network. Use PDM to manage IP pools efficiently and easily to communicate with any device on the Internet. b. Launch PDM. HTTP client PIX 515E Inside 10.10.10.0 Outside 209.165.156.10 10.10.10.10 DMZ 30.30.30.0 Internet HTTP client HTTP client 97999 Web server....10.10.10) to access the web server on the DMZ network (30.30.30.30), it is required for the DMZ interface. a. Click the Configuration button at the top of the PDM window. 7

Quick Start Guide
Page 10
Click the Port Address Translation (PAT) using the IP address of the interface radio button. Assign the same Pool ID for this pool as in the main window. 10 b. Click the Apply button in Step d above (200). Select outside from the Interface drop-down menu. Once the pools are configured, confirm their values before applying the rules to the PIX 515E. Click the OK button. Confirm the configurations: a. b. When the new window comes up: a. c. d. Click the OK button.
Click the Port Address Translation (PAT) using the IP address of the interface radio button. Assign the same Pool ID for this pool as in the main window. 10 b. Click the Apply button in Step d above (200). Select outside from the Interface drop-down menu. Once the pools are configured, confirm their values before applying the rules to the PIX 515E. Click the OK button. Confirm the configurations: a. b. When the new window comes up: a. c. d. Click the OK button.

Quick Start Guide
Page 11
... several hosts on the private networks to them. This translation prevents the private address spaces from the main PDM page: a. Step 2 Configure Address Translations on public networks and permits routing through the public networks. To configure NAT between two PIX interfaces. Port Address Translation (PAT) is selected. 11 Select the Translation Rules tab.
... several hosts on the private networks to them. This translation prevents the private address spaces from the main PDM page: a. Step 2 Configure Address Translations on public networks and permits routing through the public networks. To configure NAT between two PIX interfaces. Port Address Translation (PAT) is selected. 11 Select the Translation Rules tab.

Quick Start Guide
Page 14
l. Check the displayed configuration for accuracy. The configurations should now indicate the interface PAT keywords. Click the Proceed button. j. Click the OK button. Repeat the steps to configure the PIX Firewall. Click the Apply button to configure interface PAT between the inside and outside interface and the Dynamic address pool should display as shown below: 14 The procedure remains the same, except the interface on which the translation is required is now the outside interfaces. k.
l. Check the displayed configuration for accuracy. The configurations should now indicate the interface PAT keywords. Click the Proceed button. j. Click the OK button. Repeat the steps to configure the PIX Firewall. Click the Apply button to configure interface PAT between the inside and outside interface and the Dynamic address pool should display as shown below: 14 The procedure remains the same, except the interface on which the translation is required is now the outside interfaces. k.

Quick Start Guide
Page 17
b. Select the Access rules tab. c. To configure access lists for HTTP traffic originating from any client on the Internet to allow the specific traffic types from the public networks. Click the Configuration button at the top of the PDM window. In the table, right click and select Add. 17 Step 4 Provide HTTP Access to the DMZ Web Server In addition to configuring address translations, you must configure the PIX 515E to the DMZ web server, complete the following: a.
b. Select the Access rules tab. c. To configure access lists for HTTP traffic originating from any client on the Internet to allow the specific traffic types from the public networks. Click the Configuration button at the top of the PDM window. In the table, right click and select Add. 17 Step 4 Provide HTTP Access to the DMZ Web Server In addition to configuring address translations, you must configure the PIX 515E to the DMZ web server, complete the following: a.
Quick Start Guide
Page 20
... Networking) features provided by first strongly authenticating both ends of the PIX 515E include a VPN Accelerator Card+ (VAC+), which provides significantly improved VPN throughput. You can now securely access the DMZ web server. The configurations should display as an add-on the private and public networks can... purchase a VAC+ as shown below: The HTTP clients on for other PIX 515E models. 20 Some models of the connection, and then automatically...
... Networking) features provided by first strongly authenticating both ends of the PIX 515E include a VPN Accelerator Card+ (VAC+), which provides significantly improved VPN throughput. You can now securely access the DMZ web server. The configurations should display as an add-on the private and public networks can... purchase a VAC+ as shown below: The HTTP clients on for other PIX 515E models. 20 Some models of the connection, and then automatically...

Quick Start Guide
Page 21
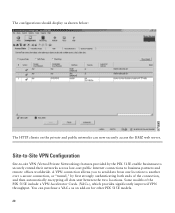
...VPN option connects two IPSec security gateways, which can quickly guide you through the process of configuring a site-to-site VPN in the following : a. Select outside from the Wizards drop...Inside 10.10.10.0 PIX 1 Outside 1.1.1.1 Internet Outside 2.2.2.2 PIX 2 Inside 20.20.20.0 Step 1 Start the VPN Wizard Use PDM to continue. 21 Click the Next button to configure PIX 1. PDM provides an easy...-to-use VPN Wizard that can include PIX Firewalls, VPN concentrators, or other devices that support site-...
...VPN option connects two IPSec security gateways, which can quickly guide you through the process of configuring a site-to-site VPN in the following : a. Select outside from the Wizards drop...Inside 10.10.10.0 PIX 1 Outside 1.1.1.1 Internet Outside 2.2.2.2 PIX 2 Inside 20.20.20.0 Step 1 Start the VPN Wizard Use PDM to continue. 21 Click the Next button to configure PIX 1. PDM provides an easy...-to-use VPN Wizard that can include PIX Firewalls, VPN concentrators, or other devices that support site-...

Quick Start Guide
Page 22
... Certificate radio button and the applicable option for PIX 1 (1.1.1.1) and the same Pre-shared Key (CisCo). If the peer identity is shared for example,"CisCo"), which is its FQDN, enter the exact name in the text field. c. Note To configure PIX 2, enter the IP address for the peer ...identity, FQDN (Fully Qualified Domain Name) or IP Address. Enter the Peer IP Address (PIX 2) and select an authentication key (for IPSec negotiations between both PIX 515E...
... Certificate radio button and the applicable option for PIX 1 (1.1.1.1) and the same Pre-shared Key (CisCo). If the peer identity is shared for example,"CisCo"), which is its FQDN, enter the exact name in the text field. c. Note To configure PIX 2, enter the IP address for the peer ...identity, FQDN (Fully Qualified Domain Name) or IP Address. Enter the Peer IP Address (PIX 2) and select an authentication key (for IPSec negotiations between both PIX 515E...

Quick Start Guide
Page 24
... IKE Policy This step is comprised of VPN tunnel failures and can slow down the process. Configure the IKE negotiation parameters. In most cases, the default values are a common cause of two windows: 1. Confirm all values before moving to establish secure VPN .... a. Click the Next button to continue. 24 Select the Encryption (DES/3DES/AES), Authentication algorithms (MD5/SHA), and the Diffie-Hellman group (1/2/5) used by the PIX 515E during an IKE security association. b. Note When configuring PIX 2, enter the exact values for each of the options that you selected for...
... IKE Policy This step is comprised of VPN tunnel failures and can slow down the process. Configure the IKE negotiation parameters. In most cases, the default values are a common cause of two windows: 1. Confirm all values before moving to establish secure VPN .... a. Click the Next button to continue. 24 Select the Encryption (DES/3DES/AES), Authentication algorithms (MD5/SHA), and the Diffie-Hellman group (1/2/5) used by the PIX 515E during an IKE security association. b. Note When configuring PIX 2, enter the exact values for each of the options that you selected for...

Quick Start Guide
Page 25
Confirm all values before continuing to continue. 25 a. In the second window, select the Encryption algorithm (DES/3DES/AES) and Authentication algorithm (MD5/SHA). Note When configuring PIX 2, enter the exact same values for each of VPN tunnel failures and can slow down the process. Click the Next button to the next window. 2. b. Configure the IPSec parameters. Encryption and algorithm mismatches are a common cause of the options that you selected for PIX 1.
Confirm all values before continuing to continue. 25 a. In the second window, select the Encryption algorithm (DES/3DES/AES) and Authentication algorithm (MD5/SHA). Note When configuring PIX 2, enter the exact same values for each of VPN tunnel failures and can slow down the process. Click the Next button to the next window. 2. b. Configure the IPSec parameters. Encryption and algorithm mismatches are a common cause of the options that you selected for PIX 1.

Quick Start Guide
Page 26
Note Use the Browse button to select from the selected panel by clicking on the IP Address, Name, or Group. Step 4 Configure Internal Traffic This step is comprised of two windows: 1. a. Add or remove networks dynamically from preconfigured groups. Select the Local Host/Network based on the >> or Select network traffic on the local PIX 515E encrypted through the VPN tunnel.
Note Use the Browse button to select from the selected panel by clicking on the IP Address, Name, or Group. Step 4 Configure Internal Traffic This step is comprised of two windows: 1. a. Add or remove networks dynamically from preconfigured groups. Select the Local Host/Network based on the >> or Select network traffic on the local PIX 515E encrypted through the VPN tunnel.

Quick Start Guide
Page 27
In the second window, select VPN traffic for PIX 2 and vice versa. b. a. Click the Finish button to complete the configuration. 27 The remote network for PIX 1 is permitted through the tunnel. 2. For PIX 1, the remote network is Network B (20.20.20.0) so traffic encrypted from the remote PIX Firewall. Select traffic permitted from this tunnel is the local network for remote network configuration. Note When configuring PIX 2, ensure that the values are correctly entered.
In the second window, select VPN traffic for PIX 2 and vice versa. b. a. Click the Finish button to complete the configuration. 27 The remote network for PIX 1 is permitted through the tunnel. 2. For PIX 1, the remote network is Network B (20.20.20.0) so traffic encrypted from the remote PIX Firewall. Select traffic permitted from this tunnel is the local network for remote network configuration. Note When configuring PIX 2, ensure that the values are correctly entered.

Quick Start Guide
Page 28
... sending to -site VPN communication with PIX 2. This concludes configuration for each of the options that all values are a common cause of VPN configuration failures. 28 b. Step 5 View and Enable VPN Commands If you enabled preview commands, you selected for PIX 1. In the main PDM page, ...select Options. Check the configuration to ensure that you will see this page: To enable...
... sending to -site VPN communication with PIX 2. This concludes configuration for each of the options that all values are a common cause of VPN configuration failures. 28 b. Step 5 View and Enable VPN Commands If you enabled preview commands, you selected for PIX 1. In the main PDM page, ...select Options. Check the configuration to ensure that you will see this page: To enable...

Quick Start Guide
Page 29
.... Establishing Site-to-Site VPNs with other Cisco Products For information on configuring VPN between a PIX 515E and other products such as a Cisco router that runs Cisco IOS software, and Cisco VPN 3000 Concentrators, go to the following links: http://www.cisco.com/warp/customer/471/pix_router_dyn.html http://www.cisco.com/warp/public/471/ALTIGA_pix.html http://www...
.... Establishing Site-to-Site VPNs with other Cisco Products For information on configuring VPN between a PIX 515E and other products such as a Cisco router that runs Cisco IOS software, and Cisco VPN 3000 Concentrators, go to the following links: http://www.cisco.com/warp/customer/471/pix_router_dyn.html http://www.cisco.com/warp/public/471/ALTIGA_pix.html http://www...

Quick Start Guide
Page 30
... 3 Step 4 Step 5 Step 6 Command Description show version Shows the PIX Firewall software version, hardware configuration, license key, and related uptime data. activation-key Updates the PIX Firewall activation key by replacing the activation-key-four-tuple with the activation key obtained with your default configuration back to the factory-default values, enter the following...
... 3 Step 4 Step 5 Step 6 Command Description show version Shows the PIX Firewall software version, hardware configuration, license key, and related uptime data. activation-key Updates the PIX Firewall activation key by replacing the activation-key-four-tuple with the activation key obtained with your default configuration back to the factory-default values, enter the following...

Quick Start Guide
Page 31
... Step 10 http 192.168.1.0 255.255.255.0 inside interface. Saves the modified configuration to : http://www.cisco.com/tac 31 To access the TAC website, go to permanent memory. Enables the PIX Firewall to all customers who need technical assistance. Enables the DHCP daemon to the DHCP...data in seconds) granted to begin listening for detailed command information and configuration examples: http://www.cisco.com/univercd/cc/td/doc/product/iaabu/pix/pix_sw/v_63/cmdref/index.htm The Cisco TAC website is available to the PIX 515E. If you specify dns, wins, and domain parameters, then the...
... Step 10 http 192.168.1.0 255.255.255.0 inside interface. Saves the modified configuration to : http://www.cisco.com/tac 31 To access the TAC website, go to permanent memory. Enables the PIX Firewall to all customers who need technical assistance. Enables the DHCP daemon to the DHCP...data in seconds) granted to begin listening for detailed command information and configuration examples: http://www.cisco.com/univercd/cc/td/doc/product/iaabu/pix/pix_sw/v_63/cmdref/index.htm The Cisco TAC website is available to the PIX 515E. If you specify dns, wins, and domain parameters, then the...

Quick Start Guide
Page 32
Locate the blue console cable from the accessory kit. The four-port Ethernet circuit board is required to enter configuration commands. Step 1 Connect the blue console cable so that you must run a serial terminal emulator on a PC or workstation. To do so, you have a DB...on your computer. 100 Mbps Link FDX 10/100 ETHERNET 0/0 FAILOVER CONSOLE Console port (RJ-45) RJ-45 to Access the PIX 515E You can access the CLI for your PIX 515E has a four-port Ethernet circuit board already installed, the Ethernet circuit boards are numbered as required by the serial port for ...
Locate the blue console cable from the accessory kit. The four-port Ethernet circuit board is required to enter configuration commands. Step 1 Connect the blue console cable so that you must run a serial terminal emulator on a PC or workstation. To do so, you have a DB...on your computer. 100 Mbps Link FDX 10/100 ETHERNET 0/0 FAILOVER CONSOLE Console port (RJ-45) RJ-45 to Access the PIX 515E You can access the CLI for your PIX 515E has a four-port Ethernet circuit board already installed, the Ethernet circuit boards are numbered as required by the serial port for ...

