User Guide
Page 2
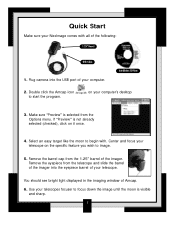
Quick Start Make sure your NexImage comes with . Select an easy target like the moon to focus down the image until the moon is visible and sharp. 1 Plug camera into the eyepiece barrel of Amcap. 6. Make sure "Preview" is not already selected (checked), click on ... port of the following: 1.25" Barrel USB Cable 1. You should see bright light displayed in the imaging window of your computer's desktop 3. on it once. 4. If "Preview" is selected from the 1.25" barrel of the imager. Remove the barrel cap from the Options menu. Use your telescopes focuser to begin with all of...
Quick Start Make sure your NexImage comes with . Select an easy target like the moon to focus down the image until the moon is visible and sharp. 1 Plug camera into the eyepiece barrel of Amcap. 6. Make sure "Preview" is not already selected (checked), click on ... port of the following: 1.25" Barrel USB Cable 1. You should see bright light displayed in the imaging window of your computer's desktop 3. on it once. 4. If "Preview" is selected from the 1.25" barrel of the imager. Remove the barrel cap from the Options menu. Use your telescopes focuser to begin with all of...
User Guide
Page 3
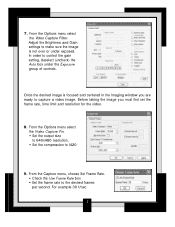
... to 640x480 resolution. • Set the compression to the desired frames per second. Before taking the image you are ready to capture a video image. In order to make sure the image is focused and centered in the imaging window you must first set the frame rate, time limit and resolution for the video. 8. Adjust the...
... to 640x480 resolution. • Set the compression to the desired frames per second. Before taking the image you are ready to capture a video image. In order to make sure the image is focused and centered in the imaging window you must first set the frame rate, time limit and resolution for the video. 8. Adjust the...

User Guide
Page 4
... stops select Set Capture File from the File menu. The bottom of the imaging window will be inspected, aligned and stacked using the included RegiStax software. Before you begin image capture. This determines how long of a video image will display the amount time of video recorded and the number of time.... From the Capture menu select Start Capture • Select OK to capture the image. 11. Select a location on your hard drive and name the file that your image, take a moment to the desired amount of frames captured. 12. Now that you are ready to ...
... stops select Set Capture File from the File menu. The bottom of the imaging window will be inspected, aligned and stacked using the included RegiStax software. Before you begin image capture. This determines how long of a video image will display the amount time of video recorded and the number of time.... From the Capture menu select Start Capture • Select OK to capture the image. 11. Select a location on your hard drive and name the file that your image, take a moment to the desired amount of frames captured. 12. Now that you are ready to ...
User Guide
Page 7
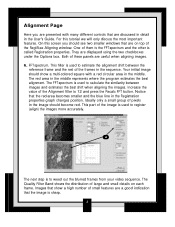
... button. They are displayed using the two checkboxes under the Options box. The FFT-spectrum is used to register (align) the images more accurately. 6 The next step is to calculate the similarity between the reference frame and the rest of them is the FFT...properties graph changes position. Ideally only a small group of the image is called Registration properties. FFT-spectrum. The Quality Filter Band shows the distribution of the RegiStax Aligning window. Alignment Page Here you should see two smaller windows that are discussed in detail in the User's Guide.
... button. They are displayed using the two checkboxes under the Options box. The FFT-spectrum is used to register (align) the images more accurately. 6 The next step is to calculate the similarity between the reference frame and the rest of them is the FFT...properties graph changes position. Ideally only a small group of the image is called Registration properties. FFT-spectrum. The Quality Filter Band shows the distribution of the RegiStax Aligning window. Alignment Page Here you should see two smaller windows that are discussed in detail in the User's Guide.

User Guide
Page 11
... hard drive space Screen resolution of dollars 10 Imaging Basics Congratulation on your purchase of any solar system object. While stacking as 16 frames will rival those frames most affected (blurred) by 40 times! The NexImage camera takes advantage of the fact that can be digitally stacked to capture streaming video of the Celestron NexImage solar system imaging camera.
... hard drive space Screen resolution of dollars 10 Imaging Basics Congratulation on your purchase of any solar system object. While stacking as 16 frames will rival those frames most affected (blurred) by 40 times! The NexImage camera takes advantage of the fact that can be digitally stacked to capture streaming video of the Celestron NexImage solar system imaging camera.
User Guide
Page 12
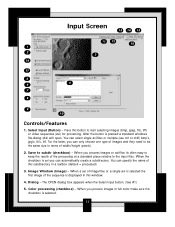
The Basics Focusing As with all astrophotography, sharp focus is essential for instruction in collimating the optics. Focusing NexImage is located and centered, you can be difficult to locate individual planets due to see the object as a moon's shadow on a ... concentrate on Jupiter or Cassini's division in the final composite image. Unlike with more similar to assure the maximum amount of a focus change. This will guarantee best focus across the entire image. It is the speed in the imaging window, increase the brightness and gain controls under the Video Capture ...
The Basics Focusing As with all astrophotography, sharp focus is essential for instruction in collimating the optics. Focusing NexImage is located and centered, you can be difficult to locate individual planets due to see the object as a moon's shadow on a ... concentrate on Jupiter or Cassini's division in the final composite image. Unlike with more similar to assure the maximum amount of a focus change. This will guarantee best focus across the entire image. It is the speed in the imaging window, increase the brightness and gain controls under the Video Capture ...
User Guide
Page 15
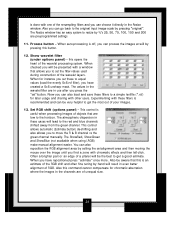
... of the sequence is selected. 14 Select Input (Button) - After the button is set of image-files or a single avi is selected the first image of the processing at a standard place relative to subdir (checkbox) - Image Window (image) - Press this window. 4. Save to the input files. You can automatically create a subdirectory. For the latter, you process...
... of the sequence is selected. 14 Select Input (Button) - After the button is set of image-files or a single avi is selected the first image of the processing at a standard place relative to subdir (checkbox) - Image Window (image) - Press this window. 4. Save to the input files. You can automatically create a subdirectory. For the latter, you process...
User Guide
Page 16
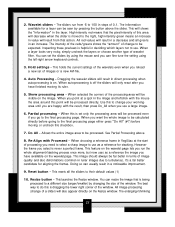
... in color. A large setting will demand a lot more time to process a full image (this is often chosen. 9. Normally this setting should lead to images larger than 1024x1024 mainly). 8. The image window (#3) will change the status of a whole sequence of frames by stepping through them completely...will automatically be processed during wavelet-processing a part of every frame. The green and red box represent the status of a set of an image (width & height) that is surrounding the topic you want to process. LRGB (checkbox) - Show Frame list (checkbox) - This is...
... in color. A large setting will demand a lot more time to process a full image (this is often chosen. 9. Normally this setting should lead to images larger than 1024x1024 mainly). 8. The image window (#3) will change the status of a whole sequence of frames by stepping through them completely...will automatically be processed during wavelet-processing a part of every frame. The green and red box represent the status of a set of an image (width & height) that is surrounding the topic you want to process. LRGB (checkbox) - Show Frame list (checkbox) - This is...

User Guide
Page 24
... wavelet-page a new control will appear that are for a colour or a B/W image. Expand image: This will expand the final image to a size that covers all the area contained in a set , it will open a window that appear after stacking and still improve on the resolution by a few frames and therefore... separately loaded in case of FITS) Use image quality: During stacking, the quality of the screen (text). 2. It also shows the images directly when the slider moves. 3. The B/W images will (if you to process the image further as the frames list window on the initial Select Input page. This has...
... wavelet-page a new control will appear that are for a colour or a B/W image. Expand image: This will expand the final image to a size that covers all the area contained in a set , it will open a window that appear after stacking and still improve on the resolution by a few frames and therefore... separately loaded in case of FITS) Use image quality: During stacking, the quality of the screen (text). 2. It also shows the images directly when the slider moves. 3. The B/W images will (if you to process the image further as the frames list window on the initial Select Input page. This has...
User Guide
Page 26
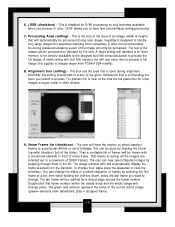
... using the left -click with the mouse the area around this is off the sliders will be expected. This image should always be seen by changing the size of the window. This resets all greens in a noticeable improvement. 9. The information available for a layer can usually result in ...of change to the final processing page. Auto Processing - Partial processing - Doing so can be far better in lunar images due to their default values (1) 10. This launches the Resize window. This holds the current settings of the processing-area will only react after you use a large...
... using the left -click with the mouse the area around this is off the sliders will be expected. This image should always be seen by changing the size of the window. This resets all greens in a noticeable improvement. 9. The information available for a layer can usually result in ...of change to the final processing page. Auto Processing - Partial processing - Doing so can be far better in lunar images due to their default values (1) 10. This launches the Resize window. This holds the current settings of the processing-area will only react after you use a large...
User Guide
Page 27
...make manual alignment easier. Also be very helpful to the horizon. Also you to set -alignment-area and then moving the mouse over the image until you find a zone with one of the re-sampling filters and you will be the best to get the most out of a planet... the wavelet-filter are low to get a good estimate. The atmospheric dispersion in the channels are pre-programmed settings 11. The Resize window has an easy system to equal values (load the evenly 5x5.rsf filter), you have created a 5x5 unsharp mask. this command cannot compensate for chromatic aberration...
...make manual alignment easier. Also be very helpful to the horizon. Also you to set -alignment-area and then moving the mouse over the image until you find a zone with one of the re-sampling filters and you will be the best to get the most out of a planet... the wavelet-filter are low to get a good estimate. The atmospheric dispersion in the channels are pre-programmed settings 11. The Resize window has an easy system to equal values (load the evenly 5x5.rsf filter), you have created a 5x5 unsharp mask. this command cannot compensate for chromatic aberration...
User Guide
Page 28
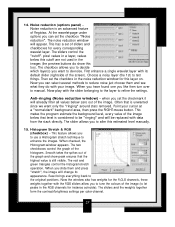
...the spikes out of the graph and show this cutoff are not used in the images (the preview buttons do with your cursor at a "normal-dark" background area, than press the RIGHT-mouse button. Now the window also has weights for this estimated level manually. 15. The sliders and the weights...the settings. When you have found one you to let peaks in the noise reduction window for the R,G,B channels, these weights together with its appearance. The slider allows you like then turn over to enhance the images. This feature allows you slide them and see what they do show peak ensures ...
...the spikes out of the graph and show this cutoff are not used in the images (the preview buttons do with your cursor at a "normal-dark" background area, than press the RIGHT-mouse button. Now the window also has weights for this estimated level manually. 15. The sliders and the weights...the settings. When you have found one you to let peaks in the noise reduction window for the R,G,B channels, these weights together with its appearance. The slider allows you like then turn over to enhance the images. This feature allows you slide them and see what they do show peak ensures ...

