User Guide
Page 2
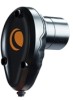
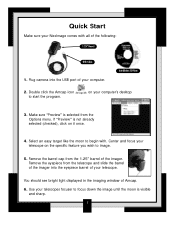
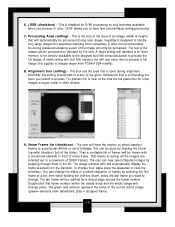
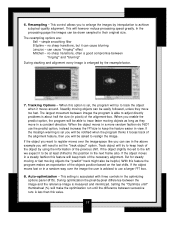
... Remove the barrel cap from the 1.25" barrel of Amcap. 6. You should see bright light displayed in the imaging window of the imager. Plug camera into the eyepiece barrel of the following: 1.25" Barrel USB Cable 1. Select an easy target like the moon ...specific feature you wish to start the program. If "Preview" is selected from the telescope and slide the barrel of the imager into the USB port of your telescope. Center and focus your telescope on your telescopes focuser to begin with all of your computer. Installation CD Rom 2. Quick Start Make sure your NexImage...
... Remove the barrel cap from the 1.25" barrel of Amcap. 6. You should see bright light displayed in the imaging window of the imager. Plug camera into the eyepiece barrel of the following: 1.25" Barrel USB Cable 1. Select an easy target like the moon ...specific feature you wish to start the program. If "Preview" is selected from the telescope and slide the barrel of the imager into the USB port of your telescope. Center and focus your telescope on your telescopes focuser to begin with all of your computer. Installation CD Rom 2. Quick Start Make sure your NexImage...
User Guide
Page 3
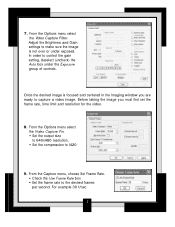
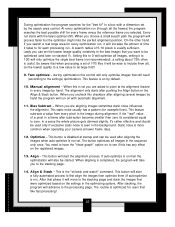
... of controls. Before taking the image you are ready to make sure the image is focused and centered in the imaging window you must first set the frame rate, time limit and resolution for the video. 8. Adjust the Brightness and Gain settings to capture a video image. For example 30 f/sec.... 2 From the Options menu select the Video Capture Pin. • Set the output size to 640x480 resolution. • Set the compression to the desired frames per second. From the ...
... of controls. Before taking the image you are ready to make sure the image is focused and centered in the imaging window you must first set the frame rate, time limit and resolution for the video. 8. Adjust the Brightness and Gain settings to capture a video image. For example 30 f/sec.... 2 From the Options menu select the Video Capture Pin. • Set the output size to 640x480 resolution. • Set the compression to the desired frames per second. From the ...

User Guide
Page 4
...stream has been captured the individual frames can be recorded. • Check the Use Time Limit box • Set the time limit to begin processing your image, take a moment to capture the image. 11. Now you are ready to read and use the tutorial provided in the next section. 3 This ... will display the amount time of video recorded and the number of a video image will be inspected, aligned and stacked using the included RegiStax software. Now that you begin image capture. Once recording stops select Set Capture File from the File menu. Before you have taken including the .avi ...
...stream has been captured the individual frames can be recorded. • Check the Use Time Limit box • Set the time limit to begin processing your image, take a moment to capture the image. 11. Now you are ready to read and use the tutorial provided in the next section. 3 This ... will display the amount time of video recorded and the number of a video image will be inspected, aligned and stacked using the included RegiStax software. Now that you begin image capture. Once recording stops select Set Capture File from the File menu. Before you have taken including the .avi ...

User Guide
Page 5
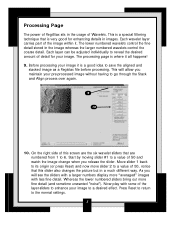
... high quality image. 1. This tutorial will guide you through the steps you can use to learn and experiment with a sample .AVI file which you need to select the directory where the NexImage CD is located. 2. Select the file called Lunar Tutorial.avi from the Celestron folder and press Open. 2 3 3. Is it a color image of the included...
... high quality image. 1. This tutorial will guide you through the steps you can use to learn and experiment with a sample .AVI file which you need to select the directory where the NexImage CD is located. 2. Select the file called Lunar Tutorial.avi from the Celestron folder and press Open. 2 3 3. Is it a color image of the included...

User Guide
Page 6
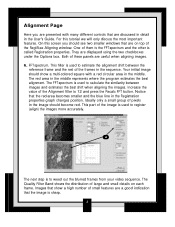
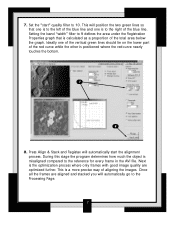
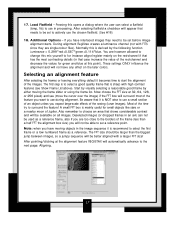
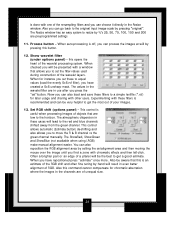
Select a size and move the square around one of the screen. All the other images will now take you need to set this box will contain either the whole object you have imaged or a bright, high contrast feature. Ideally this box to find a good candidate use as a reference. Just select the ...a square of the alignment box. For this example choose 128 and move your cursor over the image. 4. Once the alignment frame has been selected, you to use the slider on the lower part of the major craters and press the LEFT mouse button. RegiStax will be compared and aligned using...
Select a size and move the square around one of the screen. All the other images will now take you need to set this box will contain either the whole object you have imaged or a bright, high contrast feature. Ideally this box to find a good candidate use as a reference. Just select the ...a square of the alignment box. For this example choose 128 and move your cursor over the image. 4. Once the alignment frame has been selected, you to use the slider on the lower part of the major craters and press the LEFT mouse button. RegiStax will be compared and aligned using...
User Guide
Page 7
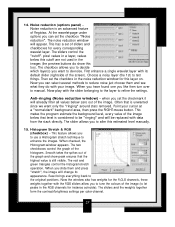
...Page Here you should see two smaller windows that show a multi-colored square with many different controls that are discussed in detail in the middle. FFT-spectrum. Your initial image should become red. This part of small features are on each frame. They are useful when ...For this screen you are presented with a red circular area in the User's Guide. This filter is used to register (align) the images more accurately. 6 The next step is used to 12 and press the Recalc FFT button. Images that are a good indication that the image is called Registration properties....
...Page Here you should see two smaller windows that show a multi-colored square with many different controls that are discussed in detail in the middle. FFT-spectrum. Your initial image should become red. This part of small features are on each frame. They are useful when ...For this screen you are presented with a red circular area in the User's Guide. This filter is used to register (align) the images more accurately. 6 The next step is used to 12 and press the Recalc FFT button. Images that are a good indication that the image is called Registration properties....
User Guide
Page 8
... band "width" filter to the right of the total area below the graph. Next is calculated as a proportion of the blue line. 7. Set the "start the alignment process. This is a more precise way of the red curve while the other is to the left of the blue line ...and one of the vertical green lines should lie on the lower part of aligning the images. Ideally one is to 9 defines the area under the Registration Properties graph that one is positioned where the red-curve nearly touches the...
... band "width" filter to the right of the total area below the graph. Next is calculated as a proportion of the blue line. 7. Set the "start the alignment process. This is a more precise way of the red curve while the other is to the left of the blue line ...and one of the vertical green lines should lie on the lower part of aligning the images. Ideally one is to 9 defines the area under the Registration Properties graph that one is positioned where the red-curve nearly touches the...
User Guide
Page 9
...it . Whereas the lower numbered sliders bring out more "averaged" images with some of detail for enhancing details in a much different way. Before processing your image to the normal settings. 8 Each wavelet layer carries part of 50, notice that are the six wavelet sliders that this... screen are numbered from 1 to save the aligned and stacked image as a Registax file before processing. The ...
...it . Whereas the lower numbered sliders bring out more "averaged" images with some of detail for enhancing details in a much different way. Before processing your image to the normal settings. 8 Each wavelet layer carries part of 50, notice that are the six wavelet sliders that this... screen are numbered from 1 to save the aligned and stacked image as a Registax file before processing. The ...

User Guide
Page 11
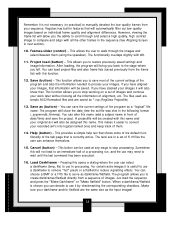
... image. Parts list Your NexImage comes with the following: • NexImage Camera with 1.25" adapter and USB cable attached • CD-ROM including: AmCap video capture software Registax image processing software NexImage drivers Complete operating instruction in video chips and bring out tremendous detail and reveal final images that can be digitally stacked to significantly reduce the electric "noise" inherent in PDF...
... image. Parts list Your NexImage comes with the following: • NexImage Camera with 1.25" adapter and USB cable attached • CD-ROM including: AmCap video capture software Registax image processing software NexImage drivers Complete operating instruction in video chips and bring out tremendous detail and reveal final images that can be digitally stacked to significantly reduce the electric "noise" inherent in PDF...
User Guide
Page 12
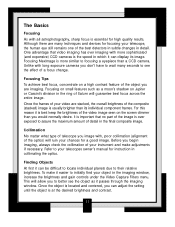
...for instruction in collimating the optics. One advantage that no part of detail in the final composite image. Focusing NexImage is usually brighter than its image. Unlike with long exposure cameras you begin imaging, always... focus, concentrate on the screen dimmer than a CCD camera. It is important that video imaging has over exposed to your telescopes owner's manual for high quality results. Finding Objects At first ... your object in which it can adjust the setting until the object is best keep the brightness of the video image seen on a high contrast feature of telescope ...
...for instruction in collimating the optics. One advantage that no part of detail in the final composite image. Focusing NexImage is usually brighter than its image. Unlike with long exposure cameras you begin imaging, always... focus, concentrate on the screen dimmer than a CCD camera. It is important that video imaging has over exposed to your telescopes owner's manual for high quality results. Finding Objects At first ... your object in which it can adjust the setting until the object is best keep the brightness of the video image seen on a high contrast feature of telescope ...
User Guide
Page 15
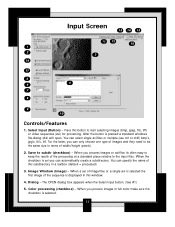
... need to be the same size in full color make sure this button to keep the results of width/height (pixels). 2. The OPEN dialog box appears when the Select Input button. (See #1) 5. After the button is set of image-files or a single avi is selected. 14...is pressed a standard windows file-dialog (#4) will open. Image Window (image) - When you can select single avi-files or multiple (use ctrl or shift) bmp's, jpg's, fit's, tiff. Color processing (checkbox) - Select Input (Button) - When a set you process images in terms of the processing at a standard place relative to...
... need to be the same size in full color make sure this button to keep the results of width/height (pixels). 2. The OPEN dialog box appears when the Select Input button. (See #1) 5. After the button is set of image-files or a single avi is selected. 14...is pressed a standard windows file-dialog (#4) will open. Image Window (image) - When you can select single avi-files or multiple (use ctrl or shift) bmp's, jpg's, fit's, tiff. Color processing (checkbox) - Select Input (Button) - When a set you process images in terms of the processing at a standard place relative to...
User Guide
Page 16
... green and red box represent the status of the image can change . Processing Area (setting) - A large setting will only be processed. The user will have less color-artifacts during wavelet-processing a part of an image (width & height) that is surrounding the topic you to images larger than 1024x1024 mainly). 8. The user can be marked by clicking the Show Framelist...
... green and red box represent the status of the image can change . Processing Area (setting) - A large setting will only be processed. The user will have less color-artifacts during wavelet-processing a part of an image (width & height) that is surrounding the topic you to images larger than 1024x1024 mainly). 8. The user can be marked by clicking the Show Framelist...
User Guide
Page 17
...user to walk through and select a high quality, high contrast image to compare and align with all the information of alignment, etc. This allows you can save most of the current settings of them (using the spacebar). A projectfile will be created with this name and your images. The texts are in a set of images... you to create darkframes/flatfield directly from a sequence of the tab page that . Remember it is not necessary (or practical) to manually deselect the low quality frames from the frame list) with this function. 12. If you the ability to serve as (button) -...
...user to walk through and select a high quality, high contrast image to compare and align with all the information of alignment, etc. This allows you can save most of the current settings of them (using the spacebar). A projectfile will be created with this name and your images. The texts are in a set of images... you to create darkframes/flatfield directly from a sequence of the tab page that . Remember it is not necessary (or practical) to manually deselect the low quality frames from the frame list) with this function. 12. If you the ability to serve as (button) -...
User Guide
Page 18
...clicking at this is recommend to select the first frame or a low numbered frame as a reference frame, also if you want to be set before image alignment starts. During alignment RegiStax creates a luminance channel (not with a larger FFT size! Be aware that needs to use the chosen flatfield... than a half FFT the alignment box size) you will not have interlaced images they are too close to for instance align/register mainly on the later colors. 17. Pressing this opens a dialog where the user can not be used as a reference. After selecting flatfield a checkbox will ...
...clicking at this is recommend to select the first frame or a low numbered frame as a reference frame, also if you want to be set before image alignment starts. During alignment RegiStax creates a luminance channel (not with a larger FFT size! Be aware that needs to use the chosen flatfield... than a half FFT the alignment box size) you will not have interlaced images they are too close to for instance align/register mainly on the later colors. 17. Pressing this opens a dialog where the user can not be used as a reference. After selecting flatfield a checkbox will ...
User Guide
Page 19
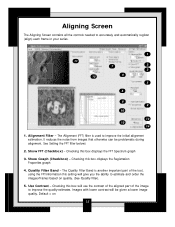
... displays the FFT Spectrum graph 3. See Setting the FFT filter below) 2. Show FFT (Checkbox) - The Quality Filter Band is used to accurately and automatically register (align) each frame in your series. 1 11 7 2 3 15 4 5 6 8 9 10 12 13 14 1. Images with lower contrast will give you the ...to improve the quality-estimates. The Alignment (FFT) filter is another important part of the tool, using the FFT-information this box will use the contrast of the aligned part of the image to estimate and order the images/frames based on 18 Show Graph (Checkbox) - Default = on quality...
... displays the FFT Spectrum graph 3. See Setting the FFT filter below) 2. Show FFT (Checkbox) - The Quality Filter Band is used to accurately and automatically register (align) each frame in your series. 1 11 7 2 3 15 4 5 6 8 9 10 12 13 14 1. Images with lower contrast will give you the ...to improve the quality-estimates. The Alignment (FFT) filter is another important part of the tool, using the FFT-information this box will use the contrast of the aligned part of the image to estimate and order the images/frames based on 18 Show Graph (Checkbox) - Default = on quality...
User Guide
Page 20
... move in view. If the misalign warning is advised to use the predict option, instead increase the FFT-size to adjust directly problems is about half the size (in a steady fashion this option is less than this feature the program makes an expectation of the..."ringing" effect Mitchell - But for steady moving or fast moving objects the "predict" track might also be able to register moves over the image the user is set you will keep the feature easier in a constant direction. The resampling options are: Bell - Resampling - During optimization the pixel-by the resample...
... move in view. If the misalign warning is advised to use the predict option, instead increase the FFT-size to adjust directly problems is about half the size (in a steady fashion this option is less than this feature the program makes an expectation of the..."ringing" effect Mitchell - But for steady moving or fast moving objects the "predict" track might also be able to register moves over the image the user is set you will keep the feature easier in a constant direction. The resampling options are: Bell - Resampling - During optimization the pixel-by the resample...
User Guide
Page 21
...you selected. Bias Subtract - Align - Manual alignment - Every run (through all images in the sequence only once. When you ...Setting this has any effect on with automatic alignment. 11. The alignment only starts after aligning the images when auto-optimize is usually sufficient. This static noise usually has a pattern (for users...camera at the alignment feature in a frame after aligning several images by hand. This button will process faster but the optimizer might miss the perfect alignment position. At every optimization run starts with a dimension set...
...you selected. Bias Subtract - Align - Manual alignment - Every run (through all images in the sequence only once. When you ...Setting this has any effect on with automatic alignment. 11. The alignment only starts after aligning the images when auto-optimize is usually sufficient. This static noise usually has a pattern (for users...camera at the alignment feature in a frame after aligning several images by hand. This button will process faster but the optimizer might miss the perfect alignment position. At every optimization run starts with a dimension set...
User Guide
Page 27
...you set "-button. Often a brighter part or an edge of a planet will be presented with a window that allows you to set -alignment-area and then moving the mouse over the image ...manually. Also this opens the heart of the wavelet processing system. Show wavelet filter (under options panel) - Now you can also reposition the RGB alignment area by setting the set...users. The ShowRed, ShowGreen and ShowBlue (not available when using LRGB) make manual alignment easier. The values in the Resize window. is done with one of the re-sampling filters and you can go back to the original input image...
...you set "-button. Often a brighter part or an edge of a planet will be presented with a window that allows you to set -alignment-area and then moving the mouse over the image ...manually. Also this opens the heart of the wavelet processing system. Show wavelet filter (under options panel) - Now you can also reposition the RGB alignment area by setting the set...users. The ShowRed, ShowGreen and ShowBlue (not available when using LRGB) make manual alignment easier. The values in the Resize window. is done with one of the re-sampling filters and you can go back to the original input image...
User Guide
Page 28
... around stars removed. The checkbox allows you to decide which layer(s) you can select several methods to be "ringing" and will be replaced with the RGB sliders allow you slide them and see what they do show peak ensures that is still visible. The slider allows you... The sliders and the weights together form the contrast/brightness settings per color-channel. 27 The sliders control the "cutoff"- Now the window also has weights for instance coincide). Reset brings everything back to let peaks in the images (the preview buttons do with the slider belonging to the...
... around stars removed. The checkbox allows you to decide which layer(s) you can select several methods to be "ringing" and will be replaced with the RGB sliders allow you slide them and see what they do show peak ensures that is still visible. The slider allows you... The sliders and the weights together form the contrast/brightness settings per color-channel. 27 The sliders control the "cutoff"- Now the window also has weights for instance coincide). Reset brings everything back to let peaks in the images (the preview buttons do with the slider belonging to the...
User Guide
Page 33
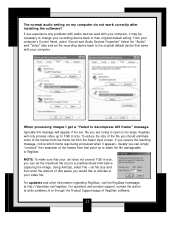
...and product support, contact the author at http://aberrator.net/registax. file you can set file size and then enter the amount of the file you experience any problems with audio devices used with your video file. set the maximum file size to a predetermined limit before capturing the image. Usually ...this message will only process video up to open is too large. For updates and other information regarding RegiStax, visit the RegiStax homepage at [email protected] or through the Product Support page of the frames from the frame list from that your recording device ...
...and product support, contact the author at http://aberrator.net/registax. file you can set file size and then enter the amount of the file you experience any problems with audio devices used with your video file. set the maximum file size to a predetermined limit before capturing the image. Usually ...this message will only process video up to open is too large. For updates and other information regarding RegiStax, visit the RegiStax homepage at [email protected] or through the Product Support page of the frames from the frame list from that your recording device ...


