User's Guide
Page 3
Advanced Wireless LAN Connection Settings 20 Web Setup 20 Enabling and Disabling Web Setup 22 Switching the Data Projector Connection Profile 23 Assigning a Name to a Data Projector 26 Configuring a Connection Keyword 27 Modifying Data Projector Manual Connection Settings 29 Creating a Computer Connection Profile 30 Sending Settings from a Computer to the Data Projector 34 Deleting a Computer Connection Profile 36 Assigning a User Name to a Computer for Projection 37 Specifying the Quality of Images Sent from a Computer 37 Selecting the Network to Use for...
Advanced Wireless LAN Connection Settings 20 Web Setup 20 Enabling and Disabling Web Setup 22 Switching the Data Projector Connection Profile 23 Assigning a Name to a Data Projector 26 Configuring a Connection Keyword 27 Modifying Data Projector Manual Connection Settings 29 Creating a Computer Connection Profile 30 Sending Settings from a Computer to the Data Projector 34 Deleting a Computer Connection Profile 36 Assigning a User Name to a Computer for Projection 37 Specifying the Quality of Images Sent from a Computer 37 Selecting the Network to Use for...
User's Guide
Page 6
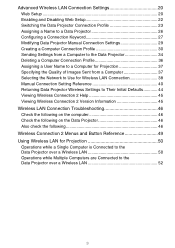
... Projector. If you are required to the Data Projector over a wireless LAN connection. Audio data cannot be sent from your computer to establish a wireless LAN connection between the Data Projector and a computer. 1 Projector..... 1 Prepare a CASIO Data Projector that supports wireless connection* or a CASIO YP-100 Multifunctional Presentation Kit. For details about configuring plugand-play feature is the initial default setting). z Note that the Data Projector's plug-and-play settings, see the YW-2L Wireless Adapter User's Guide...
... Projector. If you are required to the Data Projector over a wireless LAN connection. Audio data cannot be sent from your computer to establish a wireless LAN connection between the Data Projector and a computer. 1 Projector..... 1 Prepare a CASIO Data Projector that supports wireless connection* or a CASIO YP-100 Multifunctional Presentation Kit. For details about configuring plugand-play feature is the initial default setting). z Note that the Data Projector's plug-and-play settings, see the YW-2L Wireless Adapter User's Guide...
User's Guide
Page 7
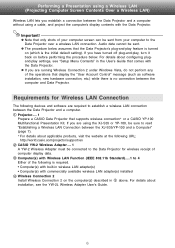
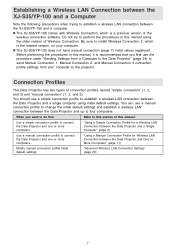
...) to perform the procedures in this manual using initial default settings. z The XJ-S35/YP-100 comes with Wireless Connection, which is a previous version of this section of the wireless connection software. Be sure to install Wireless Connection 2, which is the newest version, on your computer to change the initial default settings and establish a wireless LAN connection between the XJ-S35/YP-100 and a computer. You should use a manual connection profile to the projector.
...) to perform the procedures in this manual using initial default settings. z The XJ-S35/YP-100 comes with Wireless Connection, which is a previous version of this section of the wireless connection software. Be sure to install Wireless Connection 2, which is the newest version, on your computer to change the initial default settings and establish a wireless LAN connection between the XJ-S35/YP-100 and a computer. You should use a manual connection profile to the projector.
User's Guide
Page 8
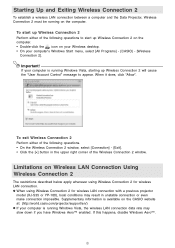
...;] button in unstable connection or even make connection impossible. To exit Wireless Connection 2 Perform either of the Wireless Connection 2 window. Limitations on the computer. If your computer is running Windows Vista, starting up Wireless Connection 2 will cause the "User Account Control" message to start up Wireless Connection 2 on the computer. • Double-click the icon on the CASIO website at: (http://world.casio.com/projector/support/en/) z If your computer's Windows Start menu, select [All Programs] - [CASIO] - [Wireless Connection...
...;] button in unstable connection or even make connection impossible. To exit Wireless Connection 2 Perform either of the Wireless Connection 2 window. Limitations on the computer. If your computer is running Windows Vista, starting up Wireless Connection 2 will cause the "User Account Control" message to start up Wireless Connection 2 on the computer. • Double-click the icon on the CASIO website at: (http://world.casio.com/projector/support/en/) z If your computer's Windows Start menu, select [All Programs] - [CASIO] - [Wireless Connection...
User's Guide
Page 9
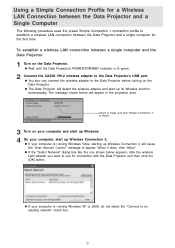
... Projector. z The Data Projector will detect the wireless adapter and start up Windows. 4 On your computer is lit green. 2 Connect the CASIO YW-2 wireless adapter to the Data Projector's USB port. Check to make sure that "Simple Connection 1" is running Windows Vista, starting up its Wireless function automatically. When it does, click "Allow". The message shown below appears, click the wireless LAN adapter you want to use for the first time. z Wait until the Data Projector's POWER...
... Projector. z The Data Projector will detect the wireless adapter and start up Windows. 4 On your computer is lit green. 2 Connect the CASIO YW-2 wireless adapter to the Data Projector's USB port. Check to make sure that "Simple Connection 1" is running Windows Vista, starting up its Wireless function automatically. When it does, click "Allow". The message shown below appears, click the wireless LAN adapter you want to use for the first time. z Wait until the Data Projector's POWER...
User's Guide
Page 11
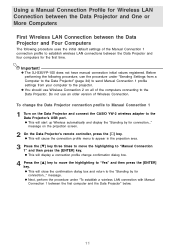
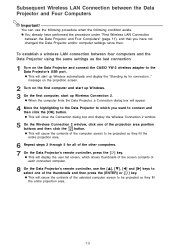
... Data Projector's USB port. z This will display a connection profile change the Data Projector connection profile to "Yes" and then press the [ENTER] key. z This will cause the connection profile menu to appear in the projection area. 3 Press the [T] key three times to move the highlighting to Manual Connection 1 1 Turn on the projection screen. 2 On the Data Projector's remote controller, press the […] key. message on the Data Projector and connect the CASIO YW-2 wireless adapter to "Manual Connection...
... Data Projector's USB port. z This will display a connection profile change the Data Projector connection profile to "Yes" and then press the [ENTER] key. z This will cause the connection profile menu to appear in the projection area. 3 Press the [T] key three times to move the highlighting to Manual Connection 1 1 Turn on the projection screen. 2 On the Data Projector's remote controller, press the […] key. message on the Data Projector and connect the CASIO YW-2 wireless adapter to "Manual Connection...

User's Guide
Page 12
..., click the wireless LAN adapter you want to appear. When it does, click "Allow". See page 39 for connection with Manual Connection 1 between the first computer and the Data Projector 1 On your computer, start up Wireless Connection 2 will display the Switch Connection Profile dialog box. 4 Click the "Profile Name" down arrow button and then select "Manual Connection 1" from the list that appears. 3 On the Wireless Connection 2 window, select [Connection] - [Switch Connection Profile].
..., click the wireless LAN adapter you want to appear. When it does, click "Allow". See page 39 for connection with Manual Connection 1 between the first computer and the Data Projector 1 On your computer, start up Wireless Connection 2 will display the Switch Connection Profile dialog box. 4 Click the "Profile Name" down arrow button and then select "Manual Connection 1" from the list that appears. 3 On the Wireless Connection 2 window, select [Connection] - [Switch Connection Profile].
User's Guide
Page 15
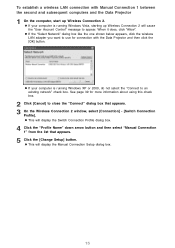
...] to use for connection with Manual Connection 1 between the second and subsequent computers and the Data Projector 1 On the computer, start up Wireless Connection 2 will cause the "User Account Control" message to an existing network" check box. z If the "Select Network" dialog box like the one shown below appears, click the wireless LAN adapter you want to close the "Connect" dialog box that appears. 5 Click the [Change Setup] button...
...] to use for connection with Manual Connection 1 between the second and subsequent computers and the Data Projector 1 On the computer, start up Wireless Connection 2 will cause the "User Account Control" message to an existing network" check box. z If the "Select Network" dialog box like the one shown below appears, click the wireless LAN adapter you want to close the "Connect" dialog box that appears. 5 Click the [Change Setup] button...
User's Guide
Page 19
...] button. z You already have not changed the Data Projector and/or computer settings since then. z When the computer finds the Data Projector, a Connection dialog box will start up Wireless automatically and display the "Standing by for all of the selected computer screen to the Data Projector's USB port. z This will display the user list screen, which you have performed the procedure under "First Wireless LAN Connection...
...] button. z You already have not changed the Data Projector and/or computer settings since then. z When the computer finds the Data Projector, a Connection dialog box will start up Wireless automatically and display the "Standing by for all of the selected computer screen to the Data Projector's USB port. z This will display the user list screen, which you have performed the procedure under "First Wireless LAN Connection...

User's Guide
Page 20
... the Wireless Connection 2 window of other Data Projector settings, you need first to display a special web browser page named "Web Setup" on a computer that is connected to configure advanced settings of the computer, click the button. z If a wireless LAN connection is already established between the Data Projector and One or More Computers" (page 11). Web Setup In order to modify the settings of a Data Projector manual setup profile and to the Data Projector over a wireless LAN. z For...
... the Wireless Connection 2 window of other Data Projector settings, you need first to display a special web browser page named "Web Setup" on a computer that is connected to configure advanced settings of the computer, click the button. z If a wireless LAN connection is already established between the Data Projector and One or More Computers" (page 11). Web Setup In order to modify the settings of a Data Projector manual setup profile and to the Data Projector over a wireless LAN. z For...

User's Guide
Page 22
... Wireless setup menu, press the [ESC] key. 22 z This will make it can disable the Web Setup page so it is shown in the projection area, press the [MENU] key on the Data Projector's remote controller. To change password page. 2 In the "Current Password" box, enter the current password ("casio" if you want to restrict access to Web Setup while there are multiple computers connected to select "Enable" or "Disable". z Selecting "Disable" will display the Wireless setup menu. 4 Press the [T] key...
... Wireless setup menu, press the [ESC] key. 22 z This will make it can disable the Web Setup page so it is shown in the projection area, press the [MENU] key on the Data Projector's remote controller. To change password page. 2 In the "Current Password" box, enter the current password ("casio" if you want to restrict access to Web Setup while there are multiple computers connected to select "Enable" or "Disable". z Selecting "Disable" will display the Wireless setup menu. 4 Press the [T] key...

User's Guide
Page 27
... symbols into the Web Setup page" (page 20) to the Data Projector over a wireless LAN using a manual connection profile. Configuring a Connection Keyword A connection keyword protects the Data Projector against unauthorized access when there are multiple computers connected over a wireless LAN, or "Off" to turn the connection keyword on /off) to establish a wireless LAN connection with the Data Projector from a computer to display the Web Setup top page. 2 In the "Projector Setup" area, click the [Edit] button. Connection keyword registration...
... symbols into the Web Setup page" (page 20) to the Data Projector over a wireless LAN using a manual connection profile. Configuring a Connection Keyword A connection keyword protects the Data Projector against unauthorized access when there are multiple computers connected over a wireless LAN, or "Off" to turn the connection keyword on /off) to establish a wireless LAN connection with the Data Projector from a computer to display the Web Setup top page. 2 In the "Projector Setup" area, click the [Edit] button. Connection keyword registration...

User's Guide
Page 29
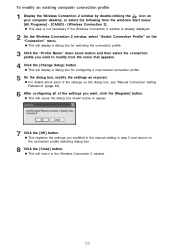
... "Connection Profile Settings" page, and correct the settings as required. will need to switch to be compatible with one or more input items." z This will display a page for the wireless LAN connection between the Data Projector and computer will terminate the current connection. Modifying Data Projector Manual Connection Settings The following are using • When you want to enhance security by modifying initial default settings You can modify manual connection settings using Web Setup...
... "Connection Profile Settings" page, and correct the settings as required. will need to switch to be compatible with one or more input items." z This will display a page for the wireless LAN connection between the Data Projector and computer will terminate the current connection. Modifying Data Projector Manual Connection Settings The following are using • When you want to enhance security by modifying initial default settings You can modify manual connection settings using Web Setup...
User's Guide
Page 30
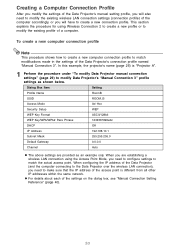
... Projector over the wireless LAN connection), you need to make sure that the IP address of the computer accordingly, or you will also need to configure settings to match the actual access point. Dialog Box Item Setting Profile Name RoomB SSID ROOM_B Access Mode Ad Hoc Security Setup WEP WEP Key Format ASCII/128bit WEP Key/WPA/WPA2 Pass Phrase 1234567890abc DHCP Off IP Address 192.168.10.1 Subnet Mask 255.255.255.0 Default Gateway 0.0.0.0 Channel Auto z The above settings are establishing a wireless LAN connection using Wireless Connection...
... Projector over the wireless LAN connection), you need to make sure that the IP address of the computer accordingly, or you will also need to configure settings to match the actual access point. Dialog Box Item Setting Profile Name RoomB SSID ROOM_B Access Mode Ad Hoc Security Setup WEP WEP Key Format ASCII/128bit WEP Key/WPA/WPA2 Pass Phrase 1234567890abc DHCP Off IP Address 192.168.10.1 Subnet Mask 255.255.255.0 Default Gateway 0.0.0.0 Channel Auto z The above settings are establishing a wireless LAN connection using Wireless Connection...
User's Guide
Page 33
... windows Start menu: [All Programs] - [CASIO] - [Wireless Connection 2]. z This registers the settings you want to the connection profile switching dialog box. 8 Click the [Close] button. z This step is not necessary if the Wireless Connection 2 window is already displayed. 2 On the Wireless Connection 2 window, select "Switch Connection Profile" on your computer desktop, or select the following from the menu that appears. 4 Click the [Change Setup] button. z This will display a dialog box for switching the connection...
... windows Start menu: [All Programs] - [CASIO] - [Wireless Connection 2]. z This registers the settings you want to the connection profile switching dialog box. 8 Click the [Close] button. z This step is not necessary if the Wireless Connection 2 window is already displayed. 2 On the Wireless Connection 2 window, select "Switch Connection Profile" on your computer desktop, or select the following from the menu that appears. 4 Click the [Change Setup] button. z This will display a dialog box for switching the connection...

User's Guide
Page 36
... the settings are the way you no longer need them. Wireless Connection 2 can use the procedure in this section to delete computer connection profiles you created with Wireless Connection 2 when you want to the Wireless Connection 2 window. 36 z This will return to delete from the windows Start menu: [All Programs] - [CASIO] - [Wireless Connection 2]. z This will display a dialog box for switching the connection profile. 3 Click the "Profile Name" down arrow button...
... the settings are the way you no longer need them. Wireless Connection 2 can use the procedure in this section to delete computer connection profiles you created with Wireless Connection 2 when you want to the Wireless Connection 2 window. 36 z This will return to delete from the windows Start menu: [All Programs] - [CASIO] - [Wireless Connection 2]. z This will display a dialog box for switching the connection profile. 3 Click the "Profile Name" down arrow button...

User's Guide
Page 42
... "Security Setup". Use this input box to enter a WEP key or WPA/WPA2 pass phrase. Enter the same encryption key that is selected. You do not need to configure the "IP Address", "Subnet Mask", or "Default Gateway" settings when this option is currently set manually on the wireless LAN access point to which you selected for "DHCP". z When "WEP" is set on the device being configured (Data Projector or computer) or the IP address assigned automatically by the DHCP server should be input using...
... "Security Setup". Use this input box to enter a WEP key or WPA/WPA2 pass phrase. Enter the same encryption key that is selected. You do not need to configure the "IP Address", "Subnet Mask", or "Default Gateway" settings when this option is currently set manually on the wireless LAN access point to which you selected for "DHCP". z When "WEP" is set on the device being configured (Data Projector or computer) or the IP address assigned automatically by the DHCP server should be input using...

User's Guide
Page 47
... [ENTER] key. Use the dialog box to check the settings and make any differences in order to view. 3 Click the [Change Setup] button. When establishing wireless LAN connections between the Data Projector and a single computer or multiple computers. Important! If there are required. z This will display a dialog box for the IP address setting, all of the computers must be different. To check computer settings 1 On the Wireless Connection 2 window...
... [ENTER] key. Use the dialog box to check the settings and make any differences in order to view. 3 Click the [Change Setup] button. When establishing wireless LAN connections between the Data Projector and a single computer or multiple computers. Important! If there are required. z This will display a dialog box for the IP address setting, all of the computers must be different. To check computer settings 1 On the Wireless Connection 2 window...

User's Guide
Page 48
... display the Web Setup page. This can cause radio interference that uses the 2.4 GHz frequency band (which is a wireless LAN connection between the Data Projector and computer keeps dropping. If the Web Setup page does not appear even through there is "Disable", change it impossible to display the Web Setup page, and so the proxy server settings should be configured to exit Wireless Connection 2, and then restart Wireless Connection 2. The wireless LAN connection between the...
... display the Web Setup page. This can cause radio interference that uses the 2.4 GHz frequency band (which is a wireless LAN connection between the Data Projector and computer keeps dropping. If the Web Setup page does not appear even through there is "Disable", change it impossible to display the Web Setup page, and so the proxy server settings should be configured to exit Wireless Connection 2, and then restart Wireless Connection 2. The wireless LAN connection between the...

User's Guide
Page 50
... settings configure with Wireless Connection 2. This means you can perform after a connection using Simple Connection is established between the Data Projector and computer. To stop projection of the image, click the button. 50 Note While the computer screen contents are being projected On the computer screen, click the button on the Wireless Connection 2 window. This will cause the button color to change from black to green...
... settings configure with Wireless Connection 2. This means you can perform after a connection using Simple Connection is established between the Data Projector and computer. To stop projection of the image, click the button. 50 Note While the computer screen contents are being projected On the computer screen, click the button on the Wireless Connection 2 window. This will cause the button color to change from black to green...
