

Owners Manual
Page 1
E DATA PROJECTOR XJ-S43W User's Guide z Be sure to keep all user documentation handy for future reference. 1 For details about setting up the projector and lamp replacement, see the User's Guide (Basic Operation). z Be sure to read the precautions in the separate User's Guide (Basic Operation).
E DATA PROJECTOR XJ-S43W User's Guide z Be sure to keep all user documentation handy for future reference. 1 For details about setting up the projector and lamp replacement, see the User's Guide (Basic Operation). z Be sure to read the precautions in the separate User's Guide (Basic Operation).
Owners Manual
Page 3
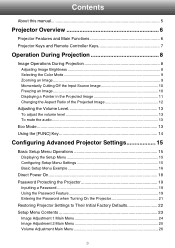
... Remote Controller Keys 7 Operation During Projection 8 Image Operations During Projection 8 Adjusting Image Brightness 8 Selecting the Color Mode 9 Zooming an Image ...9 Momentarily Cutting Off the Input Source Image 10 Freezing an Image ...10 Displaying a Pointer in the Projected Image 11 Changing the Aspect Ratio of the Projected Image 12 Adjusting the Volume Level 13 To adjust the volume level 13 To mute the audio ...13 Eco Mode ...13 Using the [FUNC] Key 14 Configuring Advanced Projector Settings 15 Basic Setup Menu Operations 15 Displaying the Setup Menu...
... Remote Controller Keys 7 Operation During Projection 8 Image Operations During Projection 8 Adjusting Image Brightness 8 Selecting the Color Mode 9 Zooming an Image ...9 Momentarily Cutting Off the Input Source Image 10 Freezing an Image ...10 Displaying a Pointer in the Projected Image 11 Changing the Aspect Ratio of the Projected Image 12 Adjusting the Volume Level 13 To adjust the volume level 13 To mute the audio ...13 Eco Mode ...13 Using the [FUNC] Key 14 Configuring Advanced Projector Settings 15 Basic Setup Menu Operations 15 Displaying the Setup Menu...

Owners Manual
Page 4
... lamp use time 37 When to replace the lamp 37 Replacing the Lamp 38 To replace the lamp 39 Resetting the Lamp Time 40 To reset the lamp time 40 To reset the lamp time after exceeding the lamp life 41 Error Indicators and Warning Messages 42 Appendix 45 Connecting to a Component Video Output Device 45 Connecting the HDMI Output of a Video Device or Computer to the Projector 46 Remote Controller Signal Range 47 Replacing the Remote Controller Battery 48 Projection Distance and Screen Size 49 Aspect Ratio Setting and Projection Image 50 Supported Signals...
... lamp use time 37 When to replace the lamp 37 Replacing the Lamp 38 To replace the lamp 39 Resetting the Lamp Time 40 To reset the lamp time 40 To reset the lamp time after exceeding the lamp life 41 Error Indicators and Warning Messages 42 Appendix 45 Connecting to a Component Video Output Device 45 Connecting the HDMI Output of a Video Device or Computer to the Projector 46 Remote Controller Signal Range 47 Replacing the Remote Controller Battery 48 Projection Distance and Screen Size 49 Aspect Ratio Setting and Projection Image 50 Supported Signals...

Owners Manual
Page 7
... buttons are not pressed inadvertently. 7 Remote Controller Keys [INPUT] key [AUTO] key [P] (Power) key [ZOOM +] [ZOOM -] keys [FOCUS ] [FOCUS ] keys [D-ZOOM +] [D-ZOOM -] keys [KEYSTONE +] [KEYSTONE -] keys [BRIGHT] key ([O] key) [ECO] key ([f] key) [ASPECT] key ([Z] key) [FUNC] key Remote control signal emitter CLASS 1 LED PRODUCT [BLANK] key [FREEZE] key [VOLUME] key [COLOR MODE] key [MENU] key Cursor keys [POINTER] key [ENTER] key ([STYLE] key) [ESC] key Important! Projector Keys and Remote Controller Keys Projector Keys and Indicator Panel TEMP indicator LAMP indicator POWER/STANDBY...
... buttons are not pressed inadvertently. 7 Remote Controller Keys [INPUT] key [AUTO] key [P] (Power) key [ZOOM +] [ZOOM -] keys [FOCUS ] [FOCUS ] keys [D-ZOOM +] [D-ZOOM -] keys [KEYSTONE +] [KEYSTONE -] keys [BRIGHT] key ([O] key) [ECO] key ([f] key) [ASPECT] key ([Z] key) [FUNC] key Remote control signal emitter CLASS 1 LED PRODUCT [BLANK] key [FREEZE] key [VOLUME] key [COLOR MODE] key [MENU] key Cursor keys [POINTER] key [ENTER] key ([STYLE] key) [ESC] key Important! Projector Keys and Remote Controller Keys Projector Keys and Indicator Panel TEMP indicator LAMP indicator POWER/STANDBY...
Owners Manual
Page 13
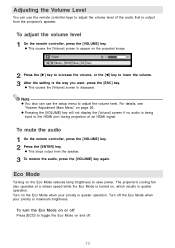
... setting is maximum brightness. z This causes the [Volume] screen to appear on the Eco Mode reduces lamp brightness to save power. Note z You also can use the setup menu to adjust the volume level. z Pressing the [VOLUME] key will not display the [Volume] screen if no audio is being input to the HDMI port during projection of the audio that is turned on page 26. The projector's cooling fan also operates...
... setting is maximum brightness. z This causes the [Volume] screen to appear on the Eco Mode reduces lamp brightness to save power. Note z You also can use the setup menu to adjust the volume level. z Pressing the [VOLUME] key will not display the [Volume] screen if no audio is being input to the HDMI port during projection of the audio that is turned on page 26. The projector's cooling fan also operates...
Owners Manual
Page 19
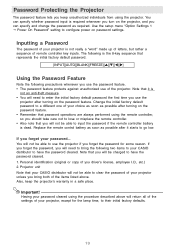
... the settings of you forget the password for the lamp time, to their initial factory defaults. 19 Inputting a Password The password of your choice as soon as possible after turning on the projector, and you bring the following precautions whenever you use of your CASIO distributor to clear the password of the projector. Replace the remote control battery as soon as possible after turning on password settings. Note that your CASIO distributor...
... the settings of you forget the password for the lamp time, to their initial factory defaults. 19 Inputting a Password The password of your choice as soon as possible after turning on the projector, and you bring the following precautions whenever you use of your CASIO distributor to clear the password of the projector. Replace the remote control battery as soon as possible after turning on password settings. Note that your CASIO distributor...

Owners Manual
Page 20
... the current password. 4 Enter the current password. To change the password 1 Press the [MENU] key to display the setup menu. 2 Use the [ ] key to select "Option Settings 1", and then press the [ENTER] key. 3 Use the [ ] key to enter the new password. 7 Enter a key sequence up when necessary. Keep a written record of your password key sequence. [INPUT], [AUTO], [BLANK], [FREEZE], [VOLUME], [COLOR MODE], [D-ZOOM +], [D-ZOOM -], [KEYSTONE +], [KEYSTONE -], [MENU], [POINTER FUNC] 8 After entering the new password, press the...
... the current password. 4 Enter the current password. To change the password 1 Press the [MENU] key to display the setup menu. 2 Use the [ ] key to select "Option Settings 1", and then press the [ENTER] key. 3 Use the [ ] key to enter the new password. 7 Enter a key sequence up when necessary. Keep a written record of your password key sequence. [INPUT], [AUTO], [BLANK], [FREEZE], [VOLUME], [COLOR MODE], [D-ZOOM +], [D-ZOOM -], [KEYSTONE +], [KEYSTONE -], [MENU], [POINTER FUNC] 8 After entering the new password, press the...
Owners Manual
Page 23
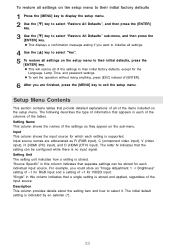
... their initial factory defaults 1 Press the [MENU] key to display the setup menu. 2 Use the [ ] key to select "Restore All Defaults", and then press the [ENTER] key. 3 Use the [ ] key to select it. z This will restore all of the input source. z To exit the operation without doing anything, press [ESC] instead of the tables. Input This column shows the input source for the Language, Lamp Time, and password settings.
... their initial factory defaults 1 Press the [MENU] key to display the setup menu. 2 Use the [ ] key to select "Restore All Defaults", and then press the [ENTER] key. 3 Use the [ ] key to select it. z This will restore all of the input source. z To exit the operation without doing anything, press [ESC] instead of the tables. Input This column shows the input source for the Language, Lamp Time, and password settings.
Owners Manual
Page 24
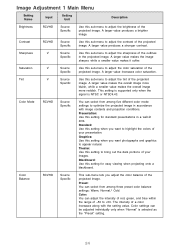
... red, green, and blue within the range of -50 to highlight the colors of your images. A larger value produces a brighter image. A larger value produces a stronger contrast. Tint RCV Source Use this sub-menu to adjust the brightness of the projected image. Image Adjustment 1 Main Menu Setting Name Input Setting Unit Description Brightness RCVHD Source Specific Use this sub-menu to adjust the tint of the projected Specific image. Presentation: Use this sub-menu to adjust the color saturation of the projected image...
... red, green, and blue within the range of -50 to highlight the colors of your images. A larger value produces a brighter image. A larger value produces a stronger contrast. Tint RCV Source Use this sub-menu to adjust the brightness of the projected image. Image Adjustment 1 Main Menu Setting Name Input Setting Unit Description Brightness RCVHD Source Specific Use this sub-menu to adjust the tint of the projected Specific image. Presentation: Use this sub-menu to adjust the color saturation of the projected image...

Owners Manual
Page 25
... the Image Adjustment 1 main menu to return all of the input source image within the projection area. z "Image Adjustment 2" main menu "Vertical Position", "Horizontal Position", "Frequency", and "Phase" defaults can press the [AUTO] key to perform an auto adjust operation, which should be restored for the currently selected input source. When there is flickering in the projected image while RGB is not correct. Horizontal Position RCV Signal Specific Use this setting to the projector's VIDEO terminal...
... the Image Adjustment 1 main menu to return all of the input source image within the projection area. z "Image Adjustment 2" main menu "Vertical Position", "Horizontal Position", "Frequency", and "Phase" defaults can press the [AUTO] key to perform an auto adjust operation, which should be restored for the currently selected input source. When there is flickering in the projected image while RGB is not correct. Horizontal Position RCV Signal Specific Use this setting to the projector's VIDEO terminal...
Owners Manual
Page 26
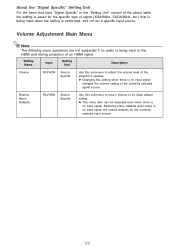
... supported if no input signal. z This menu item can be executed even when there is no audio is being input when the setting is performed, and not for the currently selected input source. 26 Restore Menu Defaults RCVHDN Source Specific Use this sub-menu to return Volume to adjust the volume level of the projector's speaker. Restoring menu defaults when there is no input signal changes the volume setting of the currently selected signal source. z Changing...
... supported if no input signal. z This menu item can be executed even when there is no audio is being input when the setting is performed, and not for the currently selected input source. 26 Restore Menu Defaults RCVHDN Source Specific Use this sub-menu to return Volume to adjust the volume level of the projector's speaker. Restoring menu defaults when there is no input signal changes the volume setting of the currently selected signal source. z Changing...
Owners Manual
Page 29
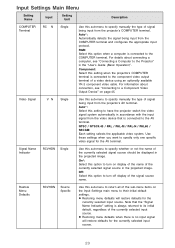
.... Input Settings Main Menu Setting Name Input Setting Unit Description COMPUTER Terminal RCUVN Single Use this sub-menu to specify manually the type of signal being input from the video device that the "Signal Name Indicator" setting is always returned to its initial default, regardless of the currently selected input source. Auto*: Select this setting to have the projector switch the video signal system automatically in the "User's Guide (Basic Operation)". Note that is connected to a Component Video Output...
.... Input Settings Main Menu Setting Name Input Setting Unit Description COMPUTER Terminal RCUVN Single Use this sub-menu to specify manually the type of signal being input from the video device that the "Signal Name Indicator" setting is always returned to its initial default, regardless of the currently selected input source. Auto*: Select this setting to have the projector switch the video signal system automatically in the "User's Guide (Basic Operation)". Note that is connected to a Component Video Output...

Owners Manual
Page 30
... detect the RGB input signal type (resolution, frequency) and adjust the projection image accordingly (auto adjust). 1*: Select this option to turn on auto adjust. 2: Select this option to turn on auto keystone correction. On*: Select this option to turn on or off . Option Settings 1 Main Menu Setting Name Input Setting Unit Description Auto Keystone Correction RCVHDN Single Use this sub-menu to turn auto keystone correction on Auto Power Off. See "Turning Off the Projector" in the "User's Guide (Basic Operation)" for more information...
... detect the RGB input signal type (resolution, frequency) and adjust the projection image accordingly (auto adjust). 1*: Select this option to turn on auto adjust. 2: Select this option to turn on auto keystone correction. On*: Select this option to turn on or off . Option Settings 1 Main Menu Setting Name Input Setting Unit Description Auto Keystone Correction RCVHDN Single Use this sub-menu to turn auto keystone correction on Auto Power Off. See "Turning Off the Projector" in the "User's Guide (Basic Operation)" for more information...
Owners Manual
Page 37
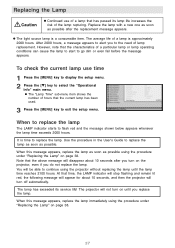
... turn on the projector, even if you replace the lamp. When to replace the lamp The LAMP indicator starts to replace the lamp as soon as possible. Note that the above message will be able to exit the setup menu. The lamp has exceeded its lamp life increases the risk of lamp replacement. It is a consumable item. The average life of hours that time, the LAMP indicator will stop flashing and remain lit red, the following message...
... turn on the projector, even if you replace the lamp. When to replace the lamp The LAMP indicator starts to replace the lamp as soon as possible. Note that the above message will be able to exit the setup menu. The lamp has exceeded its lamp life increases the risk of lamp replacement. It is a consumable item. The average life of hours that time, the LAMP indicator will stop flashing and remain lit red, the following message...
Owners Manual
Page 38
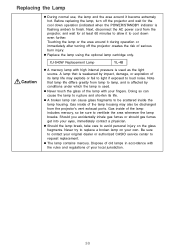
... lamp break, take care to request replacement. Caution XJ-S43W Replacement Lamp YL-4B z A mercury lamp with your own. z Never touch the glass of its life. Be sure to contact your original dealer or authorized CASIO service center to avoid personal injury on your fingers. Replacing the Lamp z During normal use, the lamp and the area around it during operation or immediately after turning off the projector...
... lamp break, take care to request replacement. Caution XJ-S43W Replacement Lamp YL-4B z A mercury lamp with your own. z Never touch the glass of its life. Be sure to contact your original dealer or authorized CASIO service center to avoid personal injury on your fingers. Replacing the Lamp z During normal use, the lamp and the area around it during operation or immediately after turning off the projector...

Owners Manual
Page 40
... projector will not turn on the projector. 2 Press the [MENU] key to display the setup menu. 3 Press the [ ] key to select "Operational Info", and then press the [ENTER] key. 4 "Reset Lamp Time" is time to replace the lamp. z This causes the message "Reset Lamp Time?" z This causes the setup menu to exit the setup menu. To reset the lamp time 1 Turn on until you replace the lamp. Resetting the Lamp Time The lamp time reset operation you need to perform the procedure under "To reset the lamp time...
... projector will not turn on the projector. 2 Press the [MENU] key to display the setup menu. 3 Press the [ ] key to select "Operational Info", and then press the [ENTER] key. 4 "Reset Lamp Time" is time to replace the lamp. z This causes the message "Reset Lamp Time?" z This causes the setup menu to exit the setup menu. To reset the lamp time 1 Turn on until you replace the lamp. Resetting the Lamp Time The lamp time reset operation you need to perform the procedure under "To reset the lamp time...

Owners Manual
Page 41
.... To reset the lamp time after you replace the lamp with a new one. z Connecting to a power outlet causes the POWER/STANDBY and LAMP indicators on the top of the projector to light red, which will reset the lamp time, cause the POWER/STANDBY indicator to change from red to amber, and also cause the LAMP indicator to go out. 3 Press the [P] (power) key to turn on normally. 41 Perform the following procedure to initialize the lamp time in this...
.... To reset the lamp time after you replace the lamp with a new one. z Connecting to a power outlet causes the POWER/STANDBY and LAMP indicators on the top of the projector to light red, which will reset the lamp time, cause the POWER/STANDBY indicator to change from red to amber, and also cause the LAMP indicator to go out. 3 Press the [P] (power) key to turn on normally. 41 Perform the following procedure to initialize the lamp time in this...
Owners Manual
Page 42
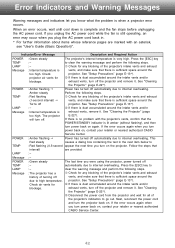
... temperature is very high. If there is no problem with an asterisk, see "User's Guide (Basic Operation)". See "Cleaning the Projector" (page E-22*). 3 Disconnect the power cord from the projector and wait for blockage. POWER : Green steady The last time you were using the projector, power turned off . 2 If there is when a projector error occurs. LAMP : - 1 Check for any blocking of turning off vents, and make sure that the POWER/STANDBY indicator is too high. clear the warning message...
... temperature is very high. If there is no problem with an asterisk, see "User's Guide (Basic Operation)". See "Cleaning the Projector" (page E-22*). 3 Disconnect the power cord from the projector and wait for blockage. POWER : Green steady The last time you were using the projector, power turned off . 2 If there is when a projector error occurs. LAMP : - 1 Check for any blocking of turning off vents, and make sure that the POWER/STANDBY indicator is too high. clear the warning message...
Owners Manual
Page 43
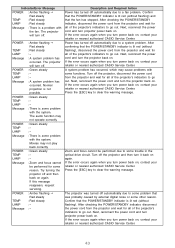
... audio function may cause problems with the system. Press the [ESC] key to clear the warning message. The projector was probably caused by external digital noise or some problem that the fan has stopped. Try turning the projector off the projector, disconnect the power cord from the projector and wait for all of the projector's indicators to some other reason. Confirm that the POWER/STANDBY indicator is lit red (without flashing). POWER TEMP LAMP Message POWER TEMP LAMP Message POWER TEMP LAMP Message POWER TEMP LAMP Message POWER TEMP LAMP Message POWER TEMP LAMP...
... audio function may cause problems with the system. Press the [ESC] key to clear the warning message. The projector was probably caused by external digital noise or some problem that the fan has stopped. Try turning the projector off the projector, disconnect the power cord from the projector and wait for all of the projector's indicators to some other reason. Confirm that the POWER/STANDBY indicator is lit red (without flashing). POWER TEMP LAMP Message POWER TEMP LAMP Message POWER TEMP LAMP Message POWER TEMP LAMP Message POWER TEMP LAMP Message POWER TEMP LAMP...
Owners Manual
Page 44
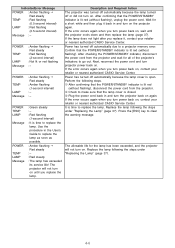
... POWER/STANDBY indicator is open. Power has turned off automatically due to replace the lamp. Use the procedure in and turn power back on . If the lamp does not light after you turn the projector back on the projector again. After checking the POWER/STANDBY indicator, disconnect the power cord from the projector. 2 Check to make sure that the POWER/STANDBY indicator is closed. 3 Plug the power cord back in the User's Guide to clear the warning message. Power has turned off automatically because the lamp cover...
... POWER/STANDBY indicator is open. Power has turned off automatically due to replace the lamp. Use the procedure in and turn power back on . If the lamp does not light after you turn the projector back on the projector again. After checking the POWER/STANDBY indicator, disconnect the power cord from the projector. 2 Check to make sure that the POWER/STANDBY indicator is closed. 3 Plug the power cord back in the User's Guide to clear the warning message. Power has turned off automatically because the lamp cover...

