Owners Manual
Page 2
... 5-4. Printing and Display test 19 7. SPECIFICATIONS 1 2. Power circuit ...14 5-3. CIRCUIT DIAGRAM 23 10. BLOCK DIAGRAM 4 4. DIAGNOSTIC OPERATIONS 17 6-1. Content of the Test ...17 6-2. Displaying the Key Code 17 6-3. IC DATA ...22 9. Displaying the Switch Condition 18 6-4. PARTS LIST 28 TE-M80 CONTENTS Page 1. Display circuit...
... 5-4. Printing and Display test 19 7. SPECIFICATIONS 1 2. Power circuit ...14 5-3. CIRCUIT DIAGRAM 23 10. BLOCK DIAGRAM 4 4. DIAGNOSTIC OPERATIONS 17 6-1. Content of the Test ...17 6-2. Displaying the Key Code 17 6-3. IC DATA ...22 9. Displaying the Switch Condition 18 6-4. PARTS LIST 28 TE-M80 CONTENTS Page 1. Display circuit...
Owners Manual
Page 5
.../Day/Year 1 Day/Month/Year 2 Monetary mode selections Add 0 (0. ) 0 C Add 1 (0.0 ) 1 Add 2 (0.00 ) 2 - 3 - To select the language You can program the cash register. To load the memory protection batteries 1. Press the following keys. 2999 HELP Select numbers from = /TEND lists B and C. Set the mode switch to Spanish. 1. Example: Change the language to OFF. 2. Initialization...
.../Day/Year 1 Day/Month/Year 2 Monetary mode selections Add 0 (0. ) 0 C Add 1 (0.0 ) 1 Add 2 (0.00 ) 2 - 3 - To select the language You can program the cash register. To load the memory protection batteries 1. Press the following keys. 2999 HELP Select numbers from = /TEND lists B and C. Set the mode switch to Spanish. 1. Example: Change the language to OFF. 2. Initialization...

Owners Manual
Page 10
Removing one screw and then the key unit. Screw s Removing the printer unit 14. Remove the LCD board. Hooks Hooks s Removing the key unit 13. Screws - 8 - Remove the three screws and then the printer unit. 12.
Removing one screw and then the key unit. Screw s Removing the printer unit 14. Remove the LCD board. Hooks Hooks s Removing the key unit 13. Screws - 8 - Remove the three screws and then the printer unit. 12.
Owners Manual
Page 19
In this case, remove the battery and perform the above operation ECR prints the following operation. 1 Turn the mode key to PGM. 2 Input "99990000" and #2 (SUB TOTAL). DIAGNOSTIC OPERATION To start the diagnostic program ECR enters the diagnostic mode by the following and issues a receipt. * Note that the test mode will not boot if once a receipt has been issued in the REG/RF/X/Z mode. Upon the above operation again Header is printed> 6.
In this case, remove the battery and perform the above operation ECR prints the following operation. 1 Turn the mode key to PGM. 2 Input "99990000" and #2 (SUB TOTAL). DIAGNOSTIC OPERATION To start the diagnostic program ECR enters the diagnostic mode by the following and issues a receipt. * Note that the test mode will not boot if once a receipt has been issued in the REG/RF/X/Z mode. Upon the above operation again Header is printed> 6.
Owners Manual
Page 20
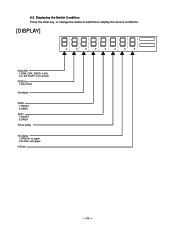
6-3. Displaying the Switch Condition Press the clear key, or change the status of switches to display the current conditions. [DISPLAY] Mode SW 1:PGM, 2:RF, 3:REG, 4:CAL, 5:X, 6:Z, 8:OFF, 0:no contact FEED key 1:ON, 0:OFF No display PAD2 1:SHORT 0:OPEN PAD1 1:SHORT 0:OPEN Printer status No display 1:OPEN or no paper 0:CLOSE, with paper 0:Fixed - 18 -
6-3. Displaying the Switch Condition Press the clear key, or change the status of switches to display the current conditions. [DISPLAY] Mode SW 1:PGM, 2:RF, 3:REG, 4:CAL, 5:X, 6:Z, 8:OFF, 0:no contact FEED key 1:ON, 0:OFF No display PAD2 1:SHORT 0:OPEN PAD1 1:SHORT 0:OPEN Printer status No display 1:OPEN or no paper 0:CLOSE, with paper 0:Fixed - 18 -
Owners Manual
Page 21
...; Receipt issuing (only in the receipt mode) • All lit (display) : 88888888= ↑ (transaction) • Waits for key input (the test proceeds by the input of any key other than the clear key, ten keys and FEED key.) • Time and date setting Set the time and date at a regular interval Operation : X 3 #2 SUB TOTAL X:0 The...
...; Receipt issuing (only in the receipt mode) • All lit (display) : 88888888= ↑ (transaction) • Waits for key input (the test proceeds by the input of any key other than the clear key, ten keys and FEED key.) • Time and date setting Set the time and date at a regular interval Operation : X 3 #2 SUB TOTAL X:0 The...
Owners Manual
Page 22
The battery voltage is pressed or a power down occurs. Time display test Operation : 9 #2 SUB TOTAL Time is displayed until the clear key is displayed until a power down occurs. X:0 30 msec :1 35 msec :2 40 msec :3 45 msec :4 50 msec :5 55 msec :6 60 msec :7 65 msec :8 70 msec :9 75 ...
The battery voltage is pressed or a power down occurs. Time display test Operation : 9 #2 SUB TOTAL Time is displayed until the clear key is displayed until a power down occurs. X:0 30 msec :1 35 msec :2 40 msec :3 45 msec :4 50 msec :5 55 msec :6 60 msec :7 65 msec :8 70 msec :9 75 ...
Owners Manual
Page 23
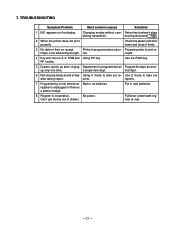
.... Use Z mode to where it firmly. 3 No date or time on the display. register is unplugged or there is inoperative. Use the PGM key. 5 Drawer opens up only one time. Put in new batteries. 8 Register is a power outage. No power. CA/AMT /TEND 2 When the printer does not... print properly. as Program the dept. Pull lever underneath register at end of drawer. 7. ceipts. 4 Key won't turn to print re- mal dept. 6 Not clearing totals at rear. - 21 - Changing modes without com- Check the platen arm/shut ...
.... Use Z mode to where it firmly. 3 No date or time on the display. register is unplugged or there is inoperative. Use the PGM key. 5 Drawer opens up only one time. Put in new batteries. 8 Register is a power outage. No power. CA/AMT /TEND 2 When the printer does not... print properly. as Program the dept. Pull lever underneath register at end of drawer. 7. ceipts. 4 Key won't turn to print re- mal dept. 6 Not clearing totals at rear. - 21 - Changing modes without com- Check the platen arm/shut ...
Owners Manual
Page 34
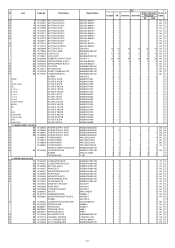
... 62453530 23 10097045 N 24 10097046 N 25 10127016 N 26 10127017 N 27 10127018 N 28 10127019 FEED C -/ERR.CORR CH +/4 9 14 5 10 15 +/1 6 11 -/2 7 12 */3 8 13 CA/AMT TEND MR/RC PD % #/NS DEPT/SHIFT X/DATE TIME CHK SUB TOTAL 4. UPPER CASE BLOCK N 31 N 32 N 33 N 34 N 35 N 36 N 37 N 38 N 39... E270 COVER/PRINTER E270 BUTTON /EJECT ARM-EJECT MOUNT/PRINTER E270 SHAFT/E270 MOUNT/PCB E270 SPRING/PRESS E270 PLATE/SW E270 MODE KEY SW ASSY WIRE ASSY CONNECTOR ASSY MOTOR RUBBER/WINDER MOUNT/WIND MOTOR E272 SCREW CONNECTOR ASSY/MOTOR SPRING/A-G55 SPRING/G67 SPRING/B-1G513 SPRING...
... 62453530 23 10097045 N 24 10097046 N 25 10127016 N 26 10127017 N 27 10127018 N 28 10127019 FEED C -/ERR.CORR CH +/4 9 14 5 10 15 +/1 6 11 -/2 7 12 */3 8 13 CA/AMT TEND MR/RC PD % #/NS DEPT/SHIFT X/DATE TIME CHK SUB TOTAL 4. UPPER CASE BLOCK N 31 N 32 N 33 N 34 N 35 N 36 N 37 N 38 N 39... E270 COVER/PRINTER E270 BUTTON /EJECT ARM-EJECT MOUNT/PRINTER E270 SHAFT/E270 MOUNT/PCB E270 SPRING/PRESS E270 PLATE/SW E270 MODE KEY SW ASSY WIRE ASSY CONNECTOR ASSY MOTOR RUBBER/WINDER MOUNT/WIND MOTOR E272 SCREW CONNECTOR ASSY/MOTOR SPRING/A-G55 SPRING/G67 SPRING/B-1G513 SPRING...
Owners Manual
Page 35
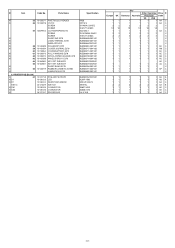
.../THERMAL E270 WIRE ASSY/FG ROLLER/DP E270 COVER/JOURNAL E270 COVER/BATTERY E272 PULLY/WINDING E270 SPOOL/PAPER HOLDER E270 PANEL/DISPLAY E270 KEY SET SUB ASSY KEY SET SUB ASSY SHEET/BLIND E270 RUBBER/COSMETIC E270B LABEL/PUSH E270 PCB ASSY/E270-PR LED RESISTOR/CARBON SWITCH CONNECTOR CONNECTOR SPACER...
.../THERMAL E270 WIRE ASSY/FG ROLLER/DP E270 COVER/JOURNAL E270 COVER/BATTERY E272 PULLY/WINDING E270 SPOOL/PAPER HOLDER E270 PANEL/DISPLAY E270 KEY SET SUB ASSY KEY SET SUB ASSY SHEET/BLIND E270 RUBBER/COSMETIC E270B LABEL/PUSH E270 PCB ASSY/E270-PR LED RESISTOR/CARBON SWITCH CONNECTOR CONNECTOR SPACER...
Owners Manual
Page 38
... 10126973 10126974 10142431 10142432 10104981 10126975 10131710 10136123 10136124 34121029 10136125 10136126 36131197 MOUNT/PCB E270 SPRING/PRESS E270 PLATE/SW E270 MODE KEY SW ASSY WIRE ASSY CONNECTOR ASSY MOTOR RUBBER/WINDER MOUNT/WIND MOTOR E272 SCREW CONNECTOR ASSY/MOTOR SPRING/A-G55 SPRING/G67 SPRING/B-1G513 .../FG ROLLER/DP E270 COVER/JOURNAL E270 COVER/BATTERY E272 PULLY/WINDING E270 SPOOL/PAPER HOLDER E270 PANEL/DISPLAY E270 PANEL/DISPLAY E270 KEY SET SUB ASSY SHEET/BLIND E270 RUBBER/COSMETIC E270B LABEL/PUSH E270 PCB ASSY/E270-PR LED RESISTOR/CARBON SWITCH CONNECTOR CONNECTOR SPACER/...
... 10126973 10126974 10142431 10142432 10104981 10126975 10131710 10136123 10136124 34121029 10136125 10136126 36131197 MOUNT/PCB E270 SPRING/PRESS E270 PLATE/SW E270 MODE KEY SW ASSY WIRE ASSY CONNECTOR ASSY MOTOR RUBBER/WINDER MOUNT/WIND MOTOR E272 SCREW CONNECTOR ASSY/MOTOR SPRING/A-G55 SPRING/G67 SPRING/B-1G513 .../FG ROLLER/DP E270 COVER/JOURNAL E270 COVER/BATTERY E272 PULLY/WINDING E270 SPOOL/PAPER HOLDER E270 PANEL/DISPLAY E270 PANEL/DISPLAY E270 KEY SET SUB ASSY SHEET/BLIND E270 RUBBER/COSMETIC E270B LABEL/PUSH E270 PCB ASSY/E270-PR LED RESISTOR/CARBON SWITCH CONNECTOR CONNECTOR SPACER/...
User Manual
Page 5
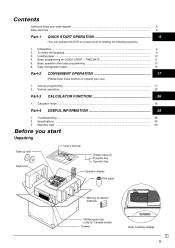
...To select the language ...9 3. Warranty card ...39 Before you start Unpacking Take-up reel Keyboard User's manual Drawer keys (2) Program key Operator key Operator display Roll paper Memory protection batteries 12345&78 Multipurpose tray (only for QUICK START - Initialization ...9 2. Loading paper......38 2. Basic programming for Canada model) Drawer Rear customer display E 5 Various programming ...17 2. Contents Getting to expand your cash register ...6 Daily Job Flow ...8 Part-1 QUICK START OPERATION 9 (You can operate this ECR on a basic level by reading the ...
...To select the language ...9 3. Warranty card ...39 Before you start Unpacking Take-up reel Keyboard User's manual Drawer keys (2) Program key Operator key Operator display Roll paper Memory protection batteries 12345&78 Multipurpose tray (only for QUICK START - Initialization ...9 2. Loading paper......38 2. Basic programming for Canada model) Drawer Rear customer display E 5 Various programming ...17 2. Contents Getting to expand your cash register ...6 Daily Job Flow ...8 Part-1 QUICK START OPERATION 9 (You can operate this ECR on a basic level by reading the ...
User Manual
Page 6
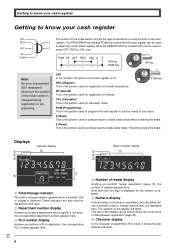
...cash register to suit the needs of your cash register CAL REG OFF RF PGM The position of the mode switch controls the type of repeats appears here. Z (Reset) This is the position used to produce reports of normal transactions. These indicators are displayed here. The capacity of refunds. A DEPT...(Read) This is obtained. Getting to know your cash register Getting to know your store. OFF In this position, the power of daily sales totals without clearing the totals. PGM RF OFF REG CAL X Z q q q q OP Key PGM Key OP key OP PGM Note: An error is generated (E01...
...cash register to suit the needs of your cash register CAL REG OFF RF PGM The position of the mode switch controls the type of repeats appears here. Z (Reset) This is the position used to produce reports of normal transactions. These indicators are displayed here. The capacity of refunds. A DEPT...(Read) This is obtained. Getting to know your cash register Getting to know your store. OFF In this position, the power of daily sales totals without clearing the totals. PGM RF OFF REG CAL X Z q q q q OP Key PGM Key OP key OP PGM Note: An error is generated (E01...
User Manual
Page 7
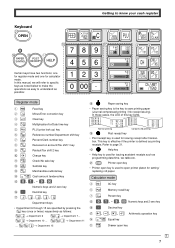
...DEPT SHIFT CLK# 89 RC PD T/S1 T/S2 0A CH CHK NS BC SUB MD TOTAL ST D CA AMT = TEND Register mode 1l Feed key 2g Minus/Error correction key 3y Clear key 4h Multiplication/for/Date time key 5i PLU (price look up) key 6j Reference number/Department shift key 7: Percent/Clerk number key... 7... PLU CORR G 14 15 9 10 ÷4 5 456 13 8 × 3 Certain keys have two functions; In this key lights. jjG → Department 11 ... Getting to know your cash register Keyboard K OPEN H I | Post receipt key • Post receipt key is used to open printer ...
...DEPT SHIFT CLK# 89 RC PD T/S1 T/S2 0A CH CHK NS BC SUB MD TOTAL ST D CA AMT = TEND Register mode 1l Feed key 2g Minus/Error correction key 3y Clear key 4h Multiplication/for/Date time key 5i PLU (price look up) key 6j Reference number/Department shift key 7: Percent/Clerk number key... 7... PLU CORR G 14 15 9 10 ÷4 5 456 13 8 × 3 Certain keys have two functions; In this key lights. jjG → Department 11 ... Getting to know your cash register Keyboard K OPEN H I | Post receipt key • Post receipt key is used to open printer ...
User Manual
Page 9
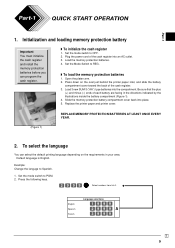
... 1) REPLACE MEMORY PROTECTION BATTERIES AT LEAST ONCE EVERY YEAR. 2. Press the following keys. Open the platen arm. 2. Load 3 new SUM-3 ("AA") type batteries into an AC outlet. 3. To select the language You can program the cash register. ◗ To initialize the cash register 1. Set the Mode Switch to Spanish. 1. Slide the memory protection battery compartment...
... 1) REPLACE MEMORY PROTECTION BATTERIES AT LEAST ONCE EVERY YEAR. 2. Press the following keys. Open the platen arm. 2. Load 3 new SUM-3 ("AA") type batteries into an AC outlet. 3. To select the language You can program the cash register. ◗ To initialize the cash register 1. Set the Mode Switch to Spanish. 1. Slide the memory protection battery compartment...
User Manual
Page 10
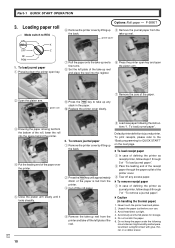
... temperature/direct sunlight/contact with glue, thinner or a rubber eraser. Never touch the printer head and platen. 2. E 10 platen arm 9 Press the l key to take off any slack in handling the thermal paper) 1. To load journal paper". take -up 5 Remove the journal paper from the bottom of the... roll, lower the roll into the register. 6 Press the printer open key and open key. 7 Roll the paper onto the take-up reel a few turns. 8 Set the left plate of the paper is journal printer. ...
... temperature/direct sunlight/contact with glue, thinner or a rubber eraser. Never touch the printer head and platen. 2. E 10 platen arm 9 Press the l key to take off any slack in handling the thermal paper) 1. To load journal paper". take -up 5 Remove the journal paper from the bottom of the... roll, lower the roll into the register. 6 Press the printer open key and open key. 7 Roll the paper onto the take-up reel a few turns. 8 Set the left plate of the paper is journal printer. ...

User Manual
Page 11
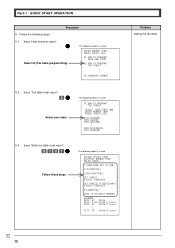
Basic programming for journal. Insert the PROGRAM key (marked "PGM") and rotate to set . (2003 ¡ 03) 4. Example: 13:18 PM = 1318 Zk ZCZh Year Month y Date P appears in mode display. To define ... display. Enter "0" for QUICK START Mode switch CAL REG X OFF Z RF PPGGMM Procedure 1. Press the following keys to PGM position. 2. Enter "1" for year set the current time. Part-1 Part-1 QUICK START OPERATION 4. Press the following keys to end the date setting) Purpose Programming Setting the current time Setting the current date •...
Basic programming for journal. Insert the PROGRAM key (marked "PGM") and rotate to set . (2003 ¡ 03) 4. Example: 13:18 PM = 1318 Zk ZCZh Year Month y Date P appears in mode display. To define ... display. Enter "0" for QUICK START Mode switch CAL REG X OFF Z RF PPGGMM Procedure 1. Press the following keys to PGM position. 2. Enter "1" for year set the current time. Part-1 Part-1 QUICK START OPERATION 4. Press the following keys to end the date setting) Purpose Programming Setting the current time Setting the current date •...
User Manual
Page 12
... TAX TABLE? •SELECT YOUR STATE AND ENTER NUMBER THEN PRESS KEY. 0101:ALABAMA 0201:ALASKA 0301:ARIZONA : : 5001:WISCONSIN 5101:WYOMING 5-3. X{ Select your state. The following report is issued. E 12 SET TABLE2(IF NECESSARY) 5)XXXX KEY. 6) XXXX IS DISTRICT NUMBER ALABAMA 0101: 4% State 0102: ...4.5% State & Local 0103: 5% State & Local : : 0111: 9% State & Local Purpose Setting the tax table. ENTER NUMBER THEN PRESS KEY. 01.HOW TO PROGRAM DATE AND TIME? 02.HOW TO PROGRAM TAX TABLE? : : 09.LANGUAGE CHANGE 5-2. Follow the following report is issued. The following...
... TAX TABLE? •SELECT YOUR STATE AND ENTER NUMBER THEN PRESS KEY. 0101:ALABAMA 0201:ALASKA 0301:ARIZONA : : 5001:WISCONSIN 5101:WYOMING 5-3. X{ Select your state. The following report is issued. E 12 SET TABLE2(IF NECESSARY) 5)XXXX KEY. 6) XXXX IS DISTRICT NUMBER ALABAMA 0101: 4% State 0102: ...4.5% State & Local 0103: 5% State & Local : : 0111: 9% State & Local Purpose Setting the tax table. ENTER NUMBER THEN PRESS KEY. 01.HOW TO PROGRAM DATE AND TIME? 02.HOW TO PROGRAM TAX TABLE? : : 09.LANGUAGE CHANGE 5-2. Follow the following report is issued. The following...
User Manual
Page 13
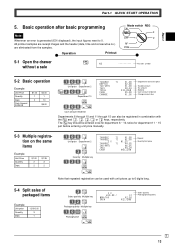
... operation Example Unit Price Quantity Dept. Subtotal $5.00 -- The j key should be used with the j and G, S, D, F or [ keys, respectively. Cash Amount tendered $1.00 1 2 $2.00 1 10 $5.00 Z?? Change amount due Cash amount tendered Departments 6 through 10 and 11 through 15 can be entered once for ... $6.29 Note that repeated registration can also be registered in combination with unit prices up to 0. Taxable amount $0.04 -- Cash amount tendered $1.96 -- Repeat @1.35 -- p TAXABLE DEPT10 TAX-AMT1 TAX1 TOTAL CASH CHANGE T1 $1.00 -- Package price/quantity E ...
... operation Example Unit Price Quantity Dept. Subtotal $5.00 -- The j key should be used with the j and G, S, D, F or [ keys, respectively. Cash Amount tendered $1.00 1 2 $2.00 1 10 $5.00 Z?? Change amount due Cash amount tendered Departments 6 through 10 and 11 through 15 can be entered once for ... $6.29 Note that repeated registration can also be registered in combination with unit prices up to 0. Taxable amount $0.04 -- Cash amount tendered $1.96 -- Repeat @1.35 -- p TAXABLE DEPT10 TAX-AMT1 TAX1 TOTAL CASH CHANGE T1 $1.00 -- Package price/quantity E ...

User Manual
Page 14
... cannot perform the amount tendered operation using the u key. 5-6 Split cash/ charge sales Example Unit Price Quantity Dept. $2.00 1 1 $3.00 1 2 $4.00 1 1 Cash Amount tendered $5.00 X?? Charge sales 5-7 Corrections 5-7-1 Before you press a department key), or after it has already been registered into the memory (by mistake instead of 100. y key clears the last item entered. G k B?? Z?? Part-1 QUICK START...
... cannot perform the amount tendered operation using the u key. 5-6 Split cash/ charge sales Example Unit Price Quantity Dept. $2.00 1 1 $3.00 1 2 $4.00 1 1 Cash Amount tendered $5.00 X?? Charge sales 5-7 Corrections 5-7-1 Before you press a department key), or after it has already been registered into the memory (by mistake instead of 100. y key clears the last item entered. G k B?? Z?? Part-1 QUICK START...


