
Owners Manual
Page 2
...Icon examples To bring attention to repair the register yourself is indicated. The symbol indicates a restriction. Handling the register Should the register malfunction, start to be indicated. Do not place containers of this product. Contact CASIO service representative. Continued use creates the danger... use creates the danger of shorting, fire and electric shock. • Contact CASIO service representative. Indicates that injury or damage may result if used . In this guide, keep all informations for attracting attention (including warning). Please keep it , immediately...
...Icon examples To bring attention to repair the register yourself is indicated. The symbol indicates a restriction. Handling the register Should the register malfunction, start to be indicated. Do not place containers of this product. Contact CASIO service representative. Continued use creates the danger... use creates the danger of shorting, fire and electric shock. • Contact CASIO service representative. Indicates that injury or damage may result if used . In this guide, keep all informations for attracting attention (including warning). Please keep it , immediately...
Owners Manual
Page 4
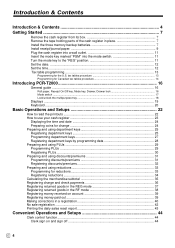
...cash register in a registration 40 No sale registration ...42 Printing the daily sales reset report 43 Convenient Operations and Setups 44 Clerk control function ...44 Clerk sign on and sign off 44 E4 tax tables procedure 13 Programming for Canadian tax tables procedure 14 Introducing PCR-T2000 16 General guide... the mode key to use your cash register 23 Displaying the time and date 24 Preparing coins for change 24 Preparing and using department keys 25 Registering department keys 25 Programming department keys 27 Registering department keys by programming data 28 Preparing and...
...cash register in a registration 40 No sale registration ...42 Printing the daily sales reset report 43 Convenient Operations and Setups 44 Clerk control function ...44 Clerk sign on and sign off 44 E4 tax tables procedure 13 Programming for Canadian tax tables procedure 14 Introducing PCR-T2000 16 General guide... the mode key to use your cash register 23 Displaying the time and date 24 Preparing coins for change 24 Preparing and using department keys 25 Registering department keys 25 Programming department keys 27 Registering department keys by programming data 28 Preparing and...
Owners Manual
Page 10
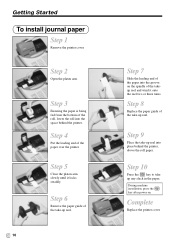
... leading end of the roll, lower the roll into the groove on . Complete Replace the printer cover. Step 6 Remove the paper guide of the take -up reel. Step 8 Replace the paper guide of the take -up reel. Getting Started To install journal paper Step 1 Remove the printer cover. During machine installation, press...
... leading end of the roll, lower the roll into the groove on . Complete Replace the printer cover. Step 6 Remove the paper guide of the take -up reel. Step 8 Replace the paper guide of the take -up reel. Getting Started To install journal paper Step 1 Remove the printer cover. During machine installation, press...
Owners Manual
Page 16
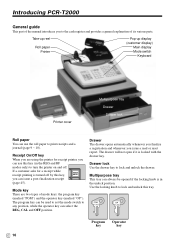
... Operator key key Drawer lock Use the drawer key to turn the printer on and off by this tray. Introducing PCR-T2000 General guide This part of the manual introduces you to the cash register and provides a general explanation of mode keys: the program key (marked "PGM") and the operator key (marked "OP"). display drawer...
... Operator key key Drawer lock Use the drawer key to turn the printer on and off by this tray. Introducing PCR-T2000 General guide This part of the manual introduces you to the cash register and provides a general explanation of mode keys: the program key (marked "PGM") and the operator key (marked "OP"). display drawer...
Owners Manual
Page 84
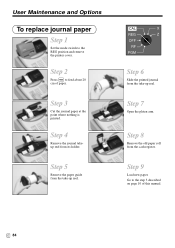
Step 4 Remove the journal takeup reel from the take -up reel. Step 7 Open the platen arm. Step 5 Remove the paper guide from its holder. Step 8 Remove the old paper roll from the take -up reel. Step 2 Press f to the step 3 described on page 10 of paper. .... Step 3 Cut the journal paper at the point where nothing is printed. E 84 CAL X REG Z OFF RF PGM Step 6 Slide the printed journal from the cash register. Step 9 Load new paper. User Maintenance and Options To replace journal paper Step 1 Set the mode switch to the REG position and remove the printer...
Step 4 Remove the journal takeup reel from the take -up reel. Step 7 Open the platen arm. Step 5 Remove the paper guide from its holder. Step 8 Remove the old paper roll from the take -up reel. Step 2 Press f to the step 3 described on page 10 of paper. .... Step 3 Cut the journal paper at the point where nothing is printed. E 84 CAL X REG Z OFF RF PGM Step 6 Slide the printed journal from the cash register. Step 9 Load new paper. User Maintenance and Options To replace journal paper Step 1 Set the mode switch to the REG position and remove the printer...
