
Owners Manual
Page 2
...register malfunction, start to emit smoke or a strange odor, or otherwise behave abnormally, immediately shut down the power and unplug the AC plug from the power outlet. Continued use creates the danger of shorting, fire and electric shock. • Contact CASIO service representative. Contact CASIO... observe the warnings and cautions indicated on the product. In this triangle the actual type of precautions to repair the register yourself is indicated. The symbol indicates a prohibited action. E2 After reading this manual thoroughly and operate as instructed. Icon...
...register malfunction, start to emit smoke or a strange odor, or otherwise behave abnormally, immediately shut down the power and unplug the AC plug from the power outlet. Continued use creates the danger of shorting, fire and electric shock. • Contact CASIO service representative. Contact CASIO... observe the warnings and cautions indicated on the product. In this triangle the actual type of precautions to repair the register yourself is indicated. The symbol indicates a prohibited action. E2 After reading this manual thoroughly and operate as instructed. Icon...
Owners Manual
Page 3
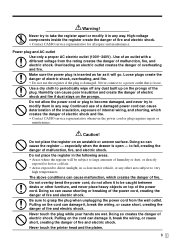
...break the wiring, or cause short, creating the danger of electric shock and fire if dust stays on top of electric shock. Continued use the register if the plug is open - The above conditions can cause shorting or breaking of the power cord, creating the danger of overheating and fire. Doing...from the wall outlet. Do not allow it , break the wiring, or cause short, creating the danger of the plug. High-voltage components inside the register create the danger of fire and electric shock. • Contact CASIO service representative for all repair and maintenance. Caution!
...break the wiring, or cause short, creating the danger of electric shock and fire if dust stays on top of electric shock. Continued use the register if the plug is open - The above conditions can cause shorting or breaking of the power cord, creating the danger of overheating and fire. Doing...from the wall outlet. Do not allow it , break the wiring, or cause short, creating the danger of the plug. High-voltage components inside the register create the danger of fire and electric shock. • Contact CASIO service representative for all repair and maintenance. Caution!
Owners Manual
Page 4
tax tables procedure 13 Programming for Canadian tax tables procedure 14 Introducing PCR-T2000 16 General guide ...16 Roll paper, Receipt On/Off key, Mode key, Drawer, Drawer lock 16 Mode switch ...17 Lock/unlock the multipurpose tray ... marked "PGM" into the mode switch 11 Turn the mode key to use your cash register 23 Displaying the time and date 24 Preparing coins for change 24 Preparing and using department keys 25 Registering department keys 25 Programming department keys 27 Registering department keys by programming data 28 Preparing and using PLUs 29 Programming PLUs ...29...
tax tables procedure 13 Programming for Canadian tax tables procedure 14 Introducing PCR-T2000 16 General guide ...16 Roll paper, Receipt On/Off key, Mode key, Drawer, Drawer lock 16 Mode switch ...17 Lock/unlock the multipurpose tray ... marked "PGM" into the mode switch 11 Turn the mode key to use your cash register 23 Displaying the time and date 24 Preparing coins for change 24 Preparing and using department keys 25 Registering department keys 25 Programming department keys 27 Registering department keys by programming data 28 Preparing and using PLUs 29 Programming PLUs ...29...
Owners Manual
Page 5
...54 Programming receipt message/logo stamp control function 54 Entering characters ...55 Using character keyboard 55 Entering characters by code 56 Department key feature programming 57 Batch feature programming 57 Individual feature programming 58 PLU feature programming 59 Batch feature programming 59 Individual ... Calculator functions ...70 About the daylight saving time 71 Printing read/reset reports 72 Reading the cash register's program 78 Troubleshooting 81 When an error occurs ...81 When the register does not operate at all 82 In case of power failure ...83 When the L sign ...
...54 Programming receipt message/logo stamp control function 54 Entering characters ...55 Using character keyboard 55 Entering characters by code 56 Department key feature programming 57 Batch feature programming 57 Individual feature programming 58 PLU feature programming 59 Batch feature programming 59 Individual ... Calculator functions ...70 About the daylight saving time 71 Printing read/reset reports 72 Reading the cash register's program 78 Troubleshooting 81 When an error occurs ...81 When the register does not operate at all 82 In case of power failure ...83 When the L sign ...
Owners Manual
Page 6
...pursuant to Part 15 of a CASIO cash register is simple enough to cause harmful interference in accordance with the limits for reference. Congratulations upon your CASIO dealer if you need to know is likely to be used in which is designed to the CASIO PCR-T2000! This equipment generates, uses,...could void the user's authority to correct the interference at his own expense. E6 Consult your selection of a CASIO Electronic Cash Register, which case the user will be easily accessible. WARNING: Changes or modifications not expressly approved by the party responsible for ...
...pursuant to Part 15 of a CASIO cash register is simple enough to cause harmful interference in accordance with the limits for reference. Congratulations upon your CASIO dealer if you need to know is likely to be used in which is designed to the CASIO PCR-T2000! This equipment generates, uses,...could void the user's authority to correct the interference at his own expense. E6 Consult your selection of a CASIO Electronic Cash Register, which case the user will be easily accessible. WARNING: Changes or modifications not expressly approved by the party responsible for ...

Owners Manual
Page 7
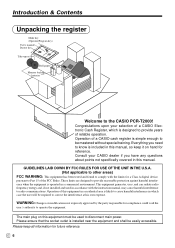
... the basic set up . User'sManual 1. printer cover battery compartment cover platen arm 7E You should look for more details. Remove the cash register from its box. Also remove the small plastic bag taped to operate. Slide the cover and pull it ready to the printer cover. .... Remove the printer cover and open the platen arm. 2. Make sure that all of the cash register in place. Getting Started 2. Getting Started This section outlines how to unpack the cash register and get it up procedure, along with page references where you should read this part of the...
... the basic set up . User'sManual 1. printer cover battery compartment cover platen arm 7E You should look for more details. Remove the cash register from its box. Also remove the small plastic bag taped to operate. Slide the cover and pull it ready to the printer cover. .... Remove the printer cover and open the platen arm. 2. Make sure that all of the cash register in place. Getting Started 2. Getting Started This section outlines how to unpack the cash register and get it up procedure, along with page references where you should read this part of the...
Owners Manual
Page 8
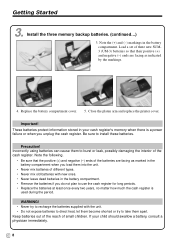
... batteries of the batteries are facing as marked in the battery compartment. • Remove the batteries if you unplug the cash register. If your cash register's memory when there is used during the period. Install the three memory backup batteries. (continued...) 3. Note the (+) and...physician immediately. Getting Started 3. Close the platen arm and replace the printer cover. Keep batteries out of the reach of the cash register. These batteries protect information stored in the battery compartment. WARNING! • Never try to recharge the batteries supplied with new ...
... batteries of the batteries are facing as marked in the battery compartment. • Remove the batteries if you unplug the cash register. If your cash register's memory when there is used during the period. Install the three memory backup batteries. (continued...) 3. Note the (+) and...physician immediately. Getting Started 3. Close the platen arm and replace the printer cover. Keep batteries out of the reach of the cash register. These batteries protect information stored in the battery compartment. WARNING! • Never try to recharge the batteries supplied with new ...

Owners Manual
Page 11
Turn the mode key to the following. OP C-A02 PGM C-A32 CAL REG OFF RF PGM 7. Getting Started 5. The display should change to the "REG" position. CAL X REG Z OFF RF PGM 11 E Be sure to check the sticker (rating plate) on the side of the cash register to make sure that its voltage matches that of the power supply in your area. 6. Plug the cash register into the mode switch. Insert the mode key marked "PGM" into a wall outlet.
Turn the mode key to the following. OP C-A02 PGM C-A32 CAL REG OFF RF PGM 7. Getting Started 5. The display should change to the "REG" position. CAL X REG Z OFF RF PGM 11 E Be sure to check the sticker (rating plate) on the side of the cash register to make sure that its voltage matches that of the power supply in your area. 6. Plug the cash register into the mode switch. Insert the mode key marked "PGM" into a wall outlet.

Owners Manual
Page 13
... tax table is printed on the guidance receipt. There are to be able to automatically register state sales tax, you can program for automatic calculation of three/four separate sales taxes. For this cash register to individually specify which departments (page 27) and PLUs (page 29) are three tax tables (U. Programming for your state...
... tax table is printed on the guidance receipt. There are to be able to automatically register state sales tax, you can program for automatic calculation of three/four separate sales taxes. For this cash register to individually specify which departments (page 27) and PLUs (page 29) are three tax tables (U. Programming for your state...
Owners Manual
Page 16
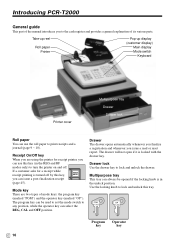
... Use the drawer key to lock and unlock the drawer. PGM C-A32 OP C-A02 E 16 Program Operator key key Introducing PCR-T2000 General guide This part of the manual introduces you to the cash register and provides a general explanation of mode keys: the program key (marked "PGM") and the operator key (marked "OP"). display...
... Use the drawer key to lock and unlock the drawer. PGM C-A32 OP C-A02 E 16 Program Operator key key Introducing PCR-T2000 General guide This part of the manual introduces you to the cash register and provides a general explanation of mode keys: the program key (marked "PGM") and the operator key (marked "OP"). display...

Owners Manual
Page 17
Use this mode for cash register programming. Use this mode to use. X Z 17 E Introducing PCR-T2000 Use this mode for calculator. Mode switch Use the mode keys to change the position of the mode switch and select the mode you want to register refund transaction. Use this mode for normal registration. Cash register standing by. CAL REG OFF...
Use this mode for cash register programming. Use this mode to use. X Z 17 E Introducing PCR-T2000 Use this mode for calculator. Mode switch Use the mode keys to change the position of the mode switch and select the mode you want to register refund transaction. Use this mode for normal registration. Cash register standing by. CAL REG OFF...

Owners Manual
Page 19
...the alphanumeric display.) 2 Item/Key descriptor When you perform a repeat registration (page 26, 30), the number of repeats Anytime you register an item or key, the item/key descriptor appears here. Note that a "5" could mean 5, 15 or even 25 repeats. ... that only one digit is lit on this digit. (REG/RF mode, during standing-by department/PLU) Pop-up (customer) display (numeric display) RPT RECEIPT ON 5 AMOUNT !50 2 1 Repeat registration alphanumeric display !50 TOTAL CHANGE 1 Introducing PCR-T2000 3 RPT RECEIPT ON 3 Totalize operation AMOUNT "50 2 1 3 3 "50 TOTAL CHANGE ...
...the alphanumeric display.) 2 Item/Key descriptor When you perform a repeat registration (page 26, 30), the number of repeats Anytime you register an item or key, the item/key descriptor appears here. Note that a "5" could mean 5, 15 or even 25 repeats. ... that only one digit is lit on this digit. (REG/RF mode, during standing-by department/PLU) Pop-up (customer) display (numeric display) RPT RECEIPT ON 5 AMOUNT !50 2 1 Repeat registration alphanumeric display !50 TOTAL CHANGE 1 Introducing PCR-T2000 3 RPT RECEIPT ON 3 Totalize operation AMOUNT "50 2 1 3 3 "50 TOTAL CHANGE ...
Owners Manual
Page 20
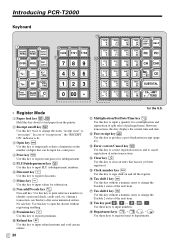
... reference number (to change the status "receipt issue" or "no receipt." I JK 54/78 30 6 60/84 36 12 66/90 42 18 72/96 48 24 DEPT SHIFT HELP EFG NO 53/77 59/83 65/89 71/95 CLK# T/S1 T/S2 29 H 5 V 35 11 41 17 47... entries. Introducing PCR-T2000 Keyboard 1 RECEIPT FEED 2 JOURNAL FEED RECEIPT ON/OFF 345 OPEN PRICE PLU/ S.DEPT 678 %- - # NS 90A X/FOR %+ RF DATE TIME BCD POST RECEIPT ERR.CORR CANCEL C C/AC I Department keys Use these keys to input a quantity for the U.S. H Ten key pad 0, 1, ~ 9, -, ^ Use these keys to register items to change...
... reference number (to change the status "receipt issue" or "no receipt." I JK 54/78 30 6 60/84 36 12 66/90 42 18 72/96 48 24 DEPT SHIFT HELP EFG NO 53/77 59/83 65/89 71/95 CLK# T/S1 T/S2 29 H 5 V 35 11 41 17 47... entries. Introducing PCR-T2000 Keyboard 1 RECEIPT FEED 2 JOURNAL FEED RECEIPT ON/OFF 345 OPEN PRICE PLU/ S.DEPT 678 %- - # NS 90A X/FOR %+ RF DATE TIME BCD POST RECEIPT ERR.CORR CANCEL C C/AC I Department keys Use these keys to input a quantity for the U.S. H Ten key pad 0, 1, ~ 9, -, ^ Use these keys to register items to change...

Owners Manual
Page 21
...O Paid out key P Use this key following a numeric entry to register money received for Canada J Department shift key d Use this key to register a cash sale. • Calculator Mode 6 Percent key \ D Clear/All ...PCR-T2000 for non-sale transactions. T Subtotal key s Use this key to shift the department key number from the drawer. N Received on account key r Use this key following a numeric entry to register...2 Dept 72 ddd! 2 Dept 73 : d% 2 Dept 48 : ddd% 2 Dept 96 K Help key / Use this key to register a check tender. P Charge key h Use this key to look up the procedures to ...
...O Paid out key P Use this key following a numeric entry to register money received for Canada J Department shift key d Use this key to register a cash sale. • Calculator Mode 6 Percent key \ D Clear/All ...PCR-T2000 for non-sale transactions. T Subtotal key s Use this key to shift the department key number from the drawer. N Received on account key r Use this key following a numeric entry to register...2 Dept 72 ddd! 2 Dept 73 : d% 2 Dept 48 : ddd% 2 Dept 96 K Help key / Use this key to register a check tender. P Charge key h Use this key to look up the procedures to ...
Owners Manual
Page 22
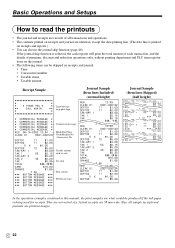
...How to read the printouts • The journal and receipts are records of premium, discount and reduction operations only, without printing department and PLU item registrations on the journal. • The following items can choose the journal skip function (page 46). Clerk... $0.20 $0.35- Item counter *** BOTTOM MESSAGE *** *** *** BOTTOM MESSAGE BOTTOM MESSAGE ******- If the journal skip function is selected, the cash register will print the total amount of each transaction, and the details of all sample receipts and journals are not actual size. They are printout images...
...How to read the printouts • The journal and receipts are records of premium, discount and reduction operations only, without printing department and PLU item registrations on the journal. • The following items can choose the journal skip function (page 46). Clerk... $0.20 $0.35- Item counter *** BOTTOM MESSAGE *** *** *** BOTTOM MESSAGE BOTTOM MESSAGE ******- If the journal skip function is selected, the cash register will print the total amount of each transaction, and the details of all sample receipts and journals are not actual size. They are printout images...
Owners Manual
Page 23
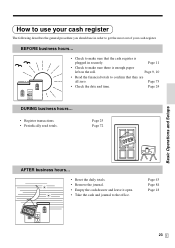
... 9, 10 • Read the financial totals to confirm that the cash register is enough paper left on the roll. Page 24 DURING business hours... • Register transactions. • Periodically read totals. Page 43 Page 84 Page 18 23 E BEFORE business hours... • Check to the office. ...Page 73 • Check the date and time. Page 11 • Check to get the most out of your cash register The following describes the general procedure you should use in securely. Page 25 Page 72 Basic Operations and Setups AFTER business hours... • ...
... 9, 10 • Read the financial totals to confirm that the cash register is enough paper left on the roll. Page 24 DURING business hours... • Register transactions. • Periodically read totals. Page 43 Page 84 Page 18 23 E BEFORE business hours... • Check to the office. ...Page 73 • Check the date and time. Page 11 • Check to get the most out of your cash register The following describes the general procedure you should use in securely. Page 25 Page 72 Basic Operations and Setups AFTER business hours... • ...
Owners Manual
Page 24
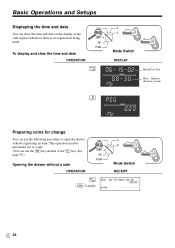
... coins for change You can show the time and date on the display of a sale. See OFF page 39.) RF PGM Opening the drawer without registering an item. This operation must be performed out of the REG cash register whenever there is no registration being OFF made.
... coins for change You can show the time and date on the display of a sale. See OFF page 39.) RF PGM Opening the drawer without registering an item. This operation must be performed out of the REG cash register whenever there is no registration being OFF made.

Owners Manual
Page 25
... price $1.00 Item Quantity Dept. 1 3 Tax status (1/2)→2 Payment Cash $1.00 OPERATION RECEIPT t3-( Shifting taxable dept. descriptor/unit price $1.00- dd! 3- to 96, press d three times (-4- Taxable amount 2 $0.30- Basic Operations and Setups Preparing and using department keys PGM C-A32 OP C-A02 Registering department keys The following examples show how you can use the...
... price $1.00 Item Quantity Dept. 1 3 Tax status (1/2)→2 Payment Cash $1.00 OPERATION RECEIPT t3-( Shifting taxable dept. descriptor/unit price $1.00- dd! 3- to 96, press d three times (-4- Taxable amount 2 $0.30- Basic Operations and Setups Preparing and using department keys PGM C-A32 OP C-A02 Registering department keys The following examples show how you can use the...
Owners Manual
Page 29
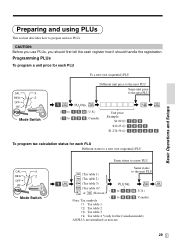
... 16-; U.S.) (1 to 800; Basic Operations and Setups Preparing and using PLUs This section describes how to prepare and use PLUs, you should first tell the cash register how it should handle the registration. CAUTION: Before you use PLUs.
... 16-; U.S.) (1 to 800; Basic Operations and Setups Preparing and using PLUs This section describes how to prepare and use PLUs, you should first tell the cash register how it should handle the registration. CAUTION: Before you use PLUs.

Owners Manual
Page 30
... subdepartment, see the "Convenient RF Operations and Setups" on page 62. Basic Operations and Setups PGM C-A32 OP C-A02 Registering PLUs CAL X The following examples show how you can use PLUs in REG Z various types of registrations. PGM PLU single item sale Mode Switch OPERATION ...RECEIPT Unit price Quantity Item PLU Taxable Payment Cash ( ): Preset value ($2.50) 1 14 (2) $3.00 14 PLU code * s 3-a REG 06-15-2002 09:10 000008 PLU0014 TAX-AMT 2 TAX 2 TOTAL...
... subdepartment, see the "Convenient RF Operations and Setups" on page 62. Basic Operations and Setups PGM C-A32 OP C-A02 Registering PLUs CAL X The following examples show how you can use PLUs in REG Z various types of registrations. PGM PLU single item sale Mode Switch OPERATION ...RECEIPT Unit price Quantity Item PLU Taxable Payment Cash ( ): Preset value ($2.50) 1 14 (2) $3.00 14 PLU code * s 3-a REG 06-15-2002 09:10 000008 PLU0014 TAX-AMT 2 TAX 2 TOTAL...


