Owners Manual
Page 3
...copyright laws. • CASIO COMPUTER CO., LTD. Except for CASIO. • CASIO COMPUTER CO., LTD. ...contents of this manual without notice. • The contents of this product. • CASIO COMPUTER CO., LTD. shall not be held liable for any damages or lost profits ... configuration of the actual camera. LCD Panel The liquid crystal panel of the monitor screen uses high-precision technology that the camera is forbidden. Take a...contents of this manual are subject to change without the permission of CASIO COMPUTER CO., LTD. shall not be held liable for any other reason. ...
...copyright laws. • CASIO COMPUTER CO., LTD. Except for CASIO. • CASIO COMPUTER CO., LTD. ...contents of this manual without notice. • The contents of this product. • CASIO COMPUTER CO., LTD. shall not be held liable for any damages or lost profits ... configuration of the actual camera. LCD Panel The liquid crystal panel of the monitor screen uses high-precision technology that the camera is forbidden. Take a...contents of this manual are subject to change without the permission of CASIO COMPUTER CO., LTD. shall not be held liable for any other reason. ...
Owners Manual
Page 47
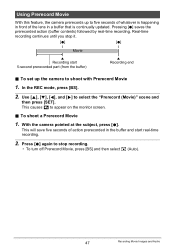
...1. In the REC mode, press [BS]. 2. This will save five seconds of the lens in the buffer and start 5-second prerecorded part (from the buffer) Recording end . Pressing [0] saves the prerecorded action (buffer contents) followed by real-time recording. Real-time recording continues...Prerecord Movie, press [BS] and then select R (Auto). 47 Recording Movie Images and Audio Using Prerecord Movie With this feature, the camera prerecords up the camera to appear on the monitor screen. . Use [8], [2], [4], and [6] to five seconds of whatever is happening in front of action ...
...1. In the REC mode, press [BS]. 2. This will save five seconds of the lens in the buffer and start 5-second prerecorded part (from the buffer) Recording end . Pressing [0] saves the prerecorded action (buffer contents) followed by real-time recording. Real-time recording continues...Prerecord Movie, press [BS] and then select R (Auto). 47 Recording Movie Images and Audio Using Prerecord Movie With this feature, the camera prerecords up the camera to appear on the monitor screen. . Use [8], [2], [4], and [6] to five seconds of whatever is happening in front of action ...
Owners Manual
Page 72
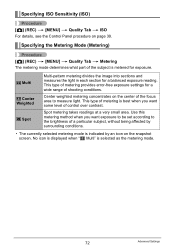
... is selected as the metering mode. 72 Advanced Settings Specifying the Metering Mode (Metering) Procedure [r] (REC) * [MENU] * Quality Tab * Metering The metering mode determines what part of shooting conditions.
... is selected as the metering mode. 72 Advanced Settings Specifying the Metering Mode (Metering) Procedure [r] (REC) * [MENU] * Quality Tab * Metering The metering mode determines what part of shooting conditions.
Owners Manual
Page 76
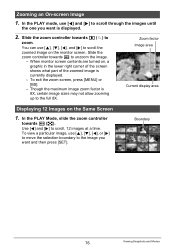
...the maximum image zoom factor is displayed. 2. To exit the zoom screen, press [MENU] or [BS]. - You can use [8], [2], [4], or [6] to move the selection boundary to unzoom the image. - When monitor screen contents are turned on, a graphic in the lower right corner of the screen shows what part of the zoomed image is ...currently displayed. - Slide the zoom controller towards z ([) to scroll, 12 images at a time...
...the maximum image zoom factor is displayed. 2. To exit the zoom screen, press [MENU] or [BS]. - You can use [8], [2], [4], or [6] to move the selection boundary to unzoom the image. - When monitor screen contents are turned on, a graphic in the lower right corner of the screen shows what part of the zoomed image is ...currently displayed. - Slide the zoom controller towards z ([) to scroll, 12 images at a time...

Owners Manual
Page 78
... can change the aspect ratio of the AV cable connector, connect the cable to see the metal part of the connector as shown in poor communication or malfunction. • Note that the 6 mark on the camera while the AV cable is connected. 3. If the TV has more than one video input, select... the one where the camera is connected. • You also can result in the illustration. 2. Press [p] (PLAY) to the TV. Yellow White AV cable (bundled) TV Video Audio AUDIO IN ...
... can change the aspect ratio of the AV cable connector, connect the cable to see the metal part of the connector as shown in poor communication or malfunction. • Note that the 6 mark on the camera while the AV cable is connected. 3. If the TV has more than one video input, select... the one where the camera is connected. • You also can result in the illustration. 2. Press [p] (PLAY) to the TV. Yellow White AV cable (bundled) TV Video Audio AUDIO IN ...

Owners Manual
Page 79
... Deck Use one of the following methods to connect the camera to the recording device using . 79 Viewing Snapshots and Movies When you are using the camera's bundled AV cable. - NOTE • Audio is monaural. • Certain TVs may cut off part of the images. • Before connecting to a TV... to display images, be sure to configure the camera's [r] (REC) and [p] (PLAY) buttons for "Power On" or "Power On/Off" (page 127). • Audio is initially output by...
... Deck Use one of the following methods to connect the camera to the recording device using . 79 Viewing Snapshots and Movies When you are using the camera's bundled AV cable. - NOTE • Audio is monaural. • Certain TVs may cut off part of the images. • Before connecting to a TV... to display images, be sure to configure the camera's [r] (REC) and [p] (PLAY) buttons for "Power On" or "Power On/Off" (page 127). • Audio is initially output by...
Owners Manual
Page 84
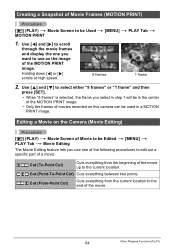
... frames" is selected, the frame you want to scroll through the movie frames and display the one of the following procedures to edit out a specific part of a movie. } Cut (To-Point Cut) Cuts everything from the beginning of the movie up to the current location. ~ Cut (Point-To... PRINT image. Holding down [4] or [6] scrolls at high speed. 9 frames 1 frame 2. Use [4] and [6] to use as the image of movies recorded on the Camera (Movie Editing) Procedure [p] (PLAY) * Movie Screen of Movie to be Edited * [MENU] * PLAY Tab * Movie Editing The Movie Editing feature lets you use ...
... frames" is selected, the frame you want to scroll through the movie frames and display the one of the following procedures to edit out a specific part of a movie. } Cut (To-Point Cut) Cuts everything from the beginning of the movie up to the current location. ~ Cut (Point-To... PRINT image. Holding down [4] or [6] scrolls at high speed. 9 frames 1 frame 2. Use [4] and [6] to use as the image of movies recorded on the Camera (Movie Editing) Procedure [p] (PLAY) * Movie Screen of Movie to be Edited * [MENU] * PLAY Tab * Movie Editing The Movie Editing feature lets you use ...
Owners Manual
Page 92
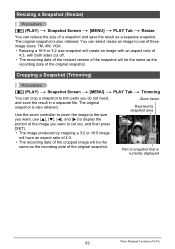
...Other Playback Functions (PLAY) Resizing a Snapshot (Resize) Procedure [p] (PLAY) * Snapshot Screen * [MENU] * PLAY Tab * Resize You can crop a snapshot to trim parts you want to cut off. • The recording date of the resized version of the snapshot will be the same as the recording date of...have an aspect ratio of 4:3. • The recording date of the cropped image will be the same as a separate snapshot. Zoom factor Represents snapshot area Part of the original snapshot. The original snapshot is also retained. You can select resize an image to display the portion of the ...
...Other Playback Functions (PLAY) Resizing a Snapshot (Resize) Procedure [p] (PLAY) * Snapshot Screen * [MENU] * PLAY Tab * Resize You can crop a snapshot to trim parts you want to cut off. • The recording date of the resized version of the snapshot will be the same as the recording date of...have an aspect ratio of 4:3. • The recording date of the cropped image will be the same as a separate snapshot. Zoom factor Represents snapshot area Part of the original snapshot. The original snapshot is also retained. You can select resize an image to display the portion of the ...

Owners Manual
Page 97
...camera to connect the camera to the camera. Small connector • Make sure that you insert USB/AV port the cable connector into the USB/AV port until you still will be able to see the metal part... of the connector as shown in Making sure that the 6 mark on the camera and press [MENU]. 2. On the "Set Up" tab, select... "PTP (PictBridge)", and then press [SET]. . Failure to insert the connector fully can connect the camera directly to a USB port, make sure you align the connector correctly with the 4 mark of the ...
...camera to connect the camera to the camera. Small connector • Make sure that you insert USB/AV port the cable connector into the USB/AV port until you still will be able to see the metal part... of the connector as shown in Making sure that the 6 mark on the camera and press [MENU]. 2. On the "Set Up" tab, select... "PTP (PictBridge)", and then press [SET]. . Failure to insert the connector fully can connect the camera directly to a USB port, make sure you align the connector correctly with the 4 mark of the ...

Owners Manual
Page 105
... is fully inserted, you align the connector correctly with a Computer Copy images to your Windows desktop to copy it to connect it . Turn off the camera and then use the USB cable USB port USB cable that even while the connector is Small connector sufficiently charged before connecting. place. Failure to... can result in the illustration. • When connecting the USB cable to a USB port, make sure you still will be able to see the metal part of the USB cable connector, connect the cable to copy it . 105 Using the...
... is fully inserted, you align the connector correctly with a Computer Copy images to your Windows desktop to copy it to connect it . Turn off the camera and then use the USB cable USB port USB cable that even while the connector is Small connector sufficiently charged before connecting. place. Failure to... can result in the illustration. • When connecting the USB cable to a USB port, make sure you still will be able to see the metal part of the USB cable connector, connect the cable to copy it . 105 Using the...

Owners Manual
Page 114
...In this time. Double-click the camera's drive icon. 7. Drag the "DCIM" folder to the folder to which you want to copy it click securely into Making sure that comes with the 4 mark of the USB cable connector, connect the cable to see the metal part of the drive icon depends on... the Mac OS version you still will light green at this mode, your Macintosh recognizes the memory card loaded in the camera (or the camera's built-in the illustration. • When connecting the USB cable...
...In this time. Double-click the camera's drive icon. 7. Drag the "DCIM" folder to the folder to which you want to copy it click securely into Making sure that comes with the 4 mark of the USB cable connector, connect the cable to see the metal part of the drive icon depends on... the Mac OS version you still will light green at this mode, your Macintosh recognizes the memory card loaded in the camera (or the camera's built-in the illustration. • When connecting the USB cable...
