

Owners Manual
Page 16
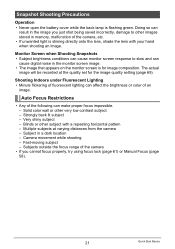
...Monitor screen Shutter button [r] (REC) 2. Zoom controller z Telephoto w Wide Angle 3. Back lamp When focus is complete, the camera will beep, the back lamp will light green, and the focus frame will turn on the camera. Half-press the shutter button to turn green. If it is on the subject it ...isn't, see page 50. You can zoom the image, if you half...
...Monitor screen Shutter button [r] (REC) 2. Zoom controller z Telephoto w Wide Angle 3. Back lamp When focus is complete, the camera will beep, the back lamp will light green, and the focus frame will turn on the camera. Half-press the shutter button to turn green. If it is on the subject it ...isn't, see page 50. You can zoom the image, if you half...

Owners Manual
Page 17
... center of the way down. See page 45 for Auto Focus to operate will record using Quick Shutter (page 66). • With Quick Shutter, the camera focuses faster than normal Auto Focus, which the subject to be out of focus when Quick Shutter is the name of the screen. 17 Quick... center of a technique you can use when you want to ensure proper focus. . If the focus frame stays red and the back lamp is flashing green, it means that some images may be focused on is not within the focus frame in focus (because the subject is recorded.) . Continuing to focus...
... center of the way down. See page 45 for Auto Focus to operate will record using Quick Shutter (page 66). • With Quick Shutter, the camera focuses faster than normal Auto Focus, which the subject to be out of focus when Quick Shutter is the name of the screen. 17 Quick... center of a technique you can use when you want to ensure proper focus. . If the focus frame stays red and the back lamp is flashing green, it means that some images may be focused on is not within the focus frame in focus (because the subject is recorded.) . Continuing to focus...
Owners Manual
Page 21
... onto the lens, shade the lens with a repeating horizontal pattern - Strongly back lit subject - Monitor Screen when Shooting Snapshots • Subject brightness conditions can cause digital noise in the monitor screen image. • The image that appears on the monitor screen is flashing green. Very shiny subject - Camera movement while shooting -
... onto the lens, shade the lens with a repeating horizontal pattern - Strongly back lit subject - Monitor Screen when Shooting Snapshots • Subject brightness conditions can cause digital noise in the monitor screen image. • The image that appears on the monitor screen is flashing green. Very shiny subject - Camera movement while shooting -

Owners Manual
Page 22
... does not turn on when you press [r] (REC) or [p] (PLAY) (page 128). 22 Quick Start Basics The back lamp will light (green) momentarily and the camera will extend from the camera at this time. • Take care to ensure that nothing is restricting or coming into contact with your hand so it extends... cannot extend creates the risk of time. [ON/OFF] (Power) Back lamp [p] (PLAY) [r] (REC) To turn off when you press [r] (REC) or [p] (PLAY). Turning the Camera On and Off To turn power on . If you are entering the REC mode, the lens will turn on To enter the REC Mode, press...
... does not turn on when you press [r] (REC) or [p] (PLAY) (page 128). 22 Quick Start Basics The back lamp will light (green) momentarily and the camera will extend from the camera at this time. • Take care to ensure that nothing is restricting or coming into contact with your hand so it extends... cannot extend creates the risk of time. [ON/OFF] (Power) Back lamp [p] (PLAY) [r] (REC) To turn off when you press [r] (REC) or [p] (PLAY). Turning the Camera On and Off To turn power on . If you are entering the REC mode, the lens will turn on To enter the REC Mode, press...

Owners Manual
Page 28
... 3. In the REC mode, press [SET]. 2. Use [8] and [2] to select the Auto Shutter type and then press [SET]. B 28 Snapshot Tutorial The camera will go into a standby mode and start detecting hand and subject movement. Press the shutter button the rest of image blur due to... green when the camera is no image blur. • "0 Auto" flashes on the monitor screen while detection of the way down. When panning, the camera releases the shutter ¯ Detect Panning automatically when it detects image blur...
... 3. In the REC mode, press [SET]. 2. Use [8] and [2] to select the Auto Shutter type and then press [SET]. B 28 Snapshot Tutorial The camera will go into a standby mode and start detecting hand and subject movement. Press the shutter button the rest of image blur due to... green when the camera is no image blur. • "0 Auto" flashes on the monitor screen while detection of the way down. When panning, the camera releases the shutter ¯ Detect Panning automatically when it detects image blur...

Owners Manual
Page 29
... go into Auto Shutter standby. press the shutter button to green when the camera is smiling (Detect Smile) 1. The camera will release the shutter automatically the moment it determines there is no blur in the subject you are following. • "0 Auto" flashes on ...the monitor screen while smile detection is getting ready to release the shutter. The camera will release the shutter automatically the moment it determines the subject is smiling. • "0 Auto" flashes on the monitor screen while panning detection is...
... go into Auto Shutter standby. press the shutter button to green when the camera is smiling (Detect Smile) 1. The camera will release the shutter automatically the moment it determines there is no blur in the subject you are following. • "0 Auto" flashes on ...the monitor screen while smile detection is getting ready to release the shutter. The camera will release the shutter automatically the moment it determines the subject is smiling. • "0 Auto" flashes on the monitor screen while panning detection is...

Owners Manual
Page 32
... frame to select the fifth Control Panel option from the top (Face Recognition). 3. To perform a face recognition recording operation (Normal) 1. Point the camera at the subject(s). The camera will turn green. 6. Press the shutter button the rest of the face. 32 Snapshot Tutorial Using Face Recognition (Face Recognition) The face recognition feature adjusts...
... frame to select the fifth Control Panel option from the top (Face Recognition). 3. To perform a face recognition recording operation (Normal) 1. Point the camera at the subject(s). The camera will turn green. 6. Press the shutter button the rest of the face. 32 Snapshot Tutorial Using Face Recognition (Face Recognition) The face recognition feature adjusts...

Owners Manual
Page 36
...the shutter button. A green focus frame will focus on the face with the highest priority (the one time to five. To give priority to detection speed or number of five to the priority level of the way. Enables detection of a maximum of faces 1. . The camera will detect human faces... will be detected at one with the Normal mode). 36 Snapshot Tutorial This will appear at the subject(s). With this setting, the camera recognizes faces in the image that can be colored according to ten faces. The light blue boundary indicates the highest priority face when the...
...the shutter button. A green focus frame will focus on the face with the highest priority (the one time to five. To give priority to detection speed or number of five to the priority level of the way. Enables detection of a maximum of faces 1. . The camera will detect human faces... will be detected at one with the Normal mode). 36 Snapshot Tutorial This will appear at the subject(s). With this setting, the camera recognizes faces in the image that can be colored according to ten faces. The light blue boundary indicates the highest priority face when the...

Owners Manual
Page 48
...the "Voice Recording" scene and then press [SET]. Press the shutter button again to start recording. • The back lamp flashes green while recording is selected. Movie recording continues after the snapshot is being recorded, press the shutter button. You can use [2] ( ) ...movie to the markers in progress. • Pressing [SET] during movie recording is not possible while any one of Voice Recording using the camera's built-in memory only. 1. C 48 Recording Movie Images and Audio Press the shutter button to stop audio recording. Recording time 4. Remaining...
...the "Voice Recording" scene and then press [SET]. Press the shutter button again to start recording. • The back lamp flashes green while recording is selected. Movie recording continues after the snapshot is being recorded, press the shutter button. You can use [2] ( ) ...movie to the markers in progress. • Pressing [SET] during movie recording is not possible while any one of Voice Recording using the camera's built-in memory only. 1. C 48 Recording Movie Images and Audio Press the shutter button to stop audio recording. Recording time 4. Remaining...

Owners Manual
Page 51
...movie. • Selecting the Night Scene or Fireworks scene results in the image, the camera automatically performs a digital noise reduction process when either direction. • To return to the scene menu, slide the zoom controller again. • To scroll between scenes, use a tripod to avoid image ...blur due to camera movement when shooting at slow shutter speeds. • Your camera includes a sample scene that it is indicated by the back lamp flashing green. BEST SHOT Precautions...
...movie. • Selecting the Night Scene or Fireworks scene results in the image, the camera automatically performs a digital noise reduction process when either direction. • To return to the scene menu, slide the zoom controller again. • To scroll between scenes, use a tripod to avoid image ...blur due to camera movement when shooting at slow shutter speeds. • Your camera includes a sample scene that it is indicated by the back lamp flashing green. BEST SHOT Precautions...

Owners Manual
Page 65
...works well with focus lock (page 61). "U Spot" or "O Tracking" "I Multi When you half-press the shutter button while this setting selected, the camera will be selected for the Auto Focus area while you are using Auto Shutter (page 28). C 65 Advanced Settings O When you half-press the shutter... the Auto Focus Area (AF Area) Procedure [r] (REC) * [MENU] * REC Tab * AF Area U Spot This mode takes readings of a small area in green. Using the easy Mode (easy Mode) Procedure [r] (REC) * [MENU] * REC Tab * easy Mode For details, see the Control Panel procedure on page 40.
...works well with focus lock (page 61). "U Spot" or "O Tracking" "I Multi When you half-press the shutter button while this setting selected, the camera will be selected for the Auto Focus area while you are using Auto Shutter (page 28). C 65 Advanced Settings O When you half-press the shutter... the Auto Focus Area (AF Area) Procedure [r] (REC) * [MENU] * REC Tab * AF Area U Spot This mode takes readings of a small area in green. Using the easy Mode (easy Mode) Procedure [r] (REC) * [MENU] * REC Tab * easy Mode For details, see the Control Panel procedure on page 40.
Owners Manual
Page 71
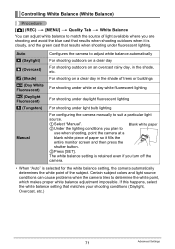
...white paper 2Under the lighting conditions you plan to use when shooting, point the camera at a blank white piece of light available where you turn off the camera. • When "Auto" is cloudy, and the green cast that results when shooting under light bulb lighting For configuring the... camera manually to determine the white point, which makes proper white balance adjustment impossible....
...white paper 2Under the lighting conditions you plan to use when shooting, point the camera at a blank white piece of light available where you turn off the camera. • When "Auto" is cloudy, and the green cast that results when shooting under light bulb lighting For configuring the... camera manually to determine the white point, which makes proper white balance adjustment impossible....

Owners Manual
Page 73
... texture roughness Turns off skin texture enhancement Using Built-in Color Filters (Color Filter) Procedure [r] (REC) * [MENU] * Quality Tab * Color Filter Settings: Off, B/W, Sepia, Red, Green, Blue, Yellow, Pink, and Purple Controlling Image Sharpness (Sharpness) Procedure [r] (REC) * [MENU] * Quality Tab * Sharpness You can adjust the Dynamic Range setting in a Portrait (Portrait...
... texture roughness Turns off skin texture enhancement Using Built-in Color Filters (Color Filter) Procedure [r] (REC) * [MENU] * Quality Tab * Color Filter Settings: Off, B/W, Sepia, Red, Green, Blue, Yellow, Pink, and Purple Controlling Image Sharpness (Sharpness) Procedure [r] (REC) * [MENU] * Quality Tab * Sharpness You can adjust the Dynamic Range setting in a Portrait (Portrait...
Owners Manual
Page 115
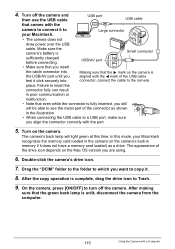
... not have a memory card loaded) as shown in poor communication or malfunction. • Note that the 6 mark on the camera is fully inserted, you still will light green at this mode, your Macintosh. USB/AV port • Make sure that you insert the cable connector into Making sure that... you are using. 6. After the copy operation is complete, drag the drive icon to turn off the camera and then use the USB cable USB port USB cable that the green back lamp is Small connector sufficiently charged before connecting. The appearance of the connector as a drive. On ...
... not have a memory card loaded) as shown in poor communication or malfunction. • Note that the 6 mark on the camera is fully inserted, you still will light green at this mode, your Macintosh. USB/AV port • Make sure that you insert the cable connector into Making sure that... you are using. 6. After the copy operation is complete, drag the drive icon to turn off the camera and then use the USB cable USB port USB cable that the green back lamp is Small connector sufficiently charged before connecting. The appearance of the connector as a drive. On ...
Owners Manual
Page 123
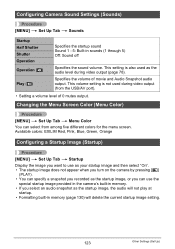
... Menu Color You can use as your startup image and then select "On". • The startup image does not appear when you turn on the camera by pressing [p] (PLAY). • You can specify a snapshot you recorded as the startup image, or you select an audio snapshot as the audio... level during video output (from among five different colors for the menu screen. Available colors: EXILIM Red, Pink, Blue, Green, Orange Configuring a Startup Image (Startup) Procedure [MENU] * Set Up Tab * Startup Display the image you want to use the special ...
... Menu Color You can use as your startup image and then select "On". • The startup image does not appear when you turn on the camera by pressing [p] (PLAY). • You can specify a snapshot you recorded as the startup image, or you select an audio snapshot as the audio... level during video output (from among five different colors for the menu screen. Available colors: EXILIM Red, Pink, Blue, Green, Orange Configuring a Startup Image (Startup) Procedure [MENU] * Set Up Tab * Startup Display the image you want to use the special ...

Owners Manual
Page 132
... number of pixels. Example Histograms A histogram towards the right side results when the overall image is light. If the histogram appears too lopsided for R (red), G (green), and B (blue). How to Use the Histogram A histogram is a graph that represents the lightness of an image in order to achieve better balance. A histogram towards...
... number of pixels. Example Histograms A histogram towards the right side results when the overall image is light. If the histogram appears too lopsided for R (red), G (green), and B (blue). How to Use the Histogram A histogram is a graph that represents the lightness of an image in order to achieve better balance. A histogram towards...

Owners Manual
Page 137
... clock. Then leave the bag sealed to allow the air inside to naturally change to strong vibration . Data Error Precautions Your digital camera is flashing green after power is cut off the camera • Disconnecting the USB cable while communication is restored (page 126). . In an area exposed to form on a hot day, or...
... clock. Then leave the bag sealed to allow the air inside to naturally change to strong vibration . Data Error Precautions Your digital camera is flashing green after power is cut off the camera • Disconnecting the USB cable while communication is restored (page 126). . In an area exposed to form on a hot day, or...

Owners Manual
Page 144
... supported memory cards and how to pop out of the memory card slot slightly. Doing so can cause data to and delete data from the camera while the back lamp is recommended. • Electrostatic charge, electrical noise, and other media (CD-R, CD-RW, hard disk, etc.) 144 Appendix However, ..., or delete any of the way and then insert another one. • Never remove a card from a memory card a number of a memory card is flashing green. Using a Memory Card • SD memory cards and SDHC memory cards have a write protect switch. Pull the card out the rest of its ability to...
... supported memory cards and how to pop out of the memory card slot slightly. Doing so can cause data to and delete data from the camera while the back lamp is recommended. • Electrostatic charge, electrical noise, and other media (CD-R, CD-RW, hard disk, etc.) 144 Appendix However, ..., or delete any of the way and then insert another one. • Never remove a card from a memory card a number of a memory card is flashing green. Using a Memory Card • SD memory cards and SDHC memory cards have a write protect switch. Pull the card out the rest of its ability to...

