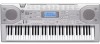

User Guide
Page 2
... limits are getting weak. • Do not short-circuit the battery terminals. • The product is not intended for children under 3 years. • Use only CASIO AD-5 adaptor. • The AC adaptor is connected. • Consult the dealer or an experienced radio/TV technician for compliance could void the user's authority... Adaptor for breakage, cuts, exposed wire and other areas). FCC WARNING Changes or modifications not expressly approved by one or more of Conformity Model Number: CTK-800 Trade Name: CASIO COMPUTER CO., LTD.
... limits are getting weak. • Do not short-circuit the battery terminals. • The product is not intended for children under 3 years. • Use only CASIO AD-5 adaptor. • The AC adaptor is connected. • Consult the dealer or an experienced radio/TV technician for compliance could void the user's authority... Adaptor for breakage, cuts, exposed wire and other areas). FCC WARNING Changes or modifications not expressly approved by one or more of Conformity Model Number: CTK-800 Trade Name: CASIO COMPUTER CO., LTD.

User Guide
Page 3
.... Symbols Various symbols are shown below. Those symbols along with a line through the instructions contained in this user's guide and on your selection of the CASIO electronic musical instrument. • Before using the instrument, be sure to carefully read through it ( ) means that the indicated action must not be performed. CAUTION...
.... Symbols Various symbols are shown below. Those symbols along with a line through the instructions contained in this user's guide and on your selection of the CASIO electronic musical instrument. • Before using the instrument, be sure to carefully read through it ( ) means that the indicated action must not be performed. CAUTION...

User Guide
Page 4
.... • Should the electric cord or plug become shorted. • Never expose batteries to become damaged, contact your original retailer or authorized CASIO Service Provider. Doing so creates the risk of electric shock, burn injury, or other personal injury. Take the following steps immediately. 1. Turn ... of metal) getting into fire. Take the following steps immediately. 1. Turn off power. 2. Contact your original retailer or an authorized CASIO Service Provider. AC Adaptor G Misuse of the AC adaptor creates the risk of fire and electric shock. Always make sure you are using...
.... • Should the electric cord or plug become shorted. • Never expose batteries to become damaged, contact your original retailer or authorized CASIO Service Provider. Doing so creates the risk of electric shock, burn injury, or other personal injury. Take the following steps immediately. 1. Turn ... of metal) getting into fire. Take the following steps immediately. 1. Turn off power. 2. Contact your original retailer or an authorized CASIO Service Provider. AC Adaptor G Misuse of the AC adaptor creates the risk of fire and electric shock. Always make sure you are using...

User Guide
Page 5
... the risk of fire and personal injury. Dropping and Impact Continued use with this precaution is built up in your original retailer or an authorized CASIO Service Provider. Doing so creates the risk of damage to use it from the wall outlet and wipe away any other sources of heat. •...
... the risk of fire and personal injury. Dropping and Impact Continued use with this precaution is built up in your original retailer or an authorized CASIO Service Provider. Doing so creates the risk of damage to use it from the wall outlet and wipe away any other sources of heat. •...

User Guide
Page 6
Display Screen • Never push on top of microphone input • Dim power supply indicator when a microphone is used • Sudden power failure when using headphones. Make sure you mount the product on . • Dim, difficult to read display • Abnormally low speaker/headphone volume • Distortion of sound output • Occasional interruption of sound when playing at high volumes • Sudden power failure when playing at high volumes • Dimming of the display when playing at high volume • Continued sound output even after you release a key • A ...
Display Screen • Never push on top of microphone input • Dim power supply indicator when a microphone is used • Sudden power failure when using headphones. Make sure you mount the product on . • Dim, difficult to read display • Abnormally low speaker/headphone volume • Distortion of sound output • Occasional interruption of sound when playing at high volumes • Sudden power failure when playing at high volumes • Dimming of the display when playing at high volume • Continued sound output even after you release a key • A ...

User Guide
Page 7
... 2 and Step 3 lessons by -step. Guidance that appears on the monitor screen helps lead you purchase or create to CASIO format, and then transfer it to rate your keyboard, use special CASIO conversion software to convert SMF data you down the path to music proficiency. • Evaluation System: The keyboard can sing...
... 2 and Step 3 lessons by -step. Guidance that appears on the monitor screen helps lead you purchase or create to CASIO format, and then transfer it to rate your keyboard, use special CASIO conversion software to convert SMF data you down the path to music proficiency. • Evaluation System: The keyboard can sing...

User Guide
Page 8
Play at normal speed E-26 Using the Phrase Practice Mode E-27 Voice Fingering Guide E-27 Using the Metronome E-28 Using a Microphone for Sing Along E-29 E-6 706A-E-008A E-23 Evaluation Mode E-24 Using the Lesson Functions and Evaluation Mode E-24 Step 1 - Master the notes E-26 Step 3 - Master the timing E-25 Step 2 - E-19 To play back a Song Bank tune E-19 To play back a Piano Bank tune E-20 Adjusting the Tempo E-20 To pause playback E-20 To fast reverse E-21 To fast forward E-21 Looping a Musical Phrase E-21 To change the melody tone E-21 To play the keyboard E-...
Play at normal speed E-26 Using the Phrase Practice Mode E-27 Voice Fingering Guide E-27 Using the Metronome E-28 Using a Microphone for Sing Along E-29 E-6 706A-E-008A E-23 Evaluation Mode E-24 Using the Lesson Functions and Evaluation Mode E-24 Step 1 - Master the notes E-26 Step 3 - Master the timing E-25 Step 2 - E-19 To play back a Song Bank tune E-19 To play back a Piano Bank tune E-20 Adjusting the Tempo E-20 To pause playback E-20 To fast reverse E-21 To fast forward E-21 Looping a Musical Phrase E-21 To change the melody tone E-21 To play the keyboard E-...
User Guide
Page 9
E-37 Parts and Tracks E-37 Recording Play Along with an Ending Pattern E-36 Using One-touch Preset E-36 Song Memory Function ...... Contents Auto Accompaniment ......... E-39 Recording a Performance E-39 Playing Back a Performance Recording E-41 Overdubbing a Performance Recording E-42 Deleting a Specific Part/Track E-42 Keyboard Settings E-43 Using Layer E-43 Using Split E-43 Using Layer and Split Together E-44 Transposing the Keyboard E-45 Using Touch Response E-45 Adjusting Accompaniment and Song Bank Volume E-46 Tuning the Keyboard E-46 Connection to a Computer E-...
E-37 Parts and Tracks E-37 Recording Play Along with an Ending Pattern E-36 Using One-touch Preset E-36 Song Memory Function ...... Contents Auto Accompaniment ......... E-39 Recording a Performance E-39 Playing Back a Performance Recording E-41 Overdubbing a Performance Recording E-42 Deleting a Specific Part/Track E-42 Keyboard Settings E-43 Using Layer E-43 Using Split E-43 Using Layer and Split Together E-44 Transposing the Keyboard E-45 Using Touch Response E-45 Adjusting Accompaniment and Song Bank Volume E-46 Tuning the Keyboard E-46 Connection to a Computer E-...

User Guide
Page 11
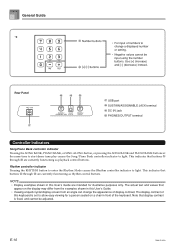
In this manual, the PLAY/STOP button that is located near the SING ALONG button is indicated as . 1 MIC jack 2 MIC VOLUME knob 3 POWER button 4 Power indicator 5 KEY CONTROL/TRANSPOSE buttons 6 button 7 SING ALONG button 8 SETTING button 9 REVERB/CHORUS button 0 SONG MEMORY button A ONE TOUCH PRESET button B TONE button C RHYTHM button G ADVANCED 3-STEP LESSON SYSTEM D SPEAK button E METRONOME button F LEFT/TRACK 1 button G RIGHT/TRACK 2 button H PRACTICE PHRASE button I STEP 1 to 3 button J SCORING 1 to 3 button K SPLIT button L LAYER button M Speaker N RHYTHM list O TONE list P SONG BANK/...
In this manual, the PLAY/STOP button that is located near the SING ALONG button is indicated as . 1 MIC jack 2 MIC VOLUME knob 3 POWER button 4 Power indicator 5 KEY CONTROL/TRANSPOSE buttons 6 button 7 SING ALONG button 8 SETTING button 9 REVERB/CHORUS button 0 SONG MEMORY button A ONE TOUCH PRESET button B TONE button C RHYTHM button G ADVANCED 3-STEP LESSON SYSTEM D SPEAK button E METRONOME button F LEFT/TRACK 1 button G RIGHT/TRACK 2 button H PRACTICE PHRASE button I STEP 1 to 3 button J SCORING 1 to 3 button K SPLIT button L LAYER button M Speaker N RHYTHM list O TONE list P SONG BANK/...
User Guide
Page 12
Use [+] (increase) and [-] (decrease) instead. This indicates that display contrast is set to allow easy viewing for illustrative purposes only. E-10 706A-E-012A General Guide *2 e Number buttons f [+]/[-] buttons • For input of the keyboard. Rhythm controller indicator Pressing the RHYTHM button to enter the Rhythm Mode causes the Rhythm controller indicator to light. Note that buttons X through \ are intended for a person seated on the display may differ from an angle can change a displayed number or setting. • Negative values cannot be adjusted. The ...
Use [+] (increase) and [-] (decrease) instead. This indicates that display contrast is set to allow easy viewing for illustrative purposes only. E-10 706A-E-012A General Guide *2 e Number buttons f [+]/[-] buttons • For input of the keyboard. Rhythm controller indicator Pressing the RHYTHM button to enter the Rhythm Mode causes the Rhythm controller indicator to light. Note that buttons X through \ are intended for a person seated on the display may differ from an angle can change a displayed number or setting. • Negative values cannot be adjusted. The ...

User Guide
Page 13
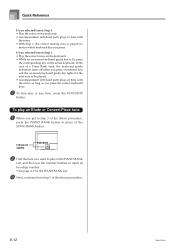
Lit 2 Set the MODE switch to show the next note of the 3-step lesson feature. STEP 2 STEP 1 4 Find the tune you want to play the keyboard 1 Press the POWER button to turn on the display. The keys that you to press first flash on the display. 6 Play the melody along with the selected tune's accompaniment. • Play in accordance with the keyboard keys, fingerings and notes that appear on power. • This causes the power indicator to light. A l oha Oe Indicators appear Keyboard key used Fingering Note pitch 706A-E-013A E-11 To play in the SONG BANK/ SING ALONG List, and...
Lit 2 Set the MODE switch to show the next note of the 3-step lesson feature. STEP 2 STEP 1 4 Find the tune you want to play the keyboard 1 Press the POWER button to turn on the display. The keys that you to press first flash on the display. 6 Play the melody along with the selected tune's accompaniment. • Play in accordance with the keyboard keys, fingerings and notes that appear on power. • This causes the power indicator to light. A l oha Oe Indicators appear Keyboard key used Fingering Note pitch 706A-E-013A E-11 To play in the SONG BANK/ SING ALONG List, and...
User Guide
Page 14
To play an Etude or Concert Piece tune 1 When you get to step 3 of the SONG BANK button. Indicators appear 2 Find the tune you want to input its two-digit number. • See page A-9 for the next note to be played. • Accompaniment (left -hand part) plays in time with the notes, as long as you press the correct keyboard keys. 7 To stop play in the PIANO BANK List, and then use the number buttons to play at any time, press the PLAY/STOP button. E-12 706A-E-014A In the case of a Piano Bank tune, the keyboard guide indication turns off when you press a keyboard key, and the on...
To play an Etude or Concert Piece tune 1 When you get to step 3 of the SONG BANK button. Indicators appear 2 Find the tune you want to input its two-digit number. • See page A-9 for the next note to be played. • Accompaniment (left -hand part) plays in time with the notes, as long as you press the correct keyboard keys. 7 To stop play in the PIANO BANK List, and then use the number buttons to play at any time, press the PLAY/STOP button. E-12 706A-E-014A In the case of a Piano Bank tune, the keyboard guide indication turns off when you press a keyboard key, and the on...
User Guide
Page 15
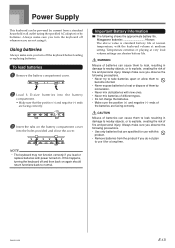
Power Supply This keyboard can shorten battery life. Always make sure you are facing correctly. Temperature extremes or playing at very loud volume settings can be powered by current from the product if you observe the following precautions. • Use only batteries that the positive (+) and negative (-) ends are specified for use it . NOTE • The keyboard may not function correctly if you load or replace batteries with the keyboard volume at normal temperature, with power turned on. Important Battery Information I The following precautions. • Never try to ...
Power Supply This keyboard can shorten battery life. Always make sure you are facing correctly. Temperature extremes or playing at very loud volume settings can be powered by current from the product if you observe the following precautions. • Use only batteries that the positive (+) and negative (-) ends are specified for use it . NOTE • The keyboard may not function correctly if you load or replace batteries with the keyboard volume at normal temperature, with power turned on. Important Battery Information I The following precautions. • Never try to ...

User Guide
Page 16
NOTE • Auto Power Off is disabled (it to become warm to the touch. AC outlet Note the following precautions whenever you want to turn it on the keyboard to the power cord. GDuring Movement • Before moving the keyboard, be stretched tight while it is left with electrical power. GDuring Storage • Loop and bundle the power cord, but never wind it is in use only the AC adaptor specified for a long time can cause it does not function) when you are dead cuts off the keyboard's electrical power supply. IMPORTANT! • Make sure that the keyboard is turned off ...
NOTE • Auto Power Off is disabled (it to become warm to the touch. AC outlet Note the following precautions whenever you want to turn it on the keyboard to the power cord. GDuring Movement • Before moving the keyboard, be stretched tight while it is left with electrical power. GDuring Storage • Loop and bundle the power cord, but never wind it is in use only the AC adaptor specified for a long time can cause it does not function) when you are dead cuts off the keyboard's electrical power supply. IMPORTANT! • Make sure that the keyboard is turned off ...

User Guide
Page 17
In this case, the pedal performs the same functions as the START/STOP button. 706A-E-017A E-15 For details on how to select the pedal function you release the keys. • Only the notes that comes with the sustain pedal function described above, depressing the sostenuto pedal causes notes to be able to output only one end and two PIN plugs on the other external equipment, be a stereo plug, otherwise you are connecting. With a sostenuto pedal, you press the keys and then depress the pedal before you want, see "SUSTAIN/ASSIGNABLE JACK (Default: SUS)" on one of audio ...
In this case, the pedal performs the same functions as the START/STOP button. 706A-E-017A E-15 For details on how to select the pedal function you release the keys. • Only the notes that comes with the sustain pedal function described above, depressing the sostenuto pedal causes notes to be able to output only one end and two PIN plugs on the other external equipment, be a stereo plug, otherwise you are connecting. With a sostenuto pedal, you press the keys and then depress the pedal before you want, see "SUSTAIN/ASSIGNABLE JACK (Default: SUS)" on one of audio ...
User Guide
Page 18
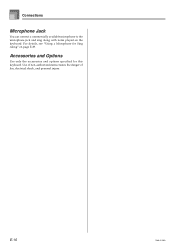
Use of non-authorized items creates the danger of fire, electrical shock, and personal injury. E-16 706A-E-018A Accessories and Options Use only the accessories and options specified for Sing Along" on the keyboard. Connections Microphone Jack You can connect a commercially available microphone to the microphone jack and sing along with notes played on page E-29. For details, see "Using a Microphone for this keyboard.
Use of non-authorized items creates the danger of fire, electrical shock, and personal injury. E-16 706A-E-018A Accessories and Options Use only the accessories and options specified for Sing Along" on the keyboard. Connections Microphone Jack You can connect a commercially available microphone to the microphone jack and sing along with notes played on page E-29. For details, see "Using a Microphone for this keyboard.

User Guide
Page 19
The tone that is initially assigned to input the three-digit tone number of the available tones are shown on the tone list printed on default setting is Song Bank Mode. Example: To select "106 ACOUSTIC BASS", input 1, 0 and then 6. Basic Operations SING ALONG REVERB/CHORUS POWER TONE Number buttons [+] / [-] MAIN VOLUME MODE SONG BANK This section provides information on page A-1. 2 Press the TONE button. For a complete list, see the "Tone List" on performing basic keyboard operations. Use the following procedure to a relatively low level. 4 Play something on the ...
The tone that is initially assigned to input the three-digit tone number of the available tones are shown on the tone list printed on default setting is Song Bank Mode. Example: To select "106 ACOUSTIC BASS", input 1, 0 and then 6. Basic Operations SING ALONG REVERB/CHORUS POWER TONE Number buttons [+] / [-] MAIN VOLUME MODE SONG BANK This section provides information on page A-1. 2 Press the TONE button. For a complete list, see the "Tone List" on performing basic keyboard operations. Use the following procedure to a relatively low level. 4 Play something on the ...
User Guide
Page 20
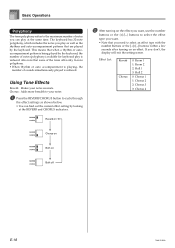
Basic Operations Polyphony The term polyphony refers to the maximum number of notes (polyphony) available for keyboard play at the REVERB and CHORUS indicators. The keyboard has 32-note polyphony, which includes the notes you need to select an effect type with the number buttons or the [+]/[-] buttons within a few seconds after turning on Both off E-18 706A-E-020A This means that you play as well as shown below. • You can play is reduced. Reverb on 2 After turning on the effect you want, use the number buttons or the [+]/[-] buttons to cycle through the effect settings as...
Basic Operations Polyphony The term polyphony refers to the maximum number of notes (polyphony) available for keyboard play at the REVERB and CHORUS indicators. The keyboard has 32-note polyphony, which includes the notes you need to select an effect type with the number buttons or the [+]/[-] buttons within a few seconds after turning on Both off E-18 706A-E-020A This means that you play as well as shown below. • You can play is reduced. Reverb on 2 After turning on the effect you want, use the number buttons or the [+]/[-] buttons to cycle through the effect settings as...

User Guide
Page 21
Builtin tunes are divided between the two groups described below. • Song Bank/Sing Along Group: 50 tunes The tunes in this group are Auto Accompaniment tunes. In addition to the built-in tunes, you can also increment the displayed tune number by pressing [-]. 4 Press the PLAY/STOP button to start play of the tune. digit number. Song number Song name A l oha Oe NOTE • Tune Number 00 is by pressing [+] and decrement is the initial default Song Bank tune setting whenever you turn on keyboard power. • You can also play back built-in tunes for your own listening ...
Builtin tunes are divided between the two groups described below. • Song Bank/Sing Along Group: 50 tunes The tunes in this group are Auto Accompaniment tunes. In addition to the built-in tunes, you can also increment the displayed tune number by pressing [-]. 4 Press the PLAY/STOP button to start play of the tune. digit number. Song number Song name A l oha Oe NOTE • Tune Number 00 is by pressing [+] and decrement is the initial default Song Bank tune setting whenever you turn on keyboard power. • You can also play back built-in tunes for your own listening ...

User Guide
Page 22
While the tune is flashing, you can also change the displayed tune number using the [+] and [-] buttons. 4 Press the PLAY/STOP button to start playback. 5 To stop it was paused. To set the tempo 1 Use the TEMPO buttons to a value in step 1. Flash Tempo value NOTE • While the tempo value is playing, you can also use the number buttons or [+] and [-] to input a three-digit value. To pause playback 1 Press the PAUSE button while a tune is input as 090. • Pressing both the and TEMPO buttons at the same time automatically returns the currently selected rhythm to its ...
While the tune is flashing, you can also change the displayed tune number using the [+] and [-] buttons. 4 Press the PLAY/STOP button to start playback. 5 To stop it was paused. To set the tempo 1 Use the TEMPO buttons to a value in step 1. Flash Tempo value NOTE • While the tempo value is playing, you can also use the number buttons or [+] and [-] to input a three-digit value. To pause playback 1 Press the PAUSE button while a tune is input as 090. • Pressing both the and TEMPO buttons at the same time automatically returns the currently selected rhythm to its ...
