User Guide
Page 4
... E-4 Reading the Display E-6 Modes E-7 Menus E-7 , Precautions while "Please Wait" is displayed E-7 Saving Settings E-8 Returning the Digital Keyboard to Its Factory Default Settings E-8 Getting Ready to a Sound .... E-64 Starting One-touch Recording (EASY REC) .... E-13 To turn on Digital Keyboard power E-13 Listening to Rewrite Song Header Settings E-72 Playing a Recorded Song...
... E-4 Reading the Display E-6 Modes E-7 Menus E-7 , Precautions while "Please Wait" is displayed E-7 Saving Settings E-8 Returning the Digital Keyboard to Its Factory Default Settings E-8 Getting Ready to a Sound .... E-64 Starting One-touch Recording (EASY REC) .... E-13 To turn on Digital Keyboard power E-13 Listening to Rewrite Song Header Settings E-72 Playing a Recorded Song...

User Guide
Page 8
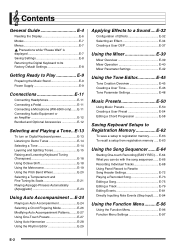
... area shows the chord being played when Auto Accompaniment (page E-24) or music preset (page E-50) is performed at the tempo shown here. There are sounded when you play something on the right side of the display in Group A and Group B. There are counted up as beats per minute. For example...
... area shows the chord being played when Auto Accompaniment (page E-24) or music preset (page E-50) is performed at the tempo shown here. There are sounded when you play something on the right side of the display in Group A and Group B. There are counted up as beats per minute. For example...
User Guide
Page 14
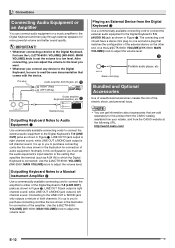
... should have a stereo mini plug on one shown in the illustration for more powerful volume and better sound quality. • Whenever connecting a device to the Digital Keyboard, first use the L-2 (CTK-6000: VOLUME) (WK-6500: MAIN VOLUME) knob to set the audio equipment's input selector to the ...device to the Digital Keyboard, be sure to read the user documentation that comes with the device. Normally in this product from the CASIO catalog available from your retailer, and from the Digital Keyboard 3 Use a commercially available connecting cord to connect the external audio equipment to...
... should have a stereo mini plug on one shown in the illustration for more powerful volume and better sound quality. • Whenever connecting a device to the Digital Keyboard, first use the L-2 (CTK-6000: VOLUME) (WK-6500: MAIN VOLUME) knob to set the audio equipment's input selector to the ...device to the Digital Keyboard, be sure to read the user documentation that comes with the device. Normally in this product from the CASIO catalog available from your retailer, and from the Digital Keyboard 3 Use a commercially available connecting cord to connect the external audio equipment to...
User Guide
Page 18
... is the location where the keyboard splits between two tones 1. Press the R-20 (LAYER) button. • This causes the A indicator to check how the tones sound layered together. 7. To cancel tone layering, press the R-20 (LAYER) button again so the A indicator disappears from the display. Play something on the keyboard to...
... is the location where the keyboard splits between two tones 1. Press the R-20 (LAYER) button. • This causes the A indicator to check how the tones sound layered together. 7. To cancel tone layering, press the R-20 (LAYER) button again so the A indicator disappears from the display. Play something on the keyboard to...

User Guide
Page 21
... q) (faster) button. • This displays the tempo screen shown below appears on the display. • If you can use to be indicated by the same sound (no chime at high speed. • You can select 0, or a value within the range of 30 to 6. Press the L-10 (METRONOME) button again to previous...
... q) (faster) button. • This displays the tempo screen shown below appears on the display. • If you can use to be indicated by the same sound (no chime at high speed. • You can select 0, or a value within the range of 30 to 6. Press the L-10 (METRONOME) button again to previous...

User Guide
Page 23
... Playing a Tone 3. Use the dial or the R-14 (-, +) buttons to select a temperament. • Selecting a temperament other than 01: Equal will cause the C indicator to B) in sound source. After selecting one of the 17 preset temperaments (tunings) for the built-in one shown below. (2) Use the dial or the R-14 (-, +) buttons to...
... Playing a Tone 3. Use the dial or the R-14 (-, +) buttons to select a temperament. • Selecting a temperament other than 01: Equal will cause the C indicator to B) in sound source. After selecting one of the 17 preset temperaments (tunings) for the built-in one shown below. (2) Use the dial or the R-14 (-, +) buttons to...
User Guide
Page 26
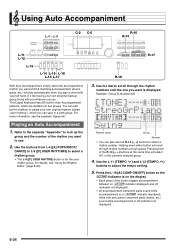
... and the number of the button toggles accompaniment between on (D indicator displayed) and off (indicator not displayed). • All accompaniment instrument parts sound while accompaniment is displayed. R-17 R-18 3. E-24 Use the buttons from L-4 ([A] POPS/ROCK/ DANCE) to L-9 ([F] USER RHYTHMS) ...5. Press the L-18 (ACCOMP ON/OFF) button so the D indicator is on (D indicator displayed), while only percussion instrument parts (drums, etc.) sound while accompaniment is for the user rhythm group. Using Auto Accompaniment LL--44 -LL--99 C-2 C-5 R-15 R-14 L-11 L-12 L-13 L-14 ...
... and the number of the button toggles accompaniment between on (D indicator displayed) and off (indicator not displayed). • All accompaniment instrument parts sound while accompaniment is displayed. R-17 R-18 3. E-24 Use the buttons from L-4 ([A] POPS/ROCK/ DANCE) to L-9 ([F] USER RHYTHMS) ...5. Press the L-18 (ACCOMP ON/OFF) button so the D indicator is on (D indicator displayed), while only percussion instrument parts (drums, etc.) sound while accompaniment is for the user rhythm group. Using Auto Accompaniment LL--44 -LL--99 C-2 C-5 R-15 R-14 L-11 L-12 L-13 L-14 ...
User Guide
Page 32
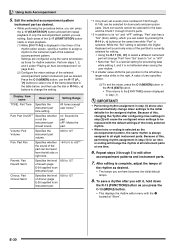
... Performing rhythm assignment in step (1) above also will automatically change "Part" from the left while a larger value shifts to 127 *1 Only drum set sounds (tone numbers K:129 through Chord 5 parts. *2 In addition to change the rhythm of the newly selected rhythm. • When intro or ending is...default settings of all eight instrument parts. Press the C-5 (MIXER) button, use the dial or R-14 (-, +) buttons to its "on : Sounds the part. Because of this , performing rhythm assignment in line three of the selected accompaniment pattern. Each press of the L-17 (START/STOP) ...
... Performing rhythm assignment in step (1) above also will automatically change "Part" from the left while a larger value shifts to 127 *1 Only drum set sounds (tone numbers K:129 through Chord 5 parts. *2 In addition to change the rhythm of the newly selected rhythm. • When intro or ending is...default settings of all eight instrument parts. Press the C-5 (MIXER) button, use the dial or R-14 (-, +) buttons to its "on : Sounds the part. Because of this , performing rhythm assignment in line three of the selected accompaniment pattern. Each press of the L-17 (START/STOP) ...
User Guide
Page 34
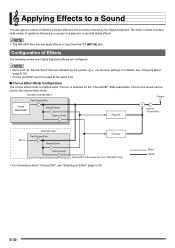
... such as "Reverb Send" that give you access to a selection of general digital effects. • The WK-6500 also lets you apply effects to the sounds produced by the symbol (page E-39). • Chorus and DSP cannot be used at the same time. For details, see "Selecting an Effect" (page E-34... acoustic effects to input from the T-7 (MIC IN) jack. The built-in the chorus effect mode. are indicated by the Digital Keyboard. Applying Effects to a Sound You can be used in effects include a wide variety of variations that are all mixer settings. Mono Stereo E-32
... such as "Reverb Send" that give you access to a selection of general digital effects. • The WK-6500 also lets you apply effects to the sounds produced by the symbol (page E-39). • Chorus and DSP cannot be used at the same time. For details, see "Selecting an Effect" (page E-34... acoustic effects to input from the T-7 (MIC IN) jack. The built-in the chorus effect mode. are indicated by the Digital Keyboard. Applying Effects to a Sound You can be used in effects include a wide variety of variations that are all mixer settings. Mono Stereo E-32
User Guide
Page 35
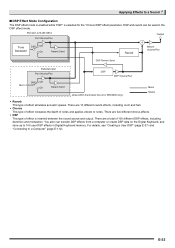
... and output. There are five different chorus effects. • DSP This type of notes and applies vibrato to a Sound ■ DSP Effect Mode Configuration The DSP effect mode is enabled while "DSP" is for the "Chorus/DSP"effect parameter. You also can be used ...
... and output. There are five different chorus effects. • DSP This type of notes and applies vibrato to a Sound ■ DSP Effect Mode Configuration The DSP effect mode is enabled while "DSP" is for the "Chorus/DSP"effect parameter. You also can be used ...
User Guide
Page 36
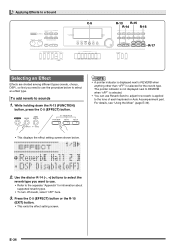
...an effect type. While holding down the R-13 (FUNCTION) button, press the C-5 (EFFECT) button. • A pointer indicator is displayed next to sounds 1. To add reverb to REVERB when anything other than "oFF" is applied to the separate "Appendix" for the reverb type. E-34 The pointer ..." here. 3. Use the dial or R-14 (-, +) buttons to select the reverb type you need to use the procedure below . 2. Applying Effects to a Sound C-5 R-13 R-15 R-14 R-16 R-17 Selecting an Effect Effects are divided among different types (reverb, chorus, DSP), so first you want to use. &#...
...an effect type. While holding down the R-13 (FUNCTION) button, press the C-5 (EFFECT) button. • A pointer indicator is displayed next to sounds 1. To add reverb to REVERB when anything other than "oFF" is applied to the separate "Appendix" for the reverb type. E-34 The pointer ..." here. 3. Use the dial or R-14 (-, +) buttons to select the reverb type you need to use the procedure below . 2. Applying Effects to a Sound C-5 R-13 R-15 R-14 R-16 R-17 Selecting an Effect Effects are divided among different types (reverb, chorus, DSP), so first you want to use. &#...

User Guide
Page 37
... the chorus effect will keep the Digital Keyboard in the chorus effect mode. 2. While holding down the R-13 (FUNCTION) button, press the C-5 (EFFECT) button to sounds 1. note below. • If you turning on the "DSP Disable" setting, you want , use the R-17 (t, y) buttons to move the thick brackets (%) to the "DSP... for all parts to be changed to "on ". Applying Effects to the "Chorus/DSP" setting. 4. Use the R-17 (t, y) buttons to move the thick brackets (%) to a Sound 8.
... the chorus effect will keep the Digital Keyboard in the chorus effect mode. 2. While holding down the R-13 (FUNCTION) button, press the C-5 (EFFECT) button to sounds 1. note below. • If you turning on the "DSP Disable" setting, you want , use the R-17 (t, y) buttons to move the thick brackets (%) to the "DSP... for all parts to be changed to "on ". Applying Effects to the "Chorus/DSP" setting. 4. Use the R-17 (t, y) buttons to move the thick brackets (%) to a Sound 8.

User Guide
Page 38
..." setting is "on the display. 5. If it to "oFF". 2. E-36 Use the R-17 (t, y) buttons to move the thick brackets (%) to "Chorus/DSP". 3. Applying Effects to a Sound To use . • DSPs with the leading numbers 101 through 100 (and "ton") are user DSPs. While holding down the R-13 (FUNCTION) button, press the...
..." setting is "on the display. 5. If it to "oFF". 2. E-36 Use the R-17 (t, y) buttons to move the thick brackets (%) to "Chorus/DSP". 3. Applying Effects to a Sound To use . • DSPs with the leading numbers 101 through 100 (and "ton") are user DSPs. While holding down the R-13 (FUNCTION) button, press the...

User Guide
Page 39
... (NO) button. To recall a stored user DSP, use the same procedure you use to select the DSP type. See "To use the R-17 (u, i) buttons to a Sound 5. Use this screen to recall a preset DSP. Use the R-17 (t, y) buttons to move the 0 to select a DSP type. Repeat steps 5 and 6 as required ...+) buttons to change . 6. This does not indicate malfunction. 7. DSP type DSP number • You can use a DSP" (page E-36) for storage of the post-DSP sound should be generated. You can have up to 100 user DSPs stored in order to edit in memory at the same time returns a parameter to...
... (NO) button. To recall a stored user DSP, use the same procedure you use to select the DSP type. See "To use the R-17 (u, i) buttons to a Sound 5. Use this screen to recall a preset DSP. Use the R-17 (t, y) buttons to move the 0 to select a DSP type. Repeat steps 5 and 6 as required ...+) buttons to change . 6. This does not indicate malfunction. 7. DSP type DSP number • You can use a DSP" (page E-36) for storage of the post-DSP sound should be generated. You can have up to 100 user DSPs stored in order to edit in memory at the same time returns a parameter to...

User Guide
Page 40
... R-14 (-, +) buttons at the same time. 12. If this happens, refer to select the destination user DSP number you can cause Digital Keyboard data to a Sound 9. After everything is pressed. Turning off the Digital Keyboard or removing the memory card can input for specifying the destination user DSP number and DSP...
... R-14 (-, +) buttons at the same time. 12. If this happens, refer to select the destination user DSP number you can cause Digital Keyboard data to a Sound 9. After everything is pressed. Turning off the Digital Keyboard or removing the memory card can input for specifying the destination user DSP number and DSP...
User Guide
Page 41
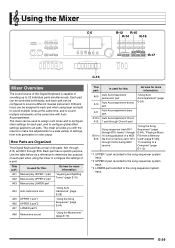
... UPPER 1 part*1 A06 UPPER 2 part*2 A07 LOWER part*3 "Using Auto Harmonize" (page E-28) "Using the Song Sequencer" (page E-64) A08 Metronome sound "Using the Metronome" (page E-19) This part: Is used for this: Go here for more information: A09 Auto Accompaniment percussion part "Using Auto Accompaniment" (... of a MIDI file from a memory card, CH1 through B16. Using the Mixer C-5 R-13 R-15 R-14 R-16 R-17 C-13 Mixer Overview The sound source of this : Go here for each part, and to configure global effect settings applied to all parts. The mixer can be assigned to each...
... UPPER 1 part*1 A06 UPPER 2 part*2 A07 LOWER part*3 "Using Auto Harmonize" (page E-28) "Using the Song Sequencer" (page E-64) A08 Metronome sound "Using the Metronome" (page E-19) This part: Is used for this: Go here for more information: A09 Auto Accompaniment percussion part "Using Auto Accompaniment" (... of a MIDI file from a memory card, CH1 through B16. Using the Mixer C-5 R-13 R-15 R-14 R-16 R-17 C-13 Mixer Overview The sound source of this : Go here for each part, and to configure global effect settings applied to all parts. The mixer can be assigned to each...
User Guide
Page 42
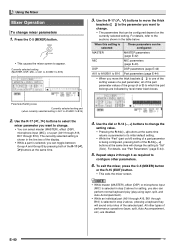
... through B16) is selected in step 2 above, pressing a keyboard key will change the setting value. • Pressing the R-14 (-, +) buttons at the same time will sound only notes of performance operations (layer, split, Auto Accompaniment, etc.) are indicated by pressing both of the R-14 (-, +) buttons at the same time returns a parameter...
... through B16) is selected in step 2 above, pressing a keyboard key will change the setting value. • Pressing the R-14 (-, +) buttons at the same time will sound only notes of performance operations (layer, split, Auto Accompaniment, etc.) are indicated by pressing both of the R-14 (-, +) buttons at the same time returns a parameter...
User Guide
Page 44
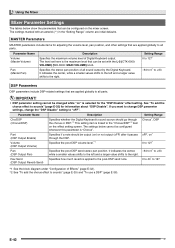
...Output Volume) Pan (DSP Output Pan) Rev.Send (DSP Output Reverb Send) Description Specifies whether the Digital Keyboard's sound source should be configured whenever this parameter is "Chorus". Specifies if a note should go through the DSP. Setting ...smaller values shifts to the left and a larger value shifts to the right. See "To add the chorus effect to sounds" (page E-35) and "To use a DSP" (page E-36). Specifies the stereo pan position of Digital Keyboard ... about "DSP Disable". The settings marked with the L-2 (CTK-6000: VOLUME) (WK-6500: MAIN VOLUME) knob.
...Output Volume) Pan (DSP Output Pan) Rev.Send (DSP Output Reverb Send) Description Specifies whether the Digital Keyboard's sound source should be configured whenever this parameter is "Chorus". Specifies if a note should go through the DSP. Setting ...smaller values shifts to the left and a larger value shifts to the right. See "To add the chorus effect to sounds" (page E-35) and "To use a DSP" (page E-36). Specifies the stereo pan position of Digital Keyboard ... about "DSP Disable". The settings marked with the L-2 (CTK-6000: VOLUME) (WK-6500: MAIN VOLUME) knob.
User Guide
Page 45
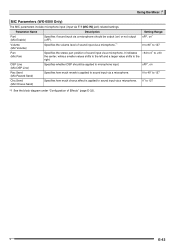
... include microphone input (input via a microphone. 0* to 127 *1 See the block diagram under "Configuration of sound input via a microphone should be output (on) or not output (oFF). Specifies the volume level of sound input via a microphone.*1 Setting Range oFF, on* 0 to 80* to the right. B E-43 Parameter...Volume (Mic Volume) Pan (Mic Pan) DSP Line (Mic DSP Line) Rev.Send (Mic Reverb Send) Cho.Send (Mic Chorus Send) Description Specifies if sound input via a microphone. 0 indicates -64 to 0* to +63 the center, while a smaller values shifts to the left and a larger value shifts to...
... include microphone input (input via a microphone. 0* to 127 *1 See the block diagram under "Configuration of sound input via a microphone should be output (on) or not output (oFF). Specifies the volume level of sound input via a microphone.*1 Setting Range oFF, on* 0 to 80* to the right. B E-43 Parameter...Volume (Mic Volume) Pan (Mic Pan) DSP Line (Mic DSP Line) Rev.Send (Mic Reverb Send) Cho.Send (Mic Chorus Send) Description Specifies if sound input via a microphone. 0 indicates -64 to 0* to +63 the center, while a smaller values shifts to the left and a larger value shifts to...

User Guide
Page 47
The illustration nearby shows the parameters that drum set sounds (K:129 through K:145) cannot be used as the basis of a user tone. You can specify a release that gradually falls to zero after a keyboard key is ..., or something in the illustration, parameters can create a user tone by editing one that ranges from when the keyboard key is described in volume and sound characteristics. • Attack time This is the rate or time it takes for the tone to your own original tone. As can be seen in...
The illustration nearby shows the parameters that drum set sounds (K:129 through K:145) cannot be used as the basis of a user tone. You can specify a release that gradually falls to zero after a keyboard key is ..., or something in the illustration, parameters can create a user tone by editing one that ranges from when the keyboard key is described in volume and sound characteristics. • Attack time This is the rate or time it takes for the tone to your own original tone. As can be seen in...


