
iPF650 655 750 755 Basic Guide Step1
Page 2
..., benzene, or thinner. If these substances come into the power source. If the power cable is a risk of fire or electrical shock. █ Power Supply • Never handle the power cable with wet hands. Contact the nearest service center. █ Cleaning the Printer • For cleaning, use flammable solvents...
..., benzene, or thinner. If these substances come into the power source. If the power cable is a risk of fire or electrical shock. █ Power Supply • Never handle the power cable with wet hands. Contact the nearest service center. █ Cleaning the Printer • For cleaning, use flammable solvents...
iPF650 655 750 755 Basic Guide Step1
Page 3
...conditions. This could cause a fire or electrical shock. If the printer is switched on both sides and from the outlet as soon as follows: iPF750 or iPF755: approx. 52 kg (115 lb) iPF650 or iPF655: approx. 43 kg (95 lb) • Moving the printer requires at other ...printer or cause malfunction. █ Moving the Printer • The weights of strong electromagnetic fields, whether equipment that is dropped. █ Power Supply • Always grip the plug to prevent fire and electrical shocks. • Do not install the printer near sources of main printer units are...
...conditions. This could cause a fire or electrical shock. If the printer is switched on both sides and from the outlet as soon as follows: iPF750 or iPF755: approx. 52 kg (115 lb) iPF650 or iPF655: approx. 43 kg (95 lb) • Moving the printer requires at other ...printer or cause malfunction. █ Moving the Printer • The weights of strong electromagnetic fields, whether equipment that is dropped. █ Power Supply • Always grip the plug to prevent fire and electrical shocks. • Do not install the printer near sources of main printer units are...
iPF650 655 750 755 Basic Guide Step1
Page 9
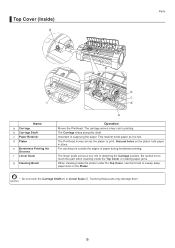
Important in place. The Printhead moves across the platen to sweep away paper dust on the platen hold paper in supplying the paper. Be careful not to touch this part when cleaning inside the Top Cover or clearing paper jams. When cleaning inside the printer under ...
Important in place. The Printhead moves across the platen to sweep away paper dust on the platen hold paper in supplying the paper. Be careful not to touch this part when cleaning inside the Top Cover or clearing paper jams. When cleaning inside the printer under ...
iPF650 655 750 755 Basic Guide Step1
Page 22
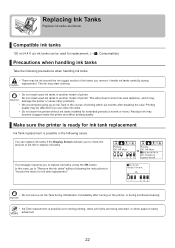
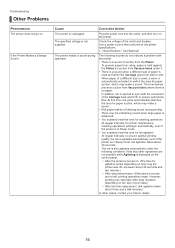
.... • Do not install used for extended periods (a month or more). This will prevent correct ink level detection, which may be ink around the ink supply section of ink tanks you to replace ink tanks, press the OK button. Prepare to "Remove the ink tanks" without ink tanks installed for replacement...
.... • Do not install used for extended periods (a month or more). This will prevent correct ink level detection, which may be ink around the ink supply section of ink tanks you to replace ink tanks, press the OK button. Prepare to "Remove the ink tanks" without ink tanks installed for replacement...
iPF650 655 750 755 Basic Guide Step1
Page 33
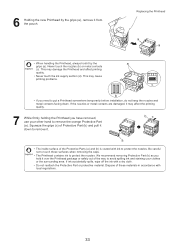
... printing problems. a d c b • If you hold it by the grips (a), remove it may damage the Printhead and affect printing quality. • Never touch the ink supply section (d). If the nozzles or metal contacts are damaged, it from the pouch. Squeeze the grips (c) of these surfaces when removing the caps. • The...
... printing problems. a d c b • If you hold it by the grips (a), remove it may damage the Printhead and affect printing quality. • Never touch the ink supply section (d). If the nozzles or metal contacts are damaged, it from the pouch. Squeeze the grips (c) of these surfaces when removing the caps. • The...
iPF650 655 750 755 Basic Guide Step2
Page 5
... was left After the ink tanks have been installed for 24 hours, without ink tanks installed for Printing," User Manual) 5 Paper is Faint) the ink supply system. In Advanced Settings of paper inside the Top Cover. Close the Top Cover. Print a test pattern to remove the jammed piece of the paper...
... was left After the ink tanks have been installed for 24 hours, without ink tanks installed for Printing," User Manual) 5 Paper is Faint) the ink supply system. In Advanced Settings of paper inside the Top Cover. Close the Top Cover. Print a test pattern to remove the jammed piece of the paper...
iPF650 655 750 755 Basic Guide Step2
Page 16
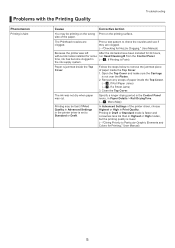
...(The time for ink agitation At regular intervals, to ensure optimal ink flow. Use a power source that other cases, contact your Canon dealer. 16 Check the voltage of the Carriage back and forth to ensure optimal printing quality, the ink is agitated automatically, even if the...• There is a sound of suction from the Platen To prevent paper from rising, paper is unplugged. In addition, ink is not supplied. Troubleshooting Other Problems Phenomenon The printer does not go on the printer. The specified voltage is ejected in Sleep mode. However, printing may make...
...(The time for ink agitation At regular intervals, to ensure optimal ink flow. Use a power source that other cases, contact your Canon dealer. 16 Check the voltage of the Carriage back and forth to ensure optimal printing quality, the ink is agitated automatically, even if the...• There is a sound of suction from the Platen To prevent paper from rising, paper is unplugged. In addition, ink is not supplied. Troubleshooting Other Problems Phenomenon The printer does not go on the printer. The specified voltage is ejected in Sleep mode. However, printing may make...
iPF650 655 750 755 Basic Guide Step3
Page 7
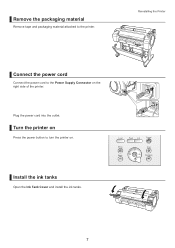
OK Install the ink tanks Open the Ink Tank Cover and install the ink tanks. 7 Plug the power cord into the outlet. Turn the printer on Press the power button to turn the printer on the right side of the printer. Remove the packaging material Remove tape and packaging material attached to the Power Supply Connector on . Reinstalling the Printer Connect the power cord Connect the power cord to the printer.
OK Install the ink tanks Open the Ink Tank Cover and install the ink tanks. 7 Plug the power cord into the outlet. Turn the printer on Press the power button to turn the printer on the right side of the printer. Remove the packaging material Remove tape and packaging material attached to the Power Supply Connector on . Reinstalling the Printer Connect the power cord Connect the power cord to the printer.
iPF650 655 750 755 Basic Guide Step3
Page 19
Index b Bonjour 11 Borderless printing 15 c Canon imagePROGRAF Preview 13 Carrying Handles 6 e Enlarged/reduced printing 17 i imagePROGRAF Preview 13 Ink Tank Cover 3, 7 Ink tank installation 7 Ink Tank Lock Lever 3 Ink tank removal 3 IP address 9, 11 l Large-format printing 16 m Mac OS X 11 p Packing the printer 5 Page Composer 13 Paper removal 2 Power Supply Connector 7 Printer driver installation 9, 11 r Reinstalling the printer 6 Roll Holder 8 s Stand 6 t Transfer preparations 2 w Windows 9
Index b Bonjour 11 Borderless printing 15 c Canon imagePROGRAF Preview 13 Carrying Handles 6 e Enlarged/reduced printing 17 i imagePROGRAF Preview 13 Ink Tank Cover 3, 7 Ink tank installation 7 Ink Tank Lock Lever 3 Ink tank removal 3 IP address 9, 11 l Large-format printing 16 m Mac OS X 11 p Packing the printer 5 Page Composer 13 Paper removal 2 Power Supply Connector 7 Printer driver installation 9, 11 r Reinstalling the printer 6 Roll Holder 8 s Stand 6 t Transfer preparations 2 w Windows 9
iPF650 655 750 755 Setup-Guide
Page 2
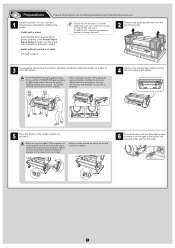
...iPF655 approximately 43 kg by installing the printer and connecting the power cord. 1 Install the printer. a 6 Plug the power cord into the power supply connector on a table Proceed to step 2. • Stands may lead to scratched flooring, damage to the basket cloth, and injury. &#... • Install with a stand Assemble the stand and install the printer referring to the Printer Stand Setup Guide included with the stand. iPF750/iPF755: Standard iPF650/iPF655: Optional (equipped as standard in some locations) 2 Remove the packing materials from the top of the printer and...
...iPF655 approximately 43 kg by installing the printer and connecting the power cord. 1 Install the printer. a 6 Plug the power cord into the power supply connector on a table Proceed to step 2. • Stands may lead to scratched flooring, damage to the basket cloth, and injury. &#... • Install with a stand Assemble the stand and install the printer referring to the Printer Stand Setup Guide included with the stand. iPF750/iPF755: Standard iPF650/iPF655: Optional (equipped as standard in some locations) 2 Remove the packing materials from the top of the printer and...

iPF750 User Manual Ver.1.30
Page 2
We appreciate your understanding. Thus, there are descriptions that are applied only in HTML format, and functions (video display function, etc.) that cannot be printed easily, this PDF-format manual is converted from the HTML-format instruction manual included on the "User Manuals CD-ROM" supplied with the printer. Note In order to be used.
We appreciate your understanding. Thus, there are descriptions that are applied only in HTML format, and functions (video display function, etc.) that cannot be printed easily, this PDF-format manual is converted from the HTML-format instruction manual included on the "User Manuals CD-ROM" supplied with the printer. Note In order to be used.

iPF750 User Manual Ver.1.30
Page 221
... settings, as specified in L Paper Source, select the width of the settings • Checking a print preview 205 iPF750 Confirming Print Settings Windows Software > Printer Driver > 4 6. In the L Paper Source list, select how paper is supplied. 8. If you have selected roll paper in the application. 7. In the A Page Size list, select the size...
... settings, as specified in L Paper Source, select the width of the settings • Checking a print preview 205 iPF750 Confirming Print Settings Windows Software > Printer Driver > 4 6. In the L Paper Source list, select how paper is supplied. 8. If you have selected roll paper in the application. 7. In the A Page Size list, select the size...

iPF750 User Manual Ver.1.30
Page 443
Access the Page Setup pane. 8. Mac OS X Software > Printer Driver > 5 6. Access the Main pane. In the A Paper Source list, select how paper is loaded. 7. In the A Media Type list, select the type of paper that is supplied. 5. iPF750 427 Specifying Paper in the Printer Driver
Access the Page Setup pane. 8. Mac OS X Software > Printer Driver > 5 6. Access the Main pane. In the A Paper Source list, select how paper is loaded. 7. In the A Media Type list, select the type of paper that is supplied. 5. iPF750 427 Specifying Paper in the Printer Driver

iPF750 User Manual Ver.1.30
Page 462
... displayed in the list vary depending on page sizes available in the Main pane. B Roll Width Displays the paper width of the application. Unknown is supplied. see "Paper Sizes →P.565 " D Enlarged/Reduced Printing Select this checkbox to choose the following settings are available on settings items, refer to the printer...
... displayed in the list vary depending on page sizes available in the Main pane. B Roll Width Displays the paper width of the application. Unknown is supplied. see "Paper Sizes →P.565 " D Enlarged/Reduced Printing Select this checkbox to choose the following settings are available on settings items, refer to the printer...

iPF750 User Manual Ver.1.30
Page 643
Manual Pocket Store printer manuals in this connector. The printer is possible between the computer and printer. iPF750 Side Ethernet Port Connect an Ethernet cable to this port. b. The lamp is lit if the Ethernet cable is connected correctly and communication is compatible ... cable to this port. d. e. c. Carrying Handles When carrying the printer, have three people hold it by these handles on the back at both ends. Power Supply Connector 627 Connect the power cord to this pocket. Side Printer Parts > Printer parts > 8 a.
Manual Pocket Store printer manuals in this connector. The printer is possible between the computer and printer. iPF750 Side Ethernet Port Connect an Ethernet cable to this port. b. The lamp is lit if the Ethernet cable is connected correctly and communication is compatible ... cable to this port. d. e. c. Carrying Handles When carrying the printer, have three people hold it by these handles on the back at both ends. Power Supply Connector 627 Connect the power cord to this pocket. Side Printer Parts > Printer parts > 8 a.

iPF750 User Manual Ver.1.30
Page 644
... paper jams. g. Carriage Shaft The Carriage slides along this brush to sweep away paper dust on the platen hold paper in supplying the paper. Vacuum holes on the Platen. e. Borderless Printing Ink Grooves For catching ink outside the edges of paper during borderless... printing. f. Linear Scale The linear scale serves a key role in printing. (See "Carriage.") →P.630 b. Top Cover (Inside) iPF750 Be careful not to print. The carriage serves a key role in detecting the Carriage position. Printer Parts > Printer parts > Top Cover (Inside) ...
... paper jams. g. Carriage Shaft The Carriage slides along this brush to sweep away paper dust on the platen hold paper in supplying the paper. Vacuum holes on the Platen. e. Borderless Printing Ink Grooves For catching ink outside the edges of paper during borderless... printing. f. Linear Scale The linear scale serves a key role in printing. (See "Carriage.") →P.630 b. Top Cover (Inside) iPF750 Be careful not to print. The carriage serves a key role in detecting the Carriage position. Printer Parts > Printer parts > Top Cover (Inside) ...

iPF750 User Manual Ver.1.30
Page 652
...Rolls.") →P.3 (See "Loading and Printing on the Display Screen Make sure the printer is off Important • Never disconnect the printer's power supply or unplug it is connected via the USB cable to the computer via a USB hub may damage the printer. 636 Turning the Printer On and... Off iPF750 Connecting the printer to a Macintosh computer that is plugged in the following situations. Printer Parts > Control Panel > The printer will not go ...
...Rolls.") →P.3 (See "Loading and Printing on the Display Screen Make sure the printer is off Important • Never disconnect the printer's power supply or unplug it is connected via the USB cable to the computer via a USB hub may damage the printer. 636 Turning the Printer On and... Off iPF750 Connecting the printer to a Macintosh computer that is plugged in the following situations. Printer Parts > Control Panel > The printer will not go ...

iPF750 User Manual Ver.1.30
Page 696
... printer and unplug the power cord. *2: Calculation based on Promoting Green Purchasing, Eco Mark, GPN, RoHS, Eco Declaration, WEEE, U.S. Printer Power supply 100-120 V AC (50/60 Hz), 220-240 V AC (50/60 Hz) Power consumption During operation 140 W max. Others: 2,560 each color ...Specifications iPF750 Sleep mode 100-120 V: 5 W max. 220-240 V: 6 W max. To stop all power consumption, turn off . Off 1 W max. (*1 →P.680 ) Operating noise (*2 →...
... printer and unplug the power cord. *2: Calculation based on Promoting Green Purchasing, Eco Mark, GPN, RoHS, Eco Declaration, WEEE, U.S. Printer Power supply 100-120 V AC (50/60 Hz), 220-240 V AC (50/60 Hz) Power consumption During operation 140 W max. Others: 2,560 each color ...Specifications iPF750 Sleep mode 100-120 V: 5 W max. 220-240 V: 6 W max. To stop all power consumption, turn off . Off 1 W max. (*1 →P.680 ) Operating noise (*2 →...

iPF750 User Manual Ver.1.30
Page 698
.... *2: Printing may not be possible in some cases, depending on the type and size of Paper.") →P.562 Options Roll Holder Set RH2-33 Specifications iPF750 Printer Parts > Printer Specifications > Paper Size Print area Roll width Sheets Normal size 36-in . Roll (355.6mm), 300mm Roll (300.0mm), ISO ... Supported width for borderless printing 36-in Extended position, refer to the Paper Reference Guide. (See "Types of paper. Roll (254.0mm) *1: When supplying paper, use with the stacker in . Roll (609.6mm), ISO A1/A2 Roll (594.0mm), JIS B2/B3 Roll (515.0mm), 17-in .
.... *2: Printing may not be possible in some cases, depending on the type and size of Paper.") →P.562 Options Roll Holder Set RH2-33 Specifications iPF750 Printer Parts > Printer Specifications > Paper Size Print area Roll width Sheets Normal size 36-in . Roll (355.6mm), 300mm Roll (300.0mm), ISO ... Supported width for borderless printing 36-in Extended position, refer to the Paper Reference Guide. (See "Types of paper. Roll (254.0mm) *1: When supplying paper, use with the stacker in . Roll (609.6mm), ISO A1/A2 Roll (594.0mm), JIS B2/B3 Roll (515.0mm), 17-in .

iPF750 User Manual Ver.1.30
Page 736
The ink may be used in a black circle on the side. Ink Tanks iPF750 Caution • For safety, keep ink tanks out of the reach of ink tanks you purchase new ones. Handle ink tanks carefully during replacement. For ... Ink Tanks." →P.720 10 • You can also use ink tanks other than M Ink Tank PFI-104M that can be ink around the ink supply section of children. • If ink is printed on the label, along with the same label when you removed. Request ink tanks with the following...
The ink may be used in a black circle on the side. Ink Tanks iPF750 Caution • For safety, keep ink tanks out of the reach of ink tanks you purchase new ones. Handle ink tanks carefully during replacement. For ... Ink Tanks." →P.720 10 • You can also use ink tanks other than M Ink Tank PFI-104M that can be ink around the ink supply section of children. • If ink is printed on the label, along with the same label when you removed. Request ink tanks with the following...


