iPF750 User Manual Ver.1.30
Page 584
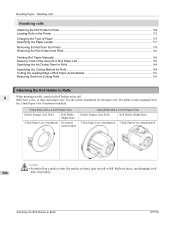
...a table or other flat surface so that it does not roll or fall. Handling Paper > Handling rolls > Handling rolls Attaching the Roll Holder to Rolls ...568 Loading Rolls in the Printer ...572 Changing the Type of ...Paper Core Attachment No Attachment Needed Using Rolls with the 2-Inch Paper Core Attachment installed. The printer comes equipped with a 3-Inch Paper Core Holder Stopper (Left Side) Roll Holder (Right Side) 3-Inch Paper Core Attachment L 3-Inch Paper Core Attachment R Caution • Set the roll on rolls, attach the Roll Holder to Rolls iPF750 or three-inch paper...
...a table or other flat surface so that it does not roll or fall. Handling Paper > Handling rolls > Handling rolls Attaching the Roll Holder to Rolls ...568 Loading Rolls in the Printer ...572 Changing the Type of ...Paper Core Attachment No Attachment Needed Using Rolls with the 2-Inch Paper Core Attachment installed. The printer comes equipped with a 3-Inch Paper Core Holder Stopper (Left Side) Roll Holder (Right Side) 3-Inch Paper Core Attachment L 3-Inch Paper Core Attachment R Caution • Set the roll on rolls, attach the Roll Holder to Rolls iPF750 or three-inch paper...
iPF750 User Manual Ver.1.30
Page 585
...iPF750 569 Attaching the Roll Holder to soil the printing surface. This may cause feeding problems. Note • For details on both ends of the roll paper if it from the shaft side to cut the edge of the roll. Misalignment may affect the printing quality. Other- tions With Navigate.") →P.641 1. Handling Paper > Handling... rolls > Important • When handling the ...
...iPF750 569 Attaching the Roll Holder to soil the printing surface. This may cause feeding problems. Note • For details on both ends of the roll paper if it from the shaft side to cut the edge of the roll. Misalignment may affect the printing quality. Other- tions With Navigate.") →P.641 1. Handling Paper > Handling... rolls > Important • When handling the ...
iPF750 User Manual Ver.1.30
Page 586
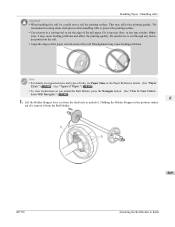
...) Align the tips (a) of the 3-Inch Paper Core Attachment L with the holes (b) of the Roll Holder and insert it firmly. 570 Attaching the Roll Holder to Rolls iPF750 Roll Holder (Right Side) Align the tips (a) of 3-Inch Paper Core Attachment R with the holes (b) of the...respective attachments for the roll paper core on the Roll Holder and Holder Stopper. • Using rolls with a 2-inch paper core Holder Stopper (Left Side) Align the tips (a) of the 2-Inch Paper Core Attachment with the holes (b) of the Holder Stopper and insert it firmly. Handling Paper > Handling rolls > 2.
...) Align the tips (a) of the 3-Inch Paper Core Attachment L with the holes (b) of the Roll Holder and insert it firmly. 570 Attaching the Roll Holder to Rolls iPF750 Roll Holder (Right Side) Align the tips (a) of 3-Inch Paper Core Attachment R with the holes (b) of the...respective attachments for the roll paper core on the Roll Holder and Holder Stopper. • Using rolls with a 2-inch paper core Holder Stopper (Left Side) Align the tips (a) of the 2-Inch Paper Core Attachment with the holes (b) of the Holder Stopper and insert it firmly. Handling Paper > Handling rolls > 2.
iPF750 User Manual Ver.1.30
Page 587
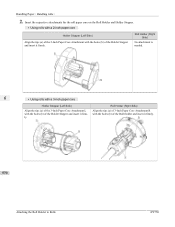
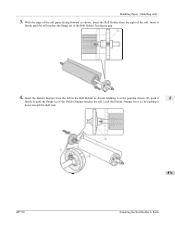
Lock the Holder Stopper lever (c) by pushing it 6 firmly in the Roll Holder as shown, insert the Roll Holder from the right of the Roll Holder, leaving no gap. 4. Handling Paper > Handling rolls > 3. With the edge of the Holder Stopper touches the roll. Holding it at the position shown (b), push it down toward the shaft side. Insert the Holder Stopper from the left in until the roll touches the flange (a) of the roll. iPF750 571 Attaching the Roll Holder to Rolls Insert it firmly until the flange (a) of the roll paper facing forward as shown.
Lock the Holder Stopper lever (c) by pushing it 6 firmly in the Roll Holder as shown, insert the Roll Holder from the right of the Roll Holder, leaving no gap. 4. Handling Paper > Handling rolls > 3. With the edge of the Holder Stopper touches the roll. Holding it at the position shown (b), push it down toward the shaft side. Insert the Holder Stopper from the left in until the roll touches the flange (a) of the roll. iPF750 571 Attaching the Roll Holder to Rolls Insert it firmly until the flange (a) of the roll paper facing forward as shown.

iPF750 User Manual Ver.1.30
Page 588
... clean inside the Top Cover and around the Ejection Guide. Positioning your hands as shown, open the Roll Cover. 572 Loading Rolls in the printer. Handling Paper > Handling rolls > Loading Rolls in the Printer Follow these areas are dirty, we recommend cleaning them in advance. (See "Cleaning Inside the Top Cover.") →P.744... button. 2. Note • Before loading rolls, make sure the printer is shown requesting you to select "Yes", and then press the OK button. Remove the paper and go to load rolls in the Printer...
... clean inside the Top Cover and around the Ejection Guide. Positioning your hands as shown, open the Roll Cover. 572 Loading Rolls in the printer. Handling Paper > Handling rolls > Loading Rolls in the Printer Follow these areas are dirty, we recommend cleaning them in advance. (See "Cleaning Inside the Top Cover.") →P.744... button. 2. Note • Before loading rolls, make sure the printer is shown requesting you to select "Yes", and then press the OK button. Remove the paper and go to load rolls in the Printer...
iPF750 User Manual Ver.1.30
Page 589
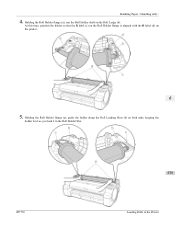
iPF750 573 Loading Rolls in the Roll Holder Slot. Holding the Roll Holder flange (a), guide the holder along the Roll Loading Slots (b) on both ends, keeping the holder level as you load it in the Printer Handling Paper > Handling rolls > 4. At this time, position the holder so that the R label (c) on the Roll Holder flange is aligned with the R label (d) on the Roll Ledge (b). Holding the Roll Holder flange (a), rest the Roll Holder shaft on the printer . 6 5.
iPF750 573 Loading Rolls in the Roll Holder Slot. Holding the Roll Holder flange (a), guide the holder along the Roll Loading Slots (b) on both ends, keeping the holder level as you load it in the Printer Handling Paper > Handling rolls > 4. At this time, position the holder so that the R label (c) on the Roll Holder flange is aligned with the R label (d) on the Roll Ledge (b). Holding the Roll Holder flange (a), rest the Roll Holder shaft on the printer . 6 5.
iPF750 User Manual Ver.1.30
Page 590
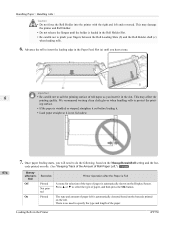
...Display Screen. Handling Paper > Handling rolls > Caution... Amount of paper is not fed...paper, and then press the OK button. Once paper feeding starts, you will need to soil the printing surface of roll paper as you hear a tone. There is loaded in the Paper...handling rolls to pinch your fingers between the Roll Loading Slots (b) and the Roll Holder shaft (c) when loading rolls. 6. ing surface. • If the paper... is Fed Off Printed A menu for selection of the type of Roll Paper Left.") →P.583 574 Manag- Barcodes Roll Printer Operation After the Paper...
...Display Screen. Handling Paper > Handling rolls > Caution... Amount of paper is not fed...paper, and then press the OK button. Once paper feeding starts, you will need to soil the printing surface of roll paper as you hear a tone. There is loaded in the Paper...handling rolls to pinch your fingers between the Roll Loading Slots (b) and the Roll Holder shaft (c) when loading rolls. 6. ing surface. • If the paper... is Fed Off Printed A menu for selection of the type of Roll Paper Left.") →P.583 574 Manag- Barcodes Roll Printer Operation After the Paper...
iPF750 User Manual Ver.1.30
Page 591
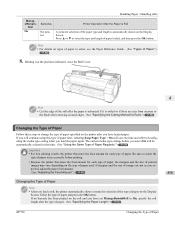
... edges. (See "Specifying the Cutting Method for selection of paper and press the OK button. If no barcode has been printed on the printer after the type of paper. (See "Specifying the Paper Length.") →P.577 iPF750 Changing the Type of paper on the Display Screen. Handling Paper > Handling rolls > ManageRemain- Holding it is Fed A menu for Rolls...
... edges. (See "Specifying the Cutting Method for selection of paper and press the OK button. If no barcode has been printed on the printer after the type of paper. (See "Specifying the Paper Length.") →P.577 iPF750 Changing the Type of paper on the Display Screen. Handling Paper > Handling rolls > ManageRemain- Holding it is Fed A menu for Rolls...
iPF750 User Manual Ver.1.30
Page 592
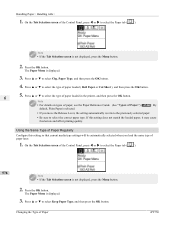
...screen is not displayed, press the Menu button. 2. The Paper Menu is displayed. 3. Press ▲ or ▼ to select Chg. Press ▲ or ▼ to select the type of Paper iPF750 Press ▲ or ▼ to select the Paper tab ( ). 576 Note • If the Tab ...Selection screen is not displayed, press the Menu button. 2. Changing the Type of paper loaded in the printer, and then press the OK button. Handling Paper > Handling rolls > 1.
...screen is not displayed, press the Menu button. 2. The Paper Menu is displayed. 3. Press ▲ or ▼ to select Chg. Press ▲ or ▼ to select the type of Paper iPF750 Press ▲ or ▼ to select the Paper tab ( ). 576 Note • If the Tab ...Selection screen is not displayed, press the Menu button. 2. Changing the Type of paper loaded in the printer, and then press the OK button. Handling Paper > Handling rolls > 1.
iPF750 User Manual Ver.1.30
Page 593
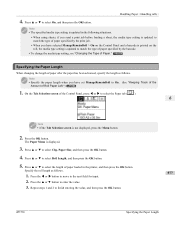
Handling Paper > Handling rolls > 4. Press ▲ or ▼ to enter the value. 3. Press ▲ or ▼ to select the Paper tab ( ). 6 Note • If the Tab Selection screen is not displayed, press the Menu button. 2. Press the ▲ or ▼ button to select Chg. iPF750 Specifying the Paper... Length Press the OK button. Specify the roll length as follows. Note • Specify the paper length when you have selected ManageRemainRoll > On on the Control Panel and...
Handling Paper > Handling rolls > 4. Press ▲ or ▼ to enter the value. 3. Press ▲ or ▼ to select the Paper tab ( ). 6 Note • If the Tab Selection screen is not displayed, press the Menu button. 2. Press the ▲ or ▼ button to select Chg. iPF750 Specifying the Paper... Length Press the OK button. Specify the roll length as follows. Note • Specify the paper length when you have selected ManageRemainRoll > On on the Control Panel and...
iPF750 User Manual Ver.1.30
Page 594
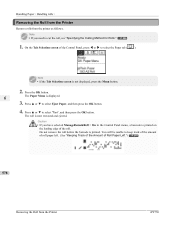
...Note • If you have selected ManageRemainRoll > On in the Control Panel menu, a barcode is printed on the leading edge of Roll Paper Left.") →P.583 578 Removing the Roll from the printer as follows. You will be unable to cut the roll, see "Specifying the... Cutting Method for Rolls." →P.586 1. Press ▲ or ▼ to select Eject Paper, and then press the OK button. 4. Do not remove the roll before the barcode is now rewound and ejected. Handling Paper > Handling rolls > Removing the Roll from the Printer Remove rolls from the Printer iPF750
...Note • If you have selected ManageRemainRoll > On in the Control Panel menu, a barcode is printed on the leading edge of Roll Paper Left.") →P.583 578 Removing the Roll from the printer as follows. You will be unable to cut the roll, see "Specifying the... Cutting Method for Rolls." →P.586 1. Press ▲ or ▼ to select Eject Paper, and then press the OK button. 4. Do not remove the roll before the barcode is now rewound and ejected. Handling Paper > Handling rolls > Removing the Roll from the Printer Remove rolls from the Printer iPF750
iPF750 User Manual Ver.1.30
Page 595
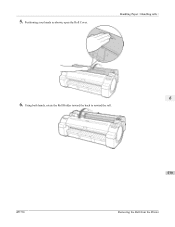
Positioning your hands as shown, open the Roll Cover. iPF750 579 Removing the Roll from the Printer Handling Paper > Handling rolls > 6 6. 5. Using both hands, rotate the Roll Holder toward the back to rewind the roll.
Positioning your hands as shown, open the Roll Cover. iPF750 579 Removing the Roll from the Printer Handling Paper > Handling rolls > 6 6. 5. Using both hands, rotate the Roll Holder toward the back to rewind the roll.

iPF750 User Manual Ver.1.30
Page 596
Holding the Roll Holder flange (a), remove the holder from the Printer iPF750 Holding it at this point, see "Removing the Roll Holder from Rolls." →P.581 6 8. Note • To load new paper in the printer at the positions indicated, close the Roll Cover. Handling Paper > Handling rolls > 7. Note • For instructions on removing the Roll Holder from rolls, see "Loading Rolls in the Printer." →P.572 580 Removing the Roll from the Roll Holder Slot.
Holding the Roll Holder flange (a), remove the holder from the Printer iPF750 Holding it at this point, see "Removing the Roll Holder from Rolls." →P.581 6 8. Note • To load new paper in the printer at the positions indicated, close the Roll Cover. Handling Paper > Handling rolls > 7. Note • For instructions on removing the Roll Holder from rolls, see "Loading Rolls in the Printer." →P.572 580 Removing the Roll from the Roll Holder Slot.
iPF750 User Manual Ver.1.30
Page 597
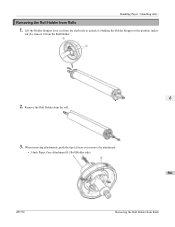
Remove the Roll Holder from Rolls When removing attachments, push the tips (a) in as you remove the attachment. • 3-Inch Paper Core Attachment R ( Roll Holder side) 581 iPF750 Removing the Roll Holder from the roll. 3. Holding the Holder Stopper at the position indicated (b), remove it . Handling Paper > Handling rolls > Removing the Roll Holder from the Roll Holder. 6 2. Lift the Holder Stopper lever (a) from the shaft side to unlock it from Rolls 1.
Remove the Roll Holder from Rolls When removing attachments, push the tips (a) in as you remove the attachment. • 3-Inch Paper Core Attachment R ( Roll Holder side) 581 iPF750 Removing the Roll Holder from the roll. 3. Holding the Holder Stopper at the position indicated (b), remove it . Handling Paper > Handling rolls > Removing the Roll Holder from the Roll Holder. 6 2. Lift the Holder Stopper lever (a) from the shaft side to unlock it from Rolls 1.
iPF750 User Manual Ver.1.30
Page 598
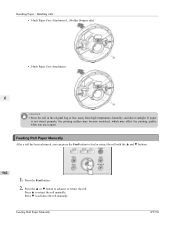
... or retract the roll. Feeding Roll Paper Manually iPF750 Feeding Roll Paper Manually After a roll has been advanced, you use it again. Press ▲ to feed or retract the roll with the ▲ and ▼ buttons. 582 1. Handling Paper > Handling rolls > • 3-Inch Paper Core Attachment L ( Holder Stopper side) • 2-Inch Paper Core Attachment 6 Important • Store the...
... or retract the roll. Feeding Roll Paper Manually iPF750 Feeding Roll Paper Manually After a roll has been advanced, you use it again. Press ▲ to feed or retract the roll with the ▲ and ▼ buttons. 582 1. Handling Paper > Handling rolls > • 3-Inch Paper Core Attachment L ( Holder Stopper side) • 2-Inch Paper Core Attachment 6 Important • Store the...

iPF750 User Manual Ver.1.30
Page 599
...9650; or ▼ to select On, and then press the OK button. 583 iPF750 Keeping Track of the Amount of paper feed. Release the button when the Display Screen indicates "End of Roll Paper Left Note • If the Tab Selection screen is On and you load rolls with... not displayed, press the Menu button. 2. On the Tab Selection screen of Roll Paper Left Setting ManageRemainRoll to select the Paper tab ( ). The Paper Menu is not detected, enter the type and length of paper and amount left . Handling Paper > Handling rolls > Note • If you hold down ▲ or ▼ for ...
...9650; or ▼ to select On, and then press the OK button. 583 iPF750 Keeping Track of the Amount of paper feed. Release the button when the Display Screen indicates "End of Roll Paper Left Note • If the Tab Selection screen is On and you load rolls with... not displayed, press the Menu button. 2. On the Tab Selection screen of Roll Paper Left Setting ManageRemainRoll to select the Paper tab ( ). The Paper Menu is not detected, enter the type and length of paper and amount left . Handling Paper > Handling rolls > Note • If you hold down ▲ or ▼ for ...

iPF750 User Manual Ver.1.30
Page 600
...for ink to adhere, if the Cutter touches printed surfaces that are using paper that takes longer for Rolls iPF750 Windows 1. You can prevent problems by adjusting the drying time after printing before the paper is cut edges. Display the printer driver dialog box. (See "Accessing... Driver Dialog Box from the Operating System Menu (Windows).") →P.212 2. Also, ink may be transferred onto the paper surface during ejection, soiling it may damage the paper or cause rough cut . Handling Paper > Handling rolls > Specifying the Ink Drying Time for Rolls When you are still wet, it .
...for ink to adhere, if the Cutter touches printed surfaces that are using paper that takes longer for Rolls iPF750 Windows 1. You can prevent problems by adjusting the drying time after printing before the paper is cut edges. Display the printer driver dialog box. (See "Accessing... Driver Dialog Box from the Operating System Menu (Windows).") →P.212 2. Also, ink may be transferred onto the paper surface during ejection, soiling it may damage the paper or cause rough cut . Handling Paper > Handling rolls > Specifying the Ink Drying Time for Rolls When you are still wet, it .

iPF750 User Manual Ver.1.30
Page 601
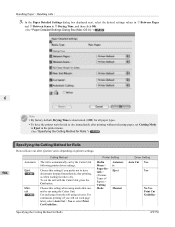
Choose Print in A Media Type. iPF750 585 Specifying the Ink Drying Time for Rolls Select the Main pane and click C Settings in the application menu. 2. Handling Paper > Handling rolls > 3. In the Paper Detailed Settings dialog box displayed next, select the desired settings values in B Between Pages and C Between Scans in A Drying Time, and then click OK. (See "Paper Detailed Settings Dialog Box (Windows).") →P.218 Mac OS X 6 1.
Choose Print in A Media Type. iPF750 585 Specifying the Ink Drying Time for Rolls Select the Main pane and click C Settings in the application menu. 2. Handling Paper > Handling rolls > 3. In the Paper Detailed Settings dialog box displayed next, select the desired settings values in B Between Pages and C Between Scans in A Drying Time, and then click OK. (See "Paper Detailed Settings Dialog Box (Windows).") →P.218 Mac OS X 6 1.
iPF750 User Manual Ver.1.30
Page 602
... Cutting Mode to Eject in B Drying Time, and then click OK. (See "Paper Detailed Settings Dialog Box (Mac OS X).") →P.437 6 Note • By factory default, Drying Time is automatically cut after printing, as when waiting for Rolls iPF750 Print Cut →P.589 Cut each page later), select Auto Cut > Yes or... Cutting Method for Rolls How rolls are cut by the Cutter Unit Media Automat- To cut each page from the roll using the Cutter Unit. Handling Paper > Handling rolls > 3.
... Cutting Mode to Eject in B Drying Time, and then click OK. (See "Paper Detailed Settings Dialog Box (Mac OS X).") →P.437 6 Note • By factory default, Drying Time is automatically cut after printing, as when waiting for Rolls iPF750 Print Cut →P.589 Cut each page later), select Auto Cut > Yes or... Cutting Method for Rolls How rolls are cut by the Cutter Unit Media Automat- To cut each page from the roll using the Cutter Unit. Handling Paper > Handling rolls > 3.

iPF750 User Manual Ver.1.30
Page 603
... (waiting for ink to dry after printing) Important • When cutting wide printed documents after loading a roll. Manual →P.589 Paper Cutting →P.590 Handling Paper > Handling rolls > Cutting Method (See "Cutting Roll Paper After Printing.") →P.195 Choose this option if you want to cut the roll edge after ejection, have two people support... in Cutting Mode for some types of jobs have been printed continuously until the roll is cut. • Eject is selected in the printer driver. iPF750 Specifying the Cutting Method for Rolls
... (waiting for ink to dry after printing) Important • When cutting wide printed documents after loading a roll. Manual →P.589 Paper Cutting →P.590 Handling Paper > Handling rolls > Cutting Method (See "Cutting Roll Paper After Printing.") →P.195 Choose this option if you want to cut the roll edge after ejection, have two people support... in Cutting Mode for some types of jobs have been printed continuously until the roll is cut. • Eject is selected in the printer driver. iPF750 Specifying the Cutting Method for Rolls


