
User Manual
Page 9
...feeder is detected. „ Compatible with Carbonless Duplicating Paper The scanner is able to scan carbonless duplicating paper. „ Sleep Mode The scanner is designed to save energy by entering the sleep mode when it detects that the document was placed askew. „ Ultrasonic Double Feed Detection (for the DR-2510C... Page Function The scanner is equipped with a Prescan function that are using. 9 DR-2010C / DR-2510C The scanner will scan both the text and background are light. Contents Back Previous Page Next Page „ Auto Color Detection The scanner detects whether the ...
...feeder is detected. „ Compatible with Carbonless Duplicating Paper The scanner is able to scan carbonless duplicating paper. „ Sleep Mode The scanner is designed to save energy by entering the sleep mode when it detects that the document was placed askew. „ Ultrasonic Double Feed Detection (for the DR-2510C... Page Function The scanner is equipped with a Prescan function that are using. 9 DR-2010C / DR-2510C The scanner will scan both the text and background are light. Contents Back Previous Page Next Page „ Auto Color Detection The scanner detects whether the ...
User Manual
Page 10
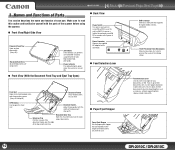
...Speed USB 2.0 to this connector. „ Feed Selection Lever Front Unit Open when clearing paper jams and cleaning the scanner. (See p.33 and p.65) Document Feeder Place the document to feed documents one at a time (page separation mode) (See p.21). Theft Prevention Hole (..., without separating them (bypass mode) (See p.23). 10 DR-2010C / DR-2510C Contents Back 33..NNaammesesanadnFdunFcutinocntsioofnPsaortfsParts This section describes the name and function of the computer. OPEN button Use to prevent the scanner from being stolen. Document Eject Tray Open this lever to scan...
...Speed USB 2.0 to this connector. „ Feed Selection Lever Front Unit Open when clearing paper jams and cleaning the scanner. (See p.33 and p.65) Document Feeder Place the document to feed documents one at a time (page separation mode) (See p.21). Theft Prevention Hole (..., without separating them (bypass mode) (See p.23). 10 DR-2010C / DR-2510C Contents Back 33..NNaammesesanadnFdunFcutinocntsioofnPsaortfsParts This section describes the name and function of the computer. OPEN button Use to prevent the scanner from being stolen. Document Eject Tray Open this lever to scan...

User Manual
Page 22
...the document feed tray and the document eject tray to prevent damage to stop scanning. • Always smooth out any folds or curls in the scanner while you place a document, check to start scanning. These items may cause a fire or electrical shock, damage the document, or cause a paper jam ...If feeding stops due to a system error or paper jam while the scanner is not being used. 22 DR-2010C / DR-2510C If the leading edge of the last page that it may get caught in your documents before placing them into the feeder. IMPORTANT • Before you are using it does not contain paper...
...the document feed tray and the document eject tray to prevent damage to stop scanning. • Always smooth out any folds or curls in the scanner while you place a document, check to start scanning. These items may cause a fire or electrical shock, damage the document, or cause a paper jam ...If feeding stops due to a system error or paper jam while the scanner is not being used. 22 DR-2010C / DR-2510C If the leading edge of the last page that it may get caught in your documents before placing them into the feeder. IMPORTANT • Before you are using it does not contain paper...

User Manual
Page 24
...are larger than LTR/A4 and therefore do not fit in the feeder. (The maximum size is 11" X 17"/A3.) To use the function, fold the document in mind if there is content such as skewed or shifted. 24 DR-2010C / DR-2510C Otherwise, the image may not be aligned properly. • The... fold line itself will scan both sides and combine the scanned images into the feeder. Place documents one at a time. • Adjust the document guides to...
...are larger than LTR/A4 and therefore do not fit in the feeder. (The maximum size is 11" X 17"/A3.) To use the function, fold the document in mind if there is content such as skewed or shifted. 24 DR-2010C / DR-2510C Otherwise, the image may not be aligned properly. • The... fold line itself will scan both sides and combine the scanned images into the feeder. Place documents one at a time. • Adjust the document guides to...

User Manual
Page 42
... the selected resolution is 300 dpi or less, the [Moire Reduction] setting is automatically enabled to allow reduction of documents. 42 DR-2010C / DR-2510C Contents Back Previous Page Next Page Scan Resolution Settings This section describes the procedure for setting the resolution for scanning. 1 In the...settings below according to the page side setting you want to use. - [Simplex] Scan only the front side of documents loaded into the feeder. - [Duplex] Scan both sides of the moire effect (a shimmering, wavy pattern) in scanned images. Scanning Side Settings This section describes...
... the selected resolution is 300 dpi or less, the [Moire Reduction] setting is automatically enabled to allow reduction of documents. 42 DR-2010C / DR-2510C Contents Back Previous Page Next Page Scan Resolution Settings This section describes the procedure for setting the resolution for scanning. 1 In the...settings below according to the page side setting you want to use. - [Simplex] Scan only the front side of documents loaded into the feeder. - [Duplex] Scan both sides of the moire effect (a shimmering, wavy pattern) in scanned images. Scanning Side Settings This section describes...

User Manual
Page 81
...the Computer 15 Counter, resetting 70 D Dimensions ...79 Disposal ...8 Document eject area 10 Document feed tray 10 Document feeder 10 Document guides 10 Document holding guide Attaching 69 Removing 69 Documents ...18 Placing ...21 Double feed detection 51 ...color, enhancing 50 Registering scan Conditions 54 Resolution, setting 42 Rotating image 48 Scan area, adjusting 44 Scan mode setting 39 Scanning side settings 42 Text orientation, correcting 49 Version, checking 54 J Job buttons ...10 Job function ...27 Job Registration Tool 55 K Kensington ...10 81 DR-2010C / DR-2510C
...the Computer 15 Counter, resetting 70 D Dimensions ...79 Disposal ...8 Document eject area 10 Document feed tray 10 Document feeder 10 Document guides 10 Document holding guide Attaching 69 Removing 69 Documents ...18 Placing ...21 Double feed detection 51 ...color, enhancing 50 Registering scan Conditions 54 Resolution, setting 42 Rotating image 48 Scan area, adjusting 44 Scan mode setting 39 Scanning side settings 42 Text orientation, correcting 49 Version, checking 54 J Job buttons ...10 Job function ...27 Job Registration Tool 55 K Kensington ...10 81 DR-2010C / DR-2510C

Reference Guide
Page 8
...specify a color for the scanner to omit from the scanned image. „ Skip Blank Page Function The scanner is equipped with a Skip Blank Page function that enables you to scan a document without needing to scan the document again. „ Job Function The scanner includes three job buttons for the DR-2510C only) ... scan both sides and combine the scanned images into a single image. „ Deskew The scanner straightens scanned images when it is in the feeder is detected. „ Compatible with an auto start function, which enables scanning to be registered) on the software you to adjust...
...specify a color for the scanner to omit from the scanned image. „ Skip Blank Page Function The scanner is equipped with a Skip Blank Page function that enables you to scan a document without needing to scan the document again. „ Job Function The scanner includes three job buttons for the DR-2510C only) ... scan both sides and combine the scanned images into a single image. „ Deskew The scanner straightens scanned images when it is in the feeder is detected. „ Compatible with an auto start function, which enables scanning to be registered) on the software you to adjust...
Reference Guide
Page 9
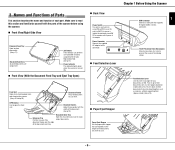
...See p.12) Extension Tray Pull this connector. „ Feed Selection Lever Front Unit Open when clearing paper jams and cleaning the scanner. (See p.22 and p.29) Document Feeder Place the document to scan. 1 USB Connector Connect a USB cable that are fastened together, such as invoices, without separating them...documents one at a time (page separation mode) (See p.12). Document Eject Tray Open this connector. Push it up to turn the scanner ON and OFF. If you want to stack output documents. „ Paper Eject Stopper Paper Eject Stopper Use the paper eject stopper that...
...See p.12) Extension Tray Pull this connector. „ Feed Selection Lever Front Unit Open when clearing paper jams and cleaning the scanner. (See p.22 and p.29) Document Feeder Place the document to scan. 1 USB Connector Connect a USB cable that are fastened together, such as invoices, without separating them...documents one at a time (page separation mode) (See p.12). Document Eject Tray Open this connector. Push it up to turn the scanner ON and OFF. If you want to stack output documents. „ Paper Eject Stopper Paper Eject Stopper Use the paper eject stopper that...
Reference Guide
Page 16
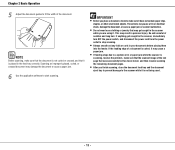
...damage the document or cause a paper jam. 6 Use the application software to stop scanning. • Always smooth out any folds or curls in the scanner, immediately turn OFF the power switch, and disconnect the power cord from the power outlet to start scanning. Chapter 2 Basic Operation 5 Adjust the document ... not being used. - 13 - Be extra careful of the document. If anything gets caught in your documents before placing them into the feeder. NOTE Before scanning, make sure it is not curled or creased, and that the document is placed in personal injury. IMPORTANT • Before...
...damage the document or cause a paper jam. 6 Use the application software to stop scanning. • Always smooth out any folds or curls in the scanner, immediately turn OFF the power switch, and disconnect the power cord from the power outlet to start scanning. Chapter 2 Basic Operation 5 Adjust the document ... not being used. - 13 - Be extra careful of the document. If anything gets caught in your documents before placing them into the feeder. NOTE Before scanning, make sure it is not curled or creased, and that the document is placed in personal injury. IMPORTANT • Before...

Reference Guide
Page 18
The DR-2010C/DR-2510C will not be used. Take care of the document. Otherwise, the image may scan as photos, diagrams, or text that get jammed may be damaged when you place cards to scan documents that are larger than LTR/A4 and therefore do not fit in the feeder. (The maximum size ... jam or the image may not be aligned properly. • The fold line itself will scan both sides and combine the scanned images into the feeder. Place documents one at a time. • Adjust the document guides to fit the width of the orientation when placing cards. Chapter 2 Basic Operation 3 Place ...
The DR-2010C/DR-2510C will not be used. Take care of the document. Otherwise, the image may scan as photos, diagrams, or text that get jammed may be damaged when you place cards to scan documents that are larger than LTR/A4 and therefore do not fit in the feeder. (The maximum size ... jam or the image may not be aligned properly. • The fold line itself will scan both sides and combine the scanned images into the feeder. Place documents one at a time. • Adjust the document guides to fit the width of the orientation when placing cards. Chapter 2 Basic Operation 3 Place ...

Reference Guide
Page 44
...Rollers ...27 Sensor glass 27 Counter, resetting 34 D Dimensions ...39 Disposal ...4 Document eject area 6 Document feed tray 6 Document feeder 6 Document guides 6 Document holding guide Attaching 33 Removing 33 Documents ...9 Placing ...12 Driver ...8 E Extension tray ...6 F ...I Installation location 1 Introduction ...i J Job Buttons ...6 K Kensington ...6 L Load limit mark 12 Long Document mode 24 M Maintenance ...26 Moving the scanner 2 N Name of parts ...6 O Open button ...6 Operating system 7 P Page Separation mode 12 Paper jam, clearing 22 Power connector 6 Power indicator...
...Rollers ...27 Sensor glass 27 Counter, resetting 34 D Dimensions ...39 Disposal ...4 Document eject area 6 Document feed tray 6 Document feeder 6 Document guides 6 Document holding guide Attaching 33 Removing 33 Documents ...9 Placing ...12 Driver ...8 E Extension tray ...6 F ...I Installation location 1 Introduction ...i J Job Buttons ...6 K Kensington ...6 L Load limit mark 12 Long Document mode 24 M Maintenance ...26 Moving the scanner 2 N Name of parts ...6 O Open button ...6 Operating system 7 P Page Separation mode 12 Paper jam, clearing 22 Power connector 6 Power indicator...
