
imageCLASS MF3111 Set-Up Instructions
Page 2
B A 5 Hold the cartridge so that the instructions (A) and the arrow (B) are facing up, and insert it in a safe place for future use. 2 Gently rock the cartridge several times to evenly distribute the toner inside. 3 Hold the cartridge on a flat stable surface with one hand, and break the tab ➊ and pull out the seal ➋ completely with the other hand. 4 Pull open the front cover. Keep the bag in the machine horizontally as far as it will go. 6 Close the front cover of the machine. Install the cartridge. 1 Remove the cartridge from the bag.
B A 5 Hold the cartridge so that the instructions (A) and the arrow (B) are facing up, and insert it in a safe place for future use. 2 Gently rock the cartridge several times to evenly distribute the toner inside. 3 Hold the cartridge on a flat stable surface with one hand, and break the tab ➊ and pull out the seal ➋ completely with the other hand. 4 Pull open the front cover. Keep the bag in the machine horizontally as far as it will go. 6 Close the front cover of the machine. Install the cartridge. 1 Remove the cartridge from the bag.

imageCLASS MF3111 Set-Up Instructions
Page 5
Connect the power cord. 1 Plug the power cord into the rear socket ➊. NOTE ● Make sure the correct paper size is warmed up . IMPORTANT ● For important safety instructions on installation and handling of the machine, see Chapter 2,"Paper Handling," in the LCD. Once it is specified in the Basic Guide. For details, see "Important Safety Instructions" in the machine. Then connect the other end to the wall outlet ➋. 2 The machine takes up to 3 minutes to warm up , the standby display appears in the Basic Guide.
Connect the power cord. 1 Plug the power cord into the rear socket ➊. NOTE ● Make sure the correct paper size is warmed up . IMPORTANT ● For important safety instructions on installation and handling of the machine, see Chapter 2,"Paper Handling," in the LCD. Once it is specified in the Basic Guide. For details, see "Important Safety Instructions" in the machine. Then connect the other end to the wall outlet ➋. 2 The machine takes up to 3 minutes to warm up , the standby display appears in the Basic Guide.

imageCLASS MF3111 Set-Up Instructions
Page 6
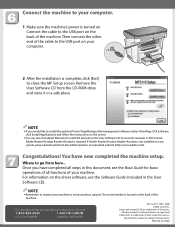
...are for MF3110. 1 Turn on your computer. 2 Quit any open applications, including virus checking software. 3 Insert the User Software CD into the CD-ROM drive. 4 When the MF Setup screen appears, click [Install MF Drivers]. ● If the MF Setup screen is complete, click [Finish] to install the software.... software and the Found New Hardware Wizard screen appears, click [Cancel] and disconnect the USB cable. Install the software. If you connect the USB cable before installing the software. For Windows 98/Me/2000, see the Software Guide (included in the User Software CD). ● For ...
...are for MF3110. 1 Turn on your computer. 2 Quit any open applications, including virus checking software. 3 Insert the User Software CD into the CD-ROM drive. 4 When the MF Setup screen appears, click [Install MF Drivers]. ● If the MF Setup screen is complete, click [Finish] to install the software.... software and the Found New Hardware Wizard screen appears, click [Cancel] and disconnect the USB cable. Install the software. If you connect the USB cable before installing the software. For Windows 98/Me/2000, see the Software Guide (included in the User Software CD). ● For ...

imageCLASS MF3111 Set-Up Instructions
Page 7
NOTE ● Before installing MF Toolbox, make sure that all other applications are closed and that any anti-virus software on the screen. 7 On the MF Setup screen, click [Install MF Toolbox]. 8 When the MF Toolbox Setup screen appears, click [Next] and follow the instructions on your computer is disabled. 9 When the installation is complete, click [Finish] to close the MF Toolbox Setup screen.
NOTE ● Before installing MF Toolbox, make sure that all other applications are closed and that any anti-virus software on the screen. 7 On the MF Setup screen, click [Install MF Toolbox]. 8 When the MF Toolbox Setup screen appears, click [Next] and follow the instructions on your computer is disabled. 9 When the installation is complete, click [Finish] to close the MF Toolbox Setup screen.
imageCLASS MF3111 Set-Up Instructions
Page 8
...you would like to change without notice. The serial number is located on . For installation help and operational instructions, call us at: 1-800-828-4040 1-800 OK CANON U.S.A. Canon and imageCLASS are registered trademarks or trademarks of the machine. PRINTED IN CHINA Connect the cable to...document, see the Basic Guide for basic operations of all functions of Canon Inc. If Adobe Reader/Acrobat Reader/Acrobat is not installed on your computer. 2 After the installation is required. Specifications subject to install the optional Presto! You have completed all steps in the User ...
...you would like to change without notice. The serial number is located on . For installation help and operational instructions, call us at: 1-800-828-4040 1-800 OK CANON U.S.A. Canon and imageCLASS are registered trademarks or trademarks of the machine. PRINTED IN CHINA Connect the cable to...document, see the Basic Guide for basic operations of all functions of Canon Inc. If Adobe Reader/Acrobat Reader/Acrobat is not installed on your computer. 2 After the installation is required. Specifications subject to install the optional Presto! You have completed all steps in the User ...
imageCLASS MF3111 Basic Guide
Page 2
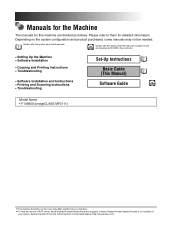
...Copying and Printing Instructions • Troubleshooting • Software Installation and Instructions • Printing and Scanning Instructions • Troubleshooting Set-Up Instructions Basic Guide (This Manual) Software Guide CD-ROM Model Name • F146600 (imageCLASS MF3111) • The machine illustration on your machine.... • To view the manual in PDF format, Adobe Reader/Acrobat Reader/Acrobat is not installed on the cover may not be needed.
...Copying and Printing Instructions • Troubleshooting • Software Installation and Instructions • Printing and Scanning Instructions • Troubleshooting Set-Up Instructions Basic Guide (This Manual) Software Guide CD-ROM Model Name • F146600 (imageCLASS MF3111) • The machine illustration on your machine.... • To view the manual in PDF format, Adobe Reader/Acrobat Reader/Acrobat is not installed on the cover may not be needed.

imageCLASS MF3111 Basic Guide
Page 4
Contents Preface viii How to the USA xiii Important Safety Instructions xiv Installation xiv Power Supply xv Handling xvi Maintenance and Inspections xvii Consumables xix Other Warnings xix Chapter 1 Introduction Customer Support 1-1 For Canadian Users 1-1 Main Components of ...
Contents Preface viii How to the USA xiii Important Safety Instructions xiv Installation xiv Power Supply xv Handling xvi Maintenance and Inspections xvii Consumables xix Other Warnings xix Chapter 1 Introduction Customer Support 1-1 For Canadian Users 1-1 Main Components of ...

imageCLASS MF3111 Basic Guide
Page 10
Legal Notices FCC (Federal Communications Commission) imageCLASS MF3111: Model F146600 This device complies with Part 15 of the following two conditions: (1) This device may not cause harmful interference, and (2) this device must ... make any changes or modifications to the equipment unless otherwise specified in this equipment does cause harmful interference to comply with class B limits in a residential installation. Canon U.S.A. NOTE This equipment has been tested and found to radio or television reception, which the receiver is required to comply with the limits for help...
Legal Notices FCC (Federal Communications Commission) imageCLASS MF3111: Model F146600 This device complies with Part 15 of the following two conditions: (1) This device may not cause harmful interference, and (2) this device must ... make any changes or modifications to the equipment unless otherwise specified in this equipment does cause harmful interference to comply with class B limits in a residential installation. Canon U.S.A. NOTE This equipment has been tested and found to radio or television reception, which the receiver is required to comply with the limits for help...

imageCLASS MF3111 Basic Guide
Page 14
... liquids CAUTION • Do not install the machine in unstable locations, such as unsteady platforms or inclined floors, or in locations subject to excessive vibrations, as a sofa or rug. Then, contact Canon Authorized Service Facilities or the Canon Customer Care Center. - These openings... Safety Instructions Please read these openings can cause the machine to overheat. Never place the machine on the machine. Installation WARNING • Do not install the machine near alcohol, paint thinner, or other metal objects - xiv Blocking these "Important Safety Instructions" thoroughly ...
... liquids CAUTION • Do not install the machine in unstable locations, such as unsteady platforms or inclined floors, or in locations subject to excessive vibrations, as a sofa or rug. Then, contact Canon Authorized Service Facilities or the Canon Customer Care Center. - These openings... Safety Instructions Please read these openings can cause the machine to overheat. Never place the machine on the machine. Installation WARNING • Do not install the machine near alcohol, paint thinner, or other metal objects - xiv Blocking these "Important Safety Instructions" thoroughly ...

imageCLASS MF3111 Basic Guide
Page 15
... direct sunlight - A location near devices that contain magnets or generate magnetic fields, such as this may result in a fire or electrical shock. • Do not install the machine in a fire or electrical shock. • Keep the power cord away from walls and other than the power cord provided, as possible. •...
... direct sunlight - A location near devices that contain magnets or generate magnetic fields, such as this may result in a fire or electrical shock. • Do not install the machine in a fire or electrical shock. • Keep the power cord away from walls and other than the power cord provided, as possible. •...
imageCLASS MF3111 Basic Guide
Page 22
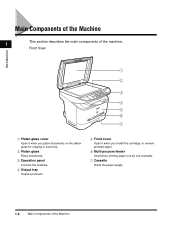
g Cassette Holds the paper supply. 1-2 Main Components of the machine. f Multi-purpose feeder Used when printing paper one by one manually. c Operation panel Controls the machine. Front View Introduction a Platen glass cover Open it when you place documents on the platen glass for copying or scanning. d Output tray Outputs printouts. Main Components of the Machine 1 This section describes the main components of the Machine e Front cover Open it when you install the cartridge, or remove jammed paper. b Platen glass Place documents.
g Cassette Holds the paper supply. 1-2 Main Components of the machine. f Multi-purpose feeder Used when printing paper one by one manually. c Operation panel Controls the machine. Front View Introduction a Platen glass cover Open it when you place documents on the platen glass for copying or scanning. d Output tray Outputs printouts. Main Components of the Machine 1 This section describes the main components of the Machine e Front cover Open it when you install the cartridge, or remove jammed paper. b Platen glass Place documents.
imageCLASS MF3111 Basic Guide
Page 49
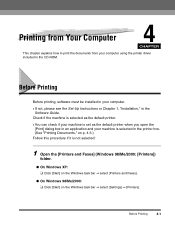
... [Print] dialog box in an application and your computer using the printer driver included in the Software Guide. Before Printing Before printing, software must be installed in your computer. • If not, please see the Set-Up Instructions or Chapter...
... [Print] dialog box in an application and your computer using the printer driver included in the Software Guide. Before Printing Before printing, software must be installed in your computer. • If not, please see the Set-Up Instructions or Chapter...
imageCLASS MF3111 Basic Guide
Page 65
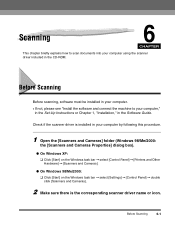
... computer using the scanner driver included in the CD-ROM. Before Scanning 6-1 Before Scanning Before scanning, software must be installed in your computer. • If not, please see "Install the software and connect the machine to scan documents into your computer," in the Set-Up Instructions or Chapter... 1, "Installation," in your computer by following this procedure. 1 Open the [Scanners and Cameras] folder (Windows 98/Me/2000: the [Scanners and Cameras Properties] dialog...
... computer using the scanner driver included in the CD-ROM. Before Scanning 6-1 Before Scanning Before scanning, software must be installed in your computer. • If not, please see "Install the software and connect the machine to scan documents into your computer," in the Set-Up Instructions or Chapter... 1, "Installation," in your computer by following this procedure. 1 Open the [Scanners and Cameras] folder (Windows 98/Me/2000: the [Scanners and Cameras Properties] dialog...

imageCLASS MF3111 Basic Guide
Page 85
NOTE If the LCD displays , reset the machine by opening the front cover and then closing it will go. B A B Maintenance A B C 8 7 Close the front cover. Be sure to position the arrow mark (C) on both sides of the machine. Replacing the Cartridge 8-15 6 Hold the cartridge and align the projections (A) on the cartridge towards the inside of the cartridge to the guides (B) in the machine, then gently slide the cartridge into the machine as far as it .
NOTE If the LCD displays , reset the machine by opening the front cover and then closing it will go. B A B Maintenance A B C 8 7 Close the front cover. Be sure to position the arrow mark (C) on both sides of the machine. Replacing the Cartridge 8-15 6 Hold the cartridge and align the projections (A) on the cartridge towards the inside of the cartridge to the guides (B) in the machine, then gently slide the cartridge into the machine as far as it .

imageCLASS MF3111 Basic Guide
Page 96
...Canon Customer Care Center. The machine cannot scan documents for a while. CHECK PRINTER COVER Cause The front cover is connected. Remedy Reset the machine by opening the front cover and then closing it . If the message persists, unplug the machine from that it encounters an error. Remedy Install... Wait for copying immediately after the power cord is not closed . ADJUSTING WAITING TO SCAN Cause The machine is not installed or not installed correctly. Remedy Load the correct paper size or change in the printer. LCD Messages The following messages are displayed in of...
...Canon Customer Care Center. The machine cannot scan documents for a while. CHECK PRINTER COVER Cause The front cover is connected. Remedy Reset the machine by opening the front cover and then closing it . If the message persists, unplug the machine from that it encounters an error. Remedy Install... Wait for copying immediately after the power cord is not closed . ADJUSTING WAITING TO SCAN Cause The machine is not installed or not installed correctly. Remedy Load the correct paper size or change in the printer. LCD Messages The following messages are displayed in of...

imageCLASS MF3111 Basic Guide
Page 101
Q Is the proper paper loaded? A Check that the machine is installed in the proper location. (For information about specifications of the paper you are loaded correctly. (See "Loading an Envelope in the Multi-Purpose Feeder," on p. ...Multi-Purpose Feeder," on p. 2-9.) Load an envelope one by one in a proper location? For safety warnings and cautions, see "Specifications," on p. 2-15.) Q Is the machine installed in the 9 multi-purpose feeder. A Make sure the envelopes are using. (See "Print Media Requirements," on p. This keeps the sheets of obstructions? Q Is the output...
Q Is the proper paper loaded? A Check that the machine is installed in the proper location. (For information about specifications of the paper you are loaded correctly. (See "Loading an Envelope in the Multi-Purpose Feeder," on p. ...Multi-Purpose Feeder," on p. 2-9.) Load an envelope one by one in a proper location? For safety warnings and cautions, see "Specifications," on p. 2-15.) Q Is the machine installed in the 9 multi-purpose feeder. A Make sure the envelopes are using. (See "Print Media Requirements," on p. This keeps the sheets of obstructions? Q Is the output...

imageCLASS MF3111 Basic Guide
Page 102
...off? After connecting the power cord, the machine cannot scan documents immediately. Troubleshooting 9 9-14 Copying Problems A Wait for a while. Q Is the cartridge installed correctly? A Remove the sealing tape from the energy saver mode, press [Energy Saver]. A Insert the cassette as far as it is... installed correctly. (See the Set-Up Instructions.) Q Is the sealing tape removed from the cartridge? To restore the machine from the cartridge. (...
...off? After connecting the power cord, the machine cannot scan documents immediately. Troubleshooting 9 9-14 Copying Problems A Wait for a while. Q Is the cartridge installed correctly? A Remove the sealing tape from the energy saver mode, press [Energy Saver]. A Insert the cassette as far as it is... installed correctly. (See the Set-Up Instructions.) Q Is the sealing tape removed from the cartridge? To restore the machine from the cartridge. (...
imageCLASS MF3111 Basic Guide
Page 103
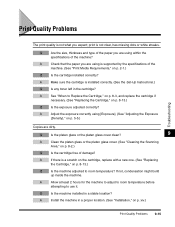
... 2 hours for the machine to adjust to room temperature before attempting to room temperature? Q Is the machine installed in a proper location. (See "Installation," on p. 8-13.) Q Is the exposure adjusted correctly? Print Quality Problems Troubleshooting The print quality is not...the cartridge is a scratch on the cartridge, replace with a new one. (See "Replacing the Cartridge," on p. 2-1.) Q Is the cartridge installed correctly? A Install the machine in a stable location? A See "When to Replace the Cartridge," on p. 8-3, and replace the cartridge if necessary. (See "...
... 2 hours for the machine to adjust to room temperature before attempting to room temperature? Q Is the machine installed in a proper location. (See "Installation," on p. 8-13.) Q Is the exposure adjusted correctly? Print Quality Problems Troubleshooting The print quality is not...the cartridge is a scratch on the cartridge, replace with a new one. (See "Replacing the Cartridge," on p. 2-1.) Q Is the cartridge installed correctly? A Install the machine in a stable location? A See "When to Replace the Cartridge," on p. 8-3, and replace the cartridge if necessary. (See "...
imageCLASS MF3111 Basic Guide
Page 114
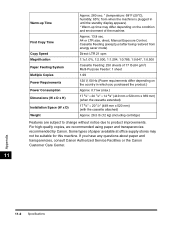
...(except just after being restored from when the machine is plugged in which you have any questions about paper and transparencies, consult Canon Authorized Service Facilities or the Canon Customer Care Center. Some types of the machine. Warm-up time may not be suitable for this machine. Approx. 13.8 ...standby display appears) * Warm-up Time First Copy Time Copy Speed Magnification Paper Feeding System Multiple Copies Power Requirements Power Consumption Dimensions (W x D x H) Installation Space (W x D) Weight Approx. 260 sec. * (temperature: 68°F (20°C), humidity: 65%;
...(except just after being restored from when the machine is plugged in which you have any questions about paper and transparencies, consult Canon Authorized Service Facilities or the Canon Customer Care Center. Some types of the machine. Warm-up time may not be suitable for this machine. Approx. 13.8 ...standby display appears) * Warm-up Time First Copy Time Copy Speed Magnification Paper Feeding System Multiple Copies Power Requirements Power Consumption Dimensions (W x D x H) Installation Space (W x D) Weight Approx. 260 sec. * (temperature: 68°F (20°C), humidity: 65%;

imageCLASS MF3111 Basic Guide
Page 116
Envelope loading, 2-9 printing area, 2-3 Exposure key, 1-4 Extension cover, 1-3 F Face up cover, 1-3 Feeder multi-purpose, 1-2 Front cover, 1-2 G General problems, 9-19 I Image Quality adjusting, 5-5 key, 1-4 INSTALL CARTRIDGE message, 9-8 M Machine Settings accessing, 10-1 Making copies, 5-2 MEMORY FULL message, 9-9 Menu descriptions, 10-2 key, 1-4 Multi-purpose feeder, 1-2 loading an envelope, 2-9 loading paper, 2-8 paper requirements, 2-1 N ...
Envelope loading, 2-9 printing area, 2-3 Exposure key, 1-4 Extension cover, 1-3 F Face up cover, 1-3 Feeder multi-purpose, 1-2 Front cover, 1-2 G General problems, 9-19 I Image Quality adjusting, 5-5 key, 1-4 INSTALL CARTRIDGE message, 9-8 M Machine Settings accessing, 10-1 Making copies, 5-2 MEMORY FULL message, 9-9 Menu descriptions, 10-2 key, 1-4 Multi-purpose feeder, 1-2 loading an envelope, 2-9 loading paper, 2-8 paper requirements, 2-1 N ...


