Starter Guide
Page 3
...Maintenance and Inspections • When cleaning the machine, turn off the power switches of the machine and computer and disconnect the interface cable if it is inserted completely after continuous printing. There are dropped or spilled inside the machine which can be hazardous if not used...allow children to the human body. Be careful not to do so may suddenly rotate and catch your local authorized Canon dealer. • When plugging or unplugging a USB cable when the power plug is connected. Failure to hurt your fingers. • Keep your hands and clothing away from...
...Maintenance and Inspections • When cleaning the machine, turn off the power switches of the machine and computer and disconnect the interface cable if it is inserted completely after continuous printing. There are dropped or spilled inside the machine which can be hazardous if not used...allow children to the human body. Be careful not to do so may suddenly rotate and catch your local authorized Canon dealer. • When plugging or unplugging a USB cable when the power plug is connected. Failure to hurt your fingers. • Keep your hands and clothing away from...
Starter Guide
Page 7
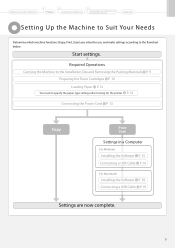
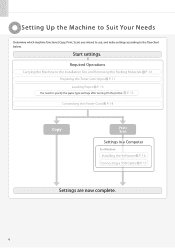
Start settings. P. 14 Connecting the Power Cord P. 13 Copy Print Scan Settings in a Computer For Windows Installing the Software P. 15 Connecting a USB Cable P. 16 For Macintosh Installing the Software P. 18 Connecting a USB Cable P.19 Settings are now complete. 5 Required Operations Carrying the Machine to the Installation Site and Removing the Packing Materials P. 9 Preparing the Toner...
Start settings. P. 14 Connecting the Power Cord P. 13 Copy Print Scan Settings in a Computer For Windows Installing the Software P. 15 Connecting a USB Cable P. 16 For Macintosh Installing the Software P. 18 Connecting a USB Cable P.19 Settings are now complete. 5 Required Operations Carrying the Machine to the Installation Site and Removing the Packing Materials P. 9 Preparing the Toner...
Starter Guide
Page 15
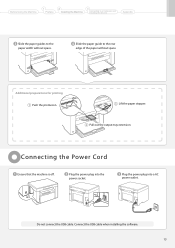
Plug the power plug into a AC power outlet. Additional preparations for printing Push the protrusion. Connect the USB cable when installing the software. 13 Slide the paper guide to the paper width without space. Connecting the Power Cord Ensure that the machine is off. ... to a Computer and Installing the Drivers Appendix Slide the paper guides to the rear edge of the paper without space. OFF Do not connect the USB cable.
Plug the power plug into a AC power outlet. Additional preparations for printing Push the protrusion. Connect the USB cable when installing the software. 13 Slide the paper guide to the paper width without space. Connecting the Power Cord Ensure that the machine is off. ... to a Computer and Installing the Drivers Appendix Slide the paper guides to the rear edge of the paper without space. OFF Do not connect the USB cable.
Starter Guide
Page 17
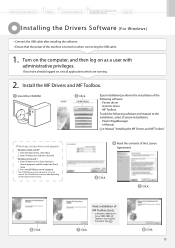
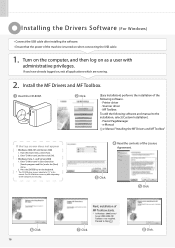
...Enter "D:\Minst.exe", and then click [OK]. • Windows Vista and 7 1. Turn on the computer, and then log on when connecting the USB cable. 1. Enter "D:\Minst.exe" in this manual. Click. Before Using the Machine 1 Preface 2 Installing the Machine 3 Connecting to a Computer and ...Installing the Drivers Appendix Installing the Drivers Software (For Windows) ••Connect the USB cable after installing the software. ••Ensure that the power of the machine is turned on as "D:" in [Start Search] or ...
...Enter "D:\Minst.exe", and then click [OK]. • Windows Vista and 7 1. Turn on the computer, and then log on when connecting the USB cable. 1. Enter "D:\Minst.exe" in this manual. Click. Before Using the Machine 1 Preface 2 Installing the Machine 3 Connecting to a Computer and ...Installing the Drivers Appendix Installing the Drivers Software (For Windows) ••Connect the USB cable after installing the software. ••Ensure that the power of the machine is turned on as "D:" in [Start Search] or ...
Starter Guide
Page 18
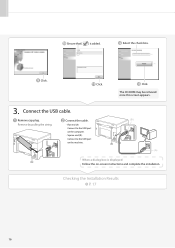
Connect the cable. • Flat end (A): Connect to the USB port on the computer. • Square end (B): Connect to the USB port on -screen instructions and complete the installation. Select the check box. (1) (2) Click. Click. Remove by pulling the string. Checking the Installation Results P. 17 16 The CD-ROM may be removed once this screen appears. 3. Connect the USB cable. Remove cap plug. Ensure that [ ] is displayed Follow the on the machine. (B) (A) When a dialog box is added. Click.
Connect the cable. • Flat end (A): Connect to the USB port on the computer. • Square end (B): Connect to the USB port on -screen instructions and complete the installation. Select the check box. (1) (2) Click. Click. Remove by pulling the string. Checking the Installation Results P. 17 16 The CD-ROM may be removed once this screen appears. 3. Connect the USB cable. Remove cap plug. Ensure that [ ] is displayed Follow the on the machine. (B) (A) When a dialog box is added. Click.

Starter Guide
Page 20
... are running. Click. Read the contents of MAC OS X. In this case, skip to step . Installing the Sof tware (For Macintosh) ••Connect the USB cable after installing the software. ••The installation screen varies depending on the version of the License Agreement. Double-click the CD-ROM icon. Click...
... are running. Click. Read the contents of MAC OS X. In this case, skip to step . Installing the Sof tware (For Macintosh) ••Connect the USB cable after installing the software. ••The installation screen varies depending on the version of the License Agreement. Double-click the CD-ROM icon. Click...
Starter Guide
Page 21
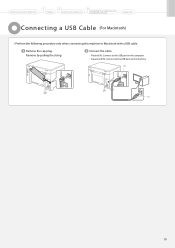
Remove by pulling the string. Connect the cable. • Flat end (A): Connect to the USB port on the computer. • Square end (B): Connect to Macintosh with a USB cable. Before Using the Machine 1 Preface 2 Installing the Machine 3 Connecting to a Computer and Installing the Drivers Appendix Connec ting a USB Cable (For Macintosh) ••Perform the following procedure only when connecting this machine to the USB port on the machine. (B) (A) 19 Remove the cap plug.
Remove by pulling the string. Connect the cable. • Flat end (A): Connect to the USB port on the computer. • Square end (B): Connect to Macintosh with a USB cable. Before Using the Machine 1 Preface 2 Installing the Machine 3 Connecting to a Computer and Installing the Drivers Appendix Connec ting a USB Cable (For Macintosh) ••Perform the following procedure only when connecting this machine to the USB port on the machine. (B) (A) 19 Remove the cap plug.
Starter Guide
Page 26
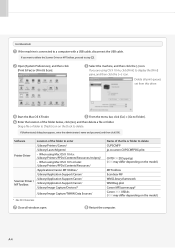
... ScanGear MF WMCLibrary.framework WMCReg.plist Canon MFScanner.app* Canon XXX USB.ds (XXX may differ depending on the Dock to step . From the menu bar, click [Go] → [Go to a computer with a USB cable, disconnect the USB cable. If you want to delete the...• When using Mac OS X 10.5 or later: /Library/Printers/PPDs/Contents/Resources/ /Applications/Canon MF Utilities/ /Library/Application Support/Canon/ /Library/Application Support/Canon/ /Library/Application Support/Canon/ /Library/Image Capture/Devices/* /Library/Image Capture/TWAIN Data Sources/ * Mac OS X 10.6 ...
... ScanGear MF WMCLibrary.framework WMCReg.plist Canon MFScanner.app* Canon XXX USB.ds (XXX may differ depending on the Dock to step . From the menu bar, click [Go] → [Go to a computer with a USB cable, disconnect the USB cable. If you want to delete the...• When using Mac OS X 10.5 or later: /Library/Printers/PPDs/Contents/Resources/ /Applications/Canon MF Utilities/ /Library/Application Support/Canon/ /Library/Application Support/Canon/ /Library/Application Support/Canon/ /Library/Image Capture/Devices/* /Library/Image Capture/TWAIN Data Sources/ * Mac OS X 10.6 ...
imageCLASS MF3010 Starter Guide
Page 3
...inside the machine. Even if the machine is not printing, the roller may suddenly rotate and catch your local authorized Canon dealer. • When plugging or unplugging a USB cable when the power plug is confirmed as for safety. • Never open covers other than those indicated in burns...., causing electricity to do not spill water, liquids, or other than that listed herein, as overnight. Also, do so can damage the cables or cords, resulting in a fire or electrical shock. 1 Read the following remarks and instructions for several days. • Open or close...
...inside the machine. Even if the machine is not printing, the roller may suddenly rotate and catch your local authorized Canon dealer. • When plugging or unplugging a USB cable when the power plug is confirmed as for safety. • Never open covers other than those indicated in burns...., causing electricity to do not spill water, liquids, or other than that listed herein, as overnight. Also, do so can damage the cables or cords, resulting in a fire or electrical shock. 1 Read the following remarks and instructions for several days. • Open or close...
imageCLASS MF3010 Starter Guide
Page 8
... turning On the printer. Start settings. P. 15 Connecting the Power Cord P. 14 Copy Print Scan Settings in a Computer For Windows Installing the Software P. 16 Connecting a USB Cable P. 17 Settings are now complete. 6 Required Operations Carrying the Machine to the Installation Site and Removing the Packing Materials P. 10 Preparing the Toner Cartridges P. 11...
... turning On the printer. Start settings. P. 15 Connecting the Power Cord P. 14 Copy Print Scan Settings in a Computer For Windows Installing the Software P. 16 Connecting a USB Cable P. 17 Settings are now complete. 6 Required Operations Carrying the Machine to the Installation Site and Removing the Packing Materials P. 10 Preparing the Toner Cartridges P. 11...

imageCLASS MF3010 Starter Guide
Page 16
Lift the paper stopper. OFF Do not connect the USB cable. Slide the paper guides to the rear edge of the paper without space. Plug the power plug into a AC power outlet. Pull out the output tray extension. Plug the power plug into the power socket. Connect the USB cable when installing the software. 14 Additional preparations for printing Push the protrusion. Connecting the Power Cord Ensure that the machine is off. Slide the paper guide to the paper width without space.
Lift the paper stopper. OFF Do not connect the USB cable. Slide the paper guides to the rear edge of the paper without space. Plug the power plug into a AC power outlet. Pull out the output tray extension. Plug the power plug into the power socket. Connect the USB cable when installing the software. 14 Additional preparations for printing Push the protrusion. Connecting the Power Cord Ensure that the machine is off. Slide the paper guide to the paper width without space.
imageCLASS MF3010 Starter Guide
Page 18
... The CD-ROM drive name is indicated as a user with administrative privileges. Installing the Drivers Software (For Windows) ••Connect the USB cable after installing the software. ••Ensure that the power of the machine is not installed. Install the MF Drivers and MF Toolbox. ...appear • Windows 2000, XP, and Server 2003 1. Enter "D:\Minst.exe" in this manual. Press the [ENTER] key on when connecting the USB cable. 1. Read the contents of the following software. • Printer driver • Scanner driver • MF Toolbox To add the following software and...
... The CD-ROM drive name is indicated as a user with administrative privileges. Installing the Drivers Software (For Windows) ••Connect the USB cable after installing the software. ••Ensure that the power of the machine is not installed. Install the MF Drivers and MF Toolbox. ...appear • Windows 2000, XP, and Server 2003 1. Enter "D:\Minst.exe" in this manual. Press the [ENTER] key on when connecting the USB cable. 1. Read the contents of the following software. • Printer driver • Scanner driver • MF Toolbox To add the following software and...

imageCLASS MF3010 Starter Guide
Page 19
The CD-ROM may be removed once this screen appears. 3. Click. Remove by pulling the string. Connect the USB cable. Connect the cable. • Flat end (A): Connect to the USB port on the computer. • Square end (B): Connect to a Computer and Installing the Drivers Appendix Ensure that [ ] is ...the installation. Checking the Installation Results P. 18 17 Before Using the Machine 1 Preface 2 Installing the Machine 3 Connecting to the USB port on the machine. (B) (A) When a dialog box is added. Remove cap plug. Select the check box. (1) (2) Click. Click.
The CD-ROM may be removed once this screen appears. 3. Click. Remove by pulling the string. Connect the USB cable. Connect the cable. • Flat end (A): Connect to the USB port on the computer. • Square end (B): Connect to a Computer and Installing the Drivers Appendix Ensure that [ ] is ...the installation. Checking the Installation Results P. 18 17 Before Using the Machine 1 Preface 2 Installing the Machine 3 Connecting to the USB port on the machine. (B) (A) When a dialog box is added. Remove cap plug. Select the check box. (1) (2) Click. Click.


