

imageCLASS D780 Fax Guide
Page 43
...; If the machine's memory becomes full while scanning your document, MEMORY FULL will light up by pressing Redial/Pause. 9 Set the next document on the platen glass. (→ Reference Guide) • To adjust the resolution, → p. 4-1. • To adjust the contrast, → p. 9-4. 3 Press Function. 4 Press Book Sending.... for memory sending. * Based on ITU-T No.1 Chart, standard mode. • The Function key will appear in order to remove documents from the platen glass. If the Function key is lit. BOOK TX SCAN SIZE Ex: LTR 6 Press Set. 7 Dial the other documents. ...
...; If the machine's memory becomes full while scanning your document, MEMORY FULL will light up by pressing Redial/Pause. 9 Set the next document on the platen glass. (→ Reference Guide) • To adjust the resolution, → p. 4-1. • To adjust the contrast, → p. 9-4. 3 Press Function. 4 Press Book Sending.... for memory sending. * Based on ITU-T No.1 Chart, standard mode. • The Function key will appear in order to remove documents from the platen glass. If the Function key is lit. BOOK TX SCAN SIZE Ex: LTR 6 Press Set. 7 Dial the other documents. ...
imageCLASS D780 Fax Guide
Page 71
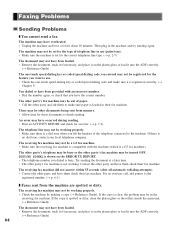
...not be set for the correct telephone line type. (→ p. 2-7) The document may not have been loaded. • Remove the document, stack it if necessary, and place it on the platen glass or load it into the ADF correctly. (→ Reference Guide) 8-2 The machine may not be turned OFF. If ... number again, or check that you lift the handset of paper. • Call the other party's fax machine may not have been loaded. • Remove the document, stack it if necessary, and place it on the ERROR TX REPORT. • The telephone number you dialed is registered correctly. (→...
...not be set for the correct telephone line type. (→ p. 2-7) The document may not have been loaded. • Remove the document, stack it if necessary, and place it on the platen glass or load it into the ADF correctly. (→ Reference Guide) 8-2 The machine may not be turned OFF. If ... number again, or check that you lift the handset of paper. • Call the other party's fax machine may not have been loaded. • Remove the document, stack it if necessary, and place it on the ERROR TX REPORT. • The telephone number you dialed is registered correctly. (→...
imageCLASS D780/D760/D761 Reference Guide
Page 11
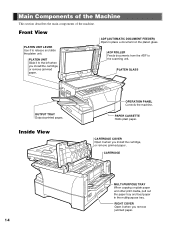
... Open it to the scanning unit. PAPER CASSETTE Holds plain paper. PLATEN GLASS OUTPUT TRAY Outputs printed pages. Inside View OPERATION PANEL Controls the machine. PLATEN UNIT Slide it when you install the cartridge, or remove jammed paper. ADF ROLLER Feeds documents from the ADF to the left... when you install the cartridge, or remove jammed paper. Main Components of the Machine This section...
... Open it to the scanning unit. PAPER CASSETTE Holds plain paper. PLATEN GLASS OUTPUT TRAY Outputs printed pages. Inside View OPERATION PANEL Controls the machine. PLATEN UNIT Slide it when you install the cartridge, or remove jammed paper. ADF ROLLER Feeds documents from the ADF to the left... when you install the cartridge, or remove jammed paper. Main Components of the Machine This section...
imageCLASS D780/D760/D761 Reference Guide
Page 25
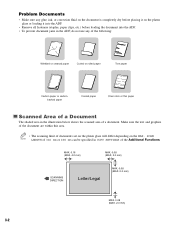
... 2.0 mm) 3-2 Problem Documents • Make sure any glue, ink, or correction fluid on the document is completely dry before placing it into the ADF. • Remove all fasteners (staples, paper clips, etc.) before loading the document into the ADF. • To prevent document jams in the ADF, do not use any... Coated paper Onion skin or thin paper Scanned Area of a Document The shaded area in COPY SETTINGS of documents set on the platen glass will differ depending on the platen glass or loading it on the MAX. Make sure the text and graphics of the document are within this area. • ...
... 2.0 mm) 3-2 Problem Documents • Make sure any glue, ink, or correction fluid on the document is completely dry before placing it into the ADF. • Remove all fasteners (staples, paper clips, etc.) before loading the document into the ADF. • To prevent document jams in the ADF, do not use any... Coated paper Onion skin or thin paper Scanned Area of a Document The shaded area in COPY SETTINGS of documents set on the platen glass will differ depending on the platen glass or loading it on the MAX. Make sure the text and graphics of the document are within this area. • ...
imageCLASS D780/D760/D761 Reference Guide
Page 30
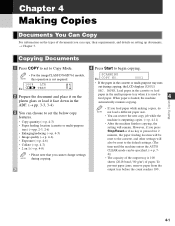
...100% LTR Ex: TEXT 01 2 Prepare the document and place it on the platen glass or load it is used to the default settings. (The time until the ...3-4) 3 You can choose to set to Copy Mode. 4 Press Start to begin copying. • For the imageCLASS D760/D761 models, NOTE this operation is outputting copies. (→ p. 4-11) • After the machine finishes copying, ...capacity of the output tray is loaded, the machine 4 automatically resumes copying. To prevent paper jams, remove paper from the output tray before the count reaches 100 . 4-1 Chapter 4 Making Copies Documents You ...
...100% LTR Ex: TEXT 01 2 Prepare the document and place it on the platen glass or load it is used to the default settings. (The time until the ...3-4) 3 You can choose to set to Copy Mode. 4 Press Start to begin copying. • For the imageCLASS D760/D761 models, NOTE this operation is outputting copies. (→ p. 4-11) • After the machine finishes copying, ...capacity of the output tray is loaded, the machine 4 automatically resumes copying. To prevent paper jams, remove paper from the output tray before the count reaches 100 . 4-1 Chapter 4 Making Copies Documents You ...
imageCLASS D780/D760/D761 Reference Guide
Page 50
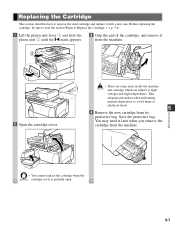
...high voltages and high temperatures. Before replacing the cartridge, be sure to read the section When to avoid burns or electrical shock. 5 4 Remove the new cartridge from its protective bag. Save the protective bag. Maintenance • You cannot replace the cartridge when the IMPORTANT cartridge cover... is partially open. 5-7 Take adequate precaution when performing internal inspections, to Replace the Cartridge. (→ p. 5-4) 1 Lift the platen unit lever q and slide the platen unit w until the 34 mark appears. 3 Grip the end of the cartridge, and...
...high voltages and high temperatures. Before replacing the cartridge, be sure to read the section When to avoid burns or electrical shock. 5 4 Remove the new cartridge from its protective bag. Save the protective bag. Maintenance • You cannot replace the cartridge when the IMPORTANT cartridge cover... is partially open. 5-7 Take adequate precaution when performing internal inspections, to Replace the Cartridge. (→ p. 5-4) 1 Lift the platen unit lever q and slide the platen unit w until the 34 mark appears. 3 Grip the end of the cartridge, and...
imageCLASS D780/D760/D761 Reference Guide
Page 51
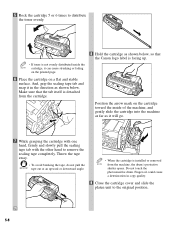
And, grip the sealing tape tab and snap it in copy quality. 9 Close the cartridge cover and slide the platen unit to remove the sealing tape completely. Make sure that the Canon logo label is facing up. Do not touch the photosensitive drum. Finger oil could cause a deterioration in the direction as...; To avoid breaking the tape, do not pull the IMPORTANT tape out at an upward or downward angle. • When the cartridge is installed or removed NOTE from the cartridge. 8 Hold the cartridge as shown below . 5 Rock the cartridge 5 or 6 times to distribute the toner evenly. • If ...
And, grip the sealing tape tab and snap it in copy quality. 9 Close the cartridge cover and slide the platen unit to remove the sealing tape completely. Make sure that the Canon logo label is facing up. Do not touch the photosensitive drum. Finger oil could cause a deterioration in the direction as...; To avoid breaking the tape, do not pull the IMPORTANT tape out at an upward or downward angle. • When the cartridge is installed or removed NOTE from the cartridge. 8 Hold the cartridge as shown below . 5 Rock the cartridge 5 or 6 times to distribute the toner evenly. • If ...
imageCLASS D780/D760/D761 Reference Guide
Page 56
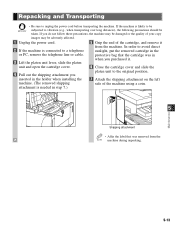
.... inserted in step 7.) Maintenance 5 Shipping attachment • Affix the label that the cartridge was removed from the machine. unit and open the cartridge cover. 6 Close the cartridge cover and slide the 4 Pull out the shipping attachment you platen unit to a telephone from the NOTE machine during unpacking. 5-13 If you purchased it...
.... inserted in step 7.) Maintenance 5 Shipping attachment • Affix the label that the cartridge was removed from the machine. unit and open the cartridge cover. 6 Close the cartridge cover and slide the 4 Pull out the shipping attachment you platen unit to a telephone from the NOTE machine during unpacking. 5-13 If you purchased it...

imageCLASS D780/D760/D761 Reference Guide
Page 58
... CAUTION high temperatures. Take adequate precaution when performing internal inspections, to remove the toner stains. 1 Lift the platen unit lever q and slide the platen unit w until the 34 mark appears. 2 Open the cartridge cover. 6 2 1 Troubleshooting 3 Remove the cartridge from the main unit, paper cassette, ADF, and multi...-purpose tray. Washing with cold water. PAPER JAM and SLIDE PLATEN LEFT. • There are some areas inside the main unit, the LCD displays REC. Removing Jammed Paper from Inside the Main Unit When print media jams inside the machine and ...
... CAUTION high temperatures. Take adequate precaution when performing internal inspections, to remove the toner stains. 1 Lift the platen unit lever q and slide the platen unit w until the 34 mark appears. 2 Open the cartridge cover. 6 2 1 Troubleshooting 3 Remove the cartridge from the main unit, paper cassette, ADF, and multi...-purpose tray. Washing with cold water. PAPER JAM and SLIDE PLATEN LEFT. • There are some areas inside the main unit, the LCD displays REC. Removing Jammed Paper from Inside the Main Unit When print media jams inside the machine and ...
imageCLASS D780/D760/D761 Reference Guide
Page 59
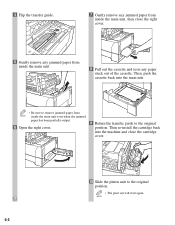
Then re-install the cartridge back into the main unit. • Be sure to remove jammed paper from inside the main unit even when the jammed paper has been partially output. 6 Open the right cover. 9 Return the transfer guide to ...the original position. • The print out will start again. NOTE 6-2 Then, push the cassette back into the machine and close the right cover. 5 Gently remove any jammed paper from inside the main unit. 8 Pull out the cassette and reset any jammed paper from NOTE inside the main unit, then close...
Then re-install the cartridge back into the main unit. • Be sure to remove jammed paper from inside the main unit even when the jammed paper has been partially output. 6 Open the right cover. 9 Return the transfer guide to ...the original position. • The print out will start again. NOTE 6-2 Then, push the cassette back into the machine and close the right cover. 5 Gently remove any jammed paper from inside the main unit. 8 Pull out the cassette and reset any jammed paper from NOTE inside the main unit, then close...
imageCLASS D780/D760/D761 Reference Guide
Page 60
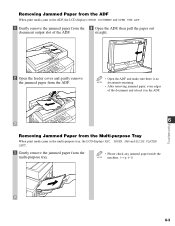
...ADF, the LCD displays CHECK DOCUMENT and OPEN THE ADF. 1 Gently remove the jammed paper from the 3 Open the ADF, then pull the paper out document output slot of the ADF. PAPER JAM and SLIDE PLATEN LEFT. 1 Gently remove the jammed paper from the multi-purpose tray. • Please check... any jammed paper inside the NOTE machine. (→ p. 6-1) 6-3 Removing Jammed Paper from the ADF When print media jams in the multi-purpose ...
...ADF, the LCD displays CHECK DOCUMENT and OPEN THE ADF. 1 Gently remove the jammed paper from the 3 Open the ADF, then pull the paper out document output slot of the ADF. PAPER JAM and SLIDE PLATEN LEFT. 1 Gently remove the jammed paper from the multi-purpose tray. • Please check... any jammed paper inside the NOTE machine. (→ p. 6-1) 6-3 Removing Jammed Paper from the ADF When print media jams in the multi-purpose ...
imageCLASS D780/D760/D761 Reference Guide
Page 61
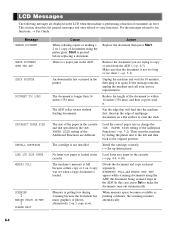
...or encounters an error. In this case, press Set to copy functions. PAPER SIZE setting of multipage documents on 1 copy was set . Remove the document you are different. The machine's memory is pressed before replacing a document. If MEMORY FULL and PRESS SET KEY appear while ...scanning documents using the platen glass, Start is full because collate copy or 2 on a flat surface to the original position. This section describes the general messages ...
...or encounters an error. In this case, press Set to copy functions. PAPER SIZE setting of multipage documents on 1 copy was set . Remove the document you are different. The machine's memory is pressed before replacing a document. If MEMORY FULL and PRESS SET KEY appear while ...scanning documents using the platen glass, Start is full because collate copy or 2 on a flat surface to the original position. This section describes the general messages ...
imageCLASS D780/D760/D761 Reference Guide
Page 62
REMOVE DOC. Press Set to the original position. Unplug the machine and wait for 10 minutes, then plug it in the cassette or multi-purpose tray. Slide the platen unit to make the document come out automatically. PAPER JAM SLIDE PLATEN LEFT There is not closed correctly. Clear the paper...setting is wrong while the report is printing. Troubleshooting 6-5 REC. ON GLASS A document has been left on the platen glass. Remove or change the document from the platen glass. STOP KEY PRESSED PRESS SET KEY The document has stopped in the cassette or multi-purpose or multi-purpose tray...
REMOVE DOC. Press Set to the original position. Unplug the machine and wait for 10 minutes, then plug it in the cassette or multi-purpose tray. Slide the platen unit to make the document come out automatically. PAPER JAM SLIDE PLATEN LEFT There is not closed correctly. Clear the paper...setting is wrong while the report is printing. Troubleshooting 6-5 REC. ON GLASS A document has been left on the platen glass. Remove or change the document from the platen glass. STOP KEY PRESSED PRESS SET KEY The document has stopped in the cassette or multi-purpose or multi-purpose tray...
imageCLASS D780/D760/D761 Reference Guide
Page 64
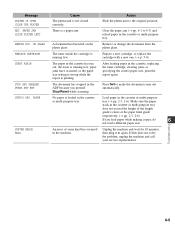
...8226; Be sure to free up Instructions) Troubleshooting The paper cassette may have been loaded correctly. • Remove the document, stack it if necessary, and load it in the cassette or multi-purpose tray. Document may ...than 10 envelopes in the multi-purpose tray. The cartridge may not be removed from the cartridge. 6 • Remove the sealing tape from the platen glass, and load it in the ADF again. ❚ MEMORY FULL ... environment are copying may not be left on the platen glass. • Remove the document from the cartridge. (→ Set-up space in the cassette.
...8226; Be sure to free up Instructions) Troubleshooting The paper cassette may have been loaded correctly. • Remove the document, stack it if necessary, and load it in the cassette or multi-purpose tray. Document may ...than 10 envelopes in the multi-purpose tray. The cartridge may not be removed from the cartridge. 6 • Remove the sealing tape from the platen glass, and load it in the ADF again. ❚ MEMORY FULL ... environment are copying may not be left on the platen glass. • Remove the document from the cartridge. (→ Set-up space in the cassette.
imageCLASS D780/D760/D761 Reference Guide
Page 78
... 1-4 unit lever 1-4 PLATEN IS OPEN CLOSE THE PLATEN message 6-5 PLEASE WAIT message 6-4 Positioning document 3-3 Power supply, safety instructions 1-2 Preset Reduction/Enlargement 4-5 PRINT EXPOSURE setting ... 1-1 maintenance 1-3 power supply 1-2 Scan area 3-2 SCANNING message 6-4 Set key 1-6 SHARPNESS setting 7-3 Size I -3 Index PAPER JAM SLIDE PLATEN LEFT message 6-5 Recycled paper 2-1 Reduction/Enlargement 4-5 REMOVE DOC. IMAGEQUALITY setting 7-3 STOP KEY PRESSED PRESS SET KEY message 6-5 Stop/Reset key 1-6, 4-1 SUPPLY REC. PAPER message 6-5 SYSTEM ERROR...
... 1-4 unit lever 1-4 PLATEN IS OPEN CLOSE THE PLATEN message 6-5 PLEASE WAIT message 6-4 Positioning document 3-3 Power supply, safety instructions 1-2 Preset Reduction/Enlargement 4-5 PRINT EXPOSURE setting ... 1-1 maintenance 1-3 power supply 1-2 Scan area 3-2 SCANNING message 6-4 Set key 1-6 SHARPNESS setting 7-3 Size I -3 Index PAPER JAM SLIDE PLATEN LEFT message 6-5 Recycled paper 2-1 Reduction/Enlargement 4-5 REMOVE DOC. IMAGEQUALITY setting 7-3 STOP KEY PRESSED PRESS SET KEY message 6-5 Stop/Reset key 1-6, 4-1 SUPPLY REC. PAPER message 6-5 SYSTEM ERROR...
imageCLASS D700 Series Set-up Instructions
Page 2
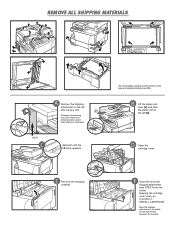
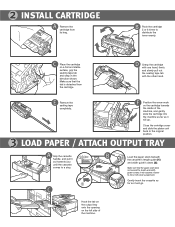
... appears. The actual shape, quantity, and/or location of the machine is locked and you need to section 2 INSTALL CARTRIDGE. F Insert the removed shipping attachment from STEP A into the holder. Keep the shipping attachment in the holder in case you cannot make copies or send faxes. 2... 11 Slide left side using a coin. E Remove the shipping material. D Open the cartridge cover. Otherwise the scanning unit of the tape and shipping material may differ. B Lift the platen unit lever (1) and slide the platen unit to the left (2).
... appears. The actual shape, quantity, and/or location of the machine is locked and you need to section 2 INSTALL CARTRIDGE. F Insert the removed shipping attachment from STEP A into the holder. Keep the shipping attachment in the holder in case you cannot make copies or send faxes. 2... 11 Slide left side using a coin. E Remove the shipping material. D Open the cartridge cover. Otherwise the scanning unit of the tape and shipping material may differ. B Lift the platen unit lever (1) and slide the platen unit to the left (2).
imageCLASS D700 Series Set-up Instructions
Page 3
... mark on the cartridge towards you until the cassette comes to do so will cause a paper jam. Close the cartridge cover and slide the platen unit back to the original position. 3 LOAD PAPER / ATTACH OUTPUT TRAY A Grip the cassette handle, and pull it will go . Failure... to a stop. 2 INSTALL CARTRIDGE A Remove the cartridge from the cartridge. Make sure that the tab is detached from its bag. E Remove the sealing tape completely. C B Load the paper stack beneath the cassette's length guide (1) and width guide's...
... mark on the cartridge towards you until the cassette comes to do so will cause a paper jam. Close the cartridge cover and slide the platen unit back to the original position. 3 LOAD PAPER / ATTACH OUTPUT TRAY A Grip the cassette handle, and pull it will go . Failure... to a stop. 2 INSTALL CARTRIDGE A Remove the cartridge from the cartridge. Make sure that the tab is detached from its bag. E Remove the sealing tape completely. C B Load the paper stack beneath the cassette's length guide (1) and width guide's...


