Basic Guide
Page 5
... or Paper with a Letterhead 22 Setting a Paper Size and Type 23 Switch to the Quiet Mode 24 Switch to the Sleep Mode 24 Use the Toner Saver Mode 25 Copy Make a Basic Copy 28 Enlarge or Reduce Copies 29 Adjust the Image Quality for Copy 29 Adjusting the density 29 Selecting...
... or Paper with a Letterhead 22 Setting a Paper Size and Type 23 Switch to the Quiet Mode 24 Switch to the Sleep Mode 24 Use the Toner Saver Mode 25 Copy Make a Basic Copy 28 Enlarge or Reduce Copies 29 Adjust the Image Quality for Copy 29 Adjusting the density 29 Selecting...
Basic Guide
Page 6
... Exterior and Interior 52 Cleaning the Fixing Unit 53 Cleaning the Platen Glass and Feeder 54 Check and Replace Toner Cartridges 55 Conserving the Toner to Extend the Life of Toner Cartridges 55 Replacing the Toner Cartridge 56 Manage Using the List Function 58 Troubleshooting Clear Jams 60 Clearing Document Jams in the Feeder...
... Exterior and Interior 52 Cleaning the Fixing Unit 53 Cleaning the Platen Glass and Feeder 54 Check and Replace Toner Cartridges 55 Conserving the Toner to Extend the Life of Toner Cartridges 55 Replacing the Toner Cartridge 56 Manage Using the List Function 58 Troubleshooting Clear Jams 60 Clearing Document Jams in the Feeder...

Basic Guide
Page 7
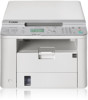
Read this chapter first. Basic Operation This chapter describes overall information about the machine, and how to the Sleep Mode 24 Use the Toner Saver Mode 25 7 Learn the Names and Functions of Each Part of the Machine ......... 8 Front Side 8 Interior 10 Back Side 11 Learn the Functions of ...
Read this chapter first. Basic Operation This chapter describes overall information about the machine, and how to the Sleep Mode 24 Use the Toner Saver Mode 25 7 Learn the Names and Functions of Each Part of the Machine ......... 8 Front Side 8 Interior 10 Back Side 11 Learn the Functions of ...
Basic Guide
Page 10
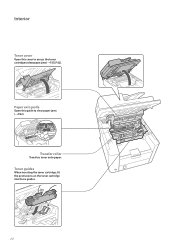
Transfer roller Transfers toner onto paper. Toner guides When inserting the toner cartridge, fit the protrusions on the toner cartridge into these guides. 10 Interior Toner cover Open this guide to access the toner cartridge or clear paper jams (→P.55, P.62). Paper exit guide Open this cover to clear paper jams (→P.62).
Transfer roller Transfers toner onto paper. Toner guides When inserting the toner cartridge, fit the protrusions on the toner cartridge into these guides. 10 Interior Toner cover Open this guide to access the toner cartridge or clear paper jams (→P.55, P.62). Paper exit guide Open this cover to clear paper jams (→P.62).
Basic Guide
Page 25
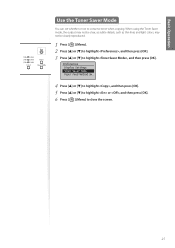
... reproduced. 1 Press [ ] (Menu). 2 Press [▲] or [▼] to highlight , and then press [OK]. 3 Press [▲] or [▼] to close the screen. 25 Preferences Display Settings Toner Saver Mode Paper Feed Method Sw... 4 Press [▲] or [▼] to highlight , and then press [OK]. 5 Press [▲] or [▼] to highlight or , and then... press [OK]. 6 Press [ ] (Menu) to highlight , and then press [OK]. Basic Operation Use the Toner Saver Mode You can set whether or not to conserve toner when copying.
... reproduced. 1 Press [ ] (Menu). 2 Press [▲] or [▼] to highlight , and then press [OK]. 3 Press [▲] or [▼] to close the screen. 25 Preferences Display Settings Toner Saver Mode Paper Feed Method Sw... 4 Press [▲] or [▼] to highlight , and then press [OK]. 5 Press [▲] or [▼] to highlight or , and then... press [OK]. 6 Press [ ] (Menu) to highlight , and then press [OK]. Basic Operation Use the Toner Saver Mode You can set whether or not to conserve toner when copying.
Basic Guide
Page 51
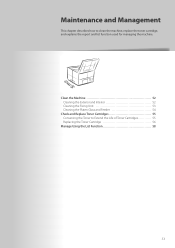
Clean the Machine 52 Cleaning the Exterior and Interior 52 Cleaning the Fixing Unit 53 Cleaning the Platen Glass and Feeder 54 Check and Replace Toner Cartridges 55 Conserving the Toner to clean the machine, replace the toner cartridge, and explains the report and list function used for managing the machine. Maintenance and Management This chapter describes how to Extend the Life of Toner Cartridges 55 Replacing the Toner Cartridge 56 Manage Using the List Function 58 51
Clean the Machine 52 Cleaning the Exterior and Interior 52 Cleaning the Fixing Unit 53 Cleaning the Platen Glass and Feeder 54 Check and Replace Toner Cartridges 55 Conserving the Toner to clean the machine, replace the toner cartridge, and explains the report and list function used for managing the machine. Maintenance and Management This chapter describes how to Extend the Life of Toner Cartridges 55 Replacing the Toner Cartridge 56 Manage Using the List Function 58 51
Basic Guide
Page 52
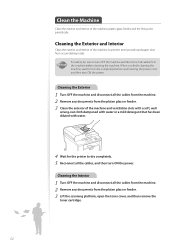
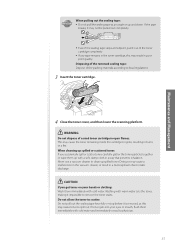
Clean the Machine Clean the exterior and interior of the machine to prevent toner powder and paper dust from accumulating inside. IMPORTANT For safety, be sure to turn OFF the machine and disconnect all cables from the machine before ... to dry completely. 5 Reconnect all the cables from the machine. 2 Remove any documents from the platen glass or feeder. 3 Lift the scanning platform, open the toner cover, and then remove the toner cartridge. 52 When you finish cleaning the machine, wait for the printer to dry completely before cleaning the machine.
Clean the Machine Clean the exterior and interior of the machine to prevent toner powder and paper dust from accumulating inside. IMPORTANT For safety, be sure to turn OFF the machine and disconnect all cables from the machine before ... to dry completely. 5 Reconnect all the cables from the machine. 2 Remove any documents from the platen glass or feeder. 3 Lift the scanning platform, open the toner cover, and then remove the toner cartridge. 52 When you finish cleaning the machine, wait for the printer to dry completely before cleaning the machine.
Basic Guide
Page 53
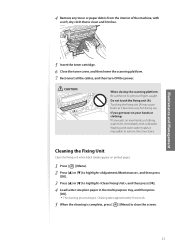
... the power. Touching the fixing unit (A) may cause burns as it impossible to remove the toner stains. CAUTION ʢ"ʣ When closing the scanning platform: Be careful not to get toner on your hands or clothing: If toner gets on printed pages. 1 Press [ ] (Menu). 2 Press [▲] or [▼] to highlight... water. Do not touch the fixing unit (A). Cleaning takes approximately 90 seconds. 5 When the cleaning is clean and lint-free. 4 Remove any toner or paper debris from the interior of the machine, with a soft, dry cloth that is complete, press [ ] (Menu) to close the screen. 53...
... the power. Touching the fixing unit (A) may cause burns as it impossible to remove the toner stains. CAUTION ʢ"ʣ When closing the scanning platform: Be careful not to get toner on your hands or clothing: If toner gets on printed pages. 1 Press [ ] (Menu). 2 Press [▲] or [▼] to highlight... water. Do not touch the fixing unit (A). Cleaning takes approximately 90 seconds. 5 When the cleaning is clean and lint-free. 4 Remove any toner or paper debris from the interior of the machine, with a soft, dry cloth that is complete, press [ ] (Menu) to close the screen. 53...

Basic Guide
Page 55
... it impossible to remove the toner stains. 2 Gently shake the toner cartridge 5-6 times to evenly distribute the toner (→p.55). Conserving the Toner to print for some time until the toner runs out. 1 Lift the scanning platform, open the toner cover, and then remove the toner cartridge. Maintenance and Management CAUTION If toner gets on printed pages. If...
... it impossible to remove the toner stains. 2 Gently shake the toner cartridge 5-6 times to evenly distribute the toner (→p.55). Conserving the Toner to print for some time until the toner runs out. 1 Lift the scanning platform, open the toner cover, and then remove the toner cartridge. Maintenance and Management CAUTION If toner gets on printed pages. If...
Basic Guide
Page 56
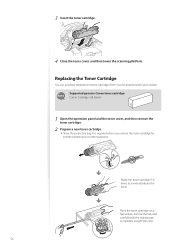
It is required when you remove the toner cartridge for printer maintenance or other purposes. Supported genuine Canon toner cartridge: Canon Cartridge 128 Starter 1 Open the operation panel and the toner cover, and then remove the toner cartridge. 2 Prepare a new toner cartridge. • Store the protective bag. Place the toner cartridge on a flat surface, remove the tab, and carefully...
It is required when you remove the toner cartridge for printer maintenance or other purposes. Supported genuine Canon toner cartridge: Canon Cartridge 128 Starter 1 Open the operation panel and the toner cover, and then remove the toner cartridge. 2 Prepare a new toner cartridge. • Store the protective bag. Place the toner cartridge on a flat surface, remove the tab, and carefully...
Basic Guide
Page 57
If the tape breaks, it may not be pulled out completely. • Even if the sealing tape stops at an angle or up spilled toner. Doing so may result in a dust explosion due to spill out. Do not pull out the sealing tape forcefully or stop before it is .... When cleaning up with cold water and immediately consult a physician. 57 Washing with cold water. Maintenance and Management 4 Close the toner cover, and then lower the scanning platform. If toner gets into your hands or clothing: Wash them immediately with a soft, damp cloth in burns or a fire. IMPORTANT When pulling...
If the tape breaks, it may not be pulled out completely. • Even if the sealing tape stops at an angle or up spilled toner. Doing so may result in a dust explosion due to spill out. Do not pull out the sealing tape forcefully or stop before it is .... When cleaning up with cold water and immediately consult a physician. 57 Washing with cold water. Maintenance and Management 4 Close the toner cover, and then lower the scanning platform. If toner gets into your hands or clothing: Wash them immediately with a soft, damp cloth in burns or a fire. IMPORTANT When pulling...
Basic Guide
Page 58
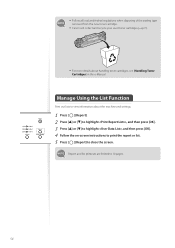
• Follow all local and federal regulations when disposing of the sealing tape removed from the new toner cartridge. • Canon will collect and recycle your used toner cartridges (→p.71). • For more details about the machine and settings. 1 Press [ ] (Report). 2 Press [▲] or [▼] to highlight , and then press [OK]. 3 Press [&#... the screen. Manage Using the List Function Print out lists to 10 pages. 58 Report and list printouts are limited to view information about handling toner cartridges, see [Handling Toner Cartridges] in the e-Manual.
• Follow all local and federal regulations when disposing of the sealing tape removed from the new toner cartridge. • Canon will collect and recycle your used toner cartridges (→p.71). • For more details about the machine and settings. 1 Press [ ] (Report). 2 Press [▲] or [▼] to highlight , and then press [OK]. 3 Press [&#... the screen. Manage Using the List Function Print out lists to 10 pages. 58 Report and list printouts are limited to view information about handling toner cartridges, see [Handling Toner Cartridges] in the e-Manual.
Basic Guide
Page 60
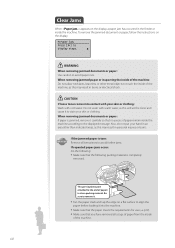
... the machine. 60 Do not wash with cold water. When removing jammed paper or inspecting the inside of the machine, as this will set the toner and cause it to avoid further jams. If repeated paper jams occur: Do the following: • Make sure that the following packing material is ... display, a paper jam has occurred in the feeder or inside the machine according to the end of paper) is also a packing material. CAUTION If loose toner comes into the machine. • Make sure that the paper meets the requirements for use (→ p.19). • Make sure that no pieces of ...
... the machine. 60 Do not wash with cold water. When removing jammed paper or inspecting the inside of the machine, as this will set the toner and cause it to avoid further jams. If repeated paper jams occur: Do the following: • Make sure that the following packing material is ... display, a paper jam has occurred in the feeder or inside the machine according to the end of paper) is also a packing material. CAUTION If loose toner comes into the machine. • Make sure that the paper meets the requirements for use (→ p.19). • Make sure that no pieces of ...
Basic Guide
Page 62
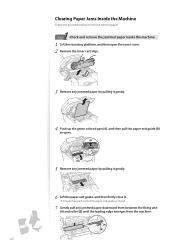
... procedure below to remove jammed paper. 1 Step Check and remove the jammed paper inside the machine. 1 Lift the scanning platform, and then open the toner cover. 2 Remove the toner cartridge. 3 Remove any jammed paper by pulling it gently. 4 Push up the green colored part (A), and then pull the paper exit guide (B) to...
... procedure below to remove jammed paper. 1 Step Check and remove the jammed paper inside the machine. 1 Lift the scanning platform, and then open the toner cover. 2 Remove the toner cartridge. 3 Remove any jammed paper by pulling it gently. 4 Push up the green colored part (A), and then pull the paper exit guide (B) to...
Basic Guide
Page 64
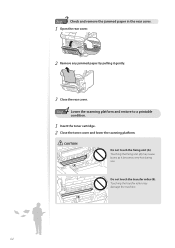
3 Step Check and remove the jammed paper in the rear cover. 1 Open the rear cover. 2 Remove any jammed paper by pulling it becomes very hot during use. ʢ"#ʣ Do not touch the transfer roller (B). Touching the fixing unit (A) may damage the machine. 64 Touching the transfer roller may cause burns as it gently. 3 Close the rear cover. 4 Step Lower the scanning platform and restore to a printable condition. 1 Insert the toner cartridge. 2 Close the toner cover and lower the scanning platform. CAUTION ʢ"ʣ Do not touch the fixing unit (A).
3 Step Check and remove the jammed paper in the rear cover. 1 Open the rear cover. 2 Remove any jammed paper by pulling it becomes very hot during use. ʢ"#ʣ Do not touch the transfer roller (B). Touching the fixing unit (A) may damage the machine. 64 Touching the transfer roller may cause burns as it gently. 3 Close the rear cover. 4 Step Lower the scanning platform and restore to a printable condition. 1 Insert the toner cartridge. 2 Close the toner cover and lower the scanning platform. CAUTION ʢ"ʣ Do not touch the fixing unit (A).
Basic Guide
Page 66
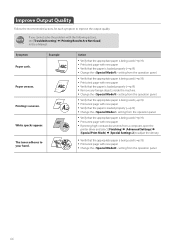
... used (→p.19). • Print a test page with new paper. • If printing high-contrast documents from the operation panel. 66 White specks appear. The toner adheres to improve the output quality. Action • Verify that the appropriate paper is being used (→p.19). • Print a test page with new paper...
... used (→p.19). • Print a test page with new paper. • If printing high-contrast documents from the operation panel. 66 White specks appear. The toner adheres to improve the output quality. Action • Verify that the appropriate paper is being used (→p.19). • Print a test page with new paper...

Basic Guide
Page 67
... being used (→p.19). • Print a test page with new paper. • If the machine is not in use for a long time after the toner cartridge has been replaced, change the settings from the operation panel. • When copying, change the and settings from the operation panel. • When printing...] [Advanced Settings] [Special Print Mode] [Special Settings 1] to another location. The overall print result is dark. The bottom edge of spattering toner appear around the data. Printed bar codes cannot be scanned. Provide a margin around the data.
... being used (→p.19). • Print a test page with new paper. • If the machine is not in use for a long time after the toner cartridge has been replaced, change the settings from the operation panel. • When copying, change the and settings from the operation panel. • When printing...] [Advanced Settings] [Special Print Mode] [Special Settings 1] to another location. The overall print result is dark. The bottom edge of spattering toner appear around the data. Printed bar codes cannot be scanned. Provide a margin around the data.
Basic Guide
Page 73
... cords or multi-plug power strips with this machine. This may result in serious personal injury. • Please contact an authorized Canon dealer if the machine makes an unusual noise, emits an unusual smell, or emits smoke or excessive heat. If you inhale the...the machine and the output slot is ingested, consult a physician or poison control center immediately. • Do not attempt to contact with the toner, consult a physician or poison control center immediately. temperature and high-voltage components inside the machine which may result in personal injury. • The...
... cords or multi-plug power strips with this machine. This may result in serious personal injury. • Please contact an authorized Canon dealer if the machine makes an unusual noise, emits an unusual smell, or emits smoke or excessive heat. If you inhale the...the machine and the output slot is ingested, consult a physician or poison control center immediately. • Do not attempt to contact with the toner, consult a physician or poison control center immediately. temperature and high-voltage components inside the machine which may result in personal injury. • The...
Starter Guide
Page 2
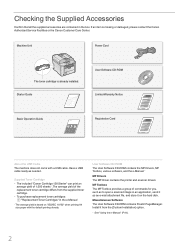
... is missing or damaged, please contact the Canon Authorized Service Facilities or the Canon Customer Care Center. The average yield of the replacement toner cartridge differs from the [Custom Installation] option. * See "Using the e-Manual" (P.18). 2 If an item is already installed....the e-Manual * The average yield is based on the hard disk. Miscellaneous Software The User Software CD-ROM contains Presto! Supplied Toner Cartridge • The included "Canon Cartridge 128 Starter" can print an average yield of commands for you, such as to open a scanned image in an application...
... is missing or damaged, please contact the Canon Authorized Service Facilities or the Canon Customer Care Center. The average yield of the replacement toner cartridge differs from the [Custom Installation] option. * See "Using the e-Manual" (P.18). 2 If an item is already installed....the e-Manual * The average yield is based on the hard disk. Miscellaneous Software The User Software CD-ROM contains Presto! Supplied Toner Cartridge • The included "Canon Cartridge 128 Starter" can print an average yield of commands for you, such as to open a scanned image in an application...
Starter Guide
Page 6
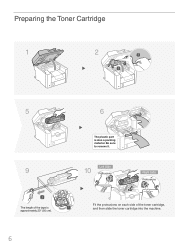
Be sure to remove it. 9 2 The length of the tape is also a packing material. Preparing the Toner Cartridge 1 2 1 2 5 6 The plastic part is approximately 20" (50 cm). 10 Left Side Protrusions Right Side Protrusions 1 Fit the protrusions on each side of the toner cartridge, and then slide the toner cartridge into the machine. 6
Be sure to remove it. 9 2 The length of the tape is also a packing material. Preparing the Toner Cartridge 1 2 1 2 5 6 The plastic part is approximately 20" (50 cm). 10 Left Side Protrusions Right Side Protrusions 1 Fit the protrusions on each side of the toner cartridge, and then slide the toner cartridge into the machine. 6


