Basic Guide
Page 6
...Interior 52 Cleaning the Fixing Unit 53 Cleaning the Platen Glass and Feeder 54 Check and Replace Toner Cartridges 55 Conserving the Toner to Extend the Life of Toner Cartridges 55 Replacing the Toner Cartridge 56 Manage Using the List Function 58 Troubleshooting Clear Jams 60 Clearing Document Jams in the Feeder (... Inside the Machine 62 Resolve a Displayed Message 65 Resolve an Error Code 65 Improve Output Quality 66 Resolve a Problem 68 FAQ 69 Recycling Used Cartridges 71 The Clean Earth Campaign 71 Important Safety Instructions 72 Legal Notices 74 Laser Safety 74 6
...Interior 52 Cleaning the Fixing Unit 53 Cleaning the Platen Glass and Feeder 54 Check and Replace Toner Cartridges 55 Conserving the Toner to Extend the Life of Toner Cartridges 55 Replacing the Toner Cartridge 56 Manage Using the List Function 58 Troubleshooting Clear Jams 60 Clearing Document Jams in the Feeder (... Inside the Machine 62 Resolve a Displayed Message 65 Resolve an Error Code 65 Improve Output Quality 66 Resolve a Problem 68 FAQ 69 Recycling Used Cartridges 71 The Clean Earth Campaign 71 Important Safety Instructions 72 Legal Notices 74 Laser Safety 74 6
Basic Guide
Page 10
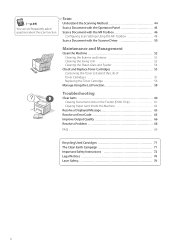
Toner guides When inserting the toner cartridge, fit the protrusions on the toner cartridge into these guides. 10 Paper exit guide Open this cover to clear paper jams (→P.62). Transfer roller Transfers toner onto paper. Interior Toner cover Open this guide to access the toner cartridge or clear paper jams (→P.55, P.62).
Toner guides When inserting the toner cartridge, fit the protrusions on the toner cartridge into these guides. 10 Paper exit guide Open this cover to clear paper jams (→P.62). Transfer roller Transfers toner onto paper. Interior Toner cover Open this guide to access the toner cartridge or clear paper jams (→P.55, P.62).
Basic Guide
Page 51
Maintenance and Management This chapter describes how to Extend the Life of Toner Cartridges 55 Replacing the Toner Cartridge 56 Manage Using the List Function 58 51 Clean the Machine 52 Cleaning the Exterior and Interior 52 Cleaning the Fixing Unit 53 Cleaning the Platen Glass and Feeder 54 Check and Replace Toner Cartridges 55 Conserving the Toner to clean the machine, replace the toner cartridge, and explains the report and list function used for managing the machine.
Maintenance and Management This chapter describes how to Extend the Life of Toner Cartridges 55 Replacing the Toner Cartridge 56 Manage Using the List Function 58 51 Clean the Machine 52 Cleaning the Exterior and Interior 52 Cleaning the Fixing Unit 53 Cleaning the Platen Glass and Feeder 54 Check and Replace Toner Cartridges 55 Conserving the Toner to clean the machine, replace the toner cartridge, and explains the report and list function used for managing the machine.
Basic Guide
Page 52
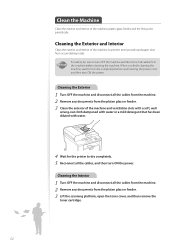
... from the machine. 2 Remove any documents from the platen glass or feeder. 3 Lift the scanning platform, open the toner cover, and then remove the toner cartridge. 52 Cleaning the Interior 1 Turn OFF the machine and disconnect all the cables, and then turn ON the power. When you finish cleaning the machine...
... from the machine. 2 Remove any documents from the platen glass or feeder. 3 Lift the scanning platform, open the toner cover, and then remove the toner cartridge. 52 Cleaning the Interior 1 Turn OFF the machine and disconnect all the cables, and then turn ON the power. When you finish cleaning the machine...
Basic Guide
Page 53
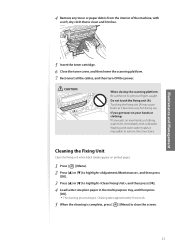
... the multi-purpose tray, and then press [OK]. • The cleaning process begins. Do not touch the fixing unit (A). Maintenance and Management 5 Insert the toner cartridge. 6 Close the toner cover, and then lower the scanning platform. 7 Reconnect all the cables, and then turn ON the power.
... the multi-purpose tray, and then press [OK]. • The cleaning process begins. Do not touch the fixing unit (A). Maintenance and Management 5 Insert the toner cartridge. 6 Close the toner cover, and then lower the scanning platform. 7 Reconnect all the cables, and then turn ON the power.

Basic Guide
Page 55
... and Management CAUTION If toner gets on printed pages. If the print result is not improved, replace the toner cartridge (→p.56). Replace the toner cartridge if necessary. Gently shake the toner cartridge 5-6 times to evenly distribute the toner. 55 When the toner has almost run out, streaks may be able to ...Extend the Life of Toner Cartridges If you redistribute the toner, you may appear on your hands or clothing, wash them immediately with warm water, as it sets the toner and...
... and Management CAUTION If toner gets on printed pages. If the print result is not improved, replace the toner cartridge (→p.56). Replace the toner cartridge if necessary. Gently shake the toner cartridge 5-6 times to evenly distribute the toner. 55 When the toner has almost run out, streaks may be able to ...Extend the Life of Toner Cartridges If you redistribute the toner, you may appear on your hands or clothing, wash them immediately with warm water, as it sets the toner and...
Basic Guide
Page 56
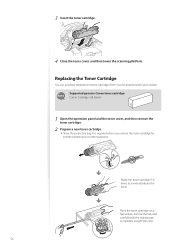
Supported genuine Canon toner cartridge: Canon Cartridge 128 Starter 1 Open the operation panel and the toner cover, and then remove the toner cartridge. 2 Prepare a new toner cartridge. • Store the protective bag. It is required when you remove the toner cartridge for printer maintenance or other purposes. Place the toner cartridge on a flat surface, remove the tab, and carefully...
Supported genuine Canon toner cartridge: Canon Cartridge 128 Starter 1 Open the operation panel and the toner cover, and then remove the toner cartridge. 2 Prepare a new toner cartridge. • Store the protective bag. It is required when you remove the toner cartridge for printer maintenance or other purposes. Place the toner cartridge on a flat surface, remove the tab, and carefully...
Basic Guide
Page 57
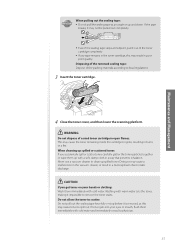
...pulling out the sealing tape: • Do not pull the sealing tape at midpoint, pull it out of the toner cartridge completely. • If any tape remains in the toner cartridge, this may cause toner to spill out. Do not pull out the sealing tape forcefully or stop before it is ...Do not allow the toner to remove the toner stains. Doing so may cause the toner remaining inside the cartridge to static discharge. Disposing of the removed sealing tape: Dispose of a used toner cartridge in poor print quality. When cleaning up spilled or scattered toner: If you get toner on your eyes...
...pulling out the sealing tape: • Do not pull the sealing tape at midpoint, pull it out of the toner cartridge completely. • If any tape remains in the toner cartridge, this may cause toner to spill out. Do not pull out the sealing tape forcefully or stop before it is ...Do not allow the toner to remove the toner stains. Doing so may cause the toner remaining inside the cartridge to static discharge. Disposing of the removed sealing tape: Dispose of a used toner cartridge in poor print quality. When cleaning up spilled or scattered toner: If you get toner on your eyes...
Basic Guide
Page 58
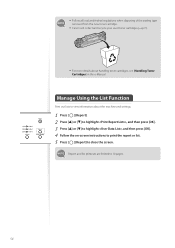
... the e-Manual. • Follow all local and federal regulations when disposing of the sealing tape removed from the new toner cartridge. • Canon will collect and recycle your used toner cartridges (→p.71). • For more details about the machine and settings. 1 Press [ ] (Report). 2 Press [▲] or [▼] to highlight , and then press...
... the e-Manual. • Follow all local and federal regulations when disposing of the sealing tape removed from the new toner cartridge. • Canon will collect and recycle your used toner cartridges (→p.71). • For more details about the machine and settings. 1 Press [ ] (Report). 2 Press [▲] or [▼] to highlight , and then press...
Basic Guide
Page 62
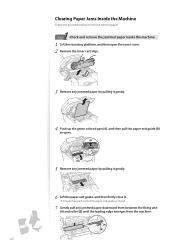
... jammed paper. 1 Step Check and remove the jammed paper inside the machine. 1 Lift the scanning platform, and then open the toner cover. 2 Remove the toner cartridge. 3 Remove any jammed paper by pulling it gently. 4 Push up the green colored part (A), and then pull the paper exit guide (B) to open. (A) (B) 5 Remove any...
... jammed paper. 1 Step Check and remove the jammed paper inside the machine. 1 Lift the scanning platform, and then open the toner cover. 2 Remove the toner cartridge. 3 Remove any jammed paper by pulling it gently. 4 Push up the green colored part (A), and then pull the paper exit guide (B) to open. (A) (B) 5 Remove any...
Basic Guide
Page 64
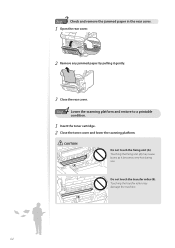
Touching the transfer roller may cause burns as it gently. 3 Close the rear cover. 4 Step Lower the scanning platform and restore to a printable condition. 1 Insert the toner cartridge. 2 Close the toner cover and lower the scanning platform. 3 Step Check and remove the jammed paper in the rear cover. 1 Open the rear cover. 2 Remove any jammed paper by pulling it becomes very hot during use. ʢ"#ʣ Do not touch the transfer roller (B). CAUTION ʢ"ʣ Do not touch the fixing unit (A). Touching the fixing unit (A) may damage the machine. 64
Touching the transfer roller may cause burns as it gently. 3 Close the rear cover. 4 Step Lower the scanning platform and restore to a printable condition. 1 Insert the toner cartridge. 2 Close the toner cover and lower the scanning platform. 3 Step Check and remove the jammed paper in the rear cover. 1 Open the rear cover. 2 Remove any jammed paper by pulling it becomes very hot during use. ʢ"#ʣ Do not touch the transfer roller (B). CAUTION ʢ"ʣ Do not touch the fixing unit (A). Touching the fixing unit (A) may damage the machine. 64

Basic Guide
Page 67
... the operation panel. • Adjust the copy density settings (→p.29). • If the machine is not in use for a long time after the toner cartridge has been replaced, change the settings from the operation panel. • When copying, change the and settings from the operation panel. • When printing from...
... the operation panel. • Adjust the copy density settings (→p.29). • If the machine is not in use for a long time after the toner cartridge has been replaced, change the settings from the operation panel. • When copying, change the and settings from the operation panel. • When printing from...

Basic Guide
Page 71
... tape. or Canadian residents. Option B: Volume Box Return We encourage you to use , simply follow the instructions detailed for replacement. The Clean Earth Campaign THE Canon CARTRIDGE RECYCLING PROGRAM The Canon Cartridge Recycling Program fulfills the first initiative of Canada. Option A-2: Multiple Box Return We encourage you to use , to remanufacture new...
... tape. or Canadian residents. Option B: Volume Box Return We encourage you to use , simply follow the instructions detailed for replacement. The Clean Earth Campaign THE Canon CARTRIDGE RECYCLING PROGRAM The Canon Cartridge Recycling Program fulfills the first initiative of Canada. Option A-2: Multiple Box Return We encourage you to use , to remanufacture new...
Basic Guide
Page 72
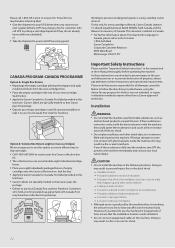
... on the machine. Please note that you to use the machine for long periods of time, ensure that Canon pays the postage. • Deposit your empty cartridge in the following locations. If any local Canada Post outlet or franchise. A location subject to high temperatures ... pick-up . A location near flammable substances, such as a more cartridges) We encourage you are intended to prevent injury to receive U.S. Customers who call 1-800-OK-Canon to the user and other than a Canon-approved technician. Corporate Customer Relations 6390 Dixie Road Mississauga, ON L5T 1P7...
... on the machine. Please note that you to use the machine for long periods of time, ensure that Canon pays the postage. • Deposit your empty cartridge in the following locations. If any local Canada Post outlet or franchise. A location subject to high temperatures ... pick-up . A location near flammable substances, such as a more cartridges) We encourage you are intended to prevent injury to receive U.S. Customers who call 1-800-OK-Canon to the user and other than a Canon-approved technician. Corporate Customer Relations 6390 Dixie Road Mississauga, ON L5T 1P7...
Basic Guide
Page 73
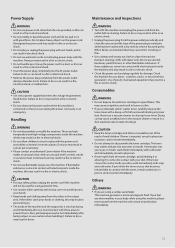
... Failure to static discharge. Failure to do so can result in open flames. There are using this machine, please move away from the toner cartridge, avoid inhaling it or allowing it . Failure to do so may result in your physician immediately. 73 Do not use alcohol, benzenes, paint ... cloth to come into contact with a damp, soft cloth and avoid inhaling any abnormalities in serious personal injury. • Please contact an authorized Canon dealer if the machine makes an unusual noise, emits an unusual smell, or emits smoke or excessive heat. CAUTION • For your skin....
... Failure to static discharge. Failure to do so can result in open flames. There are using this machine, please move away from the toner cartridge, avoid inhaling it or allowing it . Failure to do so may result in your physician immediately. 73 Do not use alcohol, benzenes, paint ... cloth to come into contact with a damp, soft cloth and avoid inhaling any abnormalities in serious personal injury. • Please contact an authorized Canon dealer if the machine makes an unusual noise, emits an unusual smell, or emits smoke or excessive heat. CAUTION • For your skin....
Starter Guide
Page 2
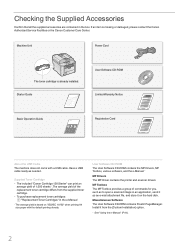
..., and store it from the supplied toner cartridge. • To purchase replacement toner cartridges: "Replacement Toner Cartridges" in the box. Supplied Toner Cartridge • The included "Canon Cartridge 128 Starter" can print an average yield of the replacement toner cartridge differs from the [Custom Installation]...printing A4 size paper with a USB cable. Machine Unit Power Cord The toner cartridge is missing or damaged, please contact the Canon Authorized Service Facilities or the Canon Customer Care Center. The average yield of 1,000 sheets*. Starter Guide Sta ...
..., and store it from the supplied toner cartridge. • To purchase replacement toner cartridges: "Replacement Toner Cartridges" in the box. Supplied Toner Cartridge • The included "Canon Cartridge 128 Starter" can print an average yield of the replacement toner cartridge differs from the [Custom Installation]...printing A4 size paper with a USB cable. Machine Unit Power Cord The toner cartridge is missing or damaged, please contact the Canon Authorized Service Facilities or the Canon Customer Care Center. The average yield of 1,000 sheets*. Starter Guide Sta ...
Starter Guide
Page 6
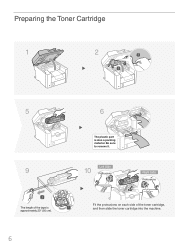
Be sure to remove it. 9 2 The length of the tape is also a packing material. Preparing the Toner Cartridge 1 2 1 2 5 6 The plastic part is approximately 20" (50 cm). 10 Left Side Protrusions Right Side Protrusions 1 Fit the protrusions on each side of the toner cartridge, and then slide the toner cartridge into the machine. 6
Be sure to remove it. 9 2 The length of the tape is also a packing material. Preparing the Toner Cartridge 1 2 1 2 5 6 The plastic part is approximately 20" (50 cm). 10 Left Side Protrusions Right Side Protrusions 1 Fit the protrusions on each side of the toner cartridge, and then slide the toner cartridge into the machine. 6

Starter Guide
Page 7
Packing materials Sealing Tape Packing material with a sheet 1 2 3 Preface Installing the Machine Connecting to 6 times. Preparing the Toner Cartridge 3 4 7 8 Shake 5 to a Computer and Installing the Drivers 7 Are all the packing materials removed? Place on a flat surface. 11 2 1 Check!
Packing materials Sealing Tape Packing material with a sheet 1 2 3 Preface Installing the Machine Connecting to 6 times. Preparing the Toner Cartridge 3 4 7 8 Shake 5 to a Computer and Installing the Drivers 7 Are all the packing materials removed? Place on a flat surface. 11 2 1 Check!
Starter Guide
Page 11
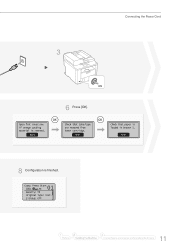
Next 8 Configuration is loaded in Drawer 1. Next ON 6 Press [OK]. Check that paper is finished. 01 Copy: Press Start 100% 1 LTR Density: +-0 Original Type: Text... 2-Sided: Off 1 2 Preface Installing the Machine 3 Connecting to a Computer and Installing the Drivers 11 Next Check that tabs/tape are removed from toner cartridge. Connecting the Power Cord 3 Open frnt cover;see if orange packing material is removed.
Next 8 Configuration is loaded in Drawer 1. Next ON 6 Press [OK]. Check that paper is finished. 01 Copy: Press Start 100% 1 LTR Density: +-0 Original Type: Text... 2-Sided: Off 1 2 Preface Installing the Machine 3 Connecting to a Computer and Installing the Drivers 11 Next Check that tabs/tape are removed from toner cartridge. Connecting the Power Cord 3 Open frnt cover;see if orange packing material is removed.


