

Set-up Sheet for imageCLASS 2300N
Page 1
Check that you for purchasing the Canon imageCLASS 2300. To get your machine ready for use, please follow the instructions in carton) G Stamp cartridge and tweezers G Paper size notice cards (2) G Paper size plates (2) G Paper size labels (2) G Power cord G Telephone cable G Destination labels for one-touch speed dialing keys (2) Unpack the machine and its components. Set-Up Sheet for the Machine Thank you have the following: G Machine with cabinet stand G Toner cartridge (in this sheet before referring to any other documentation.
Check that you for purchasing the Canon imageCLASS 2300. To get your machine ready for use, please follow the instructions in carton) G Stamp cartridge and tweezers G Paper size notice cards (2) G Paper size plates (2) G Paper size labels (2) G Power cord G Telephone cable G Destination labels for one-touch speed dialing keys (2) Unpack the machine and its components. Set-Up Sheet for the Machine Thank you have the following: G Machine with cabinet stand G Toner cartridge (in this sheet before referring to any other documentation.

Set-up Sheet for imageCLASS 2300N
Page 4
Install the toner cartridge. 1 Open the stack bypass. 2 Slide out the left cover and the stack bypass. Keep the bag in the machine horizontally... with the other hand. 6 Remove the tape holding the orange protective cover, and pull the release tabs on the cover to distribute the toner inside the toner cartridge. 7 Hold the cartridge by its handles (marked with blue) and insert it in a safe place. 4 Hold the cartridge with ...then back and forth 2 to detach it will go. 1 Tabs Protective cover 8 Close the left cover of the stack bypass. 3 Remove the toner cartridge from the cartridge.
Install the toner cartridge. 1 Open the stack bypass. 2 Slide out the left cover and the stack bypass. Keep the bag in the machine horizontally... with the other hand. 6 Remove the tape holding the orange protective cover, and pull the release tabs on the cover to distribute the toner inside the toner cartridge. 7 Hold the cartridge by its handles (marked with blue) and insert it in a safe place. 4 Hold the cartridge with ...then back and forth 2 to detach it will go. 1 Tabs Protective cover 8 Close the left cover of the stack bypass. 3 Remove the toner cartridge from the cartridge.
Basic Guide for imageCLASS 2300
Page 7
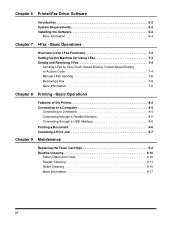
... the Printer 8-2 Connecting to a Computer 8-4 Connecting to a Network 8-4 Connecting through a Parallel Interface 8-5 Connecting through a USB Interface 8-5 Printing a Document 8-6 Canceling a Print Job 8-7 Chapter 9 Maintenance Replacing the Toner Cartridge 9-2 Routine Cleaning 9-10 Platen Glass and Cover 9-10 Feeder Cleaning 9-11 Roller Cleaning 9-15 More Information 9-17 vi
... the Printer 8-2 Connecting to a Computer 8-4 Connecting to a Network 8-4 Connecting through a Parallel Interface 8-5 Connecting through a USB Interface 8-5 Printing a Document 8-6 Canceling a Print Job 8-7 Chapter 9 Maintenance Replacing the Toner Cartridge 9-2 Routine Cleaning 9-10 Platen Glass and Cover 9-10 Feeder Cleaning 9-11 Roller Cleaning 9-15 More Information 9-17 vi

Basic Guide for imageCLASS 2300
Page 19
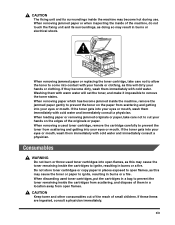
... time in a damp, dusty, or smoky location, dust can be used for a long period of time, such as this may cause the toner remaining inside the machine which are subject to ignite, resulting in burns or electrical shock. Maintenance and Inspections WARNING When cleaning the machine, fi...;ned within protective housings and external covers, the laser beam cannot escape from the machine during consecutive holidays. Do not burn or throw used toner cartridges into contact with water. Failure to your eyes. This may cause a short circuit and result in this may result in burns or ...
... time in a damp, dusty, or smoky location, dust can be used for a long period of time, such as this may cause the toner remaining inside the machine which are subject to ignite, resulting in burns or electrical shock. Maintenance and Inspections WARNING When cleaning the machine, fi...;ned within protective housings and external covers, the laser beam cannot escape from the machine during consecutive holidays. Do not burn or throw used toner cartridges into contact with water. Failure to your eyes. This may cause a short circuit and result in this may result in burns or ...
Basic Guide for imageCLASS 2300
Page 20
... touch the fixing unit and its surroundings inside the cartridges from scattering and getting into open flames, as this may cause the toner or paper to remove the toner stains. Do not store toner cartridges or copy paper in places exposed to open flames, as this will set the... hot during use. When loading paper or removing jammed originals or paper, take care not to allow the toner to cut your eyes or mouth. When removing jammed paper or replacing the toner cartridge, take care not to come into your hands on the paper from open flames. Washing them...
... touch the fixing unit and its surroundings inside the cartridges from scattering and getting into open flames, as this may cause the toner or paper to remove the toner stains. Do not store toner cartridges or copy paper in places exposed to open flames, as this will set the... hot during use. When loading paper or removing jammed originals or paper, take care not to allow the toner to cut your eyes or mouth. When removing jammed paper or replacing the toner cartridge, take care not to come into your hands on the paper from open flames. Washing them...

Basic Guide for imageCLASS 2300
Page 31
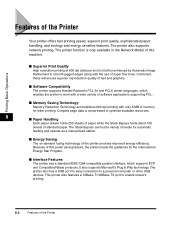
...Available in the feeder are scanned here. 1-8 Parts and Their Functions g Left Cover Open this dial counterclockwise to remove jammed paper. h Toner Cartridge Pull out the handle of the Feeder This holds originals in place on the platen glass. b Platen Glass Place originals here when...etc. d Paper Feeding Dial Turn this cover to remove jammed paper and to clear paper jams and replace the toner cartridge. i Upper Left Cover Open this cover to replace the toner cartridge. e Lower Left Cover 4 3 f Stack Bypass Feeds transparencies and nonstandard or alternate paper stock. c...
...Available in the feeder are scanned here. 1-8 Parts and Their Functions g Left Cover Open this dial counterclockwise to remove jammed paper. h Toner Cartridge Pull out the handle of the Feeder This holds originals in place on the platen glass. b Platen Glass Place originals here when...etc. d Paper Feeding Dial Turn this cover to remove jammed paper and to clear paper jams and replace the toner cartridge. i Upper Left Cover Open this cover to replace the toner cartridge. e Lower Left Cover 4 3 f Stack Bypass Feeds transparencies and nonstandard or alternate paper stock. c...
Basic Guide for imageCLASS 2300
Page 99
... of media for the International Energy Star Program. This printer also features a 10Base-T/100Base-TX port to work with only 8 MB of super fine toner. Complex page data is only available in the Network Model of the Printer I Software Compatibility The printer supports Hewlett-Packard's PCL 5e and PCL6 printer...
... of media for the International Energy Star Program. This printer also features a 10Base-T/100Base-TX port to work with only 8 MB of super fine toner. Complex page data is only available in the Network Model of the Printer I Software Compatibility The printer supports Hewlett-Packard's PCL 5e and PCL6 printer...
Basic Guide for imageCLASS 2300
Page 106
Replacing the Toner Cartridge 9-2 Routine Cleaning 9-10 Platen Glass and Cover 9-10 Feeder Cleaning 9-11 Roller Cleaning 9-15 More Information 9-17 9-1 Maintenance 9 CHAPTER This chapter describes how to replace the toner cartridge and perform routine cleaning.
Replacing the Toner Cartridge 9-2 Routine Cleaning 9-10 Platen Glass and Cover 9-10 Feeder Cleaning 9-11 Roller Cleaning 9-15 More Information 9-17 9-1 Maintenance 9 CHAPTER This chapter describes how to replace the toner cartridge and perform routine cleaning.
Basic Guide for imageCLASS 2300
Page 107
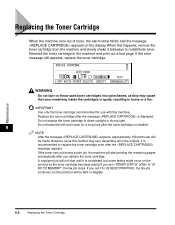
... is installed. 9 NOTE After the message appears, approximately 150 prints can still be faint or illegible. If the error message still appears, replace the toner cartridge. Replace the toner cartridge after the message is completed, but the printout will start printing the remaining pages automatically after the message appears. Maintenance 9-2 Replacing the...
... is installed. 9 NOTE After the message appears, approximately 150 prints can still be faint or illegible. If the error message still appears, replace the toner cartridge. Replace the toner cartridge after the message is completed, but the printout will start printing the remaining pages automatically after the message appears. Maintenance 9-2 Replacing the...

Basic Guide for imageCLASS 2300
Page 108
1 Open the stack bypass. 2 Pull out the left cover of the stack bypass. 9 CAUTION Grasp the handle and pull out the left cover horizontally to the left. (Be careful not to pull it upward as it may easily come off.) Maintenance Replacing the Toner Cartridge 9-3
1 Open the stack bypass. 2 Pull out the left cover of the stack bypass. 9 CAUTION Grasp the handle and pull out the left cover horizontally to the left. (Be careful not to pull it upward as it may easily come off.) Maintenance Replacing the Toner Cartridge 9-3
Basic Guide for imageCLASS 2300
Page 109
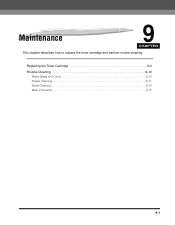
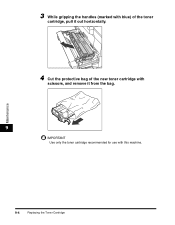
3 While gripping the handles (marked with blue) of the toner cartridge, pull it out horizontally. 4 Cut the protective bag of the new toner cartridge with scissors, and remove it from the bag. 9 IMPORTANT Use only the toner cartridge recommended for use with this machine. Maintenance 9-4 Replacing the Toner Cartridge
3 While gripping the handles (marked with blue) of the toner cartridge, pull it out horizontally. 4 Cut the protective bag of the new toner cartridge with scissors, and remove it from the bag. 9 IMPORTANT Use only the toner cartridge recommended for use with this machine. Maintenance 9-4 Replacing the Toner Cartridge

Basic Guide for imageCLASS 2300
Page 110
You will need it sideways a several times, and then back and forth b several times, to distribute the toner evenly inside the cartridge. 1 2 9 1 Maintenance Replacing the Toner Cartridge 9-5 Do not discard the protective bag for the toner cartridge. When handling the toner cartridge, hold the toner cartridge vertically or upside down. Do not hold it by the handles with both hands and gently shake it later to store the cartridge temporarily when the machine needs servicing. 5 Hold the new toner cartridge with the triangle facing up as shown in the illustration below.
You will need it sideways a several times, and then back and forth b several times, to distribute the toner evenly inside the cartridge. 1 2 9 1 Maintenance Replacing the Toner Cartridge 9-5 Do not discard the protective bag for the toner cartridge. When handling the toner cartridge, hold the toner cartridge vertically or upside down. Do not hold it by the handles with both hands and gently shake it later to store the cartridge temporarily when the machine needs servicing. 5 Hold the new toner cartridge with the triangle facing up as shown in the illustration below.

Basic Guide for imageCLASS 2300
Page 111
...removed completely from the 9 toner cartridge. Throw away the seal after removing it out with one hand while removing the seal by pulling it from the toner cartridge. Pulling the seal upwards or downwards may not be removed completely, the toner cartridge may break the seal.... If the seal breaks inside the toner cartridge and cannot be used. Tabs Protective cover 9-6 Replacing the Toner Cartridge Maintenance 7 Remove the tape that holds the orange protective cover...
...removed completely from the 9 toner cartridge. Throw away the seal after removing it out with one hand while removing the seal by pulling it from the toner cartridge. Pulling the seal upwards or downwards may not be removed completely, the toner cartridge may break the seal.... If the seal breaks inside the toner cartridge and cannot be used. Tabs Protective cover 9-6 Replacing the Toner Cartridge Maintenance 7 Remove the tape that holds the orange protective cover...

Basic Guide for imageCLASS 2300
Page 112
CAUTION When removing the protective cover, be careful not to touch the blue-green drum inside the cartridge. Toothed wheel IMPORTANT Do not reattach the protective cover on the covered side of the toner cartridge, as this may damage the drum inside the toner cartridge. 9 Drum Maintenance Replacing the Toner Cartridge 9-7 Be careful not to touch the toothed wheels on the toner cartridge, as this may result in personal injury.
CAUTION When removing the protective cover, be careful not to touch the blue-green drum inside the cartridge. Toothed wheel IMPORTANT Do not reattach the protective cover on the covered side of the toner cartridge, as this may damage the drum inside the toner cartridge. 9 Drum Maintenance Replacing the Toner Cartridge 9-7 Be careful not to touch the toothed wheels on the toner cartridge, as this may result in personal injury.

Basic Guide for imageCLASS 2300
Page 113
8 While holding the toner cartridge with both hands, align both sides of the cartridge with the guiding grooves on the machine and insert the cartridge horizontally as far as ... stack bypass. 9 CAUTION When closing the left cover until it will go. 1 Maintenance IMPORTANT Be careful not to touch the blue-green drum inside the toner cartridge, as this may result in personal injury. If the cover is not fully closed, the printout might come out lighter. 9-8 Replacing the...
8 While holding the toner cartridge with both hands, align both sides of the cartridge with the guiding grooves on the machine and insert the cartridge horizontally as far as ... stack bypass. 9 CAUTION When closing the left cover until it will go. 1 Maintenance IMPORTANT Be careful not to touch the blue-green drum inside the toner cartridge, as this may result in personal injury. If the cover is not fully closed, the printout might come out lighter. 9-8 Replacing the...

Basic Guide for imageCLASS 2300
Page 114
10 Close the stack bypass. IMPORTANT Be sure to get your fingers caught, as this may result in personal injury. CAUTION When closing the stack bypass, be careful not to clean the roller every time you replace the toner cartridge. (See "Roller Cleaning," on p. 9-15.) 9 Maintenance Replacing the Toner Cartridge 9-9
10 Close the stack bypass. IMPORTANT Be sure to get your fingers caught, as this may result in personal injury. CAUTION When closing the stack bypass, be careful not to clean the roller every time you replace the toner cartridge. (See "Roller Cleaning," on p. 9-15.) 9 Maintenance Replacing the Toner Cartridge 9-9
Basic Guide for imageCLASS 2300
Page 120
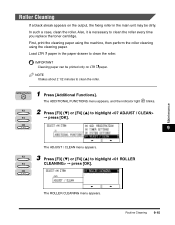
..., the fixing roller in the paper drawer to clean the roller. Also, it is necessary to clean the roller every time you replace the toner cartridge. The ADDITIONAL FUNCTIONS menu appears, and the indicator light blinks.
..., the fixing roller in the paper drawer to clean the roller. Also, it is necessary to clean the roller every time you replace the toner cartridge. The ADDITIONAL FUNCTIONS menu appears, and the indicator light blinks.
Basic Guide for imageCLASS 2300
Page 126
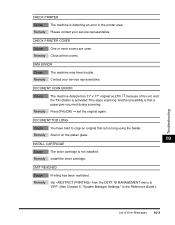
... service representative. DOCUMENT SCAN ERROR Cause The machine detected an 11" x 17" original as LTR because of Error Messages 10-3 Remedy Install the toner cartridge. DATA ERROR Cause The machine may have tried to 'OFF'. (See Chapter 5, "System Manager Settings," in the printer area. Remedy Please...scanning. Another possibility is that is too long using the feeder. Remedy Scan it on the platen glass. 10 INSTALL CARTRIDGE Cause The toner cartridge is not installed. CHECK PRINTER Cause The machine is detecting an error in the Reference Guide.) List of its curl, and ...
... service representative. DOCUMENT SCAN ERROR Cause The machine detected an 11" x 17" original as LTR because of Error Messages 10-3 Remedy Install the toner cartridge. DATA ERROR Cause The machine may have tried to 'OFF'. (See Chapter 5, "System Manager Settings," in the printer area. Remedy Please...scanning. Another possibility is that is too long using the feeder. Remedy Scan it on the platen glass. 10 INSTALL CARTRIDGE Cause The toner cartridge is not installed. CHECK PRINTER Cause The machine is detecting an error in the Reference Guide.) List of its curl, and ...
Basic Guide for imageCLASS 2300
Page 129
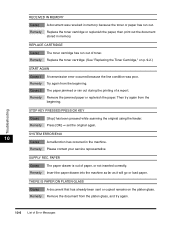
... sent or copied remains on p. 9-2.) START AGAIN Cause 1 A transmission error occurred because the line condition was received in memory because the toner or paper has run out of Error Messages Troubleshooting RECEIVED IN MEMORY Cause A document was poor. SYSTEM ERROR/E100 10 Cause A malfunction has... occurred in memory. Remedy Replace the toner cartridge or replenish the paper, then print out the document stored in the machine. Cause 2 The paper jammed or ran out during ...
... sent or copied remains on p. 9-2.) START AGAIN Cause 1 A transmission error occurred because the line condition was received in memory because the toner or paper has run out of Error Messages Troubleshooting RECEIVED IN MEMORY Cause A document was poor. SYSTEM ERROR/E100 10 Cause A malfunction has... occurred in memory. Remedy Replace the toner cartridge or replenish the paper, then print out the document stored in the machine. Cause 2 The paper jammed or ran out during ...

Basic Guide for imageCLASS 2300
Page 135
.... Remedy Contact the other party's fax machine set to memory substitution reception even though paper is clean, the problem lies with a new toner cartridge. Cause 3 Is a document set ? Cause 2 Did the other party specify the correct subaddress and password for selecting the DRAWER ELIGIBLTY.... Remedy Contact the other party's fax machine clean? Your machine switches to automatic reception? Remedy Check your toner cartridge running low on toner? The documents you specify the other party's subaddress or password correctly? If the document is present.
.... Remedy Contact the other party's fax machine set to memory substitution reception even though paper is clean, the problem lies with a new toner cartridge. Cause 3 Is a document set ? Cause 2 Did the other party specify the correct subaddress and password for selecting the DRAWER ELIGIBLTY.... Remedy Contact the other party's fax machine clean? Your machine switches to automatic reception? Remedy Check your toner cartridge running low on toner? The documents you specify the other party's subaddress or password correctly? If the document is present.


