Instruction Manual
Page 6
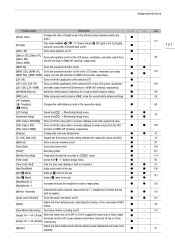
...-HEVC or XF-AVC Clip Recorded 109 Using Metadata 110 Setting a User Memo Created with Canon XF Utility 110 Entering Slate Information About the Recording 111 Recording GPS Information (Geotagging) 112 Connecting the GPS Receiver 112 Reviewing a Recording 114 Special Recording Modes 115 Slow Motion Recording 115 Pre-recording 116 Infrared Recording...
...-HEVC or XF-AVC Clip Recorded 109 Using Metadata 110 Setting a User Memo Created with Canon XF Utility 110 Entering Slate Information About the Recording 111 Recording GPS Information (Geotagging) 112 Connecting the GPS Receiver 112 Reviewing a Recording 114 Special Recording Modes 115 Slow Motion Recording 115 Pre-recording 116 Infrared Recording...
Instruction Manual
Page 14
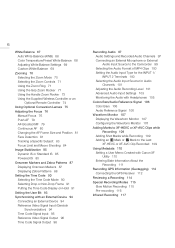
... as the optional VL-10Li II Battery Video Light. 3 Rear tally lamp (A 42) 4 Grip zoom rocker (A 71) 5 MAGN. (magnification) button (A 78)/ Assignable button Camera 6 (A 119) 6 u (review recording) button (A 114)/ Assignable button Camera 5 (A 119) 7 Ø (fast reverse playback) button (A 137)/ Assignable button Camera 8 (A 119) 8 Ú (skip backward) button (A 137)/ Assignable button Camera...
... as the optional VL-10Li II Battery Video Light. 3 Rear tally lamp (A 42) 4 Grip zoom rocker (A 71) 5 MAGN. (magnification) button (A 78)/ Assignable button Camera 6 (A 119) 6 u (review recording) button (A 114)/ Assignable button Camera 5 (A 119) 7 Ø (fast reverse playback) button (A 137)/ Assignable button Camera 8 (A 119) 8 Ú (skip backward) button (A 137)/ Assignable button Camera...
Instruction Manual
Page 42
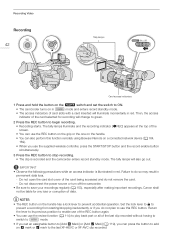
...being accessed and do not plan to use this function remotely using Browser Remote on a connected network device (A 164, 169). • When you use the review function (A 114) to play back part or all of the last clip recorded without having to switch to mode. • If you set the switch... to ON. • The camcorder turns on in red. Canon shall not be liable for recording will change to green. 2 Press the REC button to begin recording. • Recording starts. The tally lamps illuminate ...
...being accessed and do not plan to use this function remotely using Browser Remote on a connected network device (A 164, 169). • When you use the review function (A 114) to play back part or all of the last clip recorded without having to switch to mode. • If you set the switch... to ON. • The camcorder turns on in red. Canon shall not be liable for recording will change to green. 2 Press the REC button to begin recording. • Recording starts. The tally lamps illuminate ...
Instruction Manual
Page 51
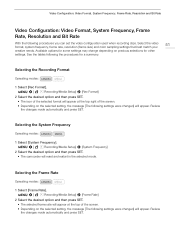
... clips. Selecting the Recording Format Operating modes: 1 Select [Rec Format]. > [Æ ! Selecting the Frame Rate Operating modes: 1 Select [Frame Rate]. > [Æ ! Review the changes made automatically and press SET. Review the changes made automatically and press SET. Selecting the System Frequency Operating modes: 1 Select [System Frequency]. > [Æ ! Available options for some settings...
... clips. Selecting the Recording Format Operating modes: 1 Select [Rec Format]. > [Æ ! Selecting the Frame Rate Operating modes: 1 Select [Frame Rate]. > [Æ ! Review the changes made automatically and press SET. Review the changes made automatically and press SET. Selecting the System Frequency Operating modes: 1 Select [System Frequency]. > [Æ ! Available options for some settings...
Instruction Manual
Page 52
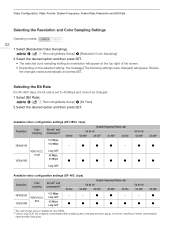
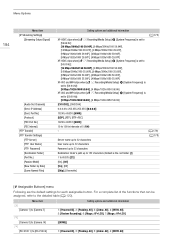
Available video configuration settings (XF-HEVC clips) Resolution 3840x2160 Color sampling Bit rate1 and compression2 110 Mbps, 160 Mbps 59.94i - Review the changes made automatically and press SET. System frequency/Frame rate 59.94 Hz 59.94P 29.97P 23.98P 50.00i Ü Ü Ü - ...
Available video configuration settings (XF-HEVC clips) Resolution 3840x2160 Color sampling Bit rate1 and compression2 110 Mbps, 160 Mbps 59.94i - Review the changes made automatically and press SET. System frequency/Frame rate 59.94 Hz 59.94P 29.97P 23.98P 50.00i Ü Ü Ü - ...
Instruction Manual
Page 114
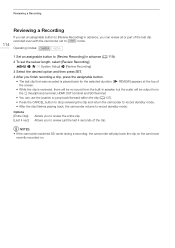
..., press the assignable button. • The last clip that was recorded is played back for the selected duration. [Ð REVIEW] appears at the top of the screen. • While the clip is reviewed, there will be no sound from the built-in speaker but the audio will play back the clip on... [Entire Clip]: [Last 4 sec]: Allows you can use the joystick to jump back/forward within the clip (A 137). • Press the CANCEL button to stop reviewing the clip and return the camcorder to record standby mode. • After the clip finishes playing back, the camcorder returns to record standby mode...
..., press the assignable button. • The last clip that was recorded is played back for the selected duration. [Ð REVIEW] appears at the top of the screen. • While the clip is reviewed, there will be no sound from the built-in speaker but the audio will play back the clip on... [Entire Clip]: [Last 4 sec]: Allows you can use the joystick to jump back/forward within the clip (A 137). • Press the CANCEL button to stop reviewing the clip and return the camcorder to record standby mode. • After the clip finishes playing back, the camcorder returns to record standby mode...
Instruction Manual
Page 115
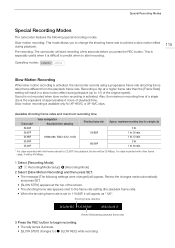
... 29.97P 23.98P 50.00P 25.00P Video configuration Resolution/Color sampling 1920x1080, YCbCr 4:2:2, 10 bit Shooting frame rate 119.88P 100.00P Approx. Review the changes made automatically and press SET. • [SLOW STBY] appears at a higher frame rate than the [Frame Rate] setting will appear as "120...
... 29.97P 23.98P 50.00P 25.00P Video configuration Resolution/Color sampling 1920x1080, YCbCr 4:2:2, 10 bit Shooting frame rate 119.88P 100.00P Approx. Review the changes made automatically and press SET. • [SLOW STBY] appears at a higher frame rate than the [Frame Rate] setting will appear as "120...
Instruction Manual
Page 121
... the respective option and [Off]. Ü [Markers] Turns onscreen markers on/off. Ü [Color Bars] Turns color bars on/off. Ü [Photo]* Records a photo. Ü [Review Recording] Plays back the last clip recorded in mode. Ü [Time Code] Opens the [B # System Setup] menu. Ü [Time Code Hold]* Puts the time code...
... the respective option and [Off]. Ü [Markers] Turns onscreen markers on/off. Ü [Color Bars] Turns color bars on/off. Ü [Photo]* Records a photo. Ü [Review Recording] Plays back the last clip recorded in mode. Ü [Time Code] Opens the [B # System Setup] menu. Ü [Time Code Hold]* Puts the time code...

Instruction Manual
Page 157
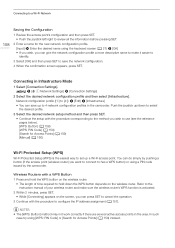
...the desired network configuration profile and then select [Camera Access Point]. If necessary, write it down. 8 Continue with the procedure to review and save the configuration (A 158). Configuring the IP Address Settings At this mode the camcorder itself serves as a Wi-Fi access point...using the keyboard screen (A 27) > [OK] • This password is available for a Camera Access Point connection (network name (SSID): [XF705-xxxx_Canon0C], password: [12345678]) are already saved under network configuration profile [1:]. After completing the four fields of the address, select [Set] and ...
...the desired network configuration profile and then select [Camera Access Point]. If necessary, write it down. 8 Continue with the procedure to review and save the configuration (A 158). Configuring the IP Address Settings At this mode the camcorder itself serves as a Wi-Fi access point...using the keyboard screen (A 27) > [OK] • This password is available for a Camera Access Point connection (network name (SSID): [XF705-xxxx_Canon0C], password: [12345678]) are already saved under network configuration profile [1:]. After completing the four fields of the address, select [Set] and ...
Instruction Manual
Page 158
... and hold the WPS button on the wireless router. Connecting to a Wi-Fi Network 158 Saving the Configuration 1 Review the access point's configuration and then press SET. • Push the joystick left/right to review all the information before pressing SET. 2 Enter a name for Access Points] (A 159) instead. Refer to the instruction...
... and hold the WPS button on the wireless router. Connecting to a Wi-Fi Network 158 Saving the Configuration 1 Review the access point's configuration and then press SET. • Push the joystick left/right to review all the information before pressing SET. 2 Enter a name for Access Points] (A 159) instead. Refer to the instruction...
Instruction Manual
Page 194
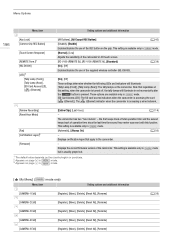
... [3 ! Recording/Media Setup] > [System Frequency] is the root folder [/]) 1 to [RC-V100 4] Setting options and additional information 1: [Powered IS], 2: [Peaking: All], 3: [Zebra: All], 4: [WFM: All], 5: [Review Recording], 6: [Magn.: VF+LCD], 7: [Magn.: VF+LCD] [(NONE)] 1: [Powered IS], 2: [Peaking: All], 3: [Zebra: All], 4: [WFM: All]
... [3 ! Recording/Media Setup] > [System Frequency] is the root folder [/]) 1 to [RC-V100 4] Setting options and additional information 1: [Powered IS], 2: [Peaking: All], 3: [Zebra: All], 4: [WFM: All], 5: [Review Recording], 6: [Magn.: VF+LCD], 7: [Magn.: VF+LCD] [(NONE)] 1: [Powered IS], 2: [Peaking: All], 3: [Zebra: All], 4: [WFM: All]
Instruction Manual
Page 196
... $ [Key Lock] [Camera Grip REC Button] [Touch Screen Response] [REMOTE Term.]2 [WL-D6000] [LED]2 [Tally Lamp (Front)], [Tally Lamp (Rear)], [SD Card Access LED], [ (Ethernet)] % [Review Recording] [Reset Hour Meter] [Fan] [Certification Logos]3 [Firmware] Setting options and additional information [All Buttons], [All Except REC Button] [Disable], [Enable] Enables/disables the use...
... $ [Key Lock] [Camera Grip REC Button] [Touch Screen Response] [REMOTE Term.]2 [WL-D6000] [LED]2 [Tally Lamp (Front)], [Tally Lamp (Rear)], [SD Card Access LED], [ (Ethernet)] % [Review Recording] [Reset Hour Meter] [Fan] [Certification Logos]3 [Firmware] Setting options and additional information [All Buttons], [All Except REC Button] [Disable], [Enable] Enables/disables the use...
Instruction Manual
Page 231
... 227 Relay recording 36 REMOTE A, REMOTE B terminals 39 Remote controller 39 Remote operation 38, 39, 164 Resetting all camcorder settings 195 Resolution (frame size 52 Reviewing a clip 114 Running mode (time code 90 S Safe area 87 SD card Compatible SD cards 33 Initializing 35 Inserting/Removing 34 Recording method 36 Switching...
... 227 Relay recording 36 REMOTE A, REMOTE B terminals 39 Remote controller 39 Remote operation 38, 39, 164 Resetting all camcorder settings 195 Resolution (frame size 52 Reviewing a clip 114 Running mode (time code 90 S Safe area 87 SD card Compatible SD cards 33 Initializing 35 Inserting/Removing 34 Recording method 36 Switching...


