Instruction Manual
Page 2
... purpose or (2) by a video provider licensed under AT&T patents for the MPEG-4 standard and may infringe on the camcorder's settings, onscreen displays and in this manual signifies Wi-Fi Protected Setup. • The Wi-Fi Protected Setup Identifier Mark is a mark of the Wi-Fi Alliance. • JavaScript is a trademark or...
... purpose or (2) by a video provider licensed under AT&T patents for the MPEG-4 standard and may infringe on the camcorder's settings, onscreen displays and in this manual signifies Wi-Fi Protected Setup. • The Wi-Fi Protected Setup Identifier Mark is a mark of the Wi-Fi Alliance. • JavaScript is a trademark or...

Instruction Manual
Page 4
... more stable focusing operation than with the 12G-SDI standard that lets you focus manually most of the way and let the camcorder finish focusing automatically. Professional Functions and... example, use assistance functions such as a visual, intuitive guide that you can use the Canon XF plugins to work with the clips directly from non-linear editing (NLE) software made... connected to restore all the menu settings or replicate them in the camcorder or on another XF705 camcorder (A 131). • Battery packs compatible with Intelligent System for improved autofocus functions (A...
... more stable focusing operation than with the 12G-SDI standard that lets you focus manually most of the way and let the camcorder finish focusing automatically. Professional Functions and... example, use assistance functions such as a visual, intuitive guide that you can use the Canon XF plugins to work with the clips directly from non-linear editing (NLE) software made... connected to restore all the menu settings or replicate them in the camcorder or on another XF705 camcorder (A 131). • Battery packs compatible with Intelligent System for improved autofocus functions (A...
Instruction Manual
Page 5
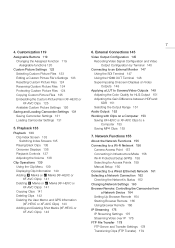
Introduction 9 About this Manual 9 Conventions Used in this Manual 9 Supplied Accessories 10 Names of the Camcorder 38 Using the Supplied Wireless Controller 38 Using the Optional RC-V100 Remote Controller 39 5 3. Recording 41 Recording ... Recording Time on SD Cards 36 Recovering Clips 37 Remote Operation of Parts 11 Camcorder 11 WL-D6000 Wireless Controller 18 2. Push Auto Iris 62 Manual Aperture 62 Iris Limit 63 Exposure Compensation - Table of Contents 1.
Introduction 9 About this Manual 9 Conventions Used in this Manual 9 Supplied Accessories 10 Names of the Camcorder 38 Using the Supplied Wireless Controller 38 Using the Optional RC-V100 Remote Controller 39 5 3. Recording 41 Recording ... Recording Time on SD Cards 36 Recovering Clips 37 Remote Operation of Parts 11 Camcorder 11 WL-D6000 Wireless Controller 18 2. Push Auto Iris 62 Manual Aperture 62 Iris Limit 63 Exposure Compensation - Table of Contents 1.
Instruction Manual
Page 6
...the Handle Zoom Rocker 73 Using the Supplied Wireless Controller or an Optional Remote Controller 74 Using Optional Conversion Lenses 75 Adjusting the Focus 76 Manual Focus 76 Push AF 79 AF-Boosted MF 79 Continuous AF 80 Changing the AF Frame Size and Position 81 Face Detection 81 Tracking a...Adding an $ Mark or % Mark to the Last XF-HEVC or XF-AVC Clip Recorded 109 Using Metadata 110 Setting a User Memo Created with Canon XF Utility 110 Entering Slate Information About the Recording 111 Recording GPS Information (Geotagging) 112 Connecting the GPS Receiver 112 Reviewing a Recording 114 Special ...
...the Handle Zoom Rocker 73 Using the Supplied Wireless Controller or an Optional Remote Controller 74 Using Optional Conversion Lenses 75 Adjusting the Focus 76 Manual Focus 76 Push AF 79 AF-Boosted MF 79 Continuous AF 80 Changing the AF Frame Size and Position 81 Face Detection 81 Tracking a...Adding an $ Mark or % Mark to the Last XF-HEVC or XF-AVC Clip Recorded 109 Using Metadata 110 Setting a User Memo Created with Canon XF Utility 110 Entering Slate Information About the Recording 111 Recording GPS Information (Geotagging) 112 Connecting the GPS Receiver 112 Reviewing a Recording 114 Special ...
Instruction Manual
Page 7
... OUT Terminal 148 Superimposing Onscreen Displays on Video Outputs 148 Applying a LUT to Screens/Video Outputs 149 Adjusting the Color Quality for Access Points 159 Manual Setup 160 Connecting to a Computer 153 Saving MP4 Clips 153 7. Network Functions 155 About the Network Functions 155 Connecting to a Wi-Fi Network 156 Camera...
... OUT Terminal 148 Superimposing Onscreen Displays on Video Outputs 148 Applying a LUT to Screens/Video Outputs 149 Adjusting the Color Quality for Access Points 159 Manual Setup 160 Connecting to a Computer 153 Saving MP4 Clips 153 7. Network Functions 155 About the Network Functions 155 Connecting to a Wi-Fi Network 156 Camera...
Instruction Manual
Page 9
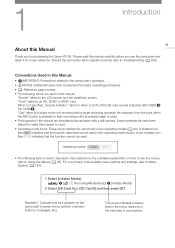
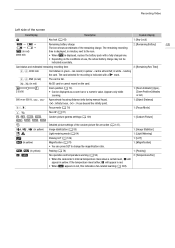
...complement the basic operating procedures. • A: Reference page number. • The following style is pressed again to read this manual carefully before you for future reference. Operating modes: • The following terms are simulated pictures taken with a single recording operation...Used in this Manual • IMPORTANT: Precautions related to a single movie unit recorded with a still camera. For a detailed explanation on the camcorder's screen (menu options, onscreen buttons, messages, etc.). Brackets [ ] indicate text as it for purchasing the Canon XF705. When not ...
...complement the basic operating procedures. • A: Reference page number. • The following style is pressed again to read this manual carefully before you for future reference. Operating modes: • The following terms are simulated pictures taken with a single recording operation...Used in this Manual • IMPORTANT: Precautions related to a single movie unit recorded with a still camera. For a detailed explanation on the camcorder's screen (menu options, onscreen buttons, messages, etc.). Brackets [ ] indicate text as it for purchasing the Canon XF705. When not ...

Instruction Manual
Page 12
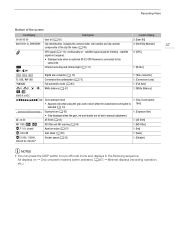
...) 15 - (audio level) switches for CH1 (top) and CH2 (bottom) (A 101) 16 SD card slots (A 34): SD CARD2 (top) and SD CARD3 (bottom) In this manual, SD cards in each slot are referred to as "SD card A" and "SD card B", respectively. 17 Card access indicators (A 34): SD CARD2 (top) and SD...
...) 15 - (audio level) switches for CH1 (top) and CH2 (bottom) (A 101) 16 SD card slots (A 34): SD CARD2 (top) and SD CARD3 (bottom) In this manual, SD cards in each slot are referred to as "SD card A" and "SD card B", respectively. 17 Card access indicators (A 34): SD CARD2 (top) and SD...
Instruction Manual
Page 25
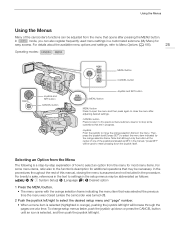
... The following is assumed and not included in the procedure. Joystick Push the joystick to select an option from the menu that are in the manual, "press SET" will browse through the pages one at the center of one of the joysticks is selected (highlighted in orange), pushing the joystick ... to settings in the menu. In mode, you can be adjusted from the menu for easy access. In the procedures throughout the rest of this manual, closing the menu is a step-by the orange selection frame. To change setup menus faster, push the joystick up/down the joystick itself ("press ...
... The following is assumed and not included in the procedure. Joystick Push the joystick to select an option from the menu that are in the manual, "press SET" will browse through the pages one at the center of one of the joysticks is selected (highlighted in orange), pushing the joystick ... to settings in the menu. In mode, you can be adjusted from the menu for easy access. In the procedures throughout the rest of this manual, closing the menu is a step-by the orange selection frame. To change setup menus faster, push the joystick up/down the joystick itself ("press ...

Instruction Manual
Page 39
... from a distance. When you turn on the terminal used and then press SET. The remote controller lets you use the REMOTE B terminal to its instruction manual. Options [RC-V100 (REMOTE A)], [RC-V100 (REMOTE B)]: Select this option to use the optional RC-V100 Remote Controller connected to the corresponding REMOTE terminal. [Standard...
... from a distance. When you turn on the terminal used and then press SET. The remote controller lets you use the REMOTE B terminal to its instruction manual. Options [RC-V100 (REMOTE A)], [RC-V100 (REMOTE B)]: Select this option to use the optional RC-V100 Remote Controller connected to the corresponding REMOTE terminal. [Standard...
Instruction Manual
Page 44
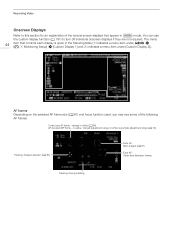
in yellow: manual adjustment range; in white: automatic adjustment range (A 79) Tracking: Subject selection (A 83) Face AF: Main subject (A 81) Face AF: Other face detection frames Tracking: During ...
in yellow: manual adjustment range; in white: automatic adjustment range (A 79) Tracking: Subject selection (A 83) Face AF: Main subject (A 81) Face AF: Other face detection frames Tracking: During ...
Instruction Manual
Page 45
... appear in red. • When ` appears in yellow) Magnification (A 78) • You can record; or not) 000 m or 000 ft, , - Approximate focusing distance (only during manual focus). : Infinity focus, -: Focus beyond the infinity point. 1: [Object Distance] @, A Focus mode (A 76) 1: [Focus Mode] , Face AF (A 81) , , , , , , , Custom picture gamma settings (A 126) 1: [Custom Picture...
... appear in red. • When ` appears in yellow) Magnification (A 78) • You can record; or not) 000 m or 000 ft, , - Approximate focusing distance (only during manual focus). : Infinity focus, -: Focus beyond the infinity point. 1: [Object Distance] @, A Focus mode (A 76) 1: [Focus Mode] , Face AF (A 81) , , , , , , , Custom picture gamma settings (A 126) 1: [Custom Picture...
Instruction Manual
Page 47
Exposure bar (A 62) • Only displayed when the gain, iris and shutter are all set to manual adjustment. 1: [Exposure Bar] AE ±0.00 AE Shift (A 63) 1: [AE Shift] ND 1/00, , ND filter and ND warning (A 60) 1: [ND Filter] E, F 0.0, closed Aperture value (A 61) 1: [...
Exposure bar (A 62) • Only displayed when the gain, iris and shutter are all set to manual adjustment. 1: [Exposure Bar] AE ±0.00 AE Shift (A 63) 1: [AE Shift] ND 1/00, , ND filter and ND warning (A 60) 1: [ND Filter] E, F 0.0, closed Aperture value (A 61) 1: [...
Instruction Manual
Page 57
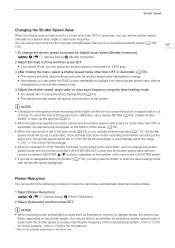
... Changing the Shutter Speed Value When the shutter speed mode is set to a mode other than OFF or automatic, you can set the shutter speed manually as fluorescent, mercury or halogen lamps, the screen may flicker depending on a connected network device (A 164, 170). 57 1 To change the shutter speed ..., use a denser ND filter (A 60), a faster shutter speed, or open up the aperture (A 61). • When the gain and aperture are set to manual and the shutter speed mode is set to 1/120 (59.94 Hz recordings) or automatically within the range 1/120 - 1/100 (50.00 Hz recordings). •...
... Changing the Shutter Speed Value When the shutter speed mode is set to a mode other than OFF or automatic, you can set the shutter speed manually as fluorescent, mercury or halogen lamps, the screen may flicker depending on a connected network device (A 164, 170). 57 1 To change the shutter speed ..., use a denser ND filter (A 60), a faster shutter speed, or open up the aperture (A 61). • When the gain and aperture are set to manual and the shutter speed mode is set to 1/120 (59.94 Hz recordings) or automatically within the range 1/120 - 1/100 (50.00 Hz recordings). •...
Instruction Manual
Page 59
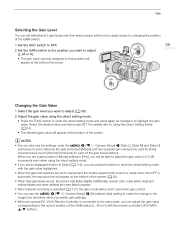
... position will appear at the bottom of the GAIN switch (L, M or H) with the gain value highlighted. • When the gain and aperture are set to manual and the shutter speed mode is connected to the camcorder, you can use the > [v " Camera Setup] > [Shockless Gain] setting to make the change in the...
... position will appear at the bottom of the GAIN switch (L, M or H) with the gain value highlighted. • When the gain and aperture are set to manual and the shutter speed mode is connected to the camcorder, you can use the > [v " Camera Setup] > [Shockless Gain] setting to make the change in the...
Instruction Manual
Page 61
...automatic) F2.8, F3.2, F3.4, F3.7, F4.0, F4.4, F4.5, F4.8, F5.2, F5.6, F12, F14, F15, F16, F17, F19, F21, F22, F25, F27, closed3 M (manual) F6.2, F6.7, F7.3, F8.0, F8.7, F.9.5, F10, F11 1 Available values depend on the zoom position (F2.8 to F11 at full wide angle; Operating modes: Available aperture...the depth of your recordings or change how quickly the exposure is adjusted when the camcorder is set automatically by adjusting the aperture. During manual aperture, press the PUSH AUTO IRIS button or use Browser Remote (A 164, 170) to adjust the aperture. 61 Automatic aperture: ...
...automatic) F2.8, F3.2, F3.4, F3.7, F4.0, F4.4, F4.5, F4.8, F5.2, F5.6, F12, F14, F15, F16, F17, F19, F21, F22, F25, F27, closed3 M (manual) F6.2, F6.7, F7.3, F8.0, F8.7, F.9.5, F10, F11 1 Available values depend on the zoom position (F2.8 to F11 at full wide angle; Operating modes: Available aperture...the depth of your recordings or change how quickly the exposure is adjusted when the camcorder is set automatically by adjusting the aperture. During manual aperture, press the PUSH AUTO IRIS button or use Browser Remote (A 164, 170) to adjust the aperture. 61 Automatic aperture: ...

Instruction Manual
Page 62
.... Optimal exposure will change in Current exposure 1/2 EV increments. In such case, press the ND FILTER - Push Auto Iris During manual aperture, you can press the PUSH AUTO IRIS button to have the camcorder temporarily take control and 62 automatically adjust the aperture for ... aperture mode will end and the E icon will appear at the edge of full auto mode). NOTES • The aperture value set manually will not be used . The selected aperture value will disappear. The indicator inside the exposure bar represents the current exposure. Aperture Momentary Automatic...
.... Optimal exposure will change in Current exposure 1/2 EV increments. In such case, press the ND FILTER - Push Auto Iris During manual aperture, you can press the PUSH AUTO IRIS button to have the camcorder temporarily take control and 62 automatically adjust the aperture for ... aperture mode will end and the E icon will appear at the edge of full auto mode). NOTES • The aperture value set manually will not be used . The selected aperture value will disappear. The indicator inside the exposure bar represents the current exposure. Aperture Momentary Automatic...
Instruction Manual
Page 63
... the AE shift level. Camera Setup] > [AE Shift] 2 Select an AE shift level and then press SET. • You can also switch between automatic and manual aperture with the remote controller's IRIS dial. Exposure Compensation - AE shift is not available when the camcorder is connected to +2.0. You can select one of...
... the AE shift level. Camera Setup] > [AE Shift] 2 Select an AE shift level and then press SET. • You can also switch between automatic and manual aperture with the remote controller's IRIS dial. Exposure Compensation - AE shift is not available when the camcorder is connected to +2.0. You can select one of...
Instruction Manual
Page 76
...and can track it if that person moves. If the camcorder was initially in autofocus mode, it moves. AF-boosted MF: Focus manually most of the internal temperature rising in focus is connected to focus and incorporates Dual Pixel CMOS AF technology for advanced autofocus performance....at the highest possible speed ([AF Speed] and [AF Response] both set to focus nearer. • You can also adjust the focus remotely using the manual focus. Face AF: The camcorder automatically detects a person's face, focuses on a 76 connected network device (A 164, 171). Tracking: After you select a...
...and can track it if that person moves. If the camcorder was initially in autofocus mode, it moves. AF-boosted MF: Focus manually most of the internal temperature rising in focus is connected to focus and incorporates Dual Pixel CMOS AF technology for advanced autofocus performance....at the highest possible speed ([AF Speed] and [AF Response] both set to focus nearer. • You can also adjust the focus remotely using the manual focus. Face AF: The camcorder automatically detects a person's face, focuses on a 76 connected network device (A 164, 171). Tracking: After you select a...
Instruction Manual
Page 79
.... 1 Set the FOCUS switch to A. • @ appears on the left of the AF frame (A 81). 6 Turn the focus ring to adjust the focus. • Focus manually to a setting other than [Automatic] (steps 1-2, A 81). 3 Select [AF Mode]. > [v # Camera Setup] > [AF Mode] 4 Select [AF-Boosted MF] and then press...automatically. • While the focus stays within the automatic adjustment range, the camcorder will keep the subject in sharp focus. This is in the manual adjustment range, the focus frame will be selected (A 80), Push AF (autofocus at the highest speed) is detected. - NOTES • The...
.... 1 Set the FOCUS switch to A. • @ appears on the left of the AF frame (A 81). 6 Turn the focus ring to adjust the focus. • Focus manually to a setting other than [Automatic] (steps 1-2, A 81). 3 Select [AF Mode]. > [v # Camera Setup] > [AF Mode] 4 Select [AF-Boosted MF] and then press...automatically. • While the focus stays within the automatic adjustment range, the camcorder will keep the subject in sharp focus. This is in the manual adjustment range, the focus frame will be selected (A 80), Push AF (autofocus at the highest speed) is detected. - NOTES • The...
Instruction Manual
Page 80
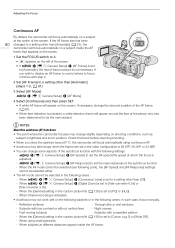
... speed at the center of the screen. When the [Gamma] setting in the following subjects or in the custom picture file (A 126) is set to [Canon Log 3] or [Wide DR]. - Subjects with a repetitive pattern - Night scenes - When infrared recording is activated, a white detection frame will appear on the following...] or [Tele-converter 3.0x]. - If you close the aperture beyond F11, the camcorder will focus automatically using small apertures. - In such case, focus manually. - Through dirty or wet windows - Subjects with low contrast or without vertical lines -
... speed at the center of the screen. When the [Gamma] setting in the following subjects or in the custom picture file (A 126) is set to [Canon Log 3] or [Wide DR]. - Subjects with a repetitive pattern - Night scenes - When infrared recording is activated, a white detection frame will appear on the following...] or [Tele-converter 3.0x]. - If you close the aperture beyond F11, the camcorder will focus automatically using small apertures. - In such case, focus manually. - Through dirty or wet windows - Subjects with low contrast or without vertical lines -


