XF100 / XF105 Instruction Manual
Page 5
... rate/resolution setting with 4:2:2 color sampling), the quality of your fingertips, such as using the supplied Canon XF Utility software. Recording media The camcorder records video and audio to use controls in the recording itself. With the built-in focus. When you press a button...their natural environment or other one CF card becomes full, the recording will help turn your recordings. Highlights of the XF105/XF100 The Canon XF105/XF100 HD Camcorder has been designed with major non-linear editing (NLE) software. The following are then processed by adjusting parameters,...
... rate/resolution setting with 4:2:2 color sampling), the quality of your fingertips, such as using the supplied Canon XF Utility software. Recording media The camcorder records video and audio to use controls in the recording itself. With the built-in focus. When you press a button...their natural environment or other one CF card becomes full, the recording will help turn your recordings. Highlights of the XF105/XF100 The Canon XF105/XF100 HD Camcorder has been designed with major non-linear editing (NLE) software. The following are then processed by adjusting parameters,...
XF100 / XF105 Instruction Manual
Page 6
...-standard HD/SD SDI terminal (0 127) for uncompressed HD signal output, embedded audio and SMPTE time code (LTC) give you even more freedom to an SD ...in the same way. Customization The camcorder features several customization options. Other Functions Audio Sound is recorded as 2-channel linear PCM audio (16-bit/48 kHz). Video scopes Check the brightness of any multi-camera ... time 6 code synchronization (0 74) allow the camcorder to aid in microphone, MIC audio input terminal or the two XLR audio input terminals (with the press of a single button. You can assign often-used functions...
...-standard HD/SD SDI terminal (0 127) for uncompressed HD signal output, embedded audio and SMPTE time code (LTC) give you even more freedom to an SD ...in the same way. Customization The camcorder features several customization options. Other Functions Audio Sound is recorded as 2-channel linear PCM audio (16-bit/48 kHz). Video scopes Check the brightness of any multi-camera ... time 6 code synchronization (0 74) allow the camcorder to aid in microphone, MIC audio input terminal or the two XLR audio input terminals (with the press of a single button. You can assign often-used functions...
XF100 / XF105 Instruction Manual
Page 8
...External Device 74 Using a Reference Video Signal (Genlock Synchronization) 74 Using a Time Code Signal 74 Time Code Signal Output 75 Recording Audio 77 Using the Built-in a Recording 102 Available Custom Picture Settings 102 Customizing Functions and Onscreen Displays 107 Customizing Functions 107 Customizing ... Camera Settings to an XLR Terminal 78 Adjusting the Audio Level 80 Monitoring the Audio with Headphones 81 Using Metadata 82 Setting a User Memo 82 Color Bars/Audio Reference Signal 83 Recording Color Bars 83 Recording an Audio Reference Signal 83 Video Scopes 84 Displaying a Video ...
...External Device 74 Using a Reference Video Signal (Genlock Synchronization) 74 Using a Time Code Signal 74 Time Code Signal Output 75 Recording Audio 77 Using the Built-in a Recording 102 Available Custom Picture Settings 102 Customizing Functions and Onscreen Displays 107 Customizing Functions 107 Customizing ... Camera Settings to an XLR Terminal 78 Adjusting the Audio Level 80 Monitoring the Audio with Headphones 81 Using Metadata 82 Setting a User Memo 82 Color Bars/Audio Reference Signal 83 Recording Color Bars 83 Recording an Audio Reference Signal 83 Video Scopes 84 Displaying a Video ...
XF100 / XF105 Instruction Manual
Page 9
...Using the AV Terminal 128 Superimposing Onscreen Displays to Appear on an External Monitor 128 Audio Output 129 b Embedded Audio 129 Synchronizing the Video with the Audio being Monitored 129 Selecting the Audio Channel 129 Selecting the Output Level of the AV Terminal 130 Saving Clips to a... Computer 131 System Requirements 131 Installing and Uninstalling Canon XF Utility (Windows) 132 Installing and Uninstalling Canon XF Utility (Mac OS)...
...Using the AV Terminal 128 Superimposing Onscreen Displays to Appear on an External Monitor 128 Audio Output 129 b Embedded Audio 129 Synchronizing the Video with the Audio being Monitored 129 Selecting the Audio Channel 129 Selecting the Output Level of the AV Terminal 130 Saving Clips to a... Computer 131 System Requirements 131 Installing and Uninstalling Canon XF Utility (Windows) 132 Installing and Uninstalling Canon XF Utility (Mac OS)...

XF100 / XF105 Instruction Manual
Page 11
... press SET. 3 After you finish recording, press the U button. • The last clip that you to record pause mode. The arrow is played back without audio for the menu item. The example illustration indicates that was recorded. Operating modes: mode, you can find the function by selecting the 11 [J Other Functions...
... press SET. 3 After you finish recording, press the U button. • The last clip that you to record pause mode. The arrow is played back without audio for the menu item. The example illustration indicates that was recorded. Operating modes: mode, you can find the function by selecting the 11 [J Other Functions...
XF100 / XF105 Instruction Manual
Page 17
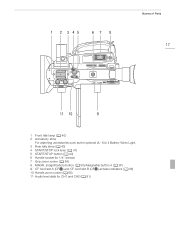
1 2 3 45 67 8 Names of Parts 17 11 10 9 1 Front tally lamp (0 40) 2 Accessory shoe For attaching accessories such as the optional VL-10Li II Battery Video Light. 3 Rear tally lamp (0 40) 4 START/STOP lock lever (0 41) 5 START/STOP button (0 40) 6 Handle socket for 1/4" screws 7 Grip zoom rocker (0 64) 8 MAGN. (magnification) button (0 50)/Assignable button 4 (0 97) 9 CF card slot A (CFj) and CF card slot B (CFl) access indicators (0 36) 10 Handle zoom rocker (0 65) 11 Audio level dials for CH1 and CH2 (0 81)
1 2 3 45 67 8 Names of Parts 17 11 10 9 1 Front tally lamp (0 40) 2 Accessory shoe For attaching accessories such as the optional VL-10Li II Battery Video Light. 3 Rear tally lamp (0 40) 4 START/STOP lock lever (0 41) 5 START/STOP button (0 40) 6 Handle socket for 1/4" screws 7 Grip zoom rocker (0 64) 8 MAGN. (magnification) button (0 50)/Assignable button 4 (0 97) 9 CF card slot A (CFj) and CF card slot B (CFl) access indicators (0 36) 10 Handle zoom rocker (0 65) 11 Audio level dials for CH1 and CH2 (0 81)
XF100 / XF105 Instruction Manual
Page 19
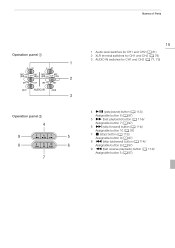
... switches for CH1 and CH2 (0 81) 2 XLR terminal switches for CH1 and CH2 (0 79) 3 AUDIO IN switches for CH1 and CH2 (0 77, 79) 1 2 3 4 D (play/pause) button (0 112)/ Assignable button 6 (0 97) 5 I (fast playback) button (0 114)/ Assignable button 7 (0 97) 6 K (skip forward) button (0 ...
... switches for CH1 and CH2 (0 81) 2 XLR terminal switches for CH1 and CH2 (0 79) 3 AUDIO IN switches for CH1 and CH2 (0 77, 79) 1 2 3 4 D (play/pause) button (0 112)/ Assignable button 6 (0 97) 5 I (fast playback) button (0 114)/ Assignable button 7 (0 97) 6 K (skip forward) button (0 ...
XF100 / XF105 Instruction Manual
Page 40
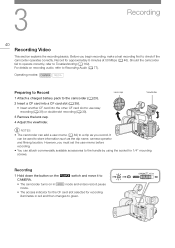
Before you record. Should the camcorder fail to operate correctly, refer to Recording Audio (0 77). However, you must set the user memo before recording. • You can add a user memo (0 82) to the handle by using the socket for 1/4"... Viewfinder NOTES • The camcorder can attach commercially available accessories to a clip as the clip name, camera operator and filming location. For details on recording audio, refer to Troubleshooting (0 162). It can be used to store information such as you begin recording, make a test recording first to CAMERA. • The ...
Before you record. Should the camcorder fail to operate correctly, refer to Recording Audio (0 77). However, you must set the user memo before recording. • You can add a user memo (0 82) to the handle by using the socket for 1/4"... Viewfinder NOTES • The camcorder can attach commercially available accessories to a clip as the clip name, camera operator and filming location. For details on recording audio, refer to Troubleshooting (0 162). It can be used to store information such as you begin recording, make a test recording first to CAMERA. • The ...
XF100 / XF105 Instruction Manual
Page 43
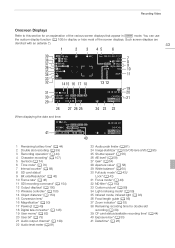
...* 16 Magnification* (0 50) 17 Peaking* (0 49) 18 Digital tele-converter* (0 146) 19 User memo* (0 82) 20 User bit* (0 73) 21 Audio output channel* (0 129) 22 Audio level meter (0 81) 40 23 Audio peak limiter (0 81) 24 Image stabilizer* (0 53)/OIS lens shift (0 95) 25 Shutter speed* (0 56) 26 AE level* (0 59) 27 Gain...
...* 16 Magnification* (0 50) 17 Peaking* (0 49) 18 Digital tele-converter* (0 146) 19 User memo* (0 82) 20 User bit* (0 73) 21 Audio output channel* (0 129) 22 Audio level meter (0 81) 40 23 Audio peak limiter (0 81) 24 Image stabilizer* (0 53)/OIS lens shift (0 95) 25 Shutter speed* (0 56) 26 AE level* (0 59) 27 Gain...
XF100 / XF105 Instruction Manual
Page 77
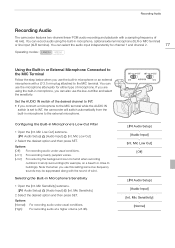
... the camcorder will switch automatically from the built-in microphone to buildings). Options [Off]: For recording audio under usual conditions. Mic Low Cut] [Off] [m Audio Setup] [Audio Input] [Int. You can also use this setting some low-frequency sounds may be suppressed along ...of 48 kHz. Mic Sensitivity] 2 Select the desired option and then press SET. Mic Sensitivity] submenu. [m Audio Setup] [Audio Input] [Int. Mic Low Cut] submenu. [m Audio Setup] [Audio Input] [Int. Note that when you use the microphone attenuator for either type of microphone. Options [Normal]: [...
... the camcorder will switch automatically from the built-in microphone to buildings). Options [Off]: For recording audio under usual conditions. Mic Low Cut] [Off] [m Audio Setup] [Audio Input] [Int. You can also use this setting some low-frequency sounds may be suppressed along ...of 48 kHz. Mic Sensitivity] 2 Select the desired option and then press SET. Mic Sensitivity] submenu. [m Audio Setup] [Audio Input] [Int. Mic Low Cut] submenu. [m Audio Setup] [Audio Input] [Int. Note that when you use the microphone attenuator for either type of microphone. Options [Normal]: [...
XF100 / XF105 Instruction Manual
Page 78
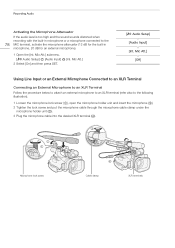
... high and the sound sounds distorted when recording with the built-in microphone, 20 dB for an external microphone). 1 Open the [Int. Mic Att.] submenu. [m Audio Setup] [Audio Input] 2 Select [On] and then press SET. [Int. Mic Att.] [Off] Using Line Input or an External Microphone Connected to an XLR Terminal Connecting...
... high and the sound sounds distorted when recording with the built-in microphone, 20 dB for an external microphone). 1 Open the [Int. Mic Att.] submenu. [m Audio Setup] [Audio Input] 2 Select [On] and then press SET. [Int. Mic Att.] [Off] Using Line Input or an External Microphone Connected to an XLR Terminal Connecting...
XF100 / XF105 Instruction Manual
Page 79
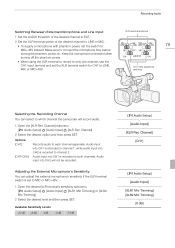
...connect the microphone first, before turning the phantom power on. Options [CH1]: [CH1/CH2]: Records audio to MIC+48V instead. Recording Audio Switching Between External Microphone and Line Input 1 Set the AUDIO IN switch of the desired channel to EXT. 2 Set the XLR terminal switch of the desired... switch to each channel separately. Make sure to which channel the camcorder will not be recorded. XLR terminal switches 79 CH1/CH2 AUDIO IN switches Selecting the Recording Channel You can adjust the external microphone's sensitivity if the XLR terminal switch is recorded to LINE, MIC...
...connect the microphone first, before turning the phantom power on. Options [CH1]: [CH1/CH2]: Records audio to MIC+48V instead. Recording Audio Switching Between External Microphone and Line Input 1 Set the AUDIO IN switch of the desired channel to EXT. 2 Set the XLR terminal switch of the desired... switch to each channel separately. Make sure to which channel the camcorder will not be recorded. XLR terminal switches 79 CH1/CH2 AUDIO IN switches Selecting the Recording Channel You can adjust the external microphone's sensitivity if the XLR terminal switch is recorded to LINE, MIC...

XF100 / XF105 Instruction Manual
Page 80
... If CH1 and CH2 are set to the built-in microphone (0 77), the settings for CH1 will also automatically adjust the audio level for CH2. Recording Audio Activating the Microphone Attenuator You can activate the external microphone's attenuator (20 dB) if the XLR terminal switch is set to automatic..., you can set the audio level to MIC or LINE, respectively. Adjusting the Audio Level You can use the [m Audio Setup] [Audio Input] [XLR ALC Link] setting (0 148) to CH2. NOTES • When both CH1 and CH2...
... If CH1 and CH2 are set to the built-in microphone (0 77), the settings for CH1 will also automatically adjust the audio level for CH2. Recording Audio Activating the Microphone Attenuator You can activate the external microphone's attenuator (20 dB) if the XLR terminal switch is set to automatic..., you can set the audio level to MIC or LINE, respectively. Adjusting the Audio Level You can use the [m Audio Setup] [Audio Input] [XLR ALC Link] setting (0 148) to CH2. NOTES • When both CH1 and CH2...

XF100 / XF105 Instruction Manual
Page 81
... using headphones when adjusting the audio level. NOTES • When you are monitoring the audio, you can choose to prevent audio distortions. Alternatively, you can use the [m Audio Setup] [Audio Output] [Headphone Volume] setting to select the method. Recording Audio Manual Audio Level Adjustment You can set to monitor the recorded audio. Regardless of audio input signals when they...
... using headphones when adjusting the audio level. NOTES • When you are monitoring the audio, you can choose to prevent audio distortions. Alternatively, you can use the [m Audio Setup] [Audio Output] [Headphone Volume] setting to select the method. Recording Audio Manual Audio Level Adjustment You can set to monitor the recorded audio. Regardless of audio input signals when they...
XF100 / XF105 Instruction Manual
Page 83
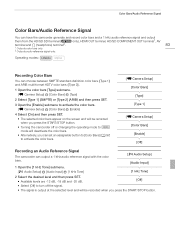
...Type] [Type 1] [l Camera Setup] [Color Bars] [Enable] [Off] Recording an Audio Reference Signal The camcorder can have the camcorder generate and record color bars and a 1 kHz audio reference signal and output them from the HD/SD SDI terminal (b only), HDMI OUT terminal...Outputs color bars only. 2 Outputs audio reference signal only. Color Bars/Audio Reference Signal Color Bars/Audio Reference Signal You can output a 1 kHz audio reference signal with the color bars. 1 Open the [1 kHz Tone] submenu. [m Audio Setup] [Audio Input] [1 kHz Tone] [m Audio Setup] [Audio Input] [1 kHz Tone] 2 ...
...Type] [Type 1] [l Camera Setup] [Color Bars] [Enable] [Off] Recording an Audio Reference Signal The camcorder can have the camcorder generate and record color bars and a 1 kHz audio reference signal and output them from the HD/SD SDI terminal (b only), HDMI OUT terminal...Outputs color bars only. 2 Outputs audio reference signal only. Color Bars/Audio Reference Signal Color Bars/Audio Reference Signal You can output a 1 kHz audio reference signal with the color bars. 1 Open the [1 kHz Tone] submenu. [m Audio Setup] [Audio Input] [1 kHz Tone] [m Audio Setup] [Audio Input] [1 kHz Tone] 2 ...
XF100 / XF105 Instruction Manual
Page 87
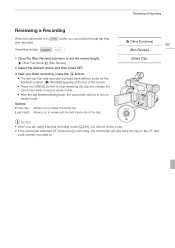
..., press the U button. • The last clip that was recorded. Reviewing a Recording Reviewing a Recording When the camcorder is in was recorded is played back without audio for the selected duration. [A REVIEW] appears at the top of the clip. [J Other Functions] 87 [Rec Review] [Entire Clip] NOTES • When you are using...
..., press the U button. • The last clip that was recorded. Reviewing a Recording Reviewing a Recording When the camcorder is in was recorded is played back without audio for the selected duration. [A REVIEW] appears at the top of the clip. [J Other Functions] 87 [Rec Review] [Entire Clip] NOTES • When you are using...
XF100 / XF105 Instruction Manual
Page 91
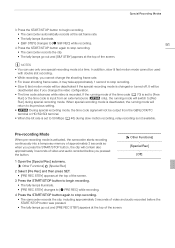
... mode will return to its previous setting. • b During special recording mode, the time code signal will contain also approximately 3 seconds of video and audio recorded before you pressed the button. [J Other Functions] [Special Rec] [Off] 1 Open the [Special Rec] submenu. [J Other Functions] [Special Rec... 4 Press the START/STOP button again to stop recording. • The camcorder records the clip, including approximately 3 seconds of video and audio recorded before the START/STOP button was pressed. • The tally lamps go out and [S&F STBY] appears at the top of the screen...
... mode will return to its previous setting. • b During special recording mode, the time code signal will contain also approximately 3 seconds of video and audio recorded before you pressed the button. [J Other Functions] [Special Rec] [Off] 1 Open the [Special Rec] submenu. [J Other Functions] [Special Rec... 4 Press the START/STOP button again to stop recording. • The camcorder records the clip, including approximately 3 seconds of video and audio recorded before the START/STOP button was pressed. • The tally lamps go out and [S&F STBY] appears at the top of the screen...
XF100 / XF105 Instruction Manual
Page 98
... [Wireless Controller] Turns the wireless controller on/off . N [Spotlight] Turns the spotlight light metering option on/off . N [Audio Output CH] Switches the audio output channel. N [Tele-converter] Activates the digital tele-converter in the following sequence: 1.5x J 3x J 6x J Off ...] Switches between [Face Pri.], [Face Only] and [Off]. N [Shot Mark 2]* Adds an d mark to the clip. N [Audio Level] Turns the audio level meter on/off . N [Onscreen Display] Displays the onscreen icons and text on subjects' faces. N [Delete Last Clip] Deletes the...
... [Wireless Controller] Turns the wireless controller on/off . N [Spotlight] Turns the spotlight light metering option on/off . N [Audio Output CH] Switches the audio output channel. N [Tele-converter] Activates the digital tele-converter in the following sequence: 1.5x J 3x J 6x J Off ...] Switches between [Face Pri.], [Face Only] and [Off]. N [Shot Mark 2]* Adds an d mark to the clip. N [Audio Level] Turns the audio level meter on/off . N [Onscreen Display] Displays the onscreen icons and text on subjects' faces. N [Delete Last Clip] Deletes the...

XF100 / XF105 Instruction Manual
Page 112
... again to pause the playback. • Press the B button to stop the playback and return to do so may notice brief stops in video or audio playback between clips. Do not open the cover of the clips on the SD card. 1 Press the INDEX button. • The index screen selection menu...
... again to pause the playback. • Press the B button to stop the playback and return to do so may notice brief stops in video or audio playback between clips. Do not open the cover of the clips on the SD card. 1 Press the INDEX button. • The index screen selection menu...
XF100 / XF105 Instruction Manual
Page 113
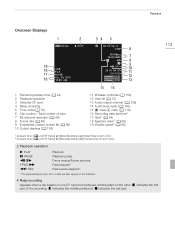
... resolution (0 46) 8 Frame rate (0 46) 9 Embedded custom picture file (0 99) 10 Output displays (0 128) 11 Wireless controller (0 150) 12 User bit (0 73) 13 Audio output channel (0 129) 14 Audio level meter (0 150) 15 e mark/Z mark (0 118) 16 Recording date and time1 17 Gain2 (0 54) 18 Aperture value2 (0 58) 19 Shutter speed2 (0 56...
... resolution (0 46) 8 Frame rate (0 46) 9 Embedded custom picture file (0 99) 10 Output displays (0 128) 11 Wireless controller (0 150) 12 User bit (0 73) 13 Audio output channel (0 129) 14 Audio level meter (0 150) 15 e mark/Z mark (0 118) 16 Recording date and time1 17 Gain2 (0 54) 18 Aperture value2 (0 58) 19 Shutter speed2 (0 56...


