Instruction Manual
Page 17
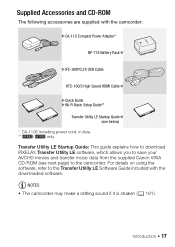
... Compact Power Adapter* BP-718 Battery PackW XIFC-300PCU/S USB Cable HTC-100/S High Speed HDMI CableW XQuick Guide XWi-Fi Basic Setup Guide** Transfer Utility LE Startup GuideW (see next page) to save your AVCHD movies and transfer music data from the supplied Canon VIXIA CD-ROM (see below) * CA-110E including power...
... Compact Power Adapter* BP-718 Battery PackW XIFC-300PCU/S USB Cable HTC-100/S High Speed HDMI CableW XQuick Guide XWi-Fi Basic Setup Guide** Transfer Utility LE Startup GuideW (see next page) to save your AVCHD movies and transfer music data from the supplied Canon VIXIA CD-ROM (see below) * CA-110E including power...
Instruction Manual
Page 102
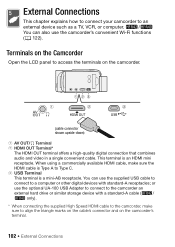
... connect to the camcorder an external hard drive or similar storage device with standard-A receptacles; You can also use the supplied USB cable to connect to access the terminals on the camcorder. (cable connector shown upside-down) 1 AV OUT/× Terminal 2 HDMI OUT Terminal* The HDMI OUT terminal offers a high-quality digital connection...
... connect to the camcorder an external hard drive or similar storage device with standard-A receptacles; You can also use the supplied USB cable to connect to access the terminals on the camcorder. (cable connector shown upside-down) 1 AV OUT/× Terminal 2 HDMI OUT Terminal* The HDMI OUT terminal offers a high-quality digital connection...
Instruction Manual
Page 104
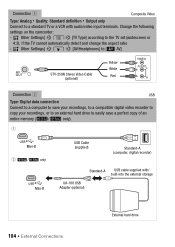
...Output only Connect to easily save a perfect copy of an entire memory (6/4 only). 1 Mini-B 2 6/4 only Mini-B USB Cable (supplied) Standard-A (computer, digital recorder) Standard-A USB cable supplied with audio/video input terminals. Change the following settings on the camcorder: - [ Other Settings] > > [TV... aspect ratio - [ Other Settings] > q > [AV/Headphones] to [Ò AV] STV-250N Stereo Video Cable (optional) Yellow White Red Connection # USB Type: Digital data connection Connect to a computer to save your recordings, to a compatible digital video recorder to copy your...
...Output only Connect to easily save a perfect copy of an entire memory (6/4 only). 1 Mini-B 2 6/4 only Mini-B USB Cable (supplied) Standard-A (computer, digital recorder) Standard-A USB cable supplied with audio/video input terminals. Change the following settings on the camcorder: - [ Other Settings] > > [TV... aspect ratio - [ Other Settings] > q > [AV/Headphones] to [Ò AV] STV-250N Stereo Video Cable (optional) Yellow White Red Connection # USB Type: Digital data connection Connect to a computer to save your recordings, to a compatible digital video recorder to copy your...

Instruction Manual
Page 105
... VIXIA CD-ROM to a memory card in the camcorder in the following cases. - Refer to the instruction manual of PIXELA's software. - On the TV, select as background music. For details, refer to the Software Guide (PDF file) of the connected TV. 4 Turn on an HDTV using the supplied USB cable ...in order to use . For details, refer to the TV. To save a memory onto an external hard drive. • Sound from the HDMI terminal while Wi-Fi functions are in speaker will be muted while a cable is connected to the HDMI OUT terminal ...
... VIXIA CD-ROM to a memory card in the camcorder in the following cases. - Refer to the instruction manual of PIXELA's software. - On the TV, select as background music. For details, refer to the Software Guide (PDF file) of the connected TV. 4 Turn on an HDTV using the supplied USB cable ...in order to use . For details, refer to the TV. To save a memory onto an external hard drive. • Sound from the HDMI terminal while Wi-Fi functions are in speaker will be muted while a cable is connected to the HDMI OUT terminal ...
Instruction Manual
Page 112
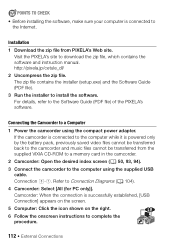
...details, refer to install the software. POINTS TO CHECK • Before installing the software, make sure your computer is successfully established, [USB Connection] appears on the screen. 5 Computer: Click the icon shown on the right. 6 Follow the onscreen instructions to complete the ...PDF file) of the PIXELA's software. Connecting the Camcorder to a Computer 1 Power the camcorder using the supplied USB cable. Connection #-1. Installation 1 Download the zip file from the supplied VIXIA CD-ROM to a memory card in the camcorder. 2 Camcorder: Open the desired index screen (A 50, 93,...
...details, refer to install the software. POINTS TO CHECK • Before installing the software, make sure your computer is successfully established, [USB Connection] appears on the screen. 5 Computer: Click the icon shown on the right. 6 Follow the onscreen instructions to complete the ...PDF file) of the PIXELA's software. Connecting the Camcorder to a Computer 1 Power the camcorder using the supplied USB cable. Connection #-1. Installation 1 Download the zip file from the supplied VIXIA CD-ROM to a memory card in the camcorder. 2 Camcorder: Open the desired index screen (A 50, 93,...
Instruction Manual
Page 114
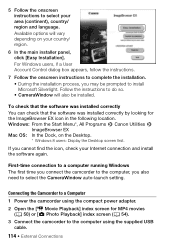
... following location. Windows: From the Start Menu*, All Programs > Canon Utilities > ImageBrowser EX Mac OS: In the Dock, on your country/ region. 6 In the main installer panel, click [Easy Installation]. Connecting the Camcorder to a Computer 1 Power the camcorder using the supplied USB cable. 114 Š External Connections Available options will also be installed...
... following location. Windows: From the Start Menu*, All Programs > Canon Utilities > ImageBrowser EX Mac OS: In the Dock, on your country/ region. 6 In the main installer panel, click [Easy Installation]. Connecting the Camcorder to a Computer 1 Power the camcorder using the supplied USB cable. 114 Š External Connections Available options will also be installed...
Instruction Manual
Page 115
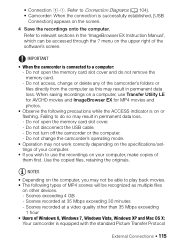
... on the upper right of MP4 scenes will be accessed through the ? Failing to do not remove the memory card. - Do not disconnect the USB cable. - Do not change or delete any of Windows 8, Windows 7, Windows Vista, Windows XP and Mac OS X: Your camcorder is connected to play... back movies. • The following precautions while the ACCESS indicator is successfully established, [USB Connection] appears on other than 35 Mbps exceeding 1 hour • Users of the camcorder's folders or files directly from the computer as multiple...
... on the upper right of MP4 scenes will be accessed through the ? Failing to do not remove the memory card. - Do not disconnect the USB cable. - Do not change or delete any of Windows 8, Windows 7, Windows Vista, Windows XP and Mac OS X: Your camcorder is connected to play... back movies. • The following precautions while the ACCESS indicator is successfully established, [USB Connection] appears on other than 35 Mbps exceeding 1 hour • Users of the camcorder's folders or files directly from the computer as multiple...
Instruction Manual
Page 116
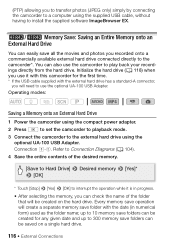
... back your recordings directly from the hard drive. up to 10 memory save folders can be created for the first time. * If the USB cable supplied with the date (in progress. • After selecting the memory, you recorded onto a commercially available external hard drive connected directly to... the camcorder*. (PTP) allowing you to transfer photos (JPEG only) simply by connecting the camcorder to a computer using the supplied USB cable, without having to install the supplied software ImageBrowser EX. 6/4 Memory Save: Saving an Entire Memory onto an External Hard Drive You can ...
... back your recordings directly from the hard drive. up to 10 memory save folders can be created for the first time. * If the USB cable supplied with the date (in progress. • After selecting the memory, you recorded onto a commercially available external hard drive connected directly to... the camcorder*. (PTP) allowing you to transfer photos (JPEG only) simply by connecting the camcorder to a computer using the supplied USB cable, without having to install the supplied software ImageBrowser EX. 6/4 Memory Save: Saving an Entire Memory onto an External Hard Drive You can ...
Instruction Manual
Page 118
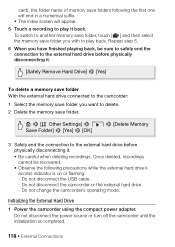
... drive connected to the camcorder: 1 Select the memory save folder you with to play it . • Be careful when deleting recordings. Do not disconnect the USB cable. - Do not change the camcorder's operating mode. card), the folder name of memory save folders following precautions while the external hard drive's access indicator is...
... drive connected to the camcorder: 1 Select the memory save folder you with to play it . • Be careful when deleting recordings. Do not disconnect the USB cable. - Do not change the camcorder's operating mode. card), the folder name of memory save folders following precautions while the external hard drive's access indicator is...
Instruction Manual
Page 119
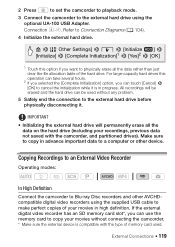
... . Make sure to copy in advance important data to a computer or other AVCHDcompatible digital video recorders using the optional UA-100 USB Adapter. Copying Recordings to an External Video Recorder Operating modes: SCN In High Definition Connect the camcorder to Blu-ray Disc recorders ...and other device. 2 Press to set the camcorder to playback mode. 3 Connect the camcorder to the external hard drive using the supplied USB cable to make perfect copies of your movies in high definition. External Connections Š 119 Connection #-2. If the external digital video recorder has...
... . Make sure to copy in advance important data to a computer or other AVCHDcompatible digital video recorders using the optional UA-100 USB Adapter. Copying Recordings to an External Video Recorder Operating modes: SCN In High Definition Connect the camcorder to Blu-ray Disc recorders ...and other device. 2 Press to set the camcorder to playback mode. 3 Connect the camcorder to the external hard drive using the supplied USB cable to make perfect copies of your movies in high definition. External Connections Š 119 Connection #-2. If the external digital video recorder has...
Instruction Manual
Page 120
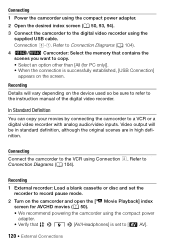
...will be sure to refer to [Ò AV]. 120 Š External Connections Refer to the digital video recorder using the supplied USB cable. Connection #-1. Recording 1 External recorder: Load a blank cassette or disc and set to the instruction manual of the digital video ...Connection ". Refer to Connection Diagrams (A 104). 4 6/4 Camcorder: Select the memory that > q > [AV/Headphones] is successfully established, [USB Connection] appears on the device used so be in standard definition, although the original scenes are in high definition. Video output will vary depending on...
...will be sure to refer to [Ò AV]. 120 Š External Connections Refer to the digital video recorder using the supplied USB cable. Connection #-1. Recording 1 External recorder: Load a blank cassette or disc and set to the instruction manual of the digital video ...Connection ". Refer to Connection Diagrams (A 104). 4 6/4 Camcorder: Select the memory that > q > [AV/Headphones] is successfully established, [USB Connection] appears on the device used so be in standard definition, although the original scenes are in high definition. Video output will vary depending on...
Instruction Manual
Page 131
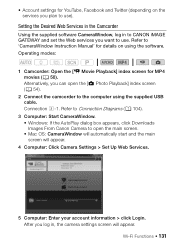
...138; 131 Alternatively, you log in to CANON iMAGE GATEWAY and set the Web services you plan to the computer using the software. • Account settings for YouTube, Facebook and Twitter (depending on using the supplied USB cable. Refer to Connection Diagrams (A 104). 3 ...Computer: Start CameraWindow. • Windows: If the AutoPlay dialog box appears, click Downloads Images From Canon Camera to 'CameraWindow Instruction Manual' for MP4 movies (A 50)....
...138; 131 Alternatively, you log in to CANON iMAGE GATEWAY and set the Web services you plan to the computer using the software. • Account settings for YouTube, Facebook and Twitter (depending on using the supplied USB cable. Refer to Connection Diagrams (A 104). 3 ...Computer: Start CameraWindow. • Windows: If the AutoPlay dialog box appears, click Downloads Images From Canon Camera to 'CameraWindow Instruction Manual' for MP4 movies (A 50)....
Instruction Manual
Page 163
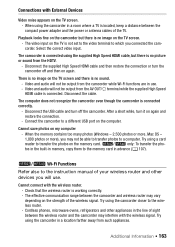
... Try using the camcorder in the line of the wireless signal. The video input on the computer. Disconnect the supplied High Speed HDMI cable and then restore the connection or turn the camcorder off the camcorder. After a short while, turn off and then on again and ... the wireless router. - Cannot save photos on the TV screen. - Connections with External Devices Video noise appears on my computer - Disconnect the USB cable and turn it on again. Check that the wireless router is connected correctly. - Additional Information Š 163 Video and audio will not be output...
... Try using the camcorder in the line of the wireless signal. The video input on the computer. Disconnect the supplied High Speed HDMI cable and then restore the connection or turn the camcorder off the camcorder. After a short while, turn off and then on again and ... the wireless router. - Cannot save photos on the TV screen. - Connections with External Devices Video noise appears on my computer - Disconnect the USB cable and turn it on again. Check that the wireless router is connected correctly. - Additional Information Š 163 Video and audio will not be output...
Instruction Manual
Page 167
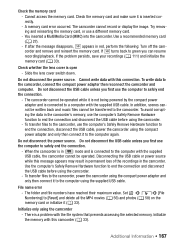
... (A 27). - To transfer files to the camcorder, use the computer's Safely Remove Hardware function to end the connection, disconnect the USB cable, power the camcorder using the compact power adapter and only then connect it is connected to safely end the connection. - When the camcorder...). Check the memory card - Check the memory card and make sure it to end the connection and disconnect the USB cable before using the supplied USB cable. Try removing and reinserting the memory card, or use the computer's Safely Remove Hardware function to the computer using the...
... (A 27). - To transfer files to the camcorder, use the computer's Safely Remove Hardware function to end the connection, disconnect the USB cable, power the camcorder using the compact power adapter and only then connect it is connected to safely end the connection. - When the camcorder...). Check the memory card - Check the memory card and make sure it to end the connection and disconnect the USB cable before using the supplied USB cable. Try removing and reinserting the memory card, or use the computer's Safely Remove Hardware function to the computer using the...
Instruction Manual
Page 170
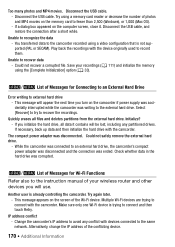
Disconnect the USB cable. - Disconnect the USB cable, and restore the connection after a short while. You transferred data to connect with the camcorder. Could not recover a corrupted file. Save your recordings (A 111) and ... movies. Make sure only one Wi-Fi device is trying to recover data - Alternatively, change the IP address of the Wi-Fi device. Disconnect the USB cable. Initialize? - Select [Recover] to try to recognize the data - This message appears on the computer screen, close it contains will be lost, including any conflict...
Disconnect the USB cable. - Disconnect the USB cable, and restore the connection after a short while. You transferred data to connect with the camcorder. Could not recover a corrupted file. Save your recordings (A 111) and ... movies. Make sure only one Wi-Fi device is trying to recover data - Alternatively, change the IP address of the Wi-Fi device. Disconnect the USB cable. Initialize? - Select [Recover] to try to recognize the data - This message appears on the computer screen, close it contains will be lost, including any conflict...

Instruction Manual
Page 180
not available as an optional accessory. ** 6/4 only. 180 Š Additional Information General Information Accessories (Availability differs from area to area) Card reader/writer Printer Computer External hard drive** TV/HDTV Digital video recorder Optional accessories not listed below are described in more detail in the following pages. 1 CA-110 Compact Power Adapter 8 HTC-100/S* or HTC-100 High Speed 5 Memory card HDMI Cable 6 IFC-300PCU/S* or IFC-400PCU USB 9 STV-250N Stereo Video Cable Cable * Supplied with the camcorder;
not available as an optional accessory. ** 6/4 only. 180 Š Additional Information General Information Accessories (Availability differs from area to area) Card reader/writer Printer Computer External hard drive** TV/HDTV Digital video recorder Optional accessories not listed below are described in more detail in the following pages. 1 CA-110 Compact Power Adapter 8 HTC-100/S* or HTC-100 High Speed 5 Memory card HDMI Cable 6 IFC-300PCU/S* or IFC-400PCU USB 9 STV-250N Stereo Video Cable Cable * Supplied with the camcorder;
Instruction Manual
Page 184
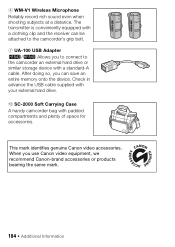
.... The transmitter is conveniently equipped with a clothing clip and the receiver can save an entire memory onto the device. After doing so, you use Canon video equipment, we recommend Canon-brand accessories or products bearing the same mark. 184 Š Additional Information Check in advance the USB cable supplied with your external hard drive.
.... The transmitter is conveniently equipped with a clothing clip and the receiver can save an entire memory onto the device. After doing so, you use Canon video equipment, we recommend Canon-brand accessories or products bearing the same mark. 184 Š Additional Information Check in advance the USB cable supplied with your external hard drive.


