ImageBrowser 6.5 for Macintosh Instruction Manual
Page 13
... Mastering the Basics More Advanced Techniques 3 Set the categories as desired. Click [Print & Email] in the Control Panel and select [Layout Print]. Sets the printer, paper size and borderless printing settings.
... Mastering the Basics More Advanced Techniques 3 Set the categories as desired. Click [Print & Email] in the Control Panel and select [Layout Print]. Sets the printer, paper size and borderless printing settings.

ImageBrowser 6.5 for Macintosh Instruction Manual
Page 15
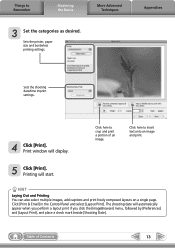
Rotates selected images. Select an image to Remember Mastering the Basics More Advanced Techniques Appendices 3 Set the categories as desired. Print window will start. Table of rows or columns. Things to rotate or trim. Sets the number of Contents 15 Configures the printing of the selected image and print it. Printing will display. 5 Click [Print]. Click here to crop a portion of the shooting information, comments, headers, footers or page numbers. 4 Click [Print]. Sets the printer, paper size and number of print copies settings.
Rotates selected images. Select an image to Remember Mastering the Basics More Advanced Techniques Appendices 3 Set the categories as desired. Print window will start. Table of rows or columns. Things to rotate or trim. Sets the number of Contents 15 Configures the printing of the selected image and print it. Printing will display. 5 Click [Print]. Click here to crop a portion of the shooting information, comments, headers, footers or page numbers. 4 Click [Print]. Sets the printer, paper size and number of print copies settings.

ZoomBrowser EX 6.5 for Windows Instruction Manual
Page 13
... in the Main Window, followed by [Print Using Other Software]. Table of an image. Sets the shooting date/time imprint settings. 5 Click [3. Sets the printer, paper size and borderless printing settings. HINT Printing Using Other Software If you have specialized printing software installed on the computer, you can also use it...
... in the Main Window, followed by [Print Using Other Software]. Table of an image. Sets the shooting date/time imprint settings. 5 Click [3. Sets the printer, paper size and borderless printing settings. HINT Printing Using Other Software If you have specialized printing software installed on the computer, you can also use it...
ZoomBrowser EX 6.5 for Windows Instruction Manual
Page 15
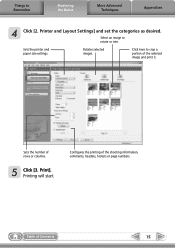
Sets the number of the shooting information, comments, headers, footers or page numbers. Printing will start. Rotates selected images. Print]. Sets the printer and paper size settings. Configures the printing of rows or columns. 5 Click [3. Things to rotate or trim. Printer and Layout Settings] and set the categories as desired. Table of the selected image and print it. Select an image to Remember Mastering the Basics More Advanced Techniques Appendices 4 Click [2. Click here to crop a portion of Contents 15
Sets the number of the shooting information, comments, headers, footers or page numbers. Printing will start. Rotates selected images. Print]. Sets the printer and paper size settings. Configures the printing of rows or columns. 5 Click [3. Things to rotate or trim. Printer and Layout Settings] and set the categories as desired. Table of the selected image and print it. Select an image to Remember Mastering the Basics More Advanced Techniques Appendices 4 Click [2. Click here to crop a portion of Contents 15

SELPHY CP710/CP510 User Guide
Page 2
... Printing Procedure and Reference Guides 24 Let's Prepare 26 Preparing Your Ink Cassette/ Paper Sets and Paper Cassette 26 Loading the Ink Cassette 27 Loading the Paper into the Paper Cassette 28 Loading the Paper Cassette 29 Placing the Printer 30 Connecting to a Camera for Printing Connecting to...Printing 31 Disconnect the camera 32 Printing on the separately sold wide size (100 x 200 mm (4 x 8 in.)) paper 32 Printing from Memory Card (CP710 only) Compatible Memory Cards 33 Inserting Memory Cards 34 Removing Memory Cards 34 About LCD Monitor and Operation Buttons 35 Main ...
... Printing Procedure and Reference Guides 24 Let's Prepare 26 Preparing Your Ink Cassette/ Paper Sets and Paper Cassette 26 Loading the Ink Cassette 27 Loading the Paper into the Paper Cassette 28 Loading the Paper Cassette 29 Placing the Printer 30 Connecting to a Camera for Printing Connecting to...Printing 31 Disconnect the camera 32 Printing on the separately sold wide size (100 x 200 mm (4 x 8 in.)) paper 32 Printing from Memory Card (CP710 only) Compatible Memory Cards 33 Inserting Memory Cards 34 Removing Memory Cards 34 About LCD Monitor and Operation Buttons 35 Main ...
SELPHY CP710/CP510 User Guide
Page 4
...This guide uses illustrations mainly for the CP710. This section explains the procedures required to print beforehand) Camera User Guide or Direct Print User Guide : Included with your printer from a camera. Things to Prepare Printer (CP710/CP510) Standard Paper (Postcard size, 5 sheets) Ink... Cassette (Postcard size, for 5 sheets) Paper Cassette (Postcard size) Compact Power Adapter CA-CP200 Power Cord Digital camera or digital camcorder ...
...This guide uses illustrations mainly for the CP710. This section explains the procedures required to print beforehand) Camera User Guide or Direct Print User Guide : Included with your printer from a camera. Things to Prepare Printer (CP710/CP510) Standard Paper (Postcard size, 5 sheets) Ink... Cassette (Postcard size, for 5 sheets) Paper Cassette (Postcard size) Compact Power Adapter CA-CP200 Power Cord Digital camera or digital camcorder ...

SELPHY CP710/CP510 User Guide
Page 5
2 Loading the paper into the paper cassette compartment. 3 Paper (Glossy side up and the address/stamp side next to its original position, and leave the top cover open. 3 Loading the Paper Cassette into the Printer (p. 29) 1 Open the paper cassette compartment cover. 2 Push the paper cassette all the way into the Paper Cassette (p. 28) 1 Open the paper cassette's top and middle covers. 2 Place the paper, glossy side up ) Top cover Middle cover Middle cover (Address / stamp side next to the middle cover) 3 Place the middle cover back to the middle cover, in the paper cassette.
2 Loading the paper into the paper cassette compartment. 3 Paper (Glossy side up and the address/stamp side next to its original position, and leave the top cover open. 3 Loading the Paper Cassette into the Printer (p. 29) 1 Open the paper cassette compartment cover. 2 Push the paper cassette all the way into the Paper Cassette (p. 28) 1 Open the paper cassette's top and middle covers. 2 Place the paper, glossy side up ) Top cover Middle cover Middle cover (Address / stamp side next to the middle cover) 3 Place the middle cover back to the middle cover, in the paper cassette.
SELPHY CP710/CP510 User Guide
Page 15
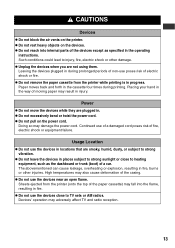
... flame, resulting in the operating instructions. Leaving the devices plugged in during printing. z Do not remove the paper cassette from the printer (onto the top of the paper cassette) may result in places subject to strong sunlight or close to injury, fire, electric shock or other injuries...injury. Sheets ejected from the printer while printing is in locations that are not using them. Devices' operation may damage the power cord. Paper moves back and forth in . Continued use the devices in progress. Such conditions could lead to TV sets or AM radios. z ...
... flame, resulting in the operating instructions. Leaving the devices plugged in during printing. z Do not remove the paper cassette from the printer (onto the top of the paper cassette) may result in places subject to strong sunlight or close to injury, fire, electric shock or other injuries...injury. Sheets ejected from the printer while printing is in locations that are not using them. Devices' operation may damage the power cord. Paper moves back and forth in . Continued use the devices in progress. Such conditions could lead to TV sets or AM radios. z ...

SELPHY CP710/CP510 User Guide
Page 16
...enter the printer, print quality may deteriorate. Avoid Condensation Related Problems z You can avoid condensation by placing the devices (printer, ink cassette, paper cassette, paper) in an airtight, resealable plastic bag and letting them adjust to Use for transport. If a case is not in use near strong ...magnets or near devices that paper has sufficient room to the rear of the printer. When Planning Not to temperature changes slowly before removing them . Moving the devices rapidly...
...enter the printer, print quality may deteriorate. Avoid Condensation Related Problems z You can avoid condensation by placing the devices (printer, ink cassette, paper cassette, paper) in an airtight, resealable plastic bag and letting them adjust to Use for transport. If a case is not in use near strong ...magnets or near devices that paper has sufficient room to the rear of the printer. When Planning Not to temperature changes slowly before removing them . Moving the devices rapidly...
SELPHY CP710/CP510 User Guide
Page 17
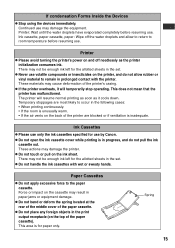
...foreign objects in the set . Printer: Wait until the water droplets have evaporated completely before resuming use may cause deformation of the paper cassette). These materials may damage the equipment. There may not be enough ink left for the allotted sheets in the print output ...not be enough ink left for the allotted sheets in prolonged contact with wet or sweaty hands. Paper Cassettes z Do not apply excessive force to room temperature before resuming use by Canon. This area is inadequate. Printer z Please avoid turning the printer's power on the printer, and...
...foreign objects in the set . Printer: Wait until the water droplets have evaporated completely before resuming use may cause deformation of the paper cassette). These materials may damage the equipment. There may not be enough ink left for the allotted sheets in the print output ...not be enough ink left for the allotted sheets in prolonged contact with wet or sweaty hands. Paper Cassettes z Do not apply excessive force to room temperature before resuming use by Canon. This area is inadequate. Printer z Please avoid turning the printer's power on the printer, and...

SELPHY CP710/CP510 User Guide
Page 18
... may result in accordance with conditions of storage. z Do not use by Canon. z You may write on the paper with an oil-based pen, but to avoid smudging please allow more than 9 sheets to dry before printing. Canon assumes no liability for color changes. 16 z Do not touch the print... side of locations. • Locations that hands are partially peeled off. WRONG RIGHT Always hold the paper along the top of the paper cassette and in the following actions as this...
... may result in accordance with conditions of storage. z Do not use by Canon. z You may write on the paper with an oil-based pen, but to avoid smudging please allow more than 9 sheets to dry before printing. Canon assumes no liability for color changes. 16 z Do not touch the print... side of locations. • Locations that hands are partially peeled off. WRONG RIGHT Always hold the paper along the top of the paper cassette and in the following actions as this...

SELPHY CP710/CP510 User Guide
Page 19
...176;F), the optimal range is low, the finished print may emit noises while charging. At cold temperatures, such as paper clips and pins. This shortens the battery life. Charging the Battery (sold separately) z Do not carry or store...cover on ski hills, performance will temporarily decline, reducing the usable time. If this happens, gently pull out the paper. z The printer consumes the battery charge when the power is not a malfunction. • Do not charge the... printer before , to ensure a full charge. This is on standard Canon testing criteria). • Charge it .
...176;F), the optimal range is low, the finished print may emit noises while charging. At cold temperatures, such as paper clips and pins. This shortens the battery life. Charging the Battery (sold separately) z Do not carry or store...cover on ski hills, performance will temporarily decline, reducing the usable time. If this happens, gently pull out the paper. z The printer consumes the battery charge when the power is not a malfunction. • Do not charge the... printer before , to ensure a full charge. This is on standard Canon testing criteria). • Charge it .

SELPHY CP710/CP510 User Guide
Page 20
... Printer" (p. 57). *2This cover prevents dust from entering the printer. When the printer is not in some regions. 18 Paper Cassette (Postcard size) Standard Paper (Postcard size, 5 sheets) Ink Cassette (Postcard size, for 5 sheets) Cleaner Stick*1 CP Printer Solution Disk Compact Power... Adapter CA-CP200 Power Cord Dust Cover*2 • User Guide (This Guide) • Warranty Card*3 • Canon Customer Support Leaflet*3 *...
... Printer" (p. 57). *2This cover prevents dust from entering the printer. When the printer is not in some regions. 18 Paper Cassette (Postcard size) Standard Paper (Postcard size, 5 sheets) Ink Cassette (Postcard size, for 5 sheets) Cleaner Stick*1 CP Printer Solution Disk Compact Power... Adapter CA-CP200 Power Cord Dust Cover*2 • User Guide (This Guide) • Warranty Card*3 • Canon Customer Support Leaflet*3 *...

SELPHY CP710/CP510 User Guide
Page 21
Separately Sold Products Paper Cassette PCL-CP100 L size Paper Cassette PCC-CP100 Credit card size Paper Cassette PCW-CP100 Wide size (100 x 200 mm (4 x 8 in order to use and print with the Bluetooth unit. http://web.canon.jp/Imaging/information-e.html 19 Please check the following website... for information on the newest firmware and how to update the printer firmware in .)) Color Ink/Paper Set KP-36IP 36 postcard size, standard sheets Color Ink...
Separately Sold Products Paper Cassette PCL-CP100 L size Paper Cassette PCC-CP100 Credit card size Paper Cassette PCW-CP100 Wide size (100 x 200 mm (4 x 8 in order to use and print with the Bluetooth unit. http://web.canon.jp/Imaging/information-e.html 19 Please check the following website... for information on the newest firmware and how to update the printer firmware in .)) Color Ink/Paper Set KP-36IP 36 postcard size, standard sheets Color Ink...
SELPHY CP710/CP510 User Guide
Page 22
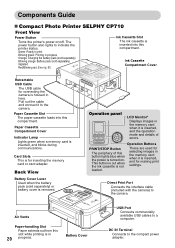
...printer status. This button is out when the ink cassette is housed in 20 progress. Components Guide „ Compact Photo Printer SELPHY CP710 Front View Power Button Turns the printer's power on . Ink Cassette Compartment Cover Retractable USB Cable The USB cable for connecting the... camera is not loaded. Air Vents Paper-handling Slot Paper extends out from this slot while printing is inserted into this button lights blue when the power is inserted, and the...
...printer status. This button is out when the ink cassette is housed in 20 progress. Components Guide „ Compact Photo Printer SELPHY CP710 Front View Power Button Turns the printer's power on . Ink Cassette Compartment Cover Retractable USB Cable The USB cable for connecting the... camera is not loaded. Air Vents Paper-handling Slot Paper extends out from this slot while printing is inserted into this button lights blue when the power is inserted, and the...
SELPHY CP710/CP510 User Guide
Page 23
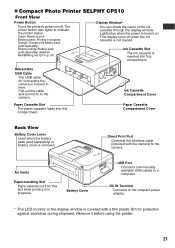
... to the camera. Retractable USB Cable The USB cable for protection against scratches during shipment. This display turns off . Air Vents Paper-handling Slot Paper extends out from this compartment. Pull out the cable and connect it before using the printer. 21 Battery Cover USB Port Connects... covered with the camera) to print Blinking green: Printing in here. DC IN Terminal Connects to a computer. „ Compact Photo Printer SELPHY CP510 Front View Power Button Turns the printer's power on/off when the ink cassette is housed in progress Orange: Charging the battery pack ...
... to the camera. Retractable USB Cable The USB cable for protection against scratches during shipment. This display turns off . Air Vents Paper-handling Slot Paper extends out from this compartment. Pull out the cable and connect it before using the printer. 21 Battery Cover USB Port Connects... covered with the camera) to print Blinking green: Printing in here. DC IN Terminal Connects to a computer. „ Compact Photo Printer SELPHY CP510 Front View Power Button Turns the printer's power on/off when the ink cassette is housed in progress Orange: Charging the battery pack ...

SELPHY CP710/CP510 User Guide
Page 25
...can alter images with a computer and lay them out in various ways • You can make original postcards by some cameras. Postcard size paper cassette • You can easily select layouts for printing. Borderless printing is not supported by printing on a computer. • Images can be... and printed any way you like . 23 Season's Greetings • You can easily combine images taken using label stickers. Credit card size paper cassette (sold separately) • You can make fullsize stickers or divided into eight equal-size areas using the camera's Stitch Assist function on...
...can alter images with a computer and lay them out in various ways • You can make original postcards by some cameras. Postcard size paper cassette • You can easily select layouts for printing. Borderless printing is not supported by printing on a computer. • Images can be... and printed any way you like . 23 Season's Greetings • You can easily combine images taken using label stickers. Credit card size paper cassette (sold separately) • You can make fullsize stickers or divided into eight equal-size areas using the camera's Stitch Assist function on...
SELPHY CP710/CP510 User Guide
Page 28
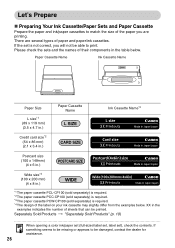
... (sold separately) is not correct, you are printing. If something seems to be missing or appears to be printed. Paper Cassette Name Ink Cassette Name Paper Size L size*1 (89 x 119 mm) (3.5 x 4.7 in.) Paper Cassette Name Ink Cassette Name*4 Credit card size*2 (54 x 86 mm) (2.1 x 3.4 in.) Postcard size (100... components in the table below . Let's Prepare „ Preparing Your Ink Cassette/Paper Sets and Paper Cassette Prepare the paper and ink/paper cassettes to match the size of paper and paper/ink cassettes. Please check the sets and the names of sheets that can be damaged...
... (sold separately) is not correct, you are printing. If something seems to be missing or appears to be printed. Paper Cassette Name Ink Cassette Name Paper Size L size*1 (89 x 119 mm) (3.5 x 4.7 in.) Paper Cassette Name Ink Cassette Name*4 Credit card size*2 (54 x 86 mm) (2.1 x 3.4 in.) Postcard size (100... components in the table below . Let's Prepare „ Preparing Your Ink Cassette/Paper Sets and Paper Cassette Prepare the paper and ink/paper cassettes to match the size of paper and paper/ink cassettes. Please check the sets and the names of sheets that can be damaged...

SELPHY CP710/CP510 User Guide
Page 29
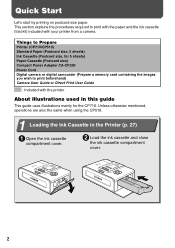
„ Loading the Ink Cassette Proper Handling of the paper if you are ready to the printer. 27 It will not be possible to print to all of Ink Cassettes "Ink Cassettes" (p. 15) 1 Take up .... z When you overwind the ink sheet. z Push the cassette all the way into place. Be careful to take up 3 Close the ink cassette compartment cover. CP710: Viewing the LCD monitor display (p. 35) CP510: Viewing the display window on the sprocket and turn gently. 2 Open the ink cassette compartment cover, and insert...
„ Loading the Ink Cassette Proper Handling of the paper if you are ready to the printer. 27 It will not be possible to print to all of Ink Cassettes "Ink Cassettes" (p. 15) 1 Take up .... z When you overwind the ink sheet. z Push the cassette all the way into place. Be careful to take up 3 Close the ink cassette compartment cover. CP710: Viewing the LCD monitor display (p. 35) CP510: Viewing the display window on the sprocket and turn gently. 2 Open the ink cassette compartment cover, and insert...

SELPHY CP710/CP510 User Guide
Page 30
.... Top cover Middle cover 2 Fan the paper stack properly and Paper place the paper into the Paper Cassette Do not insert more than 18 sheets in the direction of Paper "Paper" (p. 16) Please use specified paper types only. 1 Open the paper cassette's top cover and middle cover. „ Loading the Paper into the paper (Glossy side up) cassette, with the...
.... Top cover Middle cover 2 Fan the paper stack properly and Paper place the paper into the Paper Cassette Do not insert more than 18 sheets in the direction of Paper "Paper" (p. 16) Please use specified paper types only. 1 Open the paper cassette's top cover and middle cover. „ Loading the Paper into the paper (Glossy side up) cassette, with the...


