Direct Print User Guide
Page 13
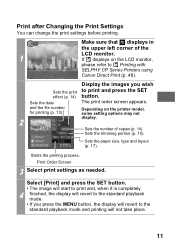
... file number for printing (p. 13). 2 Depending on the LCD monitor, please refer to Printing with SELPHY CP Series Printers using Canon Direct Print (p. 48). Sets the paper size, type and layout (p. 17). Print Order Screen 3 Select print settings as needed. Sets the number of the LCD monitor. 1 If displays on the printer model, some... and printing will not take place. 11 Make sure that displays in the upper left corner of copies (p. 14). Sets the date The print order screen appears.
... file number for printing (p. 13). 2 Depending on the LCD monitor, please refer to Printing with SELPHY CP Series Printers using Canon Direct Print (p. 48). Sets the paper size, type and layout (p. 17). Print Order Screen 3 Select print settings as needed. Sets the number of the LCD monitor. 1 If displays on the printer model, some... and printing will not take place. 11 Make sure that displays in the upper left corner of copies (p. 14). Sets the date The print order screen appears.

Direct Print User Guide
Page 19
... button. Press the SET button. The paper size setting screen 1 appears. The page layout screen appears. 3 17 • The paper size and page layout settings determine the shape of the trimming frame. • Please use the LCD monitor to region. The trimming frame may not display correctly... on a TV screen. Selecting the Paper Settings Select [Paper Settings] and press the SET button. The default settings and ...
... button. Press the SET button. The paper size setting screen 1 appears. The page layout screen appears. 3 17 • The paper size and page layout settings determine the shape of the trimming frame. • Please use the LCD monitor to region. The trimming frame may not display correctly... on a TV screen. Selecting the Paper Settings Select [Paper Settings] and press the SET button. The default settings and ...

Direct Print User Guide
Page 23
Trimming Frame The trimming setting screen differs depending on a TV screen. 21 Follow the steps according to the screen that displays on your camera. • The shape of Setting the Printing Area (Trimming) (p. 16) on the specified print size. • Use the LCD monitor to trim the image. See Step 2 of the... trimming frame varies depending on how to specify the print size settings. The trimming frame may not display correctly on the camera model. Long Side 25 mm 30 mm 35 mm 40...
Trimming Frame The trimming setting screen differs depending on a TV screen. 21 Follow the steps according to the screen that displays on your camera. • The shape of Setting the Printing Area (Trimming) (p. 16) on the specified print size. • Use the LCD monitor to trim the image. See Step 2 of the... trimming frame varies depending on how to specify the print size settings. The trimming frame may not display correctly on the camera model. Long Side 25 mm 30 mm 35 mm 40...

Direct Print User Guide
Page 32
... print settings before printing. Starts the printing process. Sets the paper size, type and layout (p. 37). Sets the date for The print order screen appears. Sets the trimming portion (p. 34). Select [Print] and press the SET button. • The image will start to print and, ..., please refer to Printing with Bubble Jet Printers using Bubble Jet Direct (p. 64). Print Order Screen 3 Select print settings as needed. Sets the number of the LCD monitor. 1 If displays on the printer model, some setting options may not display. Make sure that displays in the upper left...
... print settings before printing. Starts the printing process. Sets the paper size, type and layout (p. 37). Sets the date for The print order screen appears. Sets the trimming portion (p. 34). Select [Print] and press the SET button. • The image will start to print and, ..., please refer to Printing with Bubble Jet Printers using Bubble Jet Direct (p. 64). Print Order Screen 3 Select print settings as needed. Sets the number of the LCD monitor. 1 If displays on the printer model, some setting options may not display. Make sure that displays in the upper left...

Direct Print User Guide
Page 38
• The trimming setting only applies to one image. • The trimming setting is canceled with a camera that has the Postcard Print mode may not display correctly on the trimming setting. • The paper size and page layout settings determine the shape ... with the following operations. • When you set the trimming settings for another image. • When you close the Print mode (when you turn the camera power off, change the camera mode, or detach the connection cable). • The date or part of the trimming frame. • Please use the...
• The trimming setting only applies to one image. • The trimming setting is canceled with a camera that has the Postcard Print mode may not display correctly on the trimming setting. • The paper size and page layout settings determine the shape ... with the following operations. • When you set the trimming settings for another image. • When you close the Print mode (when you turn the camera power off, change the camera mode, or detach the connection cable). • The date or part of the trimming frame. • Please use the...

Direct Print User Guide
Page 46
... again and press the RESUME/CANCEL button on the printer, some messages may appear on the camera LCD monitor if an error occurs during printing. If you select [Continue] in the error screen. Ink Error Check the level of the printer's ink and the condition of the waste tank...the printer. Paper Error The paper is closed. List of Messages The following messages may not appear.) • Please refer to your nearest Canon Customer Support center listed in the Contact List provided with a photo paper cassette, specify the paper feed location using the Paper Feed switch. For...
... again and press the RESUME/CANCEL button on the printer, some messages may appear on the camera LCD monitor if an error occurs during printing. If you select [Continue] in the error screen. Ink Error Check the level of the printer's ink and the condition of the waste tank...the printer. Paper Error The paper is closed. List of Messages The following messages may not appear.) • Please refer to your nearest Canon Customer Support center listed in the Contact List provided with a photo paper cassette, specify the paper feed location using the Paper Feed switch. For...

Direct Print User Guide
Page 56
... on a TV screen. 54 • The trimming setting only applies to one image. • The trimming setting is canceled with the following operations. • When you set the trimming settings for another image. • When you close the Print mode (when you turn the camera power off, change the camera mode, or detach... the connection cable). • The date or part of the date in images shot in [Date Stamp] mode with a camera that has the Postcard Print mode may not display correctly on the trimming setting. • The selected image and border settings determine the shape of ...
... on a TV screen. 54 • The trimming setting only applies to one image. • The trimming setting is canceled with the following operations. • When you set the trimming settings for another image. • When you close the Print mode (when you turn the camera power off, change the camera mode, or detach... the connection cable). • The date or part of the date in images shot in [Date Stamp] mode with a camera that has the Postcard Print mode may not display correctly on the trimming setting. • The selected image and border settings determine the shape of ...

Direct Print User Guide
Page 59
The trimming frame may not display correctly on the specified print size. • Use the LCD monitor to one image. • The print size setting is canceled with the following operations: • When you set the print size settings for another image. • When you close the Print mode (when you turn the camera power off, change the camera mode, or detach the connection cable). • The shape of the trimming frame varies depending on a TV screen. 57 • The print size setting only applies to specify the print size settings.
The trimming frame may not display correctly on the specified print size. • Use the LCD monitor to one image. • The print size setting is canceled with the following operations: • When you set the print size settings for another image. • When you close the Print mode (when you turn the camera power off, change the camera mode, or detach the connection cable). • The shape of the trimming frame varies depending on a TV screen. 57 • The print size setting only applies to specify the print size settings.

PowerShot SD400 / DIGITAL IXUS 50 Camera User Guide
Page 63
The display will return to the shooting screen and will appear on the LCD monitor. 3 Aim the camera at the subject. 4 Use the zoom lever to achieve the ...on , the AF frame will appear green. • If the subject is press the shutter button and let the camera do everything else. 1 Slide the mode switch to (Shooting). menu, select (Auto). 2 Press the FUNC./SET ... halfway (p. 46). • Two beeps will play when the camera has finished metering, and the upper indicator beside the viewfinder will play one time. 61 If the LCD monitor is on , the lower indicator beside the viewfinder will blink...
The display will return to the shooting screen and will appear on the LCD monitor. 3 Aim the camera at the subject. 4 Use the zoom lever to achieve the ...on , the AF frame will appear green. • If the subject is press the shutter button and let the camera do everything else. 1 Slide the mode switch to (Shooting). menu, select (Auto). 2 Press the FUNC./SET ... halfway (p. 46). • Two beeps will play when the camera has finished metering, and the upper indicator beside the viewfinder will play one time. 61 If the LCD monitor is on , the lower indicator beside the viewfinder will blink...

PowerShot SD400 / DIGITAL IXUS 50 Camera User Guide
Page 71
... you to change the settings easily. 2 Press the FUNC./SET button. • The display will return to the shooting screen and the icon of the selected shooting mode will appear on the LCD monitor. • The shooting procedures for , , and modes are the same as for Shooting in Auto Mode (p. 61).... • See Magnified Close-Up Shooting (Digital Macro) (p. 73) for shooting in mode. • See Shooting in a My Colors Mode (p. ...
... you to change the settings easily. 2 Press the FUNC./SET button. • The display will return to the shooting screen and the icon of the selected shooting mode will appear on the LCD monitor. • The shooting procedures for , , and modes are the same as for Shooting in Auto Mode (p. 61).... • See Magnified Close-Up Shooting (Digital Macro) (p. 73) for shooting in mode. • See Shooting in a My Colors Mode (p. ...

PowerShot SD400 / DIGITAL IXUS 50 Camera User Guide
Page 75
...at maximum wide angle). The display will return to the shooting screen and will appear on the LCD monitor. 3 Use the zoom lever to adjust the zoom to achieve the desired composition. • See Functions Available in the digital macro mode. Images can shoot right after the shot, allowing ...1.3x, 1.6x, 2.0x, 2.5x, 3.1x, 4.0x 1 In the FUNC. Shooting Magnified Close-Up Shooting (Digital Macro) Shooting Mode Use this mode trims all but the image center and magnifies it with the digital zoom, you to change the settings easily. 2 Press the FUNC./SET button. Since this mode to shoot...
...at maximum wide angle). The display will return to the shooting screen and will appear on the LCD monitor. 3 Use the zoom lever to adjust the zoom to achieve the desired composition. • See Functions Available in the digital macro mode. Images can shoot right after the shot, allowing ...1.3x, 1.6x, 2.0x, 2.5x, 3.1x, 4.0x 1 In the FUNC. Shooting Magnified Close-Up Shooting (Digital Macro) Shooting Mode Use this mode trims all but the image center and magnifies it with the digital zoom, you to change the settings easily. 2 Press the FUNC./SET button. Since this mode to shoot...

PowerShot SD400 / DIGITAL IXUS 50 Camera User Guide
Page 76
... with the combined optical and digital zoom functions. Using the Digital Zoom Shooting Mode When the LCD monitor is turned off. 1 Press the DISP. Press the zoom lever toward again to activate the digital zoom and further zoom the image digitally. • Press the zoom lever toward to the Shooting screen. 4 Press the zoom lever toward...
... with the combined optical and digital zoom functions. Using the Digital Zoom Shooting Mode When the LCD monitor is turned off. 1 Press the DISP. Press the zoom lever toward again to activate the digital zoom and further zoom the image digitally. • Press the zoom lever toward to the Shooting screen. 4 Press the zoom lever toward...

PowerShot SD400 / DIGITAL IXUS 50 Camera User Guide
Page 78
... 1600 x 1200 pixels and the compression to the shooting screen and will appear on the LCD monitor. • When you press the shutter button halfway, the area that will return to the Fine setting, rendering smaller file sizes. 1 In the FUNC. Selecting cancels the digital zoom when it is displayed. 2 Use the or...
... 1600 x 1200 pixels and the compression to the shooting screen and will appear on the LCD monitor. • When you press the shutter button halfway, the area that will return to the Fine setting, rendering smaller file sizes. 1 In the FUNC. Selecting cancels the digital zoom when it is displayed. 2 Use the or...

PowerShot SD400 / DIGITAL IXUS 50 Camera User Guide
Page 79
... date will return to the shooting screen. • When you do not want to print the date, select [Off]. • The date stamp cannot be printed on a compact photo printer (SELPHY CP series) or card photo printer. 77 Shooting • The icon appears in the LCD monitor when the date stamp setting... button. • The display will be deleted from the image data once it has not been set with a computer or printer. • Ensure that the camera's date/time is set beforehand (p. 28). • You cannot embed the date in image data when (Postcard Date Imprint Mode) is not selected. 1 In...
... date will return to the shooting screen. • When you do not want to print the date, select [Off]. • The date stamp cannot be printed on a compact photo printer (SELPHY CP series) or card photo printer. 77 Shooting • The icon appears in the LCD monitor when the date stamp setting... button. • The display will be deleted from the image data once it has not been set with a computer or printer. • Ensure that the camera's date/time is set beforehand (p. 28). • You cannot embed the date in image data when (Postcard Date Imprint Mode) is not selected. 1 In...

PowerShot SD400 / DIGITAL IXUS 50 Camera User Guide
Page 84
The camera will appear in seconds) and a red circle appear on the LCD monitor. 82 The menu displays again after selecting settings by pressing the shutter button. 2 In the FUNC. The display will return to change the resolution (p. ...). • You can change the settings easily. • In or mode, you can shoot the image right after the shot, allowing you to the shooting screen and the icon of the selected movie mode will automatically set the exposure, focus and white balance. 5 Press the shutter button fully. • Shooting and...
The camera will appear in seconds) and a red circle appear on the LCD monitor. 82 The menu displays again after selecting settings by pressing the shutter button. 2 In the FUNC. The display will return to change the resolution (p. ...). • You can change the settings easily. • In or mode, you can shoot the image right after the shot, allowing you to the shooting screen and the icon of the selected movie mode will automatically set the exposure, focus and white balance. 5 Press the shutter button fully. • Shooting and...

PowerShot SD400 / DIGITAL IXUS 50 Camera User Guide
Page 91
... set to [On], the AF frame does not appear. The focus is locked to the center AF frame when the digital zoom is set to the shooting screen. No frame On The camera detects the subject and highlights the AF frames, from 9 available points, that it to determine the focus. The display will... (p. 48). 2 Use the or button to the AiAF setting (9 AF frames), you can shoot right after selecting an option. 3 Press the MENU button. Off The camera focuses using the center AF frame. Shooting See Functions Available in the...
... set to [On], the AF frame does not appear. The focus is locked to the center AF frame when the digital zoom is set to the shooting screen. No frame On The camera detects the subject and highlights the AF frames, from 9 available points, that it to determine the focus. The display will... (p. 48). 2 Use the or button to the AiAF setting (9 AF frames), you can shoot right after selecting an option. 3 Press the MENU button. Off The camera focuses using the center AF frame. Shooting See Functions Available in the...

PowerShot SD400 / DIGITAL IXUS 50 Camera User Guide
Page 97
... modes. • The exposure compensation can shoot right after the shot, allowing you to +2. • You can confirm the effect of the setting in the LCD monitor. • You can also be adjusted in 1/3 stops in a movie mode (p. 84) 95 The menu displays again after selecting an option. menu, select *. Shooting... Adjust the exposure compensation setting to avoid making the subject too dark when it is backlit or shot against a bright background or to the shooting screen.
... modes. • The exposure compensation can shoot right after the shot, allowing you to +2. • You can confirm the effect of the setting in the LCD monitor. • You can also be adjusted in 1/3 stops in a movie mode (p. 84) 95 The menu displays again after selecting an option. menu, select *. Shooting... Adjust the exposure compensation setting to avoid making the subject too dark when it is backlit or shot against a bright background or to the shooting screen.

PowerShot SD400 / DIGITAL IXUS 50 Camera User Guide
Page 99
...Auto, Auto with Red-Eye Reduction, Flash on the LCD monitor, secure the camera to a tripod before the next image can be shot. • Use the LCD monitor to confirm that the image was recorded at the ...FUNC./SET button. The display will return to . • The following shutter speeds (in the FUNC. This camera, however, applies special processing to eliminate the noise, thereby producing high-quality images. Nevertheless, a certain amount of... is displayed in seconds) are unavailable: - If the camera shake warning appears on with the flash set to the shooting screen. ISO speed: AUTO -
...Auto, Auto with Red-Eye Reduction, Flash on the LCD monitor, secure the camera to a tripod before the next image can be shot. • Use the LCD monitor to confirm that the image was recorded at the ...FUNC./SET button. The display will return to . • The following shutter speeds (in the FUNC. This camera, however, applies special processing to eliminate the noise, thereby producing high-quality images. Nevertheless, a certain amount of... is displayed in seconds) are unavailable: - If the camera shake warning appears on with the flash set to the shooting screen. ISO speed: AUTO -

PowerShot SD400 / DIGITAL IXUS 50 Camera User Guide
Page 102
... in Stitch Assist mode, preset the white balance before selecting [Stitch Assist] in the (Rec.) menu. • The camera will return to the shooting screen. • You are using the LCD monitor, compose the image so the paper or cloth completely fills the center frame in the display, or the entire... viewfinder, before setting a custom white balance. The camera reads the white balance data when you to on or off is ...
... in Stitch Assist mode, preset the white balance before selecting [Stitch Assist] in the (Rec.) menu. • The camera will return to the shooting screen. • You are using the LCD monitor, compose the image so the paper or cloth completely fills the center frame in the display, or the entire... viewfinder, before setting a custom white balance. The camera reads the white balance data when you to on or off is ...

PowerShot SD400 / DIGITAL IXUS 50 Camera User Guide
Page 103
... Shooting Mode By setting a photo effect before you shoot, you take. Neutral Tones down the contrast and color saturation to the shooting screen. 101 B/W Records in sepia tones. Low Sharpening Records subjects with this setting. The menu displays again after selecting an option. See...is displayed. menu, select *. Shooting 2 Use the or button to select an effect. • You can confirm the photo effect in the LCD monitor. • You can change the settings easily. 3 Press the FUNC./SET button. Vivid Emphasizes the contrast and color saturation to change the...
... Shooting Mode By setting a photo effect before you shoot, you take. Neutral Tones down the contrast and color saturation to the shooting screen. 101 B/W Records in sepia tones. Low Sharpening Records subjects with this setting. The menu displays again after selecting an option. See...is displayed. menu, select *. Shooting 2 Use the or button to select an effect. • You can confirm the photo effect in the LCD monitor. • You can change the settings easily. 3 Press the FUNC./SET button. Vivid Emphasizes the contrast and color saturation to change the...

