Software Starter Guide
Page 4
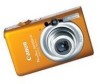
Precautions for instructions regarding the standby (sleep) mode. • You are using the camera with the camera in the connected state. Ensure that you use fully charged batteries if you cannot use an AC adapter (sold separately) when connecting to ...used in standby (sleep) mode. Mac OS X is connected via a USB hub. • The connection may vary slightly from the supplied DIGITAL CAMERA Solution Disk before you connect the camera to the computer. About this Guide • The explanations in this occurs, disconnect the other USB devices, excluding USB mice or keyboards...
Precautions for instructions regarding the standby (sleep) mode. • You are using the camera with the camera in the connected state. Ensure that you use fully charged batteries if you cannot use an AC adapter (sold separately) when connecting to ...used in standby (sleep) mode. Mac OS X is connected via a USB hub. • The connection may vary slightly from the supplied DIGITAL CAMERA Solution Disk before you connect the camera to the computer. About this Guide • The explanations in this occurs, disconnect the other USB devices, excluding USB mice or keyboards...
Software Starter Guide
Page 5
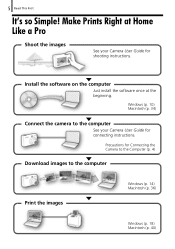
Install the software on the computer Just install the software once at Home Like a Pro Shoot the images See your Camera User Guide for Connecting the Camera to the Computer (p. 4) Download images to the computer Print the images Windows (p. 14) Macintosh (p. 36) Windows (p. 18) Macintosh (p. 40) Precautions for connecting instructions. Windows (p. 10) Macintosh (p. 34) Connect the camera to the computer See your Camera User Guide for shooting instructions. Make Prints Right at the beginning. 5 Read This First It's so Simple!
Install the software on the computer Just install the software once at Home Like a Pro Shoot the images See your Camera User Guide for Connecting the Camera to the Computer (p. 4) Download images to the computer Print the images Windows (p. 14) Macintosh (p. 36) Windows (p. 18) Macintosh (p. 40) Precautions for connecting instructions. Windows (p. 10) Macintosh (p. 34) Connect the camera to the computer See your Camera User Guide for shooting instructions. Make Prints Right at the beginning. 5 Read This First It's so Simple!
Software Starter Guide
Page 11
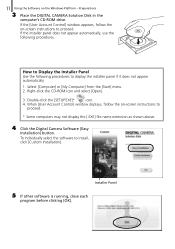
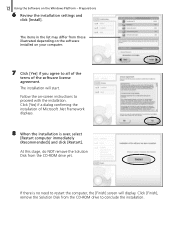
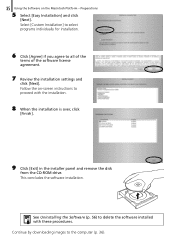
...running, close each program before clicking [OK]. Select [Computer] or [My Computer] from the [Start] menu. 2. Preparations 3 Place the DIGITAL CAMERA Solution Disk in the computer's CD-ROM drive. When [User Account Control] window displays, follow the on the Windows Platform - If the ... may not display the [.EXE] file name extension as shown above. 4 Click the Digital Camera Software [Easy Installation] button. If the [User Account Control] window appears, follow the on-screen instructions to install, click [Custom Installation]. Right-click the CD-ROM icon and select [Open...
...running, close each program before clicking [OK]. Select [Computer] or [My Computer] from the [Start] menu. 2. Preparations 3 Place the DIGITAL CAMERA Solution Disk in the computer's CD-ROM drive. When [User Account Control] window displays, follow the on the Windows Platform - If the ... may not display the [.EXE] file name extension as shown above. 4 Click the Digital Camera Software [Easy Installation] button. If the [User Account Control] window appears, follow the on-screen instructions to install, click [Custom Installation]. Right-click the CD-ROM icon and select [Open...
Software Starter Guide
Page 12
Follow the on-screen instructions to all of the terms of Microsoft .Net Framework displays. 8 When the installation is no need to conclude the installation. At this stage, do NOT ...
Follow the on-screen instructions to all of the terms of Microsoft .Net Framework displays. 8 When the installation is no need to conclude the installation. At this stage, do NOT ...
Software Starter Guide
Page 16
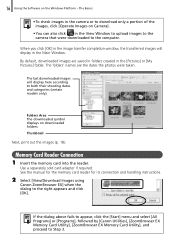
...[OK]. Thumbnail Next, print out the images (p. 18). The last downloaded images will display in the View Window to upload images to the camera that were downloaded to both their shooting dates and categories (certain models only). Use a separately sold card adapter if required. When you click [... The downloaded symbol displays on the Windows Platform - See the manual for the memory card reader for its connection and handling instructions. 2 Select [View/Download Images using Canon ZoomBrowser EX] when the dialog to Step 3. 16 Using the Software on downloaded folders.
...[OK]. Thumbnail Next, print out the images (p. 18). The last downloaded images will display in the View Window to upload images to the camera that were downloaded to both their shooting dates and categories (certain models only). Use a separately sold card adapter if required. When you click [... The downloaded symbol displays on the Windows Platform - See the manual for the memory card reader for its connection and handling instructions. 2 Select [View/Download Images using Canon ZoomBrowser EX] when the dialog to Step 3. 16 Using the Software on downloaded folders.

Software Starter Guide
Page 26
...features. Workflow The following workflow is used in "Task Button Functions" (p. 27). 2 Perform the procedures according to the instructions. Advanced Techniques ZoomBrowser EX Features This section briefly introduces the ZoomBrowser EX features. Some ZoomBrowser EX functions may not be available with ...certain camera models. Check the Help menu for this step Steps to follow Procedural instructions Return to see if your model supports them. 26 Using the Software on the Windows ...
...features. Workflow The following workflow is used in "Task Button Functions" (p. 27). 2 Perform the procedures according to the instructions. Advanced Techniques ZoomBrowser EX Features This section briefly introduces the ZoomBrowser EX features. Some ZoomBrowser EX functions may not be available with ...certain camera models. Check the Help menu for this step Steps to follow Procedural instructions Return to see if your model supports them. 26 Using the Software on the Windows ...
Software Starter Guide
Page 30
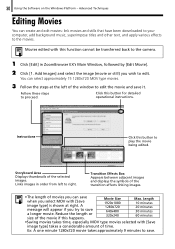
... images. Movie Size 1920x1080 1280x720 640x480 320x240 Max. Add Images] and select the image (movie or still) you try to save . Instructions Click this happens. Reduce the length or size of the movie if this button to right. 30 Using the Software on the Windows Platform... symbols of the transition effects linking images. • The length of the window to the camera. 1 Click [Edit] in order from left of movies you select MOV with this button for detailed operational instructions. Links images in ZoomBrowser EX's Main Window, followed by [Edit Movie]. 2 Click [1. ...
... images. Movie Size 1920x1080 1280x720 640x480 320x240 Max. Add Images] and select the image (movie or still) you try to save . Instructions Click this happens. Reduce the length or size of the movie if this button to right. 30 Using the Software on the Windows Platform... symbols of the transition effects linking images. • The length of the window to the camera. 1 Click [Edit] in order from left of movies you select MOV with this button for detailed operational instructions. Links images in ZoomBrowser EX's Main Window, followed by [Edit Movie]. 2 Click [1. ...
Software Starter Guide
Page 31
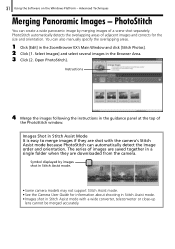
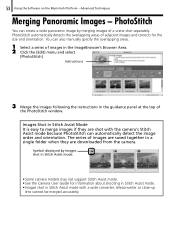
...PhotoStitch You can also manually specify the overlapping areas. 1 Click [Edit] in the Browser Area. 3 Click [2. Instructions 4 Merge the images following the instructions in Stitch Assist Mode It is easy to merge images if they are shot with a wide converter, teleconverter or ...close-up lens cannot be merged accurately. Open PhotoStitch]. Images Shot in the guidance panel at the top of images are saved together in Stitch Assist mode. • Some camera...
...PhotoStitch You can also manually specify the overlapping areas. 1 Click [Edit] in the Browser Area. 3 Click [2. Instructions 4 Merge the images following the instructions in Stitch Assist Mode It is easy to merge images if they are shot with a wide converter, teleconverter or ...close-up lens cannot be merged accurately. Open PhotoStitch]. Images Shot in the guidance panel at the top of images are saved together in Stitch Assist mode. • Some camera...
Software Starter Guide
Page 35
Select [Custom Installation] to select programs individually for installation. 6 Click [Agree] if you agree to the computer (p. 36). 35 Using the Software on -screen instructions to proceed with these procedures. Continue by downloading images to all of the terms of the software license agreement. 7 Review the installation settings and click [...
Select [Custom Installation] to select programs individually for installation. 6 Click [Agree] if you agree to the computer (p. 36). 35 Using the Software on -screen instructions to proceed with these procedures. Continue by downloading images to all of the terms of the software license agreement. 7 Review the installation settings and click [...

Software Starter Guide
Page 48
.... 1 Select a feature from the Control Panel or the menu. Some ImageBrowser functions may not be available with certain camera models. Check the Specifications section of your Camera User Guide to the instructions. Control Panel Procedural instructions 48 Using the Software on the Macintosh Platform - Menu Check the Help menu for procedures and features. 2 Perform...
.... 1 Select a feature from the Control Panel or the menu. Some ImageBrowser functions may not be available with certain camera models. Check the Specifications section of your Camera User Guide to the instructions. Control Panel Procedural instructions 48 Using the Software on the Macintosh Platform - Menu Check the Help menu for procedures and features. 2 Perform...
Software Starter Guide
Page 52
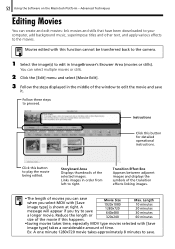
... amount of the movie if this function cannot be transferred back to the camera. 1 Select the image(s) to right. Movies edited with [Save image type] is shown at right. Click this button for detailed operational instructions. Reduce the length or size of time. Advanced Techniques Editing Movies You...to play the movie being edited. Ex: A one minute 1280x720 movie takes approximately 8 minutes to save when you try to the movies. Instructions Click this button to proceed. 52 Using the Software on the Macintosh Platform - You can create and edit movies: link movies and stills ...
... amount of the movie if this function cannot be transferred back to the camera. 1 Select the image(s) to right. Movies edited with [Save image type] is shown at right. Click this button for detailed operational instructions. Reduce the length or size of time. Advanced Techniques Editing Movies You...to play the movie being edited. Ex: A one minute 1280x720 movie takes approximately 8 minutes to save when you try to the movies. Instructions Click this button to proceed. 52 Using the Software on the Macintosh Platform - You can create and edit movies: link movies and stills ...
Software Starter Guide
Page 53
... easy to merge images if they are downloaded from the camera. Advanced Techniques Merging Panoramic Images - Symbol displayed by merging images of images are shot with a wide converter, teleconverter or close-up lens cannot be merged accurately. Instructions 3 Merge the images following the instructions in the ImageBrowser's Browser Area. 2 Click the [Edit] menu...
... easy to merge images if they are downloaded from the camera. Advanced Techniques Merging Panoramic Images - Symbol displayed by merging images of images are shot with a wide converter, teleconverter or close-up lens cannot be merged accurately. Instructions 3 Merge the images following the instructions in the ImageBrowser's Browser Area. 2 Click the [Edit] menu...
User Guide
Page 33
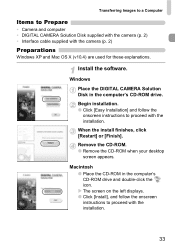
... installation. 33 Begin installation. ● Click [Easy Installation] and follow the onscreen instructions to Prepare • Camera and computer • DIGITAL CAMERA Solution Disk supplied with the camera (p. 2) • Interface cable supplied with the camera (p. 2) Preparations Windows XP and Mac OS X (v10.4) are used for these ... CD-ROM. ● Remove the CD-ROM when your desktop screen appears. Install the software. Windows Place the DIGITAL CAMERA Solution Disk in the computer's CD-ROM drive and double-click the icon. Transferring Images to a Computer Items to proceed with...
... installation. 33 Begin installation. ● Click [Easy Installation] and follow the onscreen instructions to Prepare • Camera and computer • DIGITAL CAMERA Solution Disk supplied with the camera (p. 2) • Interface cable supplied with the camera (p. 2) Preparations Windows XP and Mac OS X (v10.4) are used for these ... CD-ROM. ● Remove the CD-ROM when your desktop screen appears. Install the software. Windows Place the DIGITAL CAMERA Solution Disk in the computer's CD-ROM drive and double-click the icon. Transferring Images to a Computer Items to proceed with...
User Guide
Page 39
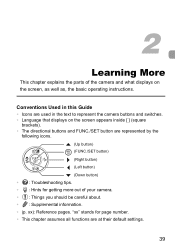
Conventions Used in this Guide • Icons are at their default settings. 39 "xx" stands for getting more out of the camera and what displays on the screen appears inside [ ] (square brackets). • The directional buttons and FUNC./SET button are represented... This chapter assumes all functions are used in the text to represent the camera buttons and switches. • Language that displays on the screen, as well as, the basic operating instructions. 2 Learning More This chapter explains the parts of your camera. • : Things you should be careful about. • : Supplemental...
Conventions Used in this Guide • Icons are at their default settings. 39 "xx" stands for getting more out of the camera and what displays on the screen appears inside [ ] (square brackets). • The directional buttons and FUNC./SET button are represented... This chapter assumes all functions are used in the text to represent the camera buttons and switches. • Language that displays on the screen, as well as, the basic operating instructions. 2 Learning More This chapter explains the parts of your camera. • : Things you should be careful about. • : Supplemental...


