Software Starter Guide
Page 4
... Guide for procedures connecting the camera to the computer. If you are using the camera with the camera in this guide are using other devices from the supplied DIGITAL CAMERA Solution Disk before you cannot use fully charged batteries if you connect the camera to the computer. • Depending on the DIGITAL CAMERA Solution Disk. 4 Read This First This...
... Guide for procedures connecting the camera to the computer. If you are using the camera with the camera in this guide are using other devices from the supplied DIGITAL CAMERA Solution Disk before you cannot use fully charged batteries if you connect the camera to the computer. • Depending on the DIGITAL CAMERA Solution Disk. 4 Read This First This...
Software Starter Guide
Page 58
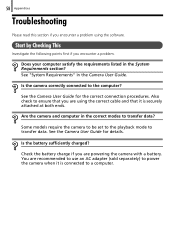
... to use an AC adapter (sold separately) to power the camera when it is connected to a computer. See the Camera User Guide for details. See the Camera User Guide for the correct connection procedures. Is the battery sufficiently charged? Some models require the camera to be set to the playback mode to the computer? Start...
... to use an AC adapter (sold separately) to power the camera when it is connected to a computer. See the Camera User Guide for details. See the Camera User Guide for the correct connection procedures. Is the battery sufficiently charged? Some models require the camera to be set to the playback mode to the computer? Start...
User Guide
Page 2
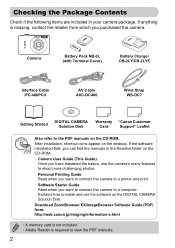
... included. • Adobe Reader is required to view the PDF manuals. 2 Camera Battery Pack NB-6L (with Terminal Cover) Battery Charger CB-2LY/CB-2LYE Interface Cable IFC-400PCU AV Cable AVC-DC400 Wrist Strap WS-DC7 Getting Started DIGITAL CAMERA Solution Disk Warranty "Canon Customer Card Support" Leaflet Also refer to a computer. Explains how to...
... included. • Adobe Reader is required to view the PDF manuals. 2 Camera Battery Pack NB-6L (with Terminal Cover) Battery Charger CB-2LY/CB-2LYE Interface Cable IFC-400PCU AV Cable AVC-DC400 Wrist Strap WS-DC7 Getting Started DIGITAL CAMERA Solution Disk Warranty "Canon Customer Card Support" Leaflet Also refer to a computer. Explains how to...

User Guide
Page 6
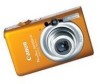
...Package Contents .......2 Read This First 3 What Do You Want to Do 4 Safety Precautions 8 1 Getting Started 11 Charging the Battery 12 Inserting the Battery and Memory Card 14 Setting the Date and Time 17 Setting the Display Language..........19 Formatting Memory Cards 20 Pressing the Shutter Button... n Menu - Table of Contents Chapters 1 - 3 explain the basic operations and frequently used functions of this camera. Turning the Flash Off 55 Zooming in More Closely on Subjects (Digital Zoom 56 Inserting the Date and Time 58 Ò Using the Self-Timer 59 " Using the Face Self-Timer...
...Package Contents .......2 Read This First 3 What Do You Want to Do 4 Safety Precautions 8 1 Getting Started 11 Charging the Battery 12 Inserting the Battery and Memory Card 14 Setting the Date and Time 17 Setting the Display Language..........19 Formatting Memory Cards 20 Pressing the Shutter Button... n Menu - Table of Contents Chapters 1 - 3 explain the basic operations and frequently used functions of this camera. Turning the Flash Off 55 Zooming in More Closely on Subjects (Digital Zoom 56 Inserting the Date and Time 58 Ò Using the Self-Timer 59 " Using the Face Self-Timer...
User Guide
Page 8
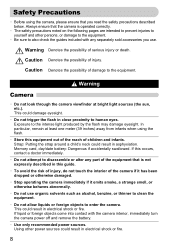
...the equipment. • Do not allow liquids or foreign objects to also check the guides included with the camera interior, immediately turn the camera power off and remove the battery. • Use only recommended power sources. This could result in asphyxiation. If liquid or foreign objects ... light sources (the sun, etc.). Using other persons, or damage to the equipment. • Be sure to enter the camera. Memory card, day/date battery: Dangerous if accidentally swallowed. Always ensure that is operated correctly. • The safety precautions noted on the following pages are ...
...the equipment. • Do not allow liquids or foreign objects to also check the guides included with the camera interior, immediately turn the camera power off and remove the battery. • Use only recommended power sources. This could result in asphyxiation. If liquid or foreign objects ... light sources (the sun, etc.). Using other persons, or damage to the equipment. • Be sure to enter the camera. Memory card, day/date battery: Dangerous if accidentally swallowed. Always ensure that is operated correctly. • The safety precautions noted on the following pages are ...
User Guide
Page 9
... cord with water and seek medical assistance. It is also possible to suffer hearing loss from the outlet and consult your camera distributor or the closest Canon Customer Support Help Desk. • Use only the specified battery charger to severe impacts. This could damage the speakers. Places subject to the surroundings. If the...
... cord with water and seek medical assistance. It is also possible to suffer hearing loss from the outlet and consult your camera distributor or the closest Canon Customer Support Help Desk. • Use only the specified battery charger to severe impacts. This could damage the speakers. Places subject to the surroundings. If the...

User Guide
Page 10
...Safety Precautions • Do not allow dust or sand to enter the camera. • Do not use the flash with tape or other insulators. Doing so may cause the camera to malfunction. • Unplug the battery charger from the power outlet after recharging is bitten, this occurs, it ...is left inside the camera, damage caused by leakage may cause malfunctions or damage the image sensor (CCD...
...Safety Precautions • Do not allow dust or sand to enter the camera. • Do not use the flash with tape or other insulators. Doing so may cause the camera to malfunction. • Unplug the battery charger from the power outlet after recharging is bitten, this occurs, it ...is left inside the camera, damage caused by leakage may cause malfunctions or damage the image sensor (CCD...

User Guide
Page 12
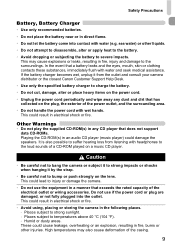
... charging has finished. Charging the Battery Use the included charger to charge the battery. Insert the battery. ● Align the S marks on the battery and charger, then insert the battery by sliding it in and up . Remove the battery. ● Unplug the battery charger from the power outlet, ...then remove the battery by sliding it in and down...
... charging has finished. Charging the Battery Use the included charger to charge the battery. Insert the battery. ● Align the S marks on the battery and charger, then insert the battery by sliding it in and up . Remove the battery. ● Unplug the battery charger from the power outlet, ...then remove the battery by sliding it in and down...
User Guide
Page 13
... the day before, it will no longer fit into the camera, please contact a Canon Customer Support Help Desk. • If the battery is a normal characteristic of its performance. • The battery charger can be taken. Attach the terminal cover and store the battery. Charging the Battery Approximate Number of Shots That Can Be Taken Number of...
... the day before, it will no longer fit into the camera, please contact a Canon Customer Support Help Desk. • If the battery is a normal characteristic of its performance. • The battery charger can be taken. Attach the terminal cover and store the battery. Charging the Battery Approximate Number of Shots That Can Be Taken Number of...
User Guide
Page 14
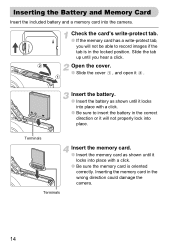
...open it will not be able to insert the battery in the correct direction or it . Insert the battery. ● Insert the battery as shown until it locks into place. Inserting the memory card in the wrong direction could damage the camera. 14 Slide the tab up until it locks... into the camera. Terminals Terminals Insert the memory card. ●...
...open it will not be able to insert the battery in the correct direction or it . Insert the battery. ● Insert the battery as shown until it locks into place. Inserting the memory card in the wrong direction could damage the camera. 14 Slide the tab up until it locks... into the camera. Terminals Terminals Insert the memory card. ●...
User Guide
Page 15
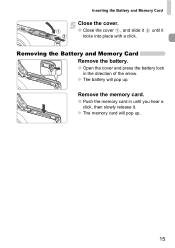
Inserting the Battery and Memory Card Close the cover. ● Close the cover , and slide it . until it Removing the Battery and Memory Card Remove the battery. ● Open the cover and press the battery lock in until you hear a click, then slowly release it locks into place with a click. Remove the memory card. ● Push the memory card in the direction of the arrow. X The memory card will pop up . 15 X The battery will pop up .
Inserting the Battery and Memory Card Close the cover. ● Close the cover , and slide it . until it Removing the Battery and Memory Card Remove the battery. ● Open the cover and press the battery lock in until you hear a click, then slowly release it locks into place with a click. Remove the memory card. ● Push the memory card in the direction of the arrow. X The memory card will pop up . 15 X The battery will pop up .
User Guide
Page 16
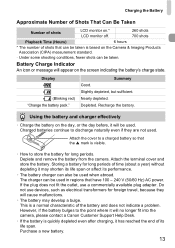
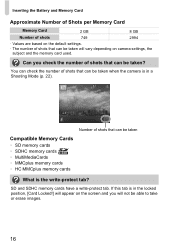
... or erase images. 16 SD and SDHC memory cards have a write-protect tab. Number of shots that can be taken when the camera is in a Shooting Mode (p. 22). Inserting the Battery and Memory Card Approximate Number of Shots per Memory Card Memory Card 2 GB 8 GB Number of shots 749 2994 • Values... can be taken will vary depending on the screen and you check the number of shots that can be taken? Can you will appear on camera settings, the subject and the memory card used.
... or erase images. 16 SD and SDHC memory cards have a write-protect tab. Number of shots that can be taken when the camera is in a Shooting Mode (p. 22). Inserting the Battery and Memory Card Approximate Number of Shots per Memory Card Memory Card 2 GB 8 GB Number of shots 749 2994 • Values... can be taken will vary depending on the screen and you check the number of shots that can be taken? Can you will appear on camera settings, the subject and the memory card used.
User Guide
Page 18
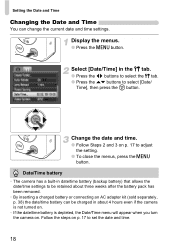
.../time settings to select [Date/ Time], then press the m button. Follow the steps on p. 17 to set the date and time. 18 Date/Time battery • The camera has a built-in the 3 tab. ● Press the qr buttons to select the 3 tab. ● Press the op buttons to be retained about 4 hours... even if the camera is not turned on. • If the date/time battery is depleted, the Date/Time menu will appear when you turn the camera on. Display the menus. ● Press the n button.
.../time settings to select [Date/ Time], then press the m button. Follow the steps on p. 17 to set the date and time. 18 Date/Time battery • The camera has a built-in the 3 tab. ● Press the qr buttons to select the 3 tab. ● Press the op buttons to be retained about 4 hours... even if the camera is not turned on. • If the date/time battery is depleted, the Date/Time menu will appear when you turn the camera on. Display the menus. ● Press the n button.
User Guide
Page 36
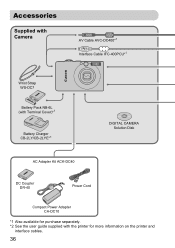
Accessories Supplied with Camera AV Cable AVC-DC400*1 Interface Cable IFC-400PCU*1 Wrist Strap WS-DC7 Battery Pack NB-6L (with Terminal Cover)*1 Battery Charger CB-2LY/CB-2LYE*1 DIGITAL CAMERA Solution Disk AC Adapter Kit ACK-DC40 DC Coupler DR-40 Power Cord Compact Power Adapter CA-DC10 *1 Also available for purchase separately. *2 See the user guide supplied with the printer for more information on the printer and interface cables. 36
Accessories Supplied with Camera AV Cable AVC-DC400*1 Interface Cable IFC-400PCU*1 Wrist Strap WS-DC7 Battery Pack NB-6L (with Terminal Cover)*1 Battery Charger CB-2LY/CB-2LYE*1 DIGITAL CAMERA Solution Disk AC Adapter Kit ACK-DC40 DC Coupler DR-40 Power Cord Compact Power Adapter CA-DC10 *1 Also available for purchase separately. *2 See the user guide supplied with the printer for more information on the printer and interface cables. 36

User Guide
Page 37
... (SELPHY series) Card Reader Waterproof Case WP-DC29 Inkjet Printers (PIXMA series)*2 Windows/ Macintosh High-Power HF-DC1 Use of non-genuine Canon accessories, although you may request such repairs on a chargeable basis. 37 Please note that this product and/or accidents such as fire,... etc., caused by the malfunction of non-genuine Canon accessories (e.g., a leakage and/or explosion of a battery pack). Canon shall not be liable for any damage to achieve excellent performance when used with genuine Canon accessories. This product is designed to this warranty does not apply...
... (SELPHY series) Card Reader Waterproof Case WP-DC29 Inkjet Printers (PIXMA series)*2 Windows/ Macintosh High-Power HF-DC1 Use of non-genuine Canon accessories, although you may request such repairs on a chargeable basis. 37 Please note that this product and/or accidents such as fire,... etc., caused by the malfunction of non-genuine Canon accessories (e.g., a leakage and/or explosion of a battery pack). Canon shall not be liable for any damage to achieve excellent performance when used with genuine Canon accessories. This product is designed to this warranty does not apply...
User Guide
Page 38
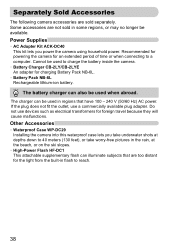
...lets you power the camera using household power. Some accessories are sold in some regions, or may no longer be available. Cannot be used when abroad. The charger can also be used in regions that are too distant for charging Battery Pack NB-6L. • Battery Pack NB-6L ...that have 100 - 240 V (50/60 Hz) AC power. Separately Sold Accessories The following camera accessories are not sold separately. The battery charger can be used to charge the battery inside the camera. • Battery Charger CB-2LY/CB-2LYE An adapter for the light from the built-in flash to a ...
...lets you power the camera using household power. Some accessories are sold in some regions, or may no longer be available. Cannot be used when abroad. The charger can also be used in regions that are too distant for charging Battery Pack NB-6L. • Battery Pack NB-6L ...that have 100 - 240 V (50/60 Hz) AC power. Separately Sold Accessories The following camera accessories are not sold separately. The battery charger can be used to charge the battery inside the camera. • Battery Charger CB-2LY/CB-2LYE An adapter for the light from the built-in flash to a ...

User Guide
Page 40
You can leave it to the camera to select settings (p. 22). For shooting movies (p. 29). 40 Components Guide Lamp (AF Assist Beam) (p. 24)/ Red-Eye Reduction Lamp (p. 111)/ Self-Timer Lamp (p. 59) ...)/ j (Wide Angle) (p. 22) Playback: k (Magnify) (p. 94)/ g (Index) (p. 90) Shutter Button (p. 21) Power Button (p. 22) Flash (p. 55) Tripod Socket DC Coupler Terminal Cover (p. 116) Memory Card/Battery Cover (p. 14) Strap Mount (p. 11) Mode Switch Use the mode switch to take various types of pictures (pp. 61, 75). You can shoot with the...
You can leave it to the camera to select settings (p. 22). For shooting movies (p. 29). 40 Components Guide Lamp (AF Assist Beam) (p. 24)/ Red-Eye Reduction Lamp (p. 111)/ Self-Timer Lamp (p. 59) ...)/ j (Wide Angle) (p. 22) Playback: k (Magnify) (p. 94)/ g (Index) (p. 90) Shutter Button (p. 21) Power Button (p. 22) Flash (p. 55) Tripod Socket DC Coupler Terminal Cover (p. 116) Memory Card/Battery Cover (p. 14) Strap Mount (p. 11) Mode Switch Use the mode switch to take various types of pictures (pp. 61, 75). You can shoot with the...
User Guide
Page 41
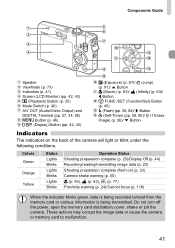
...camera...image data (p. 23) Shooting preparation complete (flash on the back of the camera will light or blink under the following conditions. Components Guide Speaker Viewfinder (p....Screen (LCD Monitor) (pp. 42, 43) 1 (Playback) Button (p. 25) Mode Switch (p. 40) A/V OUT (Audio/Video Output) and DIGITAL Terminal (pp. 27, 34, 95) n Button (p. 46) l (Display) Button (pp. 42, 43) b (Exposure) (p. 67)/...) (pp. 59, 60)/ a (1 Erase Image) (p. 26)/ p Button Indicators The indicators on ) (p. 23) Camera shake warning (p. 55) e (p. 63), u (p. 63), % (p. 77) Proximity warning (p. 24)/Cannot focus (p. 118...
...camera...image data (p. 23) Shooting preparation complete (flash on the back of the camera will light or blink under the following conditions. Components Guide Speaker Viewfinder (p....Screen (LCD Monitor) (pp. 42, 43) 1 (Playback) Button (p. 25) Mode Switch (p. 40) A/V OUT (Audio/Video Output) and DIGITAL Terminal (pp. 27, 34, 95) n Button (p. 46) l (Display) Button (pp. 42, 43) b (Exposure) (p. 67)/...) (pp. 59, 60)/ a (1 Erase Image) (p. 26)/ p Button Indicators The indicators on ) (p. 23) Camera shake warning (p. 55) e (p. 63), u (p. 63), % (p. 77) Proximity warning (p. 24)/Cannot focus (p. 118...
User Guide
Page 42
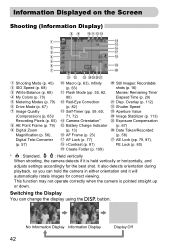
...) Image Quality (Compression) (p. 65)/ Recording Pixels (p. 65) AE Point Frame (p. 79) Digital Zoom Magnification (p. 56), Digital Tele-Converter (p. 57) Macro (p. 63), Infinity (p. 63) Flash Mode (pp. 55, 62, 80) Red-Eye Correction (p. 82) Self-Timer (pp. 59, 60, 71, 72) Camera Orientation* Battery Charge Indicator (p. 13) AF Frame (p. 23) AF Lock (p. 77) i-Contrast (p. 81...
...) Image Quality (Compression) (p. 65)/ Recording Pixels (p. 65) AE Point Frame (p. 79) Digital Zoom Magnification (p. 56), Digital Tele-Converter (p. 57) Macro (p. 63), Infinity (p. 63) Flash Mode (pp. 55, 62, 80) Red-Eye Correction (p. 82) Self-Timer (pp. 59, 60, 71, 72) Camera Orientation* Battery Charge Indicator (p. 13) AF Frame (p. 23) AF Lock (p. 77) i-Contrast (p. 81...
User Guide
Page 43
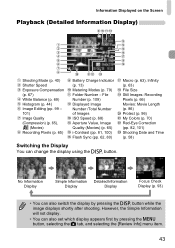
... Mode (p. 40) Shutter Speed Exposure Compensation (p. 67) White Balance (p. 69) Histogram (p. 44) Image Editing (pp. 99 - 101) Image Quality (Compression) (p. 65), (Movies) Recording Pixels (p. 65) Battery Charge Indicator (p. 13) Metering Modes (p. 79) Folder Number - No Information Display Simple Information Detailed Information Display Display Focus Check Display (p. 93) • You can change...
... Mode (p. 40) Shutter Speed Exposure Compensation (p. 67) White Balance (p. 69) Histogram (p. 44) Image Editing (pp. 99 - 101) Image Quality (Compression) (p. 65), (Movies) Recording Pixels (p. 65) Battery Charge Indicator (p. 13) Metering Modes (p. 79) Folder Number - No Information Display Simple Information Detailed Information Display Display Focus Check Display (p. 93) • You can change...


