User Guide
Page 3
... camera warranty is used-whether for still images or movies. This does not indicate damage. If covered, remove the film before contacting a Canon Customer Support Help Desk. ●● Although the LCD monitor is produced under default settings. ●● For convenience, all supported ...memory cards are indicated in rare cases some pixels may become warm. Numbers in this guide apply to make sure the images were recorded correctly. Before Use Basic Guide ...
... camera warranty is used-whether for still images or movies. This does not indicate damage. If covered, remove the film before contacting a Canon Customer Support Help Desk. ●● Although the LCD monitor is produced under default settings. ●● For convenience, all supported ...memory cards are indicated in rare cases some pixels may become warm. Numbers in this guide apply to make sure the images were recorded correctly. Before Use Basic Guide ...
User Guide
Page 20
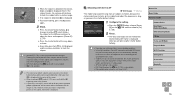
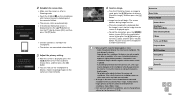
...-Fi Functions Setting Menu Accessories Appendix Index 20 Display Language Change the display language as described in "Setting the Date and Time" (= 19). In this case, press the [ ] button to an AC adapter kit (sold separately, =141), even if the camera is left off. ●● Once the date/time battery...
...-Fi Functions Setting Menu Accessories Appendix Index 20 Display Language Change the display language as described in "Setting the Date and Time" (= 19). In this case, press the [ ] button to an AC adapter kit (sold separately, =141), even if the camera is left off. ●● Once the date/time battery...
User Guide
Page 33
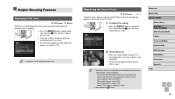
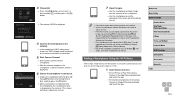
... approximately 4 GB, or the total recording time reaches approximately 16 minutes and 40 seconds. -- The camera beeps twice as separate movie files in the following cases even if they were recorded on , choosing [ ] mode, or operating the camera in other ways. ●● Sounds and vibrations from operating the camera will...
... approximately 4 GB, or the total recording time reaches approximately 16 minutes and 40 seconds. -- The camera beeps twice as separate movie files in the following cases even if they were recorded on , choosing [ ] mode, or operating the camera in other ways. ●● Sounds and vibrations from operating the camera will...
User Guide
Page 34
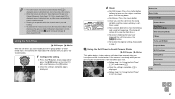
... significant camera shake. To shoot subjects at the same size shown before the shooting screen is displayed, your previous shot may sound unnatural when this case, mount the camera on a tripod or take other measures to keep it again. ●● The shutter sound will be recorded. ●● Once movie...
... significant camera shake. To shoot subjects at the same size shown before the shooting screen is displayed, your previous shot may sound unnatural when this case, mount the camera on a tripod or take other measures to keep it again. ●● The shutter sound will be recorded. ●● Once movie...
User Guide
Page 36
... brightness, and color are displayed. Children So you don't miss a photo opportunity of children who move around, the camera will not be played. In this case, an IS icon is not displayed. ●● In [ ] mode, no [ ] icon is displayed when you shoot a still image, the camera shoots continuously. Continuous Shooting...
... brightness, and color are displayed. Children So you don't miss a photo opportunity of children who move around, the camera will not be played. In this case, an IS icon is not displayed. ●● In [ ] mode, no [ ] icon is displayed when you shoot a still image, the camera shoots continuously. Continuous Shooting...
User Guide
Page 41
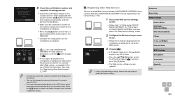
... the shutter button. timer sound. ●●Two seconds before the shot, the blinking and sound will speed up. (The lamp will remain lit in case the flash fires.) ●●To cancel shooting after you have triggered the self-timer, press the [ ] button. ●●To restore the original setting...
... the shutter button. timer sound. ●●Two seconds before the shot, the blinking and sound will speed up. (The lamp will remain lit in case the flash fires.) ●●To cancel shooting after you have triggered the self-timer, press the [ ] button. ●●To restore the original setting...
User Guide
Page 42
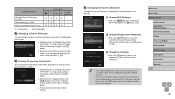
... Mode Other Shooting Modes P Mode Tv, Av, and M Mode Playback Mode Wi-Fi Functions Setting Menu Accessories Appendix Index 42 Shooting will remain lit in case the flash fires.) Continuous Shooting Still Images Movies In [ ] mode, hold the shutter button all the way down to shoot continuously. ●● During continuous...
... Mode Other Shooting Modes P Mode Tv, Av, and M Mode Playback Mode Wi-Fi Functions Setting Menu Accessories Appendix Index 42 Shooting will remain lit in case the flash fires.) Continuous Shooting Still Images Movies In [ ] mode, hold the shutter button all the way down to shoot continuously. ●● During continuous...
User Guide
Page 43
... Mode / Hybrid Auto Mode Other Shooting Modes P Mode Tv, Av, and M Mode Playback Mode Wi-Fi Functions Setting Menu Accessories Appendix Index 43 In this case, images are temporarily ungrouped. ●● The following actions are also erased. This function is displayed in advance also makes it to erase all information...
... Mode / Hybrid Auto Mode Other Shooting Modes P Mode Tv, Av, and M Mode Playback Mode Wi-Fi Functions Setting Menu Accessories Appendix Index 43 In this case, images are temporarily ungrouped. ●● The following actions are also erased. This function is displayed in advance also makes it to erase all information...
User Guide
Page 50
... now magnified. ●●To restore the original setting, choose [Off] in step 1. ●● The area in focus is not magnified in the following cases when the shutter button is complete, grid lines are not recorded in your shots. Magnifying the Area in Focus Still Images Movies Check the focus...
... now magnified. ●●To restore the original setting, choose [Off] in step 1. ●● The area in focus is not magnified in the following cases when the shutter button is complete, grid lines are not recorded in your shots. Magnifying the Area in Focus Still Images Movies Check the focus...
User Guide
Page 67
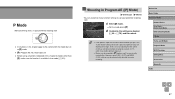
... may enable optimum exposure. ●● Movies can customize many function settings to suit your preferred shooting style ●● Instructions in orange. In this case, try adjusting the ISO speed (=69) or activating the flash (if subjects are dark, =77), which may be obtained when you press the shutter button...
... may enable optimum exposure. ●● Movies can customize many function settings to suit your preferred shooting style ●● Instructions in orange. In this case, try adjusting the ISO speed (=69) or activating the flash (if subjects are dark, =77), which may be obtained when you press the shutter button...
User Guide
Page 68
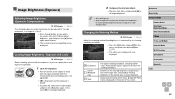
... the [ ] (Spot AE Point frame), displayed in the center of light across the entire image area, calculated by turning the [ ] dial (Program Shift). In this case, [ ] is no longer displayed. 2 Compose the shot and shoot. ●●After one shot, AE is unlocked and [ ] is no longer displayed. ●● AE...
... the [ ] (Spot AE Point frame), displayed in the center of light across the entire image area, calculated by turning the [ ] dial (Program Shift). In this case, [ ] is no longer displayed. 2 Compose the shot and shoot. ●●After one shot, AE is unlocked and [ ] is no longer displayed. ●● AE...
User Guide
Page 75
... your shot, [ ] is displayed in the center of the background too closely. ●● [AF-Point Zoom] on the [ ] tab (=28) is displayed. In this case, the focus and exposure are too small or move too rapidly, or when subject color or brightness matches that of the screen. ●● When...
... your shot, [ ] is displayed in the center of the background too closely. ●● [AF-Point Zoom] on the [ ] tab (=28) is displayed. In this case, the focus and exposure are too small or move too rapidly, or when subject color or brightness matches that of the screen. ●● When...
User Guide
Page 79
... the camera on a memory card, see "Number of shooting. ●●Follow steps 1 - 2 in the menu, and choose the desired option (= 27). In this case, set [IS Mode] to [Off]. ●● The setting is active only at each compression ratio can lock the exposure for movie recording. 79 In... this case, [ ] is no longer displayed. 3 Compose the shot and shoot. ●●After one shot, FE is unlocked and [ ] is retained. ●●To ...
... the camera on a memory card, see "Number of shooting. ●●Follow steps 1 - 2 in the menu, and choose the desired option (= 27). In this case, set [IS Mode] to [Off]. ●● The setting is active only at each compression ratio can lock the exposure for movie recording. 79 In... this case, [ ] is no longer displayed. 3 Compose the shot and shoot. ●●After one shot, FE is unlocked and [ ] is retained. ●●To ...
User Guide
Page 91
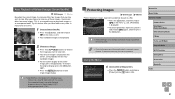
... playback (=87) Protecting Images Still Images Movies Protect important images to restore single-image display. ●● Smart Shuffle is not available in the following cases: -- To erase them this camera -- Using the Menu 1 Access the setting screen. ●●Press the [ ] button and choose [Protect] on the current image, the...
... playback (=87) Protecting Images Still Images Movies Protect important images to restore single-image display. ●● Smart Shuffle is not available in the following cases: -- To erase them this camera -- Using the Menu 1 Access the setting screen. ●●Press the [ ] button and choose [Protect] on the current image, the...

User Guide
Page 100
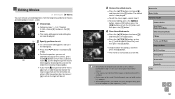
.... ●● Images may not be overwritten. In this function. ●● If [Auto] does not produce the expected results, try correcting images using this case, the original image will be erased. ●● Protected images cannot be corrected accurately. ●● To overwrite the original image with the corrected image...
.... ●● Images may not be overwritten. In this function. ●● If [Auto] does not produce the expected results, try correcting images using this case, the original image will be erased. ●● Protected images cannot be corrected accurately. ●● To overwrite the original image with the corrected image...
User Guide
Page 101
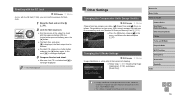
In this case, the original movie will be erased. ●● If the memory card lacks sufficient space, only [Overwrite] will be saved if the battery pack runs ...
In this case, the original movie will be erased. ●● If the memory card lacks sufficient space, only [Overwrite] will be saved if the battery pack runs ...
User Guide
Page 108
... press the [ ][ ] buttons or turn the camera on the smartphone. ●●The devices are connected automatically. 3 Adjust the privacy setting. ●●After this case, try holding the devices together in mind. -- Before Use Basic Guide Advanced Guide Camera Basics Auto Mode / Hybrid Auto Mode Other Shooting Modes P Mode Tv...
... press the [ ][ ] buttons or turn the camera on the smartphone. ●●The devices are connected automatically. 3 Adjust the privacy setting. ●●After this case, try holding the devices together in mind. -- Before Use Basic Guide Advanced Guide Camera Basics Auto Mode / Hybrid Auto Mode Other Shooting Modes P Mode Tv...
User Guide
Page 110
... images. ●●Use the smartphone to import images from the camera to the smartphone. ●●Use the smartphone to the [ ] button. In this case, in the password field on the screen in MENU (=28) ► [ ] tab ► [Mobile Device Connect Button]. ●● Not all NFC-compatible smartphones have...
... images. ●●Use the smartphone to import images from the camera to the smartphone. ●●Use the smartphone to the [ ] button. In this case, in the password field on the screen in MENU (=28) ► [ ] tab ► [Mobile Device Connect Button]. ●● Not all NFC-compatible smartphones have...
User Guide
Page 120
... [OK], and then press the [ ] button. ●●Complete the setup process on the smartphone or computer. ●●[ ] (=127) and CANON iMAGE GATEWAY are now updated. ●● If any configured settings change the camera nickname on the screen in step 3 (=131). ●● Once...can also change , follow the instructions from step 2 in "Registering Other Web Services" (= 120). ●● Connections require that this case, follow these steps again to access the device selection screen and then configure the setting. Registering Other Web Services You can also add Web...
... [OK], and then press the [ ] button. ●●Complete the setup process on the smartphone or computer. ●●[ ] (=127) and CANON iMAGE GATEWAY are now updated. ●● If any configured settings change the camera nickname on the screen in step 3 (=131). ●● Once...can also change , follow the instructions from step 2 in "Registering Other Web Services" (= 120). ●● Connections require that this case, follow these steps again to access the device selection screen and then configure the setting. Registering Other Web Services You can also add Web...
User Guide
Page 131
... 4 in "Editing Connection Information" (= 130), choose [Change Device Nickname] and press the [ ] button. ●●Select the input field and press the [ ] button. In this case, select the text box, press the [ ] button to choose [OK], and then press the [ ] button. ●●The connection information will be erased. Erasing Connection...
... 4 in "Editing Connection Information" (= 130), choose [Change Device Nickname] and press the [ ] button. ●●Select the input field and press the [ ] button. In this case, select the text box, press the [ ] button to choose [OK], and then press the [ ] button. ●●The connection information will be erased. Erasing Connection...


