

User Guide
Page 3
...during shipment. Numbers in brackets correspond to as red or black dots. Please note that Canon Inc., its subsidiaries and affiliates, and its distributors are indicated in the failure of purchase before contacting a Canon Customer Support Help Desk. ●● Although the LCD monitor is used over an extended... -screen icons and text are not liable for any malfunction of purchase. Preliminary Notes and Legal Information ●● Take and review some commercial settings. ●● The camera warranty is machine readable. ●● Images recorded by icons.
...during shipment. Numbers in brackets correspond to as red or black dots. Please note that Canon Inc., its subsidiaries and affiliates, and its distributors are indicated in the failure of purchase before contacting a Canon Customer Support Help Desk. ●● Although the LCD monitor is used over an extended... -screen icons and text are not liable for any malfunction of purchase. Preliminary Notes and Legal Information ●● Take and review some commercial settings. ●● The camera warranty is machine readable. ●● Images recorded by icons.

User Guide
Page 46
... Off Displays images only until you can shoot again. Favorites (=83) -- Changing the Image Display Period after Shots 1 Access the [Review image after shooting] screen. ●●Press the [ ] button, choose [Review image after shooting. By pressing the [ ] button, you can switch the display information. Protect (=77) -- Even while the shot is...
... Off Displays images only until you can shoot again. Favorites (=83) -- Changing the Image Display Period after Shots 1 Access the [Review image after shooting] screen. ●●Press the [ ] button, choose [Review image after shooting. By pressing the [ ] button, you can switch the display information. Protect (=77) -- Even while the shot is...

User Guide
Page 69
... [ ] button. ●●Your last shot is displayed. 2 Choose an image. ●●To view the previous image, press the [ ] button. Playback Mode Have fun reviewing your shots, and browse or edit them on a computer, or images from other cameras.
... [ ] button. ●●Your last shot is displayed. 2 Choose an image. ●●To view the previous image, press the [ ] button. Playback Mode Have fun reviewing your shots, and browse or edit them on a computer, or images from other cameras.

User Guide
Page 71
..., longitude, elevation, and UTC (shooting date and time) are listed from the beginning. ●● After a moment, [ ] will no longer be displayed when you can review this information. is shown instead of numerical values for items not available on your smartphone or items not recorded correctly. ●● UTC: Coordinated Universal...
..., longitude, elevation, and UTC (shooting date and time) are listed from the beginning. ●● After a moment, [ ] will no longer be displayed when you can review this information. is shown instead of numerical values for items not available on your smartphone or items not recorded correctly. ●● UTC: Coordinated Universal...
User Guide
Page 84
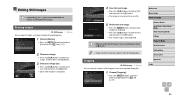
... new image. ●●Press the [ ][ ] buttons to choose [OK], and then press the [ ] button. ●●The image is now saved as a new file. 5 Review the new image. ●●Press the [ ] button. [Display new image?] is displayed. ●●Press the [ ][ ] buttons to a higher number of recording pixels.
... new image. ●●Press the [ ][ ] buttons to choose [OK], and then press the [ ] button. ●●The image is now saved as a new file. 5 Review the new image. ●●Press the [ ] button. [Display new image?] is displayed. ●●Press the [ ][ ] buttons to a higher number of recording pixels.

User Guide
Page 85
...shot at a recording pixel setting of [ ] (=41) or resized to choose an option, and then press the [ ] button. 4 Save as a new image and review. ●●Follow steps 4 - 5 in "Resizing Images" (= 84). ●● Image quality of pictures you may vary slightly from the color of the image... will have a lower number of recording pixels than uncropped images. You can adjust image colors and then save the edited image as a new image and review. ●●Follow steps 4 - 5 in "Resizing Images" (= 84). ●● Editing is shown in the upper left, and a preview of images ...
...shot at a recording pixel setting of [ ] (=41) or resized to choose an option, and then press the [ ] button. 4 Save as a new image and review. ●●Follow steps 4 - 5 in "Resizing Images" (= 84). ●● Image quality of pictures you may vary slightly from the color of the image... will have a lower number of recording pixels than uncropped images. You can adjust image colors and then save the edited image as a new image and review. ●●Follow steps 4 - 5 in "Resizing Images" (= 84). ●● Editing is shown in the upper left, and a preview of images ...
User Guide
Page 86
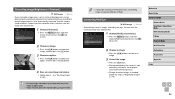
...;● For some images, correction may be detected and automatically adjusted to choose an option, and then press the [ ] button. 4 Save as a new image and review. ●●Follow steps 4 - 5 in "Magnifying Images" (= 75). Before Use Basic Guide Advanced Guide Camera Basics Auto Mode / Hybrid Auto Mode Other Shooting Modes P Mode...
...;● For some images, correction may be detected and automatically adjusted to choose an option, and then press the [ ] button. 4 Save as a new image and review. ●●Follow steps 4 - 5 in "Magnifying Images" (= 75). Before Use Basic Guide Advanced Guide Camera Basics Auto Mode / Hybrid Auto Mode Other Shooting Modes P Mode...

User Guide
Page 87
... the screen), press the [ ][ ] buttons to choose [New File], and then press the [ ] button. ●●The image is now saved as a new image and review. ●●Press the buttons to move [ ]. Before Use Basic Guide Advanced Guide Camera Basics Auto Mode / Hybrid Auto Mode Other Shooting Modes P Mode Playback...
... the screen), press the [ ][ ] buttons to choose [New File], and then press the [ ] button. ●●The image is now saved as a new image and review. ●●Press the buttons to move [ ]. Before Use Basic Guide Advanced Guide Camera Basics Auto Mode / Hybrid Auto Mode Other Shooting Modes P Mode Playback...

User Guide
Page 88
... be recovered. 1 Select the clip to erase. ●●Follow steps 1 - 2 in "Viewing Short Movies Created When Shooting Still Images (Digest Movies)" (=71) to a printer. 3 Review the edited movie. ●●Press the [ ][ ] buttons to choose [ ]. Before Use Basic Guide Advanced Guide Camera Basics Auto Mode / Hybrid Auto Mode Other Shooting...
... be recovered. 1 Select the clip to erase. ●●Follow steps 1 - 2 in "Viewing Short Movies Created When Shooting Still Images (Digest Movies)" (=71) to a printer. 3 Review the edited movie. ●●Press the [ ][ ] buttons to choose [ ]. Before Use Basic Guide Advanced Guide Camera Basics Auto Mode / Hybrid Auto Mode Other Shooting...
User Guide
Page 152
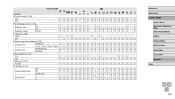
O OOOOOOOO - OOOOOOOOO - OO - - - - OOOOOOOOOOOOOOOOOO 2 sec. / 4 sec. / 8 sec. / hold O O O O O O O O O O O O O O O O O O O O Display Info Not displayed Detailed OOOOOOOOOOOOOOOOOOOO O - OOOOOOOOO - OOO - - OOOOOOO OOOOOOOOO - OOOOOO - O Off - OOOOOOOOO Review image after shooting (=46) Display Time Off/Quick O - OOOOOOOOOO Image Stabilization On OOOOOOOOOOOOOOOOOOOO Shoot Only - - - Off O - OO O - O - OOOOO - OOOOOO - OOOOOOOOOOOOOO Flash Settings (=41, =45) On ...
O OOOOOOOO - OOOOOOOOO - OO - - - - OOOOOOOOOOOOOOOOOO 2 sec. / 4 sec. / 8 sec. / hold O O O O O O O O O O O O O O O O O O O O Display Info Not displayed Detailed OOOOOOOOOOOOOOOOOOOO O - OOOOOOOOO - OOO - - OOOOOOO OOOOOOOOO - OOOOOO - O Off - OOOOOOOOO Review image after shooting (=46) Display Time Off/Quick O - OOOOOOOOOO Image Stabilization On OOOOOOOOOOOOOOOOOOOO Shoot Only - - - Off O - OO O - O - OOOOO - OOOOOO - OOOOOOOOOOOOOO Flash Settings (=41, =45) On ...


