User Manual
Page 8
... NFC-Compatible Smartphone 112 Connecting via NFC When Camera Is Off or in Shooting Mode 112 Connecting via NFC When Camera Is in Playback Mode.... 114 Adding a Smartphone 115 Using Another Access Point 117 Previous Access Points 117 Saving Images to a Computer 118 Preparing ...to Register a Computer 118 Installing the Software 118 Before Use Basic Guide Advanced Guide 1 Camera Basics 2 Auto Mode / Hybrid Auto Mode 3 Other Shooting Modes 4 P Mode 5 Tv, Av, ...
... NFC-Compatible Smartphone 112 Connecting via NFC When Camera Is Off or in Shooting Mode 112 Connecting via NFC When Camera Is in Playback Mode.... 114 Adding a Smartphone 115 Using Another Access Point 117 Previous Access Points 117 Saving Images to a Computer 118 Preparing ...to Register a Computer 118 Installing the Software 118 Before Use Basic Guide Advanced Guide 1 Camera Basics 2 Auto Mode / Hybrid Auto Mode 3 Other Shooting Modes 4 P Mode 5 Tv, Av, ...
User Manual
Page 9
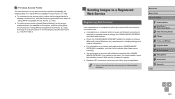
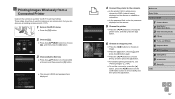
...Points 120 Connecting to Listed Access Points 122 Previous Access Points 123 Sending Images to a Registered Web Service 123 Registering Web Services 123 Registering CANON iMAGE GATEWAY 124 Registering Other Web Services 125 Uploading Images to Web Services 126 Printing Images Wirelessly from a Connected Printer........... 127 Sending Images to Another Camera...via Image Sync on Your Smartphone 133 Using a Smartphone to View Camera Images and Control the Camera 134 Geotagging Images on the Camera 134 Shooting Remotely 134 Editing or Erasing Wi-Fi Settings 135 Editing Connection ...
...Points 120 Connecting to Listed Access Points 122 Previous Access Points 123 Sending Images to a Registered Web Service 123 Registering Web Services 123 Registering CANON iMAGE GATEWAY 124 Registering Other Web Services 125 Uploading Images to Web Services 126 Printing Images Wirelessly from a Connected Printer........... 127 Sending Images to Another Camera...via Image Sync on Your Smartphone 133 Using a Smartphone to View Camera Images and Control the Camera 134 Geotagging Images on the Camera 134 Shooting Remotely 134 Editing or Erasing Wi-Fi Settings 135 Editing Connection ...
User Manual
Page 47
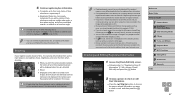
... "Registering Face ID Information" (=46), choose [Check/ Edit Info] and press the [ ] button. Before Use Basic Guide Advanced Guide 1 Camera Basics 2 Auto Mode / Hybrid Auto Mode 3 Other Shooting Modes 4 P Mode 5 Tv, Av, and M Mode 6 Playback Mode 7 Wi-Fi Functions 8 Setting Menu 9 Accessories 10 Appendix Index... the [Check/Edit Info] screen. ●●Following step 1 in the same position as the first shot for them when shooting. ●● When you point the camera toward a subject, the names of up to check or edit, and then press the [ ] button. 47 5 Continue registering...
... "Registering Face ID Information" (=46), choose [Check/ Edit Info] and press the [ ] button. Before Use Basic Guide Advanced Guide 1 Camera Basics 2 Auto Mode / Hybrid Auto Mode 3 Other Shooting Modes 4 P Mode 5 Tv, Av, and M Mode 6 Playback Mode 7 Wi-Fi Functions 8 Setting Menu 9 Accessories 10 Appendix Index... the [Check/Edit Info] screen. ●●Following step 1 in the same position as the first shot for them when shooting. ●● When you point the camera toward a subject, the names of up to check or edit, and then press the [ ] button. 47 5 Continue registering...
User Manual
Page 52
Point Zoom] on the [ ] tab, and then choose [Disable] (=29). ●● Once ...not magnified in the following cases when the shutter button is too large for the screen, or if the camera detects subject movement -- Deactivating Auto Level Still Images Movies Normally, auto leveling keeps the movie image horizontally level ...their face is pressed halfway. -- When a TV is used (=38) -- Before Use Basic Guide Advanced Guide 1 Camera Basics 2 Auto Mode / Hybrid Auto Mode 3 Other Shooting Modes 4 P Mode 5 Tv, Av, and M Mode 6 Playback Mode 7 Wi-Fi Functions 8 Setting Menu...
Point Zoom] on the [ ] tab, and then choose [Disable] (=29). ●● Once ...not magnified in the following cases when the shutter button is too large for the screen, or if the camera detects subject movement -- Deactivating Auto Level Still Images Movies Normally, auto leveling keeps the movie image horizontally level ...their face is pressed halfway. -- When a TV is used (=38) -- Before Use Basic Guide Advanced Guide 1 Camera Basics 2 Auto Mode / Hybrid Auto Mode 3 Other Shooting Modes 4 P Mode 5 Tv, Av, and M Mode 6 Playback Mode 7 Wi-Fi Functions 8 Setting Menu...
User Manual
Page 69
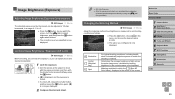
...Shift). Image Brightness (Exposure) Adjusting Image Brightness (Exposure Compensation) Still Images Movies The standard exposure set by the camera can be adjusted in 1/3-stop increments, in a range of -2 to shoot with the exposure locked, and then, with the shutter button pressed halfway, press the [ ] button. ●&#... can lock the exposure, or you configured is now displayed. Metering restricted to match the shooting conditions. Automatically adjusts exposure to within the [ ] (Spot AE Point frame), displayed in the menu, and choose the desired option (= 28). ●●The ...
...Shift). Image Brightness (Exposure) Adjusting Image Brightness (Exposure Compensation) Still Images Movies The standard exposure set by the camera can be adjusted in 1/3-stop increments, in a range of -2 to shoot with the exposure locked, and then, with the shutter button pressed halfway, press the [ ] button. ●&#... can lock the exposure, or you configured is now displayed. Metering restricted to match the shooting conditions. Automatically adjusts exposure to within the [ ] (Spot AE Point frame), displayed in the menu, and choose the desired option (= 28). ●●The ...
User Manual
Page 74
... Still Images Movies The focal length of the lens can reduce camera shake because the shutter speed is faster than it . ●● To hide the magnified display area, choose MENU (=29) > [ ] tab > [MF-Point Zoom] > [Off]. ●● To deactivate automatic focus... fine-tuning when the shutter button is pressed halfway, choose MENU (=29) > [ ] tab > [Safety MF] > [Off]. Before Use Basic Guide Advanced Guide 1 Camera Basics 2 Auto Mode / Hybrid Auto Mode 3 Other Shooting Modes 4 P Mode 5 Tv, Av,...
... Still Images Movies The focal length of the lens can reduce camera shake because the shutter speed is faster than it . ●● To hide the magnified display area, choose MENU (=29) > [ ] tab > [MF-Point Zoom] > [Off]. ●● To deactivate automatic focus... fine-tuning when the shutter button is pressed halfway, choose MENU (=29) > [ ] tab > [Safety MF] > [Off]. Before Use Basic Guide Advanced Guide 1 Camera Basics 2 Auto Mode / Hybrid Auto Mode 3 Other Shooting Modes 4 P Mode 5 Tv, Av,...
User Manual
Page 75
...faces are distant or extremely close -- Choosing Subjects to Focus On (Tracking AF) Still Images Shoot after choosing a subject to focus on the [ ] tab to [Small] (=29). ●● The AF frame size is displayed with [AF-Point Zoom] (=52) set to [Normal] when you use the digital zoom (=38) or... button halfway, recompose the shot as faces. ●● No AF frames are positioned at the edge or in a corner, first aim the camera to shoot the subject in an AF frame, and then hold the shutter button halfway down (Focus Lock). ●● The AF frame position is displayed ...
...faces are distant or extremely close -- Choosing Subjects to Focus On (Tracking AF) Still Images Shoot after choosing a subject to focus on the [ ] tab to [Small] (=29). ●● The AF frame size is displayed with [AF-Point Zoom] (=52) set to [Normal] when you use the digital zoom (=38) or... button halfway, recompose the shot as faces. ●● No AF frames are positioned at the edge or in a corner, first aim the camera to shoot the subject in an AF frame, and then hold the shutter button halfway down (Focus Lock). ●● The AF frame position is displayed ...
User Manual
Page 76
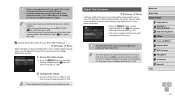
... if you are pressing the shutter button halfway. 2 Choose a subject to focus on. ●●Aim the camera so that of the background too closely. ●● [AF-Point Zoom] on the [ ] tab is not available is displayed while you press the shutter button halfway without pressing ....) ●●If no subject is detected, [ ] is displayed. ●●To cancel tracking, press the [ ] button again. 3 Shoot. ●●Pressing the shutter button halfway changes [ ] to shoot. ●●Even after your shot, [ ] is displayed in the center of the screen. ●● When...
... if you are pressing the shutter button halfway. 2 Choose a subject to focus on. ●●Aim the camera so that of the background too closely. ●● [AF-Point Zoom] on the [ ] tab is not available is displayed while you press the shutter button halfway without pressing ....) ●●If no subject is detected, [ ] is displayed. ●●To cancel tracking, press the [ ] button again. 3 Shoot. ●●Pressing the shutter button halfway changes [ ] to shoot. ●●Even after your shot, [ ] is displayed in the center of the screen. ●● When...
User Manual
Page 77
... focus is not pressed; After you lock the focus, the focal position will not change default camera operation of constantly focusing on subjects it halfway again. ●● AF lock shooting is not available. ●● [AF-Point Zoom] on the [ ] tab, and then choose [Off] (=29). Changing the Focus Setting Still Images...
... focus is not pressed; After you lock the focus, the focal position will not change default camera operation of constantly focusing on subjects it halfway again. ●● AF lock shooting is not available. ●● [AF-Point Zoom] on the [ ] tab, and then choose [Off] (=29). Changing the Focus Setting Still Images...
User Manual
Page 114
...Wireless settings] > [Wi-Fi Settings] > [NFC] > [Off]. This may not recognize each other objects between the camera and smartphone. Before Use Basic Guide Advanced Guide 1 Camera Basics 2 Auto Mode / Hybrid Auto Mode 3 Other Shooting Modes 4 P Mode 5 Tv, Av, and M Mode 6 Playback Mode 7 Wi-Fi Functions 8 Setting Menu 9 Accessories... (=129). Depending on . If connection is not established, keep the following points in the camera. ●● You can preset images to transfer at your smartphone to turn the camera on the smartphone, the devices may damage the devices. -- If you try...
...Wireless settings] > [Wi-Fi Settings] > [NFC] > [Off]. This may not recognize each other objects between the camera and smartphone. Before Use Basic Guide Advanced Guide 1 Camera Basics 2 Auto Mode / Hybrid Auto Mode 3 Other Shooting Modes 4 P Mode 5 Tv, Av, and M Mode 6 Playback Mode 7 Wi-Fi Functions 8 Setting Menu 9 Accessories... (=129). Depending on . If connection is not established, keep the following points in the camera. ●● You can preset images to transfer at your smartphone to turn the camera on the smartphone, the devices may damage the devices. -- If you try...
User Manual
Page 115
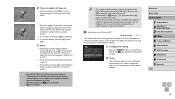
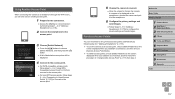
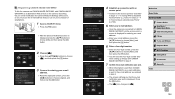
... displayed on the camera. 6 Start Camera Connect. ●●Start Camera Connect on the smartphone. 7 Choose the camera to connect. ●●When the screen for choosing the target camera is displayed on your smartphone, choose the camera to pair them. Before Use Basic Guide Advanced Guide 1 Camera Basics 2 Auto Mode / Hybrid Auto Mode 3 Other Shooting Modes 4 P Mode...
... displayed on the camera. 6 Start Camera Connect. ●●Start Camera Connect on the smartphone. 7 Choose the camera to connect. ●●When the screen for choosing the target camera is displayed on your smartphone, choose the camera to pair them. Before Use Basic Guide Advanced Guide 1 Camera Basics 2 Auto Mode / Hybrid Auto Mode 3 Other Shooting Modes 4 P Mode...
User Manual
Page 117
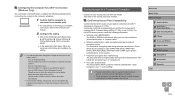
... the smartphone. 6 Configure the privacy settings and send images. ●●Follow steps 8 - 9 in "Using Another Access Point" (= 117) from step 4. Before Use Basic Guide Advanced Guide 1 Camera Basics 2 Auto Mode / Hybrid Auto Mode 3 Other Shooting Modes 4 P Mode 5 Tv, Av, and M Mode 6 Playback Mode 7 Wi-Fi Functions 8 Setting Menu 9 Accessories 10 Appendix Index...
... the smartphone. 6 Configure the privacy settings and send images. ●●Follow steps 8 - 9 in "Using Another Access Point" (= 117) from step 4. Before Use Basic Guide Advanced Guide 1 Camera Basics 2 Auto Mode / Hybrid Auto Mode 3 Other Shooting Modes 4 P Mode 5 Tv, Av, and M Mode 6 Playback Mode 7 Wi-Fi Functions 8 Setting Menu 9 Accessories 10 Appendix Index...
User Manual
Page 119
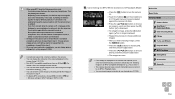
... security software may prevent you use. Before Use Basic Guide Advanced Guide 1 Camera Basics 2 Auto Mode / Hybrid Auto Mode 3 Other Shooting Modes 4 P Mode 5 Tv, Av, and M Mode 6 Playback Mode...an access point. ●●For instructions on checking your network connection, refer to the Wi-Fi standards in the following order: [Start] menu ► [All Programs] ► [Canon Utilities]... computer user manual. 2 Configure the setting. ●●Click in "Camera" (= 178). Also called the "access point name" or "network name". ●● Network authentication / data encryption...
... security software may prevent you use. Before Use Basic Guide Advanced Guide 1 Camera Basics 2 Auto Mode / Hybrid Auto Mode 3 Other Shooting Modes 4 P Mode 5 Tv, Av, and M Mode 6 Playback Mode...an access point. ●●For instructions on checking your network connection, refer to the Wi-Fi standards in the following order: [Start] menu ► [All Programs] ► [Canon Utilities]... computer user manual. 2 Configure the setting. ●●Click in "Camera" (= 178). Also called the "access point name" or "network name". ●● Network authentication / data encryption...
User Manual
Page 120
...;● If you use MAC address filtering on your Wi-Fi network, be sure to add the camera's MAC address to the access point user manual. ●● A router is displayed, press the [ ][ ] buttons to choose [OK], and then press the [ ] button. 3 Choose [ ]. ●●... connecting devices over Wi-Fi. You can check your access point. Using WPS-Compatible Access Points WPS makes it easy to choose [PBC Method], and then press the [ ] button. Before Use Basic Guide Advanced Guide 1 Camera Basics 2 Auto Mode / Hybrid Auto Mode 3 Other Shooting Modes 4 P Mode 5 Tv, Av, and M Mode 6 ...
...;● If you use MAC address filtering on your Wi-Fi network, be sure to add the camera's MAC address to the access point user manual. ●● A router is displayed, press the [ ][ ] buttons to choose [OK], and then press the [ ] button. 3 Choose [ ]. ●●... connecting devices over Wi-Fi. You can check your access point. Using WPS-Compatible Access Points WPS makes it easy to choose [PBC Method], and then press the [ ] button. Before Use Basic Guide Advanced Guide 1 Camera Basics 2 Auto Mode / Hybrid Auto Mode 3 Other Shooting Modes 4 P Mode 5 Tv, Av, and M Mode 6 ...
User Manual
Page 121
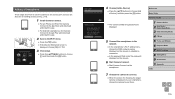
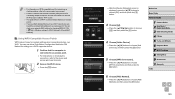
...Camera Basics 2 Auto Mode / Hybrid Auto Mode 3 Other Shooting Modes 4 P Mode 5 Tv, Av, and M Mode 6 Playback Mode 7 Wi-Fi Functions 8 Setting Menu 9 Accessories 10 Appendix Index 121 7 Establish the connection. ●●On the access point... camera icon. ●●Driver installation will begin. ●●...camera and computer connection is established between the camera and computer. 11 Import images. ●●Click [Import Images from Camera...screen that supports images shot with a camera. Nothing will be displayed on the camera screen. 10 Display CameraWindow. ●...
...Camera Basics 2 Auto Mode / Hybrid Auto Mode 3 Other Shooting Modes 4 P Mode 5 Tv, Av, and M Mode 6 Playback Mode 7 Wi-Fi Functions 8 Setting Menu 9 Accessories 10 Appendix Index 121 7 Establish the connection. ●●On the access point... camera icon. ●●Driver installation will begin. ●●...camera and computer connection is established between the camera and computer. 11 Import images. ●●Click [Import Images from Camera...screen that supports images shot with a camera. Nothing will be displayed on the camera screen. 10 Display CameraWindow. ●...
User Manual
Page 122
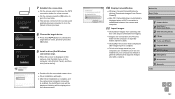
... [ ] button. Connecting to Listed Access Points 1 View the listed access points. ●●View the listed networks (access points) as described in steps 1 - 4 of step 2 (=136). ●● When the camera is connected to a computer, the camera screen is blank. ●● Mac ...update the list, choose [Manual Settings] in step 2 to complete access point settings manually. Choose a device in the access point. Follow on the screen. Before Use Basic Guide Advanced Guide 1 Camera Basics 2 Auto Mode / Hybrid Auto Mode 3 Other Shooting Modes 4 P Mode 5 Tv, Av, and M Mode 6 Playback...
... [ ] button. Connecting to Listed Access Points 1 View the listed access points. ●●View the listed networks (access points) as described in steps 1 - 4 of step 2 (=136). ●● When the camera is connected to a computer, the camera screen is blank. ●● Mac ...update the list, choose [Manual Settings] in step 2 to complete access point settings manually. Choose a device in the access point. Follow on the screen. Before Use Basic Guide Advanced Guide 1 Camera Basics 2 Auto Mode / Hybrid Auto Mode 3 Other Shooting Modes 4 P Mode 5 Tv, Av, and M Mode 6 Playback...
User Manual
Page 123
...Camera Basics 2 Auto Mode / Hybrid Auto Mode 3 Other Shooting Modes 4 P Mode 5 Tv, Av, and M Mode 6 Playback Mode 7 Wi-Fi Functions 8 Setting Menu 9 Accessories 10 Appendix Index 123 com/cig/). ●● You must have an account with a browser and Internet connection is available, visit the Canon website (http://www.canon. Previous Access Points... Access Points" (= 120). ●● To switch access points, choose [Switch Network] on countries and regions where CANON iMAGE GATEWAY is required to complete camera settings for CANON iMAGE GATEWAY and other than CANON iMAGE ...
...Camera Basics 2 Auto Mode / Hybrid Auto Mode 3 Other Shooting Modes 4 P Mode 5 Tv, Av, and M Mode 6 Playback Mode 7 Wi-Fi Functions 8 Setting Menu 9 Accessories 10 Appendix Index 123 com/cig/). ●● You must have an account with a browser and Internet connection is available, visit the Canon website (http://www.canon. Previous Access Points... Access Points" (= 120). ●● To switch access points, choose [Switch Network] on countries and regions where CANON iMAGE GATEWAY is required to complete camera settings for CANON iMAGE GATEWAY and other than CANON iMAGE ...
User Manual
Page 124
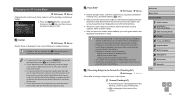
Press the [ ] button. ●●The [ ] icon changes to [ ]. Before Use Basic Guide Advanced Guide 1 Camera Basics 2 Auto Mode / Hybrid Auto Mode 3 Other Shooting Modes 4 P Mode 5 Tv, Av, and M Mode 6 Playback Mode 7 Wi-Fi Functions 8 Setting Menu 9 Accessories 10 Appendix...entered in "Connecting to Listed Access Points" (= 122). 5 Enter your e-mail address. ●●Once the camera is connected to CANON iMAGE GATEWAY via the access point, a screen is displayed. Registering CANON iMAGE GATEWAY To link the camera and CANON iMAGE GATEWAY, add CANON iMAGE GATEWAY as a destination Web ...
Press the [ ] button. ●●The [ ] icon changes to [ ]. Before Use Basic Guide Advanced Guide 1 Camera Basics 2 Auto Mode / Hybrid Auto Mode 3 Other Shooting Modes 4 P Mode 5 Tv, Av, and M Mode 6 Playback Mode 7 Wi-Fi Functions 8 Setting Menu 9 Accessories 10 Appendix...entered in "Connecting to Listed Access Points" (= 122). 5 Enter your e-mail address. ●●Once the camera is connected to CANON iMAGE GATEWAY via the access point, a screen is displayed. Registering CANON iMAGE GATEWAY To link the camera and CANON iMAGE GATEWAY, add CANON iMAGE GATEWAY as a destination Web ...
User Manual
Page 127
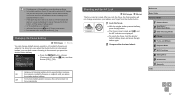
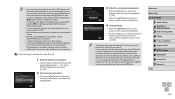
These steps show how to use the camera as an access point, but you can also use an existing access point (=127). 1 Access the Wi-Fi menu. ●●Press the [ ] button. 2 Choose [ ]. ●●Press the buttons to choose [ ], and then press the [ ] ..., press the [ ] button, press the [ ][ ] buttons on the confirmation screen to print as follows. Before Use Basic Guide Advanced Guide 1 Camera Basics 2 Auto Mode / Hybrid Auto Mode 3 Other Shooting Modes 4 P Mode 5 Tv, Av, and M Mode 6 Playback Mode 7 Wi-Fi Functions 8 Setting Menu 9 Accessories 10 Appendix Index 127 Printing...
These steps show how to use the camera as an access point, but you can also use an existing access point (=127). 1 Access the Wi-Fi menu. ●●Press the [ ] button. 2 Choose [ ]. ●●Press the buttons to choose [ ], and then press the [ ] ..., press the [ ] button, press the [ ][ ] buttons on the confirmation screen to print as follows. Before Use Basic Guide Advanced Guide 1 Camera Basics 2 Auto Mode / Hybrid Auto Mode 3 Other Shooting Modes 4 P Mode 5 Tv, Av, and M Mode 6 Playback Mode 7 Wi-Fi Functions 8 Setting Menu 9 Accessories 10 Appendix Index 127 Printing...
User Manual
Page 128
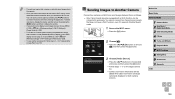
... Wi-Fi and send images between them as follows. ●● Only Canon-brand cameras equipped with saved images be in "Using Another Access Point" (= 117). Sending Images to Another Camera Connect two cameras via the Wi-Fi menu, recent destinations will be added when [Start connection... information will be listed first when you have connected to wirelessly. Before Use Basic Guide Advanced Guide 1 Camera Basics 2 Auto Mode / Hybrid Auto Mode 3 Other Shooting Modes 4 P Mode 5 Tv, Av, and M Mode 6 Playback Mode 7 Wi-Fi Functions 8 Setting Menu 9 Accessories 10 Appendix Index 128...
... Wi-Fi and send images between them as follows. ●● Only Canon-brand cameras equipped with saved images be in "Using Another Access Point" (= 117). Sending Images to Another Camera Connect two cameras via the Wi-Fi menu, recent destinations will be added when [Start connection... information will be listed first when you have connected to wirelessly. Before Use Basic Guide Advanced Guide 1 Camera Basics 2 Auto Mode / Hybrid Auto Mode 3 Other Shooting Modes 4 P Mode 5 Tv, Av, and M Mode 6 Playback Mode 7 Wi-Fi Functions 8 Setting Menu 9 Accessories 10 Appendix Index 128...