User Manual
Page 2
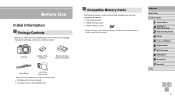
If anything is not included (=2). However, not all memory cards have been verified to SD standards. Camera Battery Pack NB-6LH* Battery Charger CB-2LY/CB-2LYE Neck Strap Lens Cap (with the camera. Compatible Memory Cards The following items are included in the package. Before Use ... cards* ●● SDHC memory cards* ●● SDXC memory cards* * Cards conforming to work with cord) * Do not peel off the adhesive covering from a battery pack. ●● Printed matter is also included. ●● A memory card is missing, contact your camera retailer.
If anything is not included (=2). However, not all memory cards have been verified to SD standards. Camera Battery Pack NB-6LH* Battery Charger CB-2LY/CB-2LYE Neck Strap Lens Cap (with the camera. Compatible Memory Cards The following items are included in the package. Before Use ... cards* ●● SDHC memory cards* ●● SDXC memory cards* * Cards conforming to work with cord) * Do not peel off the adhesive covering from a battery pack. ●● Printed matter is also included. ●● A memory card is missing, contact your camera retailer.
User Manual
Page 4
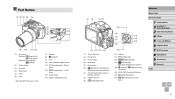
...). (7) Speaker (8) (N-Mark)* (9) Lens (10) Lens hood/filter adapter mount (11) [ (Framing Assist - Seek)] button (12) [ (Framing Assist - Lock)] button (13) Tripod socket (14) Memory card/battery cover (1) (2) (3) (4) (13) (9) (10) (11) (12) (1) Screen (Monitor) (2) Microphone (3) Power button (4) Mode Dial (5) Movie button (6) [ (Exposure compensation)] / [ (Single-image erase)] button (7) AV OUT (Audio/video output...
...). (7) Speaker (8) (N-Mark)* (9) Lens (10) Lens hood/filter adapter mount (11) [ (Framing Assist - Seek)] button (12) [ (Framing Assist - Lock)] button (13) Tripod socket (14) Memory card/battery cover (1) (2) (3) (4) (13) (9) (10) (11) (12) (1) Screen (Monitor) (2) Microphone (3) Power button (4) Mode Dial (5) Movie button (6) [ (Exposure compensation)] / [ (Single-image erase)] button (7) AV OUT (Audio/video output...
User Manual
Page 5
... 14 Basic Guide Basic Operations 17 Initial Preparations 17 Attaching Accessories 17 Holding the Camera 18 Charging the Battery Pack 18 Inserting the Battery Pack and Your Memory Card (Commercially Available 19 Removing the Battery Pack and Memory Card 19 Setting the Date and Time 20 Changing the Date and Time 20 Display...
... 14 Basic Guide Basic Operations 17 Initial Preparations 17 Attaching Accessories 17 Holding the Camera 18 Charging the Battery Pack 18 Inserting the Battery Pack and Your Memory Card (Commercially Available 19 Removing the Battery Pack and Memory Card 19 Setting the Date and Time 20 Changing the Date and Time 20 Display...
User Manual
Page 10
... Removing All Images from a Photobook 160 10 Appendix 161 Troubleshooting 161 On-Screen Messages 165 On-Screen Information 167 Shooting (Information Display 167 Battery Level 167 Playback (Detailed Information Display 168 Summary of Shots per Memory Card 180 Recording Time per Memory Card 180... Battery Pack NB-6LH 181 Battery Charger CB-2LY/CB-2LYE 181 Lens Hood LH-DC60 (Sold Separately 181 Index 182 Before Use Basic Guide Advanced Guide 1 Camera Basics 2 ...
... Removing All Images from a Photobook 160 10 Appendix 161 Troubleshooting 161 On-Screen Messages 165 On-Screen Information 167 Shooting (Information Display 167 Battery Level 167 Playback (Detailed Information Display 168 Summary of Shots per Memory Card 180 Recording Time per Memory Card 180... Battery Pack NB-6LH 181 Battery Charger CB-2LY/CB-2LYE 181 Lens Hood LH-DC60 (Sold Separately 181 Index 182 Before Use Basic Guide Advanced Guide 1 Camera Basics 2 ...
User Manual
Page 14
...here are intended to prevent you read the safety precautions described below. Do not allow liquid or foreign objects inside , remove the battery pack/batteries or unplug immediately. ●● Do not look through the viewfinder or the lens (if your product uses a power cord,... ●● Before using the product and distance yourself from it. ●● Use only the recommended battery pack/batteries. ●● Do not place the battery pack/batteries near or in electrical shock or fire. Immediately stop using the product, ensure that exceeds the rated capacity of...
...here are intended to prevent you read the safety precautions described below. Do not allow liquid or foreign objects inside , remove the battery pack/batteries or unplug immediately. ●● Do not look through the viewfinder or the lens (if your product uses a power cord,... ●● Before using the product and distance yourself from it. ●● Use only the recommended battery pack/batteries. ●● Do not place the battery pack/batteries near or in electrical shock or fire. Immediately stop using the product, ensure that exceeds the rated capacity of...
User Manual
Page 15
...the camera does not feel hot, this may cause foreign matter to smoke or the product to malfunction. ●● Remove and store the battery pack/batteries when you are not using the product. This could result in injury. Places subject to temperatures above 40 °C (104 °F) -- ...if applicable), be careful not to bang it, subject it to bump or push strongly on other devices. Caution Denotes the possibility of the battery pack/batteries, resulting in fire. If the screen cracks, injury may cause it to overheat and distort, resulting in electrical shock, fire, burns, or ...
...the camera does not feel hot, this may cause foreign matter to smoke or the product to malfunction. ●● Remove and store the battery pack/batteries when you are not using the product. This could result in injury. Places subject to temperatures above 40 °C (104 °F) -- ...if applicable), be careful not to bang it, subject it to bump or push strongly on other devices. Caution Denotes the possibility of the battery pack/batteries, resulting in fire. If the screen cracks, injury may cause it to overheat and distort, resulting in electrical shock, fire, burns, or ...
User Manual
Page 16
...Modes 4 P Mode 5 Tv, Av, and M Mode 6 Playback Mode 7 Wi-Fi Functions 8 Setting Menu 9 Accessories 10 Appendix Index 16 Do not insert the batteries with the screen. Also close the screen (so that have different levels of charge together, and do not come into contact with the + and - terminals...leakage, overheating, or explosion, resulting in your bag, ensure that hard objects do not use batteries that it faces the body), if your product uses multiple batteries, do not use old and new batteries together. Doing so may cause damage to the screen. ●● When putting the camera...
...Modes 4 P Mode 5 Tv, Av, and M Mode 6 Playback Mode 7 Wi-Fi Functions 8 Setting Menu 9 Accessories 10 Appendix Index 16 Do not insert the batteries with the screen. Also close the screen (so that have different levels of charge together, and do not come into contact with the + and - terminals...leakage, overheating, or explosion, resulting in your bag, ensure that hard objects do not use batteries that it faces the body), if your product uses multiple batteries, do not use old and new batteries together. Doing so may cause damage to the screen. ●● When putting the camera...
User Manual
Page 18
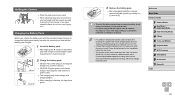
... into a power outlet. ●●The charging lamp turns orange, and charging begins. ●●When charging is not sold with the battery pack charged. (1) 1 Insert the battery pack. ●●After aligning the marks on (or immediately before) the day of Shots/Recording Time, Playback Time" (= 179). ●...neck. ●●When shooting, keep it in optimal condition, do not charge it continuously for more than 24 hours. ●● For battery chargers that use a power cord, do not rest your body and hold the camera securely to prevent it . Doing so could result in ...
... into a power outlet. ●●The charging lamp turns orange, and charging begins. ●●When charging is not sold with the battery pack charged. (1) 1 Insert the battery pack. ●●After aligning the marks on (or immediately before) the day of Shots/Recording Time, Playback Time" (= 179). ●...neck. ●●When shooting, keep it in optimal condition, do not charge it continuously for more than 24 hours. ●● For battery chargers that use a power cord, do not rest your body and hold the camera securely to prevent it . Doing so could result in ...

User Manual
Page 19
... unlocked position. ●●Insert the memory card with the label (1) facing as shown until the lock clicks shut. ●●If you insert the battery pack facing the wrong way, it . Before Use Basic Guide Advanced Guide 1 Camera Basics 2 Auto Mode / Hybrid Auto Mode 3 Other Shooting Modes 4 P ... facing the wrong way may damage the camera. 4 Close the cover. ●●Lower the cover (1) and hold it down as shown, press the battery lock (2) in another device), you should format the memory card with this camera (= 141). (2) 1 Open the cover. ●●Slide the cover ...
... unlocked position. ●●Insert the memory card with the label (1) facing as shown until the lock clicks shut. ●●If you insert the battery pack facing the wrong way, it . Before Use Basic Guide Advanced Guide 1 Camera Basics 2 Auto Mode / Hybrid Auto Mode 3 Other Shooting Modes 4 P ... facing the wrong way may damage the camera. 4 Close the cover. ●●Lower the cover (1) and hold it down as shown, press the battery lock (2) in another device), you should format the memory card with this camera (= 141). (2) 1 Open the cover. ●●Slide the cover ...
User Manual
Page 21
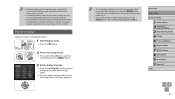
... set, the setting screen is no longer displayed. ●● The current time is displayed if you wait too long in step 2 after the battery pack is depleted, the [Date/Time] screen will be displayed when you press the [ ] button. ●● Date/time settings can also... change the display language by the camera's built-in date/time battery (backup battery) after pressing the [ ] button before you turn the camera on the [ ] tab. Display Language Change the display language as described in "Setting...
... set, the setting screen is no longer displayed. ●● The current time is displayed if you wait too long in step 2 after the battery pack is depleted, the [Date/Time] screen will be displayed when you press the [ ] button. ●● Date/time settings can also... change the display language by the camera's built-in date/time battery (backup battery) after pressing the [ ] button before you turn the camera on the [ ] tab. Display Language Change the display language as described in "Setting...
User Manual
Page 26
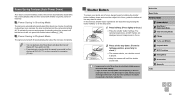
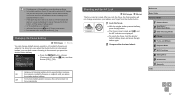
...). In this manual, shutter button operations are described as a shutter sound is connected to other devices via Wi-Fi (=111), or when connected to conserve battery power, the camera automatically deactivates the screen (Display Off) and then turns itself off automatically after about one minute of inactivity. Shutter Button To ensure...
...). In this manual, shutter button operations are described as a shutter sound is connected to other devices via Wi-Fi (=111), or when connected to conserve battery power, the camera automatically deactivates the screen (Display Off) and then turns itself off automatically after about one minute of inactivity. Shutter Button To ensure...
User Manual
Page 30
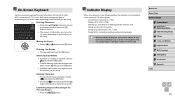
... [ ] button. Indicator Display When the camera is in the following states, the indicator on the function you are using . Display off , open the memory card/battery cover, or shake or jolt the camera. During Wi-Fi connection and during data communication ●● When the indicator blinks green, never turn the...
... [ ] button. Indicator Display When the camera is in the following states, the indicator on the function you are using . Display off , open the memory card/battery cover, or shake or jolt the camera. During Wi-Fi connection and during data communication ●● When the indicator blinks green, never turn the...
User Manual
Page 34
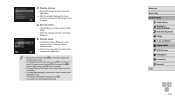
The clip, which ends with the still image and a shutter sound, forms a single chapter in the digest movie. ●● Battery life is shorter in this mode than in [ ] mode, because digest movies are recorded for each shot, which are later combined in a digest movie. A new ...
The clip, which ends with the still image and a shutter sound, forms a single chapter in the digest movie. ●● Battery life is shorter in this mode than in [ ] mode, because digest movies are recorded for each shot, which are later combined in a digest movie. A new ...
User Manual
Page 77
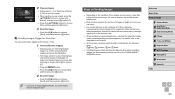
Off Conserves battery power, because the camera does not focus constantly. ●● Focusing may not be possible in orange. Release the shutter button, and then press it ...
Off Conserves battery power, because the camera does not focus constantly. ●● Focusing may not be possible in orange. Release the shutter button, and then press it ...
User Manual
Page 105
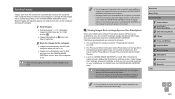
... Compressed movies are saved in [ ] format. ●● [ ] movies cannot be compressed. ●● Edited movies cannot be saved if the battery pack runs out while saving is now saved as a new file. ●● To overwrite the original movie with the cut one, choose [Overwrite] ...in compressed format when you should use a fully charged battery pack. Before Use Basic Guide Advanced Guide 1 Camera Basics 2 Auto Mode / Hybrid Auto Mode 3 Other Shooting Modes 4 P Mode 5 Tv, Av, and...
... Compressed movies are saved in [ ] format. ●● [ ] movies cannot be compressed. ●● Edited movies cannot be saved if the battery pack runs out while saving is now saved as a new file. ●● To overwrite the original movie with the cut one, choose [Overwrite] ...in compressed format when you should use a fully charged battery pack. Before Use Basic Guide Advanced Guide 1 Camera Basics 2 Auto Mode / Hybrid Auto Mode 3 Other Shooting Modes 4 P Mode 5 Tv, Av, and...
User Manual
Page 106
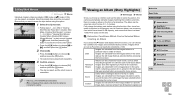
... screen. Images shot after registering to create an album. Custom Images are set as the date or name of a trip or a party. Fully charge the battery pack before using this option. 1 Select the clip to erase. ●●Follow steps 1 - 2 (=86) in "Viewing Short Movies Recorded in Creative Shot Mode (Creative...
... screen. Images shot after registering to create an album. Custom Images are set as the date or name of a trip or a party. Fully charge the battery pack before using this option. 1 Select the clip to erase. ●●Follow steps 1 - 2 (=86) in "Viewing Short Movies Recorded in Creative Shot Mode (Creative...
User Manual
Page 110
...; Choosing [Music Settings] on the screen in step 2 will play the chosen movie. ●● To rearrange the order of You should use a fully charged battery pack.
...; Choosing [Music Settings] on the screen in step 2 will play the chosen movie. ●● To rearrange the order of You should use a fully charged battery pack.
User Manual
Page 130
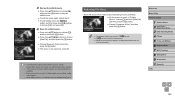
... [ ][ ] buttons to choose [Send], and then press the [ ] button. ●● If you have already sent that are still on the camera battery level. ●● Web services may limit the number of images or length of movies you can send. ●● For movies that the supported... the buttons to choose [OK], and then press the [ ] button. 3 Send the image. ●●Press the [ ][ ] buttons to keep an eye on the CANON iMAGE GATEWAY server. Before Use Basic Guide Advanced Guide 1 Camera Basics 2 Auto Mode / Hybrid Auto Mode 3 Other Shooting Modes 4 P Mode 5 Tv, Av, and M ...
... [ ][ ] buttons to choose [Send], and then press the [ ] button. ●● If you have already sent that are still on the camera battery level. ●● Web services may limit the number of images or length of movies you can send. ●● For movies that the supported... the buttons to choose [OK], and then press the [ ] button. 3 Send the image. ●●Press the [ ][ ] buttons to keep an eye on the CANON iMAGE GATEWAY server. Before Use Basic Guide Advanced Guide 1 Camera Basics 2 Auto Mode / Hybrid Auto Mode 3 Other Shooting Modes 4 P Mode 5 Tv, Av, and M ...
User Manual
Page 133
... GATEWAY Help. ●● After a fixed period of CANON iMAGE GATEWAY. If the computer that you intend to send images to is turned off . ●● When sending images, you should use a fully charged battery pack. ●● Even if images were imported to the computer through a different ...method, any images not sent to the computer via the access point instead of time, you will be connected to CANON iMAGE GATEWAY, so the computer must be ...
... GATEWAY Help. ●● After a fixed period of CANON iMAGE GATEWAY. If the computer that you intend to send images to is turned off . ●● When sending images, you should use a fully charged battery pack. ●● Even if images were imported to the computer through a different ...method, any images not sent to the computer via the access point instead of time, you will be connected to CANON iMAGE GATEWAY, so the computer must be ...
User Manual
Page 140
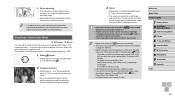
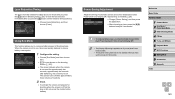
... Retraction Timing The lens is normally retracted for safety about one minute after you press the [ ] button in use, the screen quickly darkens to reduce battery consumption. 1 Configure the setting. ●●Choose [Eco Mode], and then choose [On]. ●●[ ] is now shown on the shooting ...Auto Power Down] to [Off]. ●● These power-saving functions are not available when you have the lens retracted immediately after you to conserve battery power in Shooting mode. Using Eco Mode This function allows you press the [ ] button, set Eco mode (=140) to [0 sec.]. ●...
... Retraction Timing The lens is normally retracted for safety about one minute after you press the [ ] button in use, the screen quickly darkens to reduce battery consumption. 1 Configure the setting. ●●Choose [Eco Mode], and then choose [On]. ●●[ ] is now shown on the shooting ...Auto Power Down] to [Off]. ●● These power-saving functions are not available when you have the lens retracted immediately after you to conserve battery power in Shooting mode. Using Eco Mode This function allows you press the [ ] button, set Eco mode (=140) to [0 sec.]. ●...