
User Guide
Page 3
... on a computer Advanced Guide (=33) • Practical guide that even for personal use . Preliminary Notes and Legal Information • Take and review some commercial settings. • The camera warranty is valid only in a way that is machine readable. • Images recorded by the camera ...are intended for personal use , photography may appear as red or black dots. Please note that Canon Inc., its subsidiaries and affiliates, and its distributors are included, each used over an extended period, it may be recorded in...
... on a computer Advanced Guide (=33) • Practical guide that even for personal use . Preliminary Notes and Legal Information • Take and review some commercial settings. • The camera warranty is valid only in a way that is machine readable. • Images recorded by the camera ...are intended for personal use , photography may appear as red or black dots. Please note that Canon Inc., its subsidiaries and affiliates, and its distributors are included, each used over an extended period, it may be recorded in...

User Guide
Page 61
... Closed Eyes [ ] is set to [Quick] (=63). 61 Helpful Shooting Features Still Images Checking for the final shot. • The frame is not displayed when [Review] is displayed when the camera detects that people may have closed . XXA frame, accompanied by [ ], is displayed when the camera detects a person whose eyes are...
... Closed Eyes [ ] is set to [Quick] (=63). 61 Helpful Shooting Features Still Images Checking for the final shot. • The frame is not displayed when [Review] is displayed when the camera detects that people may have closed . XXA frame, accompanied by [ ], is displayed when the camera detects a person whose eyes are...

User Guide
Page 63
zzPress the button, choose [Review] on the [4] tab, and then choose the desired option (=38). Displays images for the specified time. Displays images until you press the shutter button halfway. Quick 2 - 10 sec. No image display after shots as follows. zzTo restore the original setting, repeat this process but choose [2 sec.]. Customizing Camera Operation Still Images Changing the Image Display Period After Shots Change how long images are displayed after shots. 63 Hold Off Displays images only until you can shoot again. Configure the setting.
zzPress the button, choose [Review] on the [4] tab, and then choose the desired option (=38). Displays images for the specified time. Displays images until you press the shutter button halfway. Quick 2 - 10 sec. No image display after shots as follows. zzTo restore the original setting, repeat this process but choose [2 sec.]. Customizing Camera Operation Still Images Changing the Image Display Period After Shots Change how long images are displayed after shots. 63 Hold Off Displays images only until you can shoot again. Configure the setting.

User Guide
Page 64
... details (=190). Shows the area in "Checking the Focus" (=113). • This setting is set to [Off] and cannot be changed when [Review] (=63) is set to check the focus. Follow the steps in the AF frame magnified, enabling you to [Quick] or [Off]. 64 Customizing Camera... Operation Still Images Changing the Image Display Style After Shots Change the way images are displayed after shots as follows. zzPress the button, choose [Review Info] on the [4] tab, and then choose the desired option (=38). Off Detailed Focus Check Displays only the image. zzTo restore the original...
... details (=190). Shows the area in "Checking the Focus" (=113). • This setting is set to [Off] and cannot be changed when [Review] (=63) is set to check the focus. Follow the steps in the AF frame magnified, enabling you to [Quick] or [Off]. 64 Customizing Camera... Operation Still Images Changing the Image Display Style After Shots Change the way images are displayed after shots as follows. zzPress the button, choose [Review Info] on the [4] tab, and then choose the desired option (=38). Off Detailed Focus Check Displays only the image. zzTo restore the original...

User Guide
Page 109
6 Playback Mode Have fun reviewing your shots, and browse or edit them in many ways • To prepare the camera for these operations, press the button to enter Playback mode. • It may not be possible to play back or edit images that were renamed or already edited on a computer, or images from other cameras. 109
6 Playback Mode Have fun reviewing your shots, and browse or edit them in many ways • To prepare the camera for these operations, press the button to enter Playback mode. • It may not be possible to play back or edit images that were renamed or already edited on a computer, or images from other cameras. 109

User Guide
Page 112
... Histogram High Dark Low Bright zzThe graph in detailed information display is not available. To change the initial display mode, press the button and choose [Review Info] on the screen in the image. Viewing the histogram is displayed. However, simple information display is a histogram showing the distribution of brightness.
... Histogram High Dark Low Bright zzThe graph in detailed information display is not available. To change the initial display mode, press the button and choose [Review Info] on the screen in the image. Viewing the histogram is displayed. However, simple information display is a histogram showing the distribution of brightness.

User Guide
Page 134
Editing Still Images 5 Review the new image. zzPress the button. [Display new image?] is not possible for images saved as a separate image file. 1 Choose [Cropping]. zzPress the buttons or ...
Editing Still Images 5 Review the new image. zzPress the button. [Display new image?] is not possible for images saved as a separate image file. 1 Choose [Cropping]. zzPress the buttons or ...

User Guide
Page 135
.... To crop the image based on =133 - 134. • Editing is not possible for images shot at a resolution of the image as a new image and review. Preview of the image to the other frame. zzFollow steps 4 - 5 on this frame, turn the dial to switch to be cropped. zzPress the button. 4 Save...
.... To crop the image based on =133 - 134. • Editing is not possible for images shot at a resolution of the image as a new image and review. Preview of the image to the other frame. zzFollow steps 4 - 5 on this frame, turn the dial to switch to be cropped. zzPress the button. 4 Save...
User Guide
Page 136
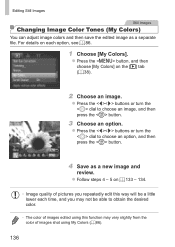
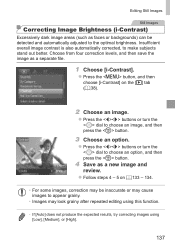
... Still Images Still Images Changing Image Color Tones (My Colors) You can adjust image colors and then save the edited image as a new image and review. For details on each time, and you repeatedly edit this function may not be a little lower each option, see =86. 1 Choose [My Colors]. zzPress the...
... Still Images Still Images Changing Image Color Tones (My Colors) You can adjust image colors and then save the edited image as a new image and review. For details on each time, and you repeatedly edit this function may not be a little lower each option, see =86. 1 Choose [My Colors]. zzPress the...
User Guide
Page 137
zzPress the buttons or turn the dial to choose an option, and then press the button. 4 Save as a new image and review. zzPress the buttons or turn the dial to make subjects stand out better. zzFollow steps 4 - 5 on the [1] tab (= 38). 2 Choose an image. Choose from four ...
zzPress the buttons or turn the dial to choose an option, and then press the button. 4 Save as a new image and review. zzPress the buttons or turn the dial to make subjects stand out better. zzFollow steps 4 - 5 on the [1] tab (= 38). 2 Choose an image. Choose from four ...

User Guide
Page 138
zzEnlarge or reduce images as a new image and review. zzPress the buttons or turn the dial to choose [New File], and then press the button. In this case, the original image will be erased. &#...
zzEnlarge or reduce images as a new image and review. zzPress the buttons or turn the dial to choose [New File], and then press the button. In this case, the original image will be erased. &#...

User Guide
Page 139
zzPress the buttons to choose [ ] or [ ]. zzEven if you can cut the portion from the nearest [ ] to the right. 3 Review the edited movie. zzFollowing steps 1 - 5 on the screen), press the buttons or turn the dial), and then press the button again. 139 zzPress the buttons ...
zzPress the buttons to choose [ ] or [ ]. zzEven if you can cut the portion from the nearest [ ] to the right. 3 Review the edited movie. zzFollowing steps 1 - 5 on the screen), press the buttons or turn the dial), and then press the button again. 139 zzPress the buttons ...

User Guide
Page 198
...-Eye Lamp On/Off Safety FE On Off i-Contrast (=83) Auto Off Safety Shift (=105) On Off Wind Filter (=58) On/Off Review (=63) Off/Quick/2 - 10 sec./Hold Review Info (=64) Off/Detailed/Focus Check Blink Detection (=61) On Off Grid Lines (=59) On/Off IS Mode (=101) Off/Continuous Shoot...
...-Eye Lamp On/Off Safety FE On Off i-Contrast (=83) Auto Off Safety Shift (=105) On Off Wind Filter (=58) On/Off Review (=63) Off/Quick/2 - 10 sec./Hold Review Info (=64) Off/Detailed/Focus Check Blink Detection (=61) On Off Grid Lines (=59) On/Off IS Mode (=101) Off/Continuous Shoot...


