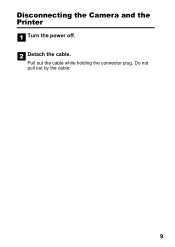
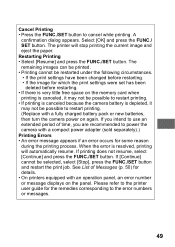
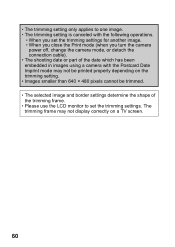
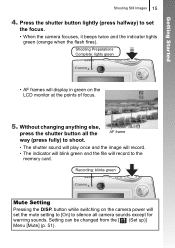
ZoomBrowser EX 6.5 for Windows Instruction Manual
Page 9
...Images Transferring Images by [Connect to Camera]. 1 Connect the camera to the computer with the supplied interface cable. 2 Turn on the camera power, set it to playback mode and prepare it to communicate with the computer. 3 When a window similar to the one at the right... appears, click [Downloads Images From Canon Camera using Canon CameraWindow], then click [OK]. 4. IMPORTANT • The instructions in the AutoPlay window. Please also refer to "Precautions for software installation procedures...
ZoomBrowser EX 6.5 for Windows Instruction Manual
Page 57
... data. Some models require the camera to be set to the playback mode to ensure that you are using the software. You are powering the camera with a battery. See "System Requirements" in the System Requirements section? Table of Contents 57 Start by Checking This Investigate ...the following points first if you are recommended to use an AC adapter (sold separately) to power the camera when it is connected to Remember Mastering the Basics More Advanced Techniques Appendices Troubleshooting Please read this section if you encounter a...
ImageBrowser 6.0.2a Updater for Mac OS X
Page 10
... of the desktop). 1 Connect the camera to the computer with the supplied interface cable. 2 Set the camera to the Playback mode and switch on the power. 3 Click [Transfer Untransferred Images Automatically].
Direct Print User Guide
Page 10
... the interface cable Camera: Connect the cable to the printer with the appropriate interface cable supplied with the camera. Turn the printer's power on the camera model, use the FUNC./SET button 8 and the JUMP button). • Resetting the camera's settings to their ...on . Some printers require specific connection cables which differ from the above cable. Depending on the camera model, the camera's power will automatically turn the power on printer and camera operation methods, refer to default. Set one of the following operations are not available during a camera...
Direct Print User Guide
Page 11
Pull out the cable while holding the connector plug. Detach the cable. Do not pull out by the cable. 9 Disconnecting the Camera and the Printer Turn the power off.
Direct Print User Guide
Page 20
... the following operations. • When you set the trimming settings for another image. • When you close the Print mode (when you turn the camera power off, change the camera mode, or detach the connection cable). • The shooting date or part of the trimming frame. • Please use the LCD...
Direct Print User Guide
Page 32
...cancel printing between images printed, press the FUNC./ SET button. If [Continue] cannot be possible to power the camera with a fully charged battery pack or new batteries, then turn the camera power on the memory card when printing is canceled, it may not be possible to restart printing. •... FUNC./SET button. The printer will automatically resume. See List of time, you are recommended to restart printing. (Replace with a compact power adapter (sold separately).) Printing Errors • An error message appears if an error occurs for details. 30 A confirmation dialog appears.
Direct Print User Guide
Page 43
...; The trimming setting only applies to set the trimming settings for another image. • When you close the Print mode (when you turn the camera power off, change the camera mode, or detach the connection cable). • The shooting date or part of the date which has been embedded in images...
Direct Print User Guide
Page 51
..., it may not be possible to use an extended period of Messages (p. 50) for details. • On printers equipped with a compact power adapter (sold separately).) Printing Errors • An error message appears if an error occurs for some reason during the printing process. Please refer ...to restart printing. (Replace with a fully charged battery pack or new batteries, then turn the camera power on again. If you intend to restart printing. • If printing is canceled because the camera battery is resolved, printing will stop printing...
Direct Print User Guide
Page 53
... Select [Continue] on the error screen to ascertain the problem and its remedy. The printer automatically starts printing the images from your nearest Canon Customer Support Center (listed in the contact list provided with another camera or modified using the screen (only the selectable paper sizes appear on...is displayed, please refer to the printer's user guide to print an image that the correct paper size is set , turn off the printer power. The printer is not compatible with the printer). You tried to ascertain the problem and its remedy. Select [Continue] on the screen), ...
Direct Print User Guide
Page 62
...; Please use the LCD monitor to set the trimming settings for another image. • When you close the Print mode (when you turn the camera power off, change the camera mode, or detach the connection cable). • The shooting date or part of the date which has been embedded in images...
Direct Print User Guide
Page 65
The trimming frame may not display correctly on the specified print size. • Use the LCD monitor to specify the print size settings. • The print size setting only applies to one image. • The print size setting is canceled with the following operations: • When you set the print size settings for another image. • When you close the Print mode (when you turn the camera power off, change the camera mode, or detach the connection cable). • The shape of the trimming frame varies depending on a TV screen. 63
Direct Print User Guide
Page 70
...[Standard], the [File No.] cannot be printed. • The ID photo print function cannot be possible to restart printing. (Replace with a compact power adapter (sold separately).) 68 The remaining images can be printed. • Printing cannot be restarted under the following circumstances. • If the print settings...use an extended period of images printed on one page in Setting the DPOF Print Settings to power the camera with a fully charged battery pack or new batteries, then turn the camera power on again. Once the current print is depleted, it may not be used. • ...
ZoomBrowser EX 6.0 Software User Guide
Page 10
... open when the camera is connected. With Windows Vista, click [Downloads Images From Canon Camera using Canon CameraWindow] in this case, double-click the ZoomBrowser EX icon on the power. 3 When a window similar to the one at the right appears, select [Canon CameraWindow] and click [OK]. Basic Functions & Features Contents Things to Remember Mastering...
PowerShot SD950 IS DIGITAL ELPH / DIGITAL IXUS 960 IS Camera User Guide
Page 4
... Learning More 37 Components Guide 38 Using the Touch Control Dial 41 Using the Button 43 How to Use the Mode Dial 44 Indicators 45 Power Saving Function 45 Basic Operations 47 Menus and Settings 47 Menus and Default Settings 49 Using the LCD Monitor 54 Information Displayed on the LCD...
PowerShot SD950 IS DIGITAL ELPH / DIGITAL IXUS 960 IS Camera User Guide
Page 10
... 2 hours 5 minutes. Getting Started 8 Preparations Preparations Charging the Battery 1. Remove the battery after charging is complete. Plug the battery charger (CB-2LX) into a power outlet, or attach the power cord to the battery charger (CB2LXE) and plug it for longer than 24 hours continuously. Charge Indicator For CB-2LX On Charging: lights... Indicator Charging Complete: lights green To protect the battery and prolong its life, do not charge it into the battery charger. Insert the battery into a power outlet.
PowerShot SD950 IS DIGITAL ELPH / DIGITAL IXUS 960 IS Camera User Guide
Page 14
... 3. Use the or button to select a category. 2. Select the year, month, day and time, and the display order. 1. Press the button. Press the power button. 2. Use the or button to select [Date/Time]. 4. Set the date and time as shown in step 3 and 4 in the explanation below. Press the... button. Power Button Button / / / Buttons 1. Getting Started 12 Preparations Setting the Date and Time The Date/Time settings menu will appear the first time the power is turned on. Press the button. 2.
PowerShot SD950 IS DIGITAL ELPH / DIGITAL IXUS 960 IS Camera User Guide
Page 16
Getting Started 14 Shooting Still Images Shooting Still Images ( Auto Mode) Indicators Power Button Shutter Button Mode Dial Button 1. Press the power button. • The start-up sound will play and the start-up image will display in the LCD monitor. • Pressing the power button again turns the power off. 2. Set the mode dial to (Auto). 3. Aim the camera at the subject.
PowerShot SD950 IS DIGITAL ELPH / DIGITAL IXUS 960 IS Camera User Guide
Page 17
... DISP. Press the shutter button lightly (press halfway) to shoot. Shooting Preparations Complete: lights green • AF frames will display in green on the camera power will record to silence all the way (press fully) to set the mute setting to [On] to the memory card.
PowerShot SD950 IS DIGITAL ELPH / DIGITAL IXUS 960 IS Camera User Guide
Page 20
Select a shooting mode. 1. Use the or button to (Movie). 2. Press the button. 3. Press the power button. 2. Set the mode dial to select (Standard). 4. Getting Started 18 Shooting Movies Shooting Movies ( Standard Mode) Power Button Shutter Button Mode Dial Button / Buttons 1. Press the button. 3. Aim the camera at the subject.