PowerShot S1 IS Quick Start Guide
Page 2
... the main window of ImageBrowser. You can magnify images and check the information on them from the following URL: http://web.canon.jp/Imaging/information-e.html • ZoomBrowser EX Software User Guide (Windows) • ImageBrowser Software User Guide (Macintosh) Viewing the... cover USB port 1. b. Click here to restart my computer now.] in USB ports. Double-click the [Canon ImageBrowser] icon on computers with the installation while reviewing installation settings. In the [CameraWindow-Download Image(s)] window, click [Start Image Download]. Install the software.
... the main window of ImageBrowser. You can magnify images and check the information on them from the following URL: http://web.canon.jp/Imaging/information-e.html • ZoomBrowser EX Software User Guide (Windows) • ImageBrowser Software User Guide (Macintosh) Viewing the... cover USB port 1. b. Click here to restart my computer now.] in USB ports. Double-click the [Canon ImageBrowser] icon on computers with the installation while reviewing installation settings. In the [CameraWindow-Download Image(s)] window, click [Start Image Download]. Install the software.

PowerShot S1 IS Camera User Guide
Page 4
... Setting the Shutter Selecting an AF Frame 75 Erasing Erasing Images Individually 43 Erasing All Images 44 Chapter 5. Shooting-The Basics Auto Mode 27 Reviewing an Image Right after Shooting 30 Changing the Resolution and Compression 32 Using the Built-in Sets of Contents Items marked with are lists...
... Setting the Shutter Selecting an AF Frame 75 Erasing Erasing Images Individually 43 Erasing All Images 44 Chapter 5. Shooting-The Basics Auto Mode 27 Reviewing an Image Right after Shooting 30 Changing the Resolution and Compression 32 Using the Built-in Sets of Contents Items marked with are lists...

PowerShot S1 IS Camera User Guide
Page 28
... displayed information (p. 24) appears clearly. Preparing the Camera Using the LCD Monitor The LCD monitor can be opened left to the following times. Š When reviewing an image right after it when the camera is shot in the LCD monitor (information view) or in use. Always keep the LCD monitor closed...
... displayed information (p. 24) appears clearly. Preparing the Camera Using the LCD Monitor The LCD monitor can be opened left to the following times. Š When reviewing an image right after it when the camera is shot in the LCD monitor (information view) or in use. Always keep the LCD monitor closed...
PowerShot S1 IS Camera User Guide
Page 32
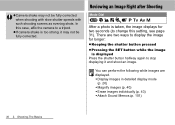
...; Display images in detailed display mode (p. 26) Š Magnify images (p. 40) Š Erase images individually (p. 43) Š Attach Sound Memos (p. 101) 30 2. Shooting-The Basics Reviewing an Image Right after Shooting Mode Dial After a photo is taken, the image displays for longer: z Keeping the shutter button pressed z Pressing the SET button...
...; Display images in detailed display mode (p. 26) Š Magnify images (p. 40) Š Erase images individually (p. 43) Š Attach Sound Memos (p. 101) 30 2. Shooting-The Basics Reviewing an Image Right after Shooting Mode Dial After a photo is taken, the image displays for longer: z Keeping the shutter button pressed z Pressing the SET button...

PowerShot S1 IS Camera User Guide
Page 33
The [ (Rec.)] menu appears. bSelect [Review] using the S or T arrow on the omni selector and select a duration setting using the W or X arrow on (p. 19), and press the MENU button. z You can .... z Another picture can continue to 10 sec.:Images appear for the time selected even if the shutter button is fully held pressed regardless of the Review setting. cPress the MENU button.
The [ (Rec.)] menu appears. bSelect [Review] using the S or T arrow on the omni selector and select a duration setting using the W or X arrow on (p. 19), and press the MENU button. z You can .... z Another picture can continue to 10 sec.:Images appear for the time selected even if the shutter button is fully held pressed regardless of the Review setting. cPress the MENU button.

PowerShot S1 IS Camera User Guide
Page 67
... registered on the LCD monitor (or in an automated slide show. Menu Item Spot AE Point MF-Point Zoom AF Mode Tally Lamp Digital Zoom Review Reverse Disp. Setting content Reference Page Sets the option of [Spot AE Point] (one of the light metering modes) to Center (the AE point is...
... registered on the LCD monitor (or in an automated slide show. Menu Item Spot AE Point MF-Point Zoom AF Mode Tally Lamp Digital Zoom Review Reverse Disp. Setting content Reference Page Sets the option of [Spot AE Point] (one of the light metering modes) to Center (the AE point is...
PowerShot S1 IS Camera User Guide
Page 103
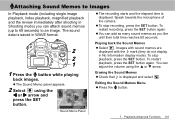
... z Select . You can attach sound memos (up to 60 seconds) to Images In Playback mode (including single image playback, index playback, magnified playback and the review immediately after shooting in Shooting mode) you like until their total time reaches 60 seconds. Playback-Advanced Functions 101 z The Sound Memo panel appears. 2 Select...
... z Select . You can attach sound memos (up to 60 seconds) to Images In Playback mode (including single image playback, index playback, magnified playback and the review immediately after shooting in Shooting mode) you like until their total time reaches 60 seconds. Playback-Advanced Functions 101 z The Sound Memo panel appears. 2 Select...

PowerShot S1 IS Camera User Guide
Page 161
...-Eye Reduction 10, 34, 36, 64 Remote Sensor 10 Resetting the File Numbers 110 Resetting the Settings to Default 68 Resolution 32 Reverse Disp 65 Review 65 Rotate 65 Rotating Images 100 S Saturation 82 Save Settings 65 Saving Custom Settings 98 Self-timer 12, 49, 64 Self-timer Sound 67, 111...
...-Eye Reduction 10, 34, 36, 64 Remote Sensor 10 Resetting the File Numbers 110 Resetting the Settings to Default 68 Resolution 32 Reverse Disp 65 Review 65 Rotate 65 Rotating Images 100 S Saturation 82 Save Settings 65 Saving Custom Settings 98 Self-timer 12, 49, 64 Self-timer Sound 67, 111...

Software Starter Guide Ver.16
Page 16
... to proceed. Select [Custom Installation] to select programs individually for your operating system). •Windows 2000/Windows 98: Canon Camera TWAIN Driver •Windows Me: Canon Camera WIA Driver With Windows XP, the USB driver supplied with an interface cable. 12 Installing the Software and USB...]. Ensure that you consent to the computer with the Windows operating system is used so there is connected to all the conditions. 8 Review the installation settings and click [Next]. When [Custom Installation] is Selected The USB driver (the software for connecting) is required when the...
... to proceed. Select [Custom Installation] to select programs individually for your operating system). •Windows 2000/Windows 98: Canon Camera TWAIN Driver •Windows Me: Canon Camera WIA Driver With Windows XP, the USB driver supplied with an interface cable. 12 Installing the Software and USB...]. Ensure that you consent to the computer with the Windows operating system is used so there is connected to all the conditions. 8 Review the installation settings and click [Next]. When [Custom Installation] is Selected The USB driver (the software for connecting) is required when the...
Software Starter Guide Ver.16
Page 52
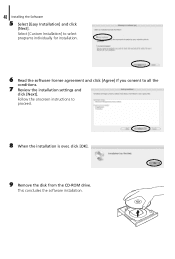
48 Installing the Software 5 Select [Easy Installation] and click [Next]. Select [Custom Installation] to select programs individually for installation. 6 Read the software license agreement and click [Agree] if you consent to proceed. 8 When the installation is over, click [OK]. 9 Remove the disk from the CD-ROM drive. Follow the onscreen instructions to all the conditions. 7 Review the installation settings and click [Next]. This concludes the software installation.
48 Installing the Software 5 Select [Easy Installation] and click [Next]. Select [Custom Installation] to select programs individually for installation. 6 Read the software license agreement and click [Agree] if you consent to proceed. 8 When the installation is over, click [OK]. 9 Remove the disk from the CD-ROM drive. Follow the onscreen instructions to all the conditions. 7 Review the installation settings and click [Next]. This concludes the software installation.


