User Manual
Page 2
... CB-2LH/CB-2LHE Wrist Strap * Do not peel off the adhesive covering from a battery pack. ●● Printed matter is also included. ●● A memory card is missing, contact your camera retailer. However, not all memory cards have been ...
... CB-2LH/CB-2LHE Wrist Strap * Do not peel off the adhesive covering from a battery pack. ●● Printed matter is also included. ●● A memory card is missing, contact your camera retailer. However, not all memory cards have been ...
User Manual
Page 4
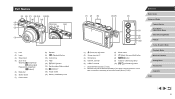
... (6) Shutter button (7) Power button (8) Speaker (9) [ (Playback)] button (10) Control ring (11) Flash (12) [ (Wi-Fi)] button (13) Serial number (Body number) (14) (N-Mark)*1 (15) Tripod socket (16) Memory card/battery cover (1) (2) (3) (4) (5) (6) (7) (8) (9) (10) (1) [ (Flash pop up)] switch (6) Movie button (2) Screen (monitor)*2 (7) [ (Quick Set menu/Set)] button (3) Microphone (8) [ ] button (4) DIGITAL terminal (9) Indicator / USB charge...
... (6) Shutter button (7) Power button (8) Speaker (9) [ (Playback)] button (10) Control ring (11) Flash (12) [ (Wi-Fi)] button (13) Serial number (Body number) (14) (N-Mark)*1 (15) Tripod socket (16) Memory card/battery cover (1) (2) (3) (4) (5) (6) (7) (8) (9) (10) (1) [ (Flash pop up)] switch (6) Movie button (2) Screen (monitor)*2 (7) [ (Quick Set menu/Set)] button (3) Microphone (8) [ ] button (4) DIGITAL terminal (9) Indicator / USB charge...

User Manual
Page 5
... Operations 17 Touching 17 Dragging 17 Initial Preparations 18 Attaching the Strap 18 Holding the Camera 18 Charging the Battery Pack 18 Inserting the Battery Pack and Your Memory Card 19 Removing the Battery Pack and Memory Card 20 Setting the Date and Time 20 Changing the Date and Time 21 Display Language...
... Operations 17 Touching 17 Dragging 17 Initial Preparations 18 Attaching the Strap 18 Holding the Camera 18 Charging the Battery Pack 18 Inserting the Battery Pack and Your Memory Card 19 Removing the Battery Pack and Memory Card 20 Setting the Date and Time 20 Changing the Date and Time 21 Display Language...
User Manual
Page 10
... Other Accessories 171 Printers 172 Photo and Movie Storage 172 Using Optional Accessories 172 Playback on a TV 172 Inserting and Charging the Battery Pack 173 Using a Computer to Charge the Battery 174 Using the Software 175 Before Use Basic Guide Advanced Guide Camera Basics Auto Mode / Hybrid Auto Mode Other Shooting Modes...
... Other Accessories 171 Printers 172 Photo and Movie Storage 172 Using Optional Accessories 172 Playback on a TV 172 Inserting and Charging the Battery Pack 173 Using a Computer to Charge the Battery 174 Using the Software 175 Before Use Basic Guide Advanced Guide Camera Basics Auto Mode / Hybrid Auto Mode Other Shooting Modes...
User Manual
Page 11
... to a Photobook 183 Removing All Images from a Photobook 184 Appendix 185 Troubleshooting 185 On-Screen Messages 189 On-Screen Information 192 Shooting (Information Display 192 Battery Level 192 During Playback 193 Info Display 1 193 Info Display 2 193 Info Display 3 194 Info Display 4 194 Info Display 5 194 Summary of Movie Control Panel...
... to a Photobook 183 Removing All Images from a Photobook 184 Appendix 185 Troubleshooting 185 On-Screen Messages 189 On-Screen Information 192 Shooting (Information Display 192 Battery Level 192 During Playback 193 Info Display 1 193 Info Display 2 193 Info Display 3 194 Info Display 4 194 Info Display 5 194 Summary of Movie Control Panel...
User Manual
Page 12
Operating Environment 213 Dimensions (CIPA Compliant 213 Weight (CIPA Compliant 213 Battery Pack NB-13L 214 Battery Charger CB-2LH/CB-2LHE 214 Compact Power Adapter CA-DC30/CA-DC30E 214 Index 215 Precautions for Wireless Features (Wi-Fi, Bluetooth, or Others ...
Operating Environment 213 Dimensions (CIPA Compliant 213 Weight (CIPA Compliant 213 Battery Pack NB-13L 214 Battery Charger CB-2LH/CB-2LHE 214 Compact Power Adapter CA-DC30/CA-DC30E 214 Index 215 Precautions for Wireless Features (Wi-Fi, Bluetooth, or Others ...
User Manual
Page 14
... power sources. ●● Do not disassemble, alter, or apply heat to the product. ●● Do not peel off the adhesive covering, if the battery pack has it. ●● Avoid dropping or subjecting the product to severe impacts. ●● Do not touch the interior of the product if... online -- =145 ●● Send images to also check the guides included with liquid, and do not allow liquid or foreign objects inside , remove the battery pack/batteries or unplug immediately.
... power sources. ●● Do not disassemble, alter, or apply heat to the product. ●● Do not peel off the adhesive covering, if the battery pack has it. ●● Avoid dropping or subjecting the product to severe impacts. ●● Do not touch the interior of the product if... online -- =145 ●● Send images to also check the guides included with liquid, and do not allow liquid or foreign objects inside , remove the battery pack/batteries or unplug immediately.
User Manual
Page 15
...electrical shock or fire. ●● Turn the camera off , it . ●● Use only the recommended battery pack/batteries. ●● Do not place the battery pack/batteries near or in redness of the power outlet, and the surrounding area. -- If the screen cracks, injury may ...and damage may cause low-temperature burns, manifested in direct flame. Places subject to temperatures above 40 °C (104 °F) -- If leaking battery electrolyte comes into contact with eyes, mouth, skin, or clothing, immediately flush with wet hands. -- This could lead to injury or damage the...
...electrical shock or fire. ●● Turn the camera off , it . ●● Use only the recommended battery pack/batteries. ●● Do not place the battery pack/batteries near or in redness of the power outlet, and the surrounding area. -- If the screen cracks, injury may ...and damage may cause low-temperature burns, manifested in direct flame. Places subject to temperatures above 40 °C (104 °F) -- If leaking battery electrolyte comes into contact with eyes, mouth, skin, or clothing, immediately flush with wet hands. -- This could lead to injury or damage the...
User Manual
Page 16
...plugged in for a long period of time may cause the product to overheat and distort, resulting in fire. ●● Do not leave any battery charger used with the product when not in use. This may cause it to malfunction. ●● When putting the camera in product damage ...or fire. ●● If your product uses multiple batteries, do not use batteries that have different levels of property damage. ●● Do not aim the camera at a windy location, be careful not to allow dust...
...plugged in for a long period of time may cause the product to overheat and distort, resulting in fire. ●● Do not leave any battery charger used with the product when not in use. This may cause it to malfunction. ●● When putting the camera in product damage ...or fire. ●● If your product uses multiple batteries, do not use batteries that have different levels of property damage. ●● Do not aim the camera at a windy location, be careful not to allow dust...
User Manual
Page 18
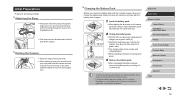
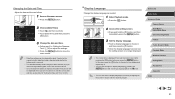
... Hybrid Auto Mode Other Shooting Modes P Mode Tv, Av, M, and C Mode Playback Mode Wireless Features Setting Menu Accessories Appendix Index 18 Charging the Battery Pack Before use a power cord, do not charge it from moving. zzCB-2LHE: Plug the power cord into the charger, then plug the other... Camera zzPlace the strap around your body and hold the camera securely to your wrist. zzAfter aligning the marks on it in (1) and up (2). ●● To protect the battery pack and keep your arms close to prevent it continuously for shooting as follows. zzThe charging lamp turns ...
... Hybrid Auto Mode Other Shooting Modes P Mode Tv, Av, M, and C Mode Playback Mode Wireless Features Setting Menu Accessories Appendix Index 18 Charging the Battery Pack Before use a power cord, do not charge it from moving. zzCB-2LHE: Plug the power cord into the charger, then plug the other... Camera zzPlace the strap around your body and hold the camera securely to your wrist. zzAfter aligning the marks on it in (1) and up (2). ●● To protect the battery pack and keep your arms close to prevent it continuously for shooting as follows. zzThe charging lamp turns ...
User Manual
Page 19
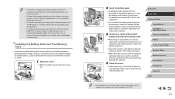
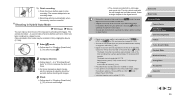
... Mode Wireless Features Setting Menu Accessories Appendix Index 19 For power outlets in areas with 100 - 240 V AC power (50/60 Hz). zzHolding the battery pack with the terminals in another device, you insert it clicks into the correct position. ●● For details on charging time and the number...on how many shots or hours of recording can be saved on one . ●● The charger can be locked into place. Note that the battery pack is in the locked position. zzRecording is facing the right way when you should format the memory card with this camera (= 162). 1 Open ...
... Mode Wireless Features Setting Menu Accessories Appendix Index 19 For power outlets in areas with 100 - 240 V AC power (50/60 Hz). zzHolding the battery pack with the terminals in another device, you insert it clicks into the correct position. ●● For details on charging time and the number...on how many shots or hours of recording can be saved on one . ●● The charger can be locked into place. Note that the battery pack is in the locked position. zzRecording is facing the right way when you should format the memory card with this camera (= 162). 1 Open ...
User Manual
Page 20
... and Memory Card Remove the battery pack. zzPush the memory card in the direction of the arrow. zzWhen finished, press the [ ] button. ... will pop up . Remove the memory card. zzPress the [ ] button when finished. zzOpen the cover and press the battery lock in until it clicks, and then slowly release it is used when you manage images by shooting date or print images... the camera on. After a confirmation message, the setting screen is displayed. 2 Set the date and time. zzThe battery pack will pop up . zzPress the power button. zzThe [Date/Time] screen is no longer displayed.
... and Memory Card Remove the battery pack. zzPush the memory card in the direction of the arrow. zzWhen finished, press the [ ] button. ... will pop up . Remove the memory card. zzPress the [ ] button when finished. zzOpen the cover and press the battery lock in until it clicks, and then slowly release it is used when you manage images by shooting date or print images... the camera on. After a confirmation message, the setting screen is displayed. 2 Set the date and time. zzThe battery pack will pop up . zzPress the power button. zzThe [Date/Time] screen is no longer displayed.
User Manual
Page 21
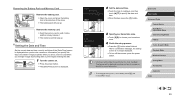
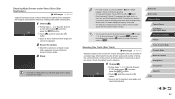
... the [ ] button. 3 Set the display language. zzOnce the display language has been set the display language by the camera's built-in date/time battery (backup battery) after pressing the [ ] button before you turn the camera on the screen in "Setting the Date and Time" (=20) to dismiss the time ... ] on the [ 3] tab. ●● You can be retained for about 4 hours once you insert a charged battery pack, even if the camera is left off. ●● Once the date/time battery is displayed if you wait too long in "Setting the Date and Time" (= 20). zzTouch [Date/Time], and...
... the [ ] button. 3 Set the display language. zzOnce the display language has been set the display language by the camera's built-in date/time battery (backup battery) after pressing the [ ] button before you turn the camera on the screen in "Setting the Date and Time" (=20) to dismiss the time ... ] on the [ 3] tab. ●● You can be retained for about 4 hours once you insert a charged battery pack, even if the camera is left off. ●● Once the date/time battery is displayed if you wait too long in "Setting the Date and Time" (= 20). zzTouch [Date/Time], and...

User Manual
Page 26
... blurry if you move the camera (or the subject moves) before the shutter sound ends. Power-Saving Features (Auto Power Down) As a way to conserve battery power, the camera automatically deactivates the screen (Display Off) and then turns itself off after about five minutes of inactivity. ●● You can deactivate...
... blurry if you move the camera (or the subject moves) before the shutter sound ends. Power-Saving Features (Auto Power Down) As a way to conserve battery power, the camera automatically deactivates the screen (Display Off) and then turns itself off after about five minutes of inactivity. ●● You can deactivate...

User Manual
Page 31
... off (=26, =163, =164) Charging via a compact power adapter ●● When the indicator blinks green, never turn the camera off, open the memory card/battery cover, or shake or hit the camera, which may corrupt images or damage the camera or memory card. Indicator Display The indicator on the camera...
... off (=26, =163, =164) Charging via a compact power adapter ●● When the indicator blinks green, never turn the camera off, open the memory card/battery cover, or shake or hit the camera, which may corrupt images or damage the camera or memory card. Indicator Display The indicator on the camera...
User Manual
Page 35
...) to [ ] for NTSC or [ ] for each shot, which ends with the still image and a shutter sound, forms a single chapter in the digest movie. ●● Battery life is created (=161). ●● Recorded shutter sounds cannot be edited (=127). The digest movie file size reaches approximately 4 GB, or the total recording...
...) to [ ] for NTSC or [ ] for each shot, which ends with the still image and a shutter sound, forms a single chapter in the digest movie. ●● Battery life is created (=161). ●● Recorded shutter sounds cannot be edited (=127). The digest movie file size reaches approximately 4 GB, or the total recording...
User Manual
Page 62
... to maximum wide angle and cannot be a delay before shooting. ●● To make stars brighter, choose MENU (=29) > [ 6] tab > [Star Emphasis] > [Sharp]. Check the battery level in the image is set [Star Emphasis] to about two hours. Starlight in advance. 1 Choose [ ]. zzFollow steps 1 - 2 in "Specific Scenes" (=53) and choose [ ], and...
... to maximum wide angle and cannot be a delay before shooting. ●● To make stars brighter, choose MENU (=29) > [ 6] tab > [Star Emphasis] > [Sharp]. Check the battery level in the image is set [Star Emphasis] to about two hours. Starlight in advance. 1 Choose [ ]. zzFollow steps 1 - 2 in "Specific Scenes" (=53) and choose [ ], and...

User Manual
Page 63
... C Mode Playback Mode Wireless Features Setting Menu Accessories Appendix Index 63 zzTo cancel shooting, press the shutter button all the way down again. Check the battery level and memory card space in "Specific Scenes" (=53) and choose [ ], and then press the [ ] button. 2 Specify the duration of "Specific Scenes" (=..., as needed. zzMount the camera on a tripod or take up to about 30 seconds. ●● If the camera runs out of battery power, shooting stops and a composite image created from the images up to that each session takes a long time, and requires many shots. ...
... C Mode Playback Mode Wireless Features Setting Menu Accessories Appendix Index 63 zzTo cancel shooting, press the shutter button all the way down again. Check the battery level and memory card space in "Specific Scenes" (=53) and choose [ ], and then press the [ ] button. 2 Specify the duration of "Specific Scenes" (=..., as needed. zzMount the camera on a tripod or take up to about 30 seconds. ●● If the camera runs out of battery power, shooting stops and a composite image created from the images up to that each session takes a long time, and requires many shots. ...

User Manual
Page 64
... and change the exposure level. zzSwitch to shoot a single still image. Note that when [Enable] is selected, [Effect] is not available. To record until the battery runs out, choose [Unlimited]. zzTo adjust the brightness, turn the [ ] ring on a tripod or take up to about 30 seconds. Choose the length of the...
... and change the exposure level. zzSwitch to shoot a single still image. Note that when [Enable] is selected, [Effect] is not available. To record until the battery runs out, choose [Unlimited]. zzTo adjust the brightness, turn the [ ] ring on a tripod or take up to about 30 seconds. Choose the length of the...
User Manual
Page 65
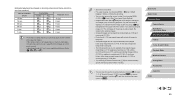
... sec. 30 sec. 30 sec. 1 min. If you can shoot again, as the camera processes the images. ●● If the camera runs out of battery power or memory card space, shooting stops and a movie created from the images up individual image printing (=182), or adding to access the setting screen...
... sec. 30 sec. 30 sec. 1 min. If you can shoot again, as the camera processes the images. ●● If the camera runs out of battery power or memory card space, shooting stops and a movie created from the images up individual image printing (=182), or adding to access the setting screen...
