
PowerShot G1 X Camera User Guide
Page 2
... your camera dealer. Camera Battery Pack NB-10L (with terminal cover) Battery Charger CB-2LC/CB-2LCE Interface Cable IFC-400PCU Neck Strap NS-DC9 Lens Cap (with the camera. 2
... your camera dealer. Camera Battery Pack NB-10L (with terminal cover) Battery Charger CB-2LC/CB-2LCE Interface Cable IFC-400PCU Neck Strap NS-DC9 Lens Cap (with the camera. 2

PowerShot G1 X Camera User Guide
Page 4
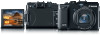
... m FUNC./SET button on back r Right button on back p Down button on back • On-screen text is indicated in This Guide Front dial Lamp Lens Zoom lever Shooting: i (telephoto) / j (wide angle) Playback: k (magnify) / g (index) Strap mount Shutter button Power button/lamp Mode dial Exposure compensation dial Hot shoe (Pop up...
... m FUNC./SET button on back r Right button on back p Down button on back • On-screen text is indicated in This Guide Front dial Lamp Lens Zoom lever Shooting: i (telephoto) / j (wide angle) Playback: k (magnify) / g (index) Strap mount Shutter button Power button/lamp Mode dial Exposure compensation dial Hot shoe (Pop up...

PowerShot G1 X Camera User Guide
Page 11
... an explosion of the battery, resulting in electrical shock, fire, burns or other objects. • Be careful not to bump or push strongly on the lens. Humid or dusty areas These could result in burns or damage to the flash. • Avoid using the camera on a beach or at bright light...
... an explosion of the battery, resulting in electrical shock, fire, burns or other objects. • Be careful not to bump or push strongly on the lens. Humid or dusty areas These could result in burns or damage to the flash. • Avoid using the camera on a beach or at bright light...

PowerShot G1 X Camera User Guide
Page 13
... your body and hold the camera securely to the neck strap when the cap is not in use . Attaching Accessories Attach the strap. Attach the lens cap to the camera as follows. z On the other side of the camera, attach the strap the same way. z Keep the... have raised the flash, do not rest your neck. z Always remove the lens cap before turning the camera on it from the lens and attach the lens cap cord to the strap. z Attach the included strap to the strap. z Remove the lens cap from moving. Holding the Camera z Place the strap around your fingers...
... your body and hold the camera securely to the neck strap when the cap is not in use . Attaching Accessories Attach the strap. Attach the lens cap to the camera as follows. z On the other side of the camera, attach the strap the same way. z Keep the... have raised the flash, do not rest your neck. z Always remove the lens cap before turning the camera on it from the lens and attach the lens cap cord to the strap. z Attach the included strap to the strap. z Remove the lens cap from moving. Holding the Camera z Place the strap around your fingers...

PowerShot G1 X Camera User Guide
Page 17
... be able to shoot a movie. • When including yourself in shots, you can view a mirror image of yourself by rotating the screen around toward the lens 180° ( ). z Open the screen ( ) and rotate it toward the front of the camera. z Close the screen in this orientation ( ). • The screen can only...
... be able to shoot a movie. • When including yourself in shots, you can view a mirror image of yourself by rotating the screen around toward the lens 180° ( ). z Open the screen ( ) and rotate it toward the front of the camera. z Close the screen in this orientation ( ). • The screen can only...

PowerShot G1 X Camera User Guide
Page 32
... EXPLOSION IF BATTERY IS REPLACED BY AN INCORRECT TYPE. DISPOSE OF USED BATTERIES ACCORDING TO LOCAL REGULATION. 32 Accessories Included Accessories Neck Strap NS-DC9 Lens Cap Battery Pack Battery Charger (with cord) NB-10L*1 CB-2LC/ (with terminal cover) CB-2LCE*1 DIGITAL CAMERA Solution Disk Interface Cable IFC-400PCU*1 Power...
... EXPLOSION IF BATTERY IS REPLACED BY AN INCORRECT TYPE. DISPOSE OF USED BATTERIES ACCORDING TO LOCAL REGULATION. 32 Accessories Included Accessories Neck Strap NS-DC9 Lens Cap Battery Pack Battery Charger (with cord) NB-10L*1 CB-2LC/ (with terminal cover) CB-2LCE*1 DIGITAL CAMERA Solution Disk Interface Cable IFC-400PCU*1 Power...

PowerShot G1 X Camera User Guide
Page 33
... Accessories Macro Ring Lite MR-14EX*4 Waterproof Case WP-DC44 *5 Soft Case SC-DC75 Lens Accessories Canon-brand Lens Filter (58 mm dia.)*6 Lens Hood LH-DC70 Canon PictBridge-Compatible Printers Other Accessories Remote Switch RS60-E3 Use of non-genuine Canon accessories, although you may request such repairs on a chargeable basis. 33 Please note that...
... Accessories Macro Ring Lite MR-14EX*4 Waterproof Case WP-DC44 *5 Soft Case SC-DC75 Lens Accessories Canon-brand Lens Filter (58 mm dia.)*6 Lens Hood LH-DC70 Canon PictBridge-Compatible Printers Other Accessories Remote Switch RS60-E3 Use of non-genuine Canon accessories, although you may request such repairs on a chargeable basis. 33 Please note that...

PowerShot G1 X Camera User Guide
Page 36
... button. • To switch to Shooting mode from Playback mode, press the shutter button halfway (p. 37). • The lens will be retracted after about two more minutes, the lens is retracted and the camera turns itself off automatically after about one minute of inactivity. You can also adjust the timing... Press the power button to turn the camera on and view your shots. Power Saving in Playback Mode The camera turns itself off when the lens is in Shooting Mode The screen is still out, press the shutter button halfway (p. 37). z To turn the camera off after about one...
... button. • To switch to Shooting mode from Playback mode, press the shutter button halfway (p. 37). • The lens will be retracted after about two more minutes, the lens is retracted and the camera turns itself off automatically after about one minute of inactivity. You can also adjust the timing... Press the power button to turn the camera on and view your shots. Power Saving in Playback Mode The camera turns itself off when the lens is in Shooting Mode The screen is still out, press the shutter button halfway (p. 37). z To turn the camera off after about one...

PowerShot G1 X Camera User Guide
Page 38
... is not possible. 38 Adjust the diopter. z As you can use the optical viewfinder instead of the screen. Check the settings before shooting. • The lens may differ slightly from the image area in your shots. Deactivate the screen. Shoot the same way as when using the screen.
... is not possible. 38 Adjust the diopter. z As you can use the optical viewfinder instead of the screen. Check the settings before shooting. • The lens may differ slightly from the image area in your shots. Deactivate the screen. Shoot the same way as when using the screen.

PowerShot G1 X Camera User Guide
Page 74
...by blurring image areas above and below your shot will move it. 74 Image Effects (Creative Filters) Still Images Shooting with a Fish-Eye Lens Effect (Fish-eye Effect) Shoot with the effect applied. z Move the zoom lever to resize the frame, and turn the 7 dial .... z Follow steps 1 - 2 on p. 71 and choose . Still Images Movies Shots Resembling Miniature Models (Miniature Effect) Creates the effect of a fish-eye lens. Shoot. z Press the button. Choose . People and objects in the scene will look like scenes in focus. X A white frame is displayed, indicating the image...
...by blurring image areas above and below your shot will move it. 74 Image Effects (Creative Filters) Still Images Shooting with a Fish-Eye Lens Effect (Fish-eye Effect) Shoot with the effect applied. z Move the zoom lever to resize the frame, and turn the 7 dial .... z Follow steps 1 - 2 on p. 71 and choose . Still Images Movies Shots Resembling Miniature Models (Miniature Effect) Creates the effect of a fish-eye lens. Shoot. z Press the button. Choose . People and objects in the scene will look like scenes in focus. X A white frame is displayed, indicating the image...

PowerShot G1 X Camera User Guide
Page 106
... the shutter button halfway to [ (p. 53). Shooting Range and Focusing • If the flash fires, vignetting may occur. • Be careful to avoid damaging the lens. • In the yellow bar display area below the zoom bar, e will turn gray and the camera will not focus. • To prevent camera shake...
... the shutter button halfway to [ (p. 53). Shooting Range and Focusing • If the flash fires, vignetting may occur. • Be careful to avoid damaging the lens. • In the yellow bar display area below the zoom bar, e will turn gray and the camera will not focus. • To prevent camera shake...

PowerShot G1 X Camera User Guide
Page 107
... zoom (p. 51) or digital tele-converter, or when using a TV as a display (p. 187), but the magnified display will look grainy at a resolution (p. 57) of the lens can reduce camera shake because the shutter speed is faster than it . • To hide the magnified display area, press the n button and set [Safety...
... zoom (p. 51) or digital tele-converter, or when using a TV as a display (p. 187), but the magnified display will look grainy at a resolution (p. 57) of the lens can reduce camera shake because the shutter speed is faster than it . • To hide the magnified display area, press the n button and set [Safety...

PowerShot G1 X Camera User Guide
Page 125
... exposure cannot otherwise be obtained. Press the n button and set the aperture value. • Orange display of the opening made by the iris in the lens) • To avoid exposure problems in the Getting Started guide. z Set the mode dial to set [Safety Shift] on available aperture values, see below). •...
... exposure cannot otherwise be obtained. Press the n button and set the aperture value. • Orange display of the opening made by the iris in the lens) • To avoid exposure problems in the Getting Started guide. z Set the mode dial to set [Safety Shift] on available aperture values, see below). •...

PowerShot G1 X Camera User Guide
Page 174
...], and then choose [0 sec.]. z Choose [Power Saving], and then press the m button. Access the [Power Saving] screen. To have the lens retracted immediately after you press the 1 button in Shooting mode (p. 36). Configure the settings. Power-Saving Adjustment Adjust the timing of automatic camera and screen ... Off] setting is normally retracted for safety about one minute after you press the 1 button, set [Auto Power Down] to [0 sec.]. Adjusting Basic Camera Functions Lens Retraction Timing The lens is applied even if you set the retraction timing to [Off]. 174
...], and then choose [0 sec.]. z Choose [Power Saving], and then press the m button. Access the [Power Saving] screen. To have the lens retracted immediately after you press the 1 button in Shooting mode (p. 36). Configure the settings. Power-Saving Adjustment Adjust the timing of automatic camera and screen ... Off] setting is normally retracted for safety about one minute after you press the 1 button, set [Auto Power Down] to [0 sec.]. Adjusting Basic Camera Functions Lens Retraction Timing The lens is applied even if you set the retraction timing to [Off]. 174

PowerShot G1 X Camera User Guide
Page 185
... way down). For details, visit your nearest Canon dealer. 185 Filter Adapter FA-DC58C z Adapter required when mounting a 58 mm filter. Lens Hood LH-DC70 z Prevents extraneous light outside the angle of shooting effects. • A lens hood and filter adapter cannot be attached to... TV screen. Optional Accessories Stereo AV Cable AVC-DC400ST z Connect the camera to a TV to a Canon PictBridge-compatible printer. Canon Lens Filter (58 mm dia.) z Protects the lens and enables a variety of view from entering the lens and causing flares or ghosting, which reduce image quality.
... way down). For details, visit your nearest Canon dealer. 185 Filter Adapter FA-DC58C z Adapter required when mounting a 58 mm filter. Lens Hood LH-DC70 z Prevents extraneous light outside the angle of shooting effects. • A lens hood and filter adapter cannot be attached to... TV screen. Optional Accessories Stereo AV Cable AVC-DC400ST z Connect the camera to a TV to a Canon PictBridge-compatible printer. Canon Lens Filter (58 mm dia.) z Protects the lens and enables a variety of view from entering the lens and causing flares or ghosting, which reduce image quality.

PowerShot G1 X Camera User Guide
Page 191
... LH-DC70 to the camera at the same time. 191 z Align the lens hood mark ( ) with the camera mark ( ), and turn it locks in flash when the lens hood is attached. • The filter adapter and a lens hood cannot be attached to prevent light outside the angle of the arrow until it ...the opposite direction. • Vignetting may occur if you use the built-in place. Attach the hood. z To remove the lens hood, turn the lens hood in the direction of view...
... LH-DC70 to the camera at the same time. 191 z Align the lens hood mark ( ) with the camera mark ( ), and turn it locks in flash when the lens hood is attached. • The filter adapter and a lens hood cannot be attached to prevent light outside the angle of the arrow until it ...the opposite direction. • Vignetting may occur if you use the built-in place. Attach the hood. z To remove the lens hood, turn the lens hood in the direction of view...

PowerShot G1 X Camera User Guide
Page 192
... notches on the camera and the filter adapter and turn it to attach the filter too tightly. Attaching multiple filters, or accessories such as a heavy lens, may appear darker. • When using the filter adapter, be attached to the camera at a time. z To remove the filter adapter, turn the adapter ... attach it in the opposite direction. Doing so could prevent removal of the filter and damage the camera. • We recommend the use of genuine Canon filters (58 mm dia.). • When not using auto focus to shoot, set the manual focus option [Safety MF] to [On]. • If you ...
... notches on the camera and the filter adapter and turn it to attach the filter too tightly. Attaching multiple filters, or accessories such as a heavy lens, may appear darker. • When using the filter adapter, be attached to the camera at a time. z To remove the filter adapter, turn the adapter ... attach it in the opposite direction. Doing so could prevent removal of the filter and damage the camera. • We recommend the use of genuine Canon filters (58 mm dia.). • When not using auto focus to shoot, set the manual focus option [Safety MF] to [On]. • If you ...

PowerShot G1 X Camera User Guide
Page 216
...(p. 15). • Confirm that the memory card/battery cover is fully closed (p. 16). • Dirty battery terminals reduce battery performance. The lens is not retracted. • Do not open the memory card/battery cover while the camera is a problem with the camera, first check the ... the battery a few times. The battery is swollen. • Battery swelling is still depleted soon after charging, it in the camera, contact a Canon Customer Support Help Desk. Shooting Cannot shoot. • In Playback mode (p. 20), press the shutter button halfway (p. 37). Troubleshooting If you are ...
...(p. 15). • Confirm that the memory card/battery cover is fully closed (p. 16). • Dirty battery terminals reduce battery performance. The lens is not retracted. • Do not open the memory card/battery cover while the camera is a problem with the camera, first check the ... the battery a few times. The battery is swollen. • Battery swelling is still depleted soon after charging, it in the camera, contact a Canon Customer Support Help Desk. Shooting Cannot shoot. • In Playback mode (p. 20), press the shutter button halfway (p. 37). Troubleshooting If you are ...

PowerShot G1 X Camera User Guide
Page 221
... this case, contact a Canon Customer Support Help Desk. Print error • Check the paper size setting. On-Screen Messages Exceeded selection limit • More than 500 images in dusty or sandy locations. • Frequent display of this error message may indicate camera damage. Lens Error • This error... may occur if the lens is held while it is moving, or when the camera is used in Protect (p. 148), Erase (p. 152), Favorites ...
... this case, contact a Canon Customer Support Help Desk. Print error • Check the paper size setting. On-Screen Messages Exceeded selection limit • More than 500 images in dusty or sandy locations. • Frequent display of this error message may indicate camera damage. Lens Error • This error... may occur if the lens is held while it is moving, or when the camera is used in Protect (p. 148), Erase (p. 152), Favorites ...

PowerShot G1 X Camera User Guide
Page 234
Functions and Menu Tables 3 Set up Menu Item Mute Volume Sound Options Hints & Tips LCD Brightness Start-up Image Format File Numbering Create Folder Lens Retract Power Saving Ref. Page p. 133 234 Page p. 175 p. 19 p. 176 p. 176 p. 187 p. 188 p. 212 p. 177 p. 20 p. 179 My Menu Menu Item My Menu settings Ref. Page p. 168 p. 168 p. 169 p. 169 p. 170 p. 170 pp. 171, 172 p. 173 p. 173 p. 174 pp. 36, 174 Item Time Zone Date/Time Distance Units Electronic Level Video System Ctrl via HDMI Eye-Fi Settings Copyright Info Language Reset All Ref.
Functions and Menu Tables 3 Set up Menu Item Mute Volume Sound Options Hints & Tips LCD Brightness Start-up Image Format File Numbering Create Folder Lens Retract Power Saving Ref. Page p. 133 234 Page p. 175 p. 19 p. 176 p. 176 p. 187 p. 188 p. 212 p. 177 p. 20 p. 179 My Menu Menu Item My Menu settings Ref. Page p. 168 p. 168 p. 169 p. 169 p. 170 p. 170 pp. 171, 172 p. 173 p. 173 p. 174 pp. 36, 174 Item Time Zone Date/Time Distance Units Electronic Level Video System Ctrl via HDMI Eye-Fi Settings Copyright Info Language Reset All Ref.


