User Guide
Page 18
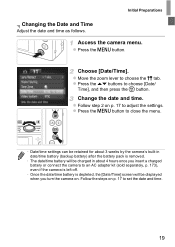
... off. • Once the date/time battery is depleted, the [Date/Time] screen will be charged in about 4 hours once you insert a charged battery or connect the camera to adjust the settings. z Press the n button. Change the date and time. z Press the op buttons to choose the 3 tab. Access the camera...
... off. • Once the date/time battery is depleted, the [Date/Time] screen will be charged in about 4 hours once you insert a charged battery or connect the camera to adjust the settings. z Press the n button. Change the date and time. z Press the op buttons to choose the 3 tab. Access the camera...
User Guide
Page 25
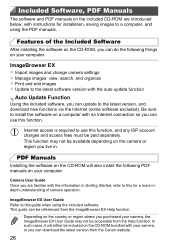
... on the CD-ROM bundled with the information in . PDF Manuals Installing the software on the CD-ROM will either be accessible from the Canon website. 26 ImageBrowser EX User Guide Refer to a computer, and using the included software. ImageBrowser EX z Import images and change camera settings... z Manage images: view, search, and organize z Print and edit images z Update to the latest software version with an Internet connection so you can update to use this guide when using the PDF manuals. Be sure to install the software on a computer with the auto ...
... on the CD-ROM bundled with the information in . PDF Manuals Installing the software on the CD-ROM will either be accessible from the Canon website. 26 ImageBrowser EX User Guide Refer to a computer, and using the included software. ImageBrowser EX z Import images and change camera settings... z Manage images: view, search, and organize z Print and edit images z Update to the latest software version with an Internet connection so you can update to use this guide when using the PDF manuals. Be sure to install the software on a computer with the auto ...
User Guide
Page 26
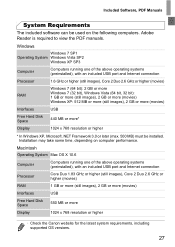
.... Macintosh Operating System Mac OS X 10.6 Computer Computers running one of the above operating systems (preinstalled), with an included USB port and Internet connection Processor 1.6 GHz or higher (still images), Core 2 Duo 2.6 GHz or higher (movies) RAM Windows 7 (64 bit): 2 GB or more... (movies) Interfaces USB Free Hard Disk Space 440 MB or more Display 1024 x 768 resolution or higher • Check the Canon website for the latest system requirements, including supported OS versions. 27 Installation may take some time, depending on the following computers. ...
.... Macintosh Operating System Mac OS X 10.6 Computer Computers running one of the above operating systems (preinstalled), with an included USB port and Internet connection Processor 1.6 GHz or higher (still images), Core 2 Duo 2.6 GHz or higher (movies) RAM Windows 7 (64 bit): 2 GB or more... (movies) Interfaces USB Free Hard Disk Space 440 MB or more Display 1024 x 768 resolution or higher • Check the Canon website for the latest system requirements, including supported OS versions. 27 Installation may take some time, depending on the following computers. ...
User Guide
Page 27
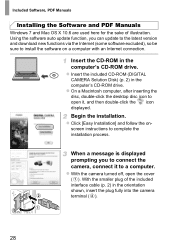
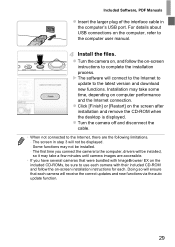
z Click [Easy Installation] and follow the on a computer with an Internet connection. screen instructions to install the software on - z With the camera turned off, open it to a computer. Using the software auto update function, you to open ...the cover ( ). z On a Macintosh computer, after inserting the disc, double-click the desktop disc icon to connect the camera, connect it , and then double-click the icon displayed. z Insert the included CD-ROM (DIGITAL CAMERA Solution Disk) (p. 2) in the computer's CD-ROM drive. With...
z Click [Easy Installation] and follow the on a computer with an Internet connection. screen instructions to install the software on - z With the camera turned off, open it to a computer. Using the software auto update function, you to open ...the cover ( ). z On a Macintosh computer, after inserting the disc, double-click the desktop disc icon to connect the camera, connect it , and then double-click the icon displayed. z Insert the included CD-ROM (DIGITAL CAMERA Solution Disk) (p. 2) in the computer's CD-ROM drive. With...
User Guide
Page 28
... the camera on, and follow the on the screen after installation and remove the CD-ROM when the desktop is displayed. The first time you connect the camera to the Internet, there are accessible. • If you have several cameras that each camera will receive the correct updates and new ... the computer, drivers will be installed, so it may take some time, depending on computer performance and the Internet connection. Doing so will connect to the Internet to update to use each . X The software will ensure that were bundled with ImageBrowser EX on the included CD-ROMs, be sure...
... the camera on, and follow the on the screen after installation and remove the CD-ROM when the desktop is displayed. The first time you connect the camera to the Internet, there are accessible. • If you have several cameras that each camera will receive the correct updates and new ... the computer, drivers will be installed, so it may take some time, depending on computer performance and the Internet connection. Doing so will connect to the Internet to update to use each . X The software will ensure that were bundled with ImageBrowser EX on the included CD-ROMs, be sure...
User Guide
Page 29
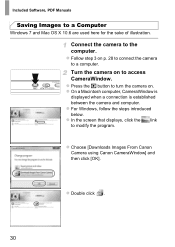
... used here for the sake of illustration. z Choose [Downloads Images From Canon Camera using Canon CameraWindow] and then click [OK]. Turn the camera on to turn the camera on p. 28 to connect the camera to the computer. z Press the 1 button to access CameraWindow. Connect the camera to a computer. z Follow step 3 on . z On a Macintosh computer...
... used here for the sake of illustration. z Choose [Downloads Images From Canon Camera using Canon CameraWindow] and then click [OK]. Turn the camera on to turn the camera on p. 28 to connect the camera to the computer. z Press the 1 button to access CameraWindow. Connect the camera to a computer. z Follow step 3 on . z On a Macintosh computer...
User Guide
Page 30
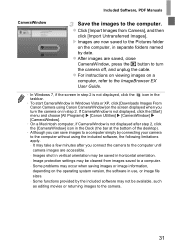
... images to the camera. 31 Some functions provided by the included software may be saved in separate folders named by connecting your camera to the ImageBrowser EX User Guide. • In Windows 7, if the screen in step 2 is not displayed after you...on in use, or image file sizes. - X Images are accessible. - If CameraWindow is not displayed, click the [Start] menu and choose [All Programs] X [Canon Utilities] X [CameraWindow] X [CameraWindow]. • On a Macintosh computer, if CameraWindow is not displayed, click the icon in the taskbar. • To start CameraWindow in...
... images to the camera. 31 Some functions provided by the included software may be saved in separate folders named by connecting your camera to the ImageBrowser EX User Guide. • In Windows 7, if the screen in step 2 is not displayed after you...on in use, or image file sizes. - X Images are accessible. - If CameraWindow is not displayed, click the [Start] menu and choose [All Programs] X [Canon Utilities] X [CameraWindow] X [CameraWindow]. • On a Macintosh computer, if CameraWindow is not displayed, click the icon in the taskbar. • To start CameraWindow in...
User Guide
Page 40
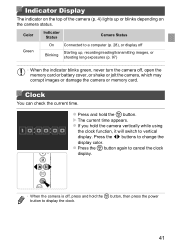
... You can check the current time. z Press the m button again to vertical display. X The current time appears. Color Indicator Status Camera Status Green On Blinking Connected to a computer (p. 28), or display off Starting up or blinks depending on the top of the camera (p. 4) lights up , recording/reading/transmitting images, or shooting...
... You can check the current time. z Press the m button again to vertical display. X The current time appears. Color Indicator Status Camera Status Green On Blinking Connected to a computer (p. 28), or display off Starting up or blinks depending on the top of the camera (p. 4) lights up , recording/reading/transmitting images, or shooting...
User Guide
Page 172
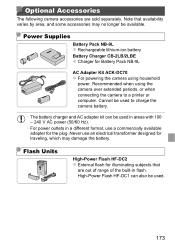
... a commercially available adapter for Battery Pack NB-9L AC Adapter Kit ACK-DC70 z For powering the camera using the camera over extended periods, or when connecting the camera to charge the camera battery. • The battery charger and AC adapter kit can also be available.
... a commercially available adapter for Battery Pack NB-9L AC Adapter Kit ACK-DC70 z For powering the camera using the camera over extended periods, or when connecting the camera to charge the camera battery. • The battery charger and AC adapter kit can also be available.
User Guide
Page 173
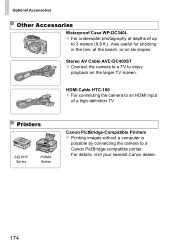
... camera to a TV to 3 meters (9.8 ft.). HDMI Cable HTC-100 z For connecting the camera to a Canon PictBridge-compatible printer. Printers SELPHY Series PIXMA Series Canon PictBridge-Compatible Printers z Printing images without a computer is possible by connecting the camera to an HDMI input of up to enjoy playback on ski slopes. Optional Accessories Other Accessories...
... camera to a TV to 3 meters (9.8 ft.). HDMI Cable HTC-100 z For connecting the camera to a Canon PictBridge-compatible printer. Printers SELPHY Series PIXMA Series Canon PictBridge-Compatible Printers z Printing images without a computer is possible by connecting the camera to an HDMI input of up to enjoy playback on ski slopes. Optional Accessories Other Accessories...
User Guide
Page 174
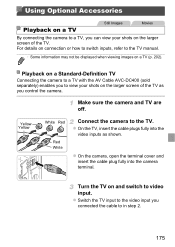
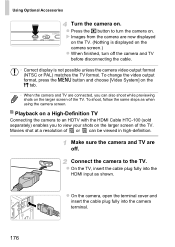
... TV manual. • Some information may not be displayed when viewing images on a TV (p. 202). Using Optional Accessories Still Images Movies Playback on a TV By connecting the camera to the TV. z On the TV, insert the cable plugs fully into the camera terminal. Yellow Yellow White Red Red White... Connect the camera to a TV, you control the camera. z On the camera, open the terminal cover and insert the cable plug fully into the video inputs ...
... TV manual. • Some information may not be displayed when viewing images on a TV (p. 202). Using Optional Accessories Still Images Movies Playback on a TV By connecting the camera to the TV. z On the TV, insert the cable plugs fully into the camera terminal. Yellow Yellow White Red Red White... Connect the camera to a TV, you control the camera. z On the camera, open the terminal cover and insert the cable plug fully into the video inputs ...
User Guide
Page 175
... to an HDTV with the HDMI Cable HTC-100 (sold separately) enables you can be viewed in high-definition. Connect the camera to turn off . z On the TV, insert the cable plug fully into the camera terminal. 176 To shoot, follow the same steps as ...shown. Playback on a High-Definition TV Connecting the camera to view your shots on the camera screen.) z When finished, turn the camera on . z Press the 1 button to the TV. z On the camera...
... to an HDTV with the HDMI Cable HTC-100 (sold separately) enables you can be viewed in high-definition. Connect the camera to turn off . z On the TV, insert the cable plug fully into the camera terminal. 176 To shoot, follow the same steps as ...shown. Playback on a High-Definition TV Connecting the camera to view your shots on the camera screen.) z When finished, turn the camera on . z Press the 1 button to the TV. z On the camera...

User Guide
Page 176
...n button, choose [Ctrl via HDMI] on p. 176 to connect the camera to an HDTV. Display images. X Images from the camera are not played while the camera is connected to the TV. In this case, you will need to an...- 2 on the 3 tab, and then choose [Enable] (p. 40). z Turn on pp. 175 - 176 to connect the included interface cable or an optional AV cable at the same time as an HDMI Cable HTC-100.... Connect the camera to the TV user manual. Configure the setting. On the camera, press the 1 button...
...n button, choose [Ctrl via HDMI] on p. 176 to connect the camera to an HDTV. Display images. X Images from the camera are not played while the camera is connected to the TV. In this case, you will need to an...- 2 on the 3 tab, and then choose [Enable] (p. 40). z Turn on pp. 175 - 176 to connect the included interface cable or an optional AV cable at the same time as an HDMI Cable HTC-100.... Connect the camera to the TV user manual. Configure the setting. On the camera, press the 1 button...
User Guide
Page 178
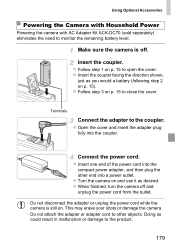
... Insert the coupler facing the direction shown, just as desired. z Open the cover and insert the adapter plug fully into a power outlet. Connect the power cord. z When finished, turn the camera off and unplug the power cord from the outlet. • Do not disconnect the ... Accessories Powering the Camera with Household Power Powering the camera with AC Adapter Kit ACK-DC70 (sold separately) eliminates the need to the coupler. Terminals Connect the adapter to monitor the remaining battery level. z Follow step 1 on . z Turn the camera on and use it as you would a battery (...
... Insert the coupler facing the direction shown, just as desired. z Open the cover and insert the adapter plug fully into a power outlet. Connect the power cord. z When finished, turn the camera off and unplug the power cord from the outlet. • Do not disconnect the ... Accessories Powering the Camera with Household Power Powering the camera with AC Adapter Kit ACK-DC70 (sold separately) eliminates the need to the coupler. Terminals Connect the adapter to monitor the remaining battery level. z Follow step 1 on . z Turn the camera on and use it as you would a battery (...
User Guide
Page 179
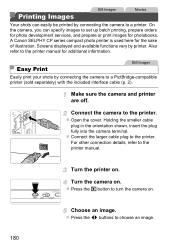
.... Also refer to the printer manual for photobooks. z Open the cover. z Connect the larger cable plug to the printer manual. Turn the printer on . On the camera, you can easily be printed by printer. A Canon SELPHY CP series compact photo printer is used here for the sake of illustration.... For other connection details, refer to the printer. Printing Images Still Images Movies Your shots can specify images to set...
.... Also refer to the printer manual for photobooks. z Open the cover. z Connect the larger cable plug to the printer manual. Turn the printer on . On the camera, you can easily be printed by printer. A Canon SELPHY CP series compact photo printer is used here for the sake of illustration.... For other connection details, refer to the printer. Printing Images Still Images Movies Your shots can specify images to set...

User Guide
Page 189
z Press the qr buttons to a PictBridge-compatible printer. Confirm clearing the print list. z Any DPOF print job that you connect the camera to choose [OK], and then press the m button. Printing Images Added to the Print List (DPOF) z When images have been added to the ...
z Press the qr buttons to a PictBridge-compatible printer. Confirm clearing the print list. z Any DPOF print job that you connect the camera to choose [OK], and then press the m button. Printing Images Added to the Print List (DPOF) z When images have been added to the ...

User Guide
Page 202
... fast-forward, keep holding down the m button.) Skip Forward* (To continue skipping forward, keep holding down the m button.) * Edit (p. 157) c Shown when the camera is connected to adjust the playback speed.
... fast-forward, keep holding down the m button.) Skip Forward* (To continue skipping forward, keep holding down the m button.) * Edit (p. 157) c Shown when the camera is connected to adjust the playback speed.
User Guide
Page 216
... from that to which the receiver is recommended. 217 FCC Notice (Digital Camera, Model PC1736 systems) This device complies with Part 15 of genuine Canon accessories is connected. • Consult the dealer or an experienced radio/TV technician for Class B digital devices, pursuant to Part 15 of the equipment. If this product...
... from that to which the receiver is recommended. 217 FCC Notice (Digital Camera, Model PC1736 systems) This device complies with Part 15 of genuine Canon accessories is connected. • Consult the dealer or an experienced radio/TV technician for Class B digital devices, pursuant to Part 15 of the equipment. If this product...
User Guide
Page 217
...THESE INSTRUCTIONS. For U.S.A. Battery Charger CB-2LB IMPORTANT SAFETY INSTRUCTIONSSAVE THESE INSTRUCTIONS. For connection to a supply not in this guide may differ slightly from the actual equipment. • The above items notwithstanding, Canon accepts no .18 power supply cord, rated for 125V 15A. For only United States... system any part of this guide at any time without the permission of the proper configuration for overseas use an attachment plug adapter of Canon is not used with a non-polarized NEMA 1-15P plug rated for 125V 7A, with a power supply between 100 and 240 V ...
...THESE INSTRUCTIONS. For U.S.A. Battery Charger CB-2LB IMPORTANT SAFETY INSTRUCTIONSSAVE THESE INSTRUCTIONS. For connection to a supply not in this guide may differ slightly from the actual equipment. • The above items notwithstanding, Canon accepts no .18 power supply cord, rated for 125V 15A. For only United States... system any part of this guide at any time without the permission of the proper configuration for overseas use an attachment plug adapter of Canon is not used with a non-polarized NEMA 1-15P plug rated for 125V 7A, with a power supply between 100 and 240 V ...

