

A80_QuickStart.pdf
Page 1
... This guide explains the required operations the first time the camera is complete. Insert the CF card. To put the settings into effect, press the button. 3 Reviewing an Image 1. Continued on . CDI-E109-010 xxxxCHxx © 2003 CANON INC. Shooting Mode Dial Mode Switch The first time you... wish to erase using the left or right button to select items, and use the camera, set the date and time. ...
... This guide explains the required operations the first time the camera is complete. Insert the CF card. To put the settings into effect, press the button. 3 Reviewing an Image 1. Continued on . CDI-E109-010 xxxxCHxx © 2003 CANON INC. Shooting Mode Dial Mode Switch The first time you... wish to erase using the left or right button to select items, and use the camera, set the date and time. ...
PowerShot A80 Camera User Guide
Page 6
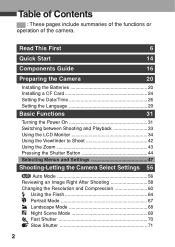
Table of Contents : These pages include summaries of the functions or operation of the camera. Read This First 6 Quick Start 14 Components Guide 16 Preparing the Camera 20 Installing the Batteries 20 Installing a CF Card 24 Setting the Date/Time 26 Setting the Language 29 Basic Functions 31...to Shoot 42 Using the Zoom 43 Pressing the Shutter Button 44 Selecting Menus and Settings 47 Shooting-Letting the Camera Select Settings 56 Auto Mode 56 Reviewing an Image Right After Shooting 58 Changing the Resolution and Compression 60 Using the Flash 64 Portrait Mode 67 Landscape...
Table of Contents : These pages include summaries of the functions or operation of the camera. Read This First 6 Quick Start 14 Components Guide 16 Preparing the Camera 20 Installing the Batteries 20 Installing a CF Card 24 Setting the Date/Time 26 Setting the Language 29 Basic Functions 31...to Shoot 42 Using the Zoom 43 Pressing the Shutter Button 44 Selecting Menus and Settings 47 Shooting-Letting the Camera Select Settings 56 Auto Mode 56 Reviewing an Image Right After Shooting 58 Changing the Resolution and Compression 60 Using the Flash 64 Portrait Mode 67 Landscape...

PowerShot A80 Camera User Guide
Page 57
... Reference Page AiAF On*/Off 96 Red-eye On*/ Off 65 MF-Point Zoom On*/ Off 115 AF-assist Beam On*/ Off 168 Digital Zoom On / Off* 82 Review Off / 2* to images 132 Erase all Erases all images on and off 135 Rotate Rotates the image in a slide show 134 Print Order... card 137 Auto Play Automatically plays back images in the display 131 Sound Memo Adds sound memos to 10 sec. 59 Reverse Disp. Preparing the Camera, Basic Functions button Rec.
... Reference Page AiAF On*/Off 96 Red-eye On*/ Off 65 MF-Point Zoom On*/ Off 115 AF-assist Beam On*/ Off 168 Digital Zoom On / Off* 82 Review Off / 2* to images 132 Erase all Erases all images on and off 135 Rotate Rotates the image in a slide show 134 Print Order... card 137 Auto Play Automatically plays back images in the display 131 Sound Memo Adds sound memos to 10 sec. 59 Reverse Disp. Preparing the Camera, Basic Functions button Rec.

PowerShot A80 Camera User Guide
Page 62
... is taken, the image displays on the LCD monitor, it . You can perform the following modes. Erasing Images Individually (p. 15, 136) - Magnifying Images (p. 123) 58 Reviewing an Image Right After Shooting Available in the following while images are two ways to display the image for two seconds.
... is taken, the image displays on the LCD monitor, it . You can perform the following modes. Erasing Images Individually (p. 15, 136) - Magnifying Images (p. 123) 58 Reviewing an Image Right After Shooting Available in the following while images are two ways to display the image for two seconds.

PowerShot A80 Camera User Guide
Page 63
... been taken can be changed from between 2 seconds to 10 seconds or turned off. 1 In the [ (Rec.)] menu, select See Selecting Menus and Settings (p. 47) (Review). 2 Select a Review setting and press the button. • With the [Off] option, the image will not automatically display. • With the [2 sec.] to [10 sec.] options... for the time selected. • You can continue to display the image as long as the shutter button is fully held pressed regardless of the Review setting. • Another picture can be taken even while the last is displayed. 59
... been taken can be changed from between 2 seconds to 10 seconds or turned off. 1 In the [ (Rec.)] menu, select See Selecting Menus and Settings (p. 47) (Review). 2 Select a Review setting and press the button. • With the [Off] option, the image will not automatically display. • With the [2 sec.] to [10 sec.] options... for the time selected. • You can continue to display the image as long as the shutter button is fully held pressed regardless of the Review setting. • Another picture can be taken even while the last is displayed. 59

PowerShot A80 Camera User Guide
Page 173
Reverse Disp. Item/ Menu Screen Review * Default setting Setting Content Reference Page Sets the duration images display on the shooting mode dial. Sets whether or not the images are 35 reversed. • On* • Off Save Settings Saves settings selected in the and 116 menus to the or shooting mode shown on the 59 LCD monitor after the shutter button is released. • Off • 2 sec.* to 10 sec. Menu and Message Lists 169
Reverse Disp. Item/ Menu Screen Review * Default setting Setting Content Reference Page Sets the duration images display on the shooting mode dial. Sets whether or not the images are 35 reversed. • On* • Off Save Settings Saves settings selected in the and 116 menus to the or shooting mode shown on the 59 LCD monitor after the shutter button is released. • Off • 2 sec.* to 10 sec. Menu and Message Lists 169
Software Starter Guide DC SD Ver.14
Page 19
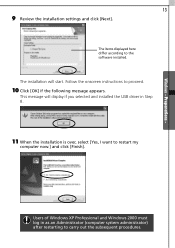
... When the installation is over, select [Yes, I want to the software installed. Follow the onscreen instructions to carry out the subsequent procedures. Windows - Preparations - 13 9 Review the installation settings and click [Next]. The items displayed here differ according to restart my computer now.] and click [Finish].
... When the installation is over, select [Yes, I want to the software installed. Follow the onscreen instructions to carry out the subsequent procedures. Windows - Preparations - 13 9 Review the installation settings and click [Next]. The items displayed here differ according to restart my computer now.] and click [Finish].


