Quick Start Guide
Page 5
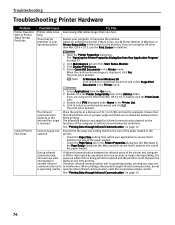
...Contents Basic Printing Turning on the Printer 2 Turning off the Printer 3 Loading Paper 4 Using Speciality Media 8 Printing with Windows 10 Printing with Macintosh 12 Canceling Printing 14 Printing Data through Infrared Communication 15 Advanced Printing Printing Photographs Directly from a PictBridge Compliant ...Print Properly through Infrared Communication 81 Cannot Print Properly from the Digital Camera 82 Appendix Printing Photographs Directly from Canon Bubble Jet Direct Compatible Digital Cameras 84 User's Guide Table of Contents 86 Accessory Options 87 Traveling Abroad...
...Contents Basic Printing Turning on the Printer 2 Turning off the Printer 3 Loading Paper 4 Using Speciality Media 8 Printing with Windows 10 Printing with Macintosh 12 Canceling Printing 14 Printing Data through Infrared Communication 15 Advanced Printing Printing Photographs Directly from a PictBridge Compliant ...Print Properly through Infrared Communication 81 Cannot Print Properly from the Digital Camera 82 Appendix Printing Photographs Directly from Canon Bubble Jet Direct Compatible Digital Cameras 84 User's Guide Table of Contents 86 Accessory Options 87 Traveling Abroad...
Quick Start Guide
Page 10
... right side of the envelope. Printing direction (3) Select Envelope in Page Size. in Media Type, and then select Comm. Env. #10 according to the instructions packaged with embossed or treated surfaces, a double flap, pressure seals or sticker flaps. • Select either DL or US ...Comm. #10 size envelopes. For the printer driver setting, refer to "Printing with Windows" on page 10, "Printing with its flap facing up on page 12. 6 Fold the envelope flap shut. (1) Align the ...
... right side of the envelope. Printing direction (3) Select Envelope in Page Size. in Media Type, and then select Comm. Env. #10 according to the instructions packaged with embossed or treated surfaces, a double flap, pressure seals or sticker flaps. • Select either DL or US ...Comm. #10 size envelopes. For the printer driver setting, refer to "Printing with Windows" on page 10, "Printing with its flap facing up on page 12. 6 Fold the envelope flap shut. (1) Align the ...
Quick Start Guide
Page 11
... at a time) (2) Slide the Paper Guide against the right side of the Auto Sheet Feeder. For the printer driver setting, refer to "Printing with Windows" on page 10, "Printing with Macintosh" on 4" x 6" size papers. Basic Printing (1) Align the paper stack against the left side of the stack of the photograph, load the...
... at a time) (2) Slide the Paper Guide against the right side of the Auto Sheet Feeder. For the printer driver setting, refer to "Printing with Windows" on page 10, "Printing with Macintosh" on 4" x 6" size papers. Basic Printing (1) Align the paper stack against the left side of the stack of the photograph, load the...
Quick Start Guide
Page 13
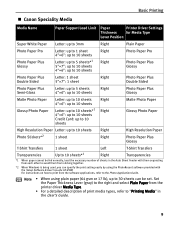
...Transfers 1 sheet Left T-Shirt Transfers Transparencies Up to 10 sheets*1 Right Transparencies *1 When paper cannot be fed normally, load the necessary number of print media types, refer to the Photo Application Guide. Basic Printing Canon Speciality Media Media Name Paper Support Load Limit Paper ... up to 10 sheets 4"×6": up to 10 sheets Letter: up to 10 sheets*1 4"×6": up to 10 sheets Credit Card: up to 10 sheets Right Right Matte Photo Paper Glossy Photo Paper High Resolution Paper Letter: up to avoid them from sticking together. *2 When Windows is being used...
...Transfers 1 sheet Left T-Shirt Transfers Transparencies Up to 10 sheets*1 Right Transparencies *1 When paper cannot be fed normally, load the necessary number of print media types, refer to the Photo Application Guide. Basic Printing Canon Speciality Media Media Name Paper Support Load Limit Paper ... up to 10 sheets 4"×6": up to 10 sheets Letter: up to 10 sheets*1 4"×6": up to 10 sheets Credit Card: up to 10 sheets Right Right Matte Photo Paper Glossy Photo Paper High Resolution Paper Letter: up to avoid them from sticking together. *2 When Windows is being used...
Quick Start Guide
Page 14
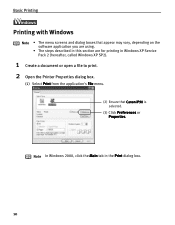
Note In Windows 2000, click the Main tab in Windows XP Service Pack 2 (hereafter, called Windows XP SP2). 1 Create a document or open a file to print. 2 Open the Printer Properties dialog box. (1) Select Print from the application's File menu. (2) Ensure that appear may vary, depending on the software application you are using. • The steps described in this section are for printing in the Print dialog box. 10 Basic Printing l Printing with Windows Note • The menu screens and dialog boxes that Canon iP90 is selected. (3) Click Preferences or Properties.
Note In Windows 2000, click the Main tab in Windows XP Service Pack 2 (hereafter, called Windows XP SP2). 1 Create a document or open a file to print. 2 Open the Printer Properties dialog box. (1) Select Print from the application's File menu. (2) Ensure that appear may vary, depending on the software application you are using. • The steps described in this section are for printing in the Print dialog box. 10 Basic Printing l Printing with Windows Note • The menu screens and dialog boxes that Canon iP90 is selected. (3) Click Preferences or Properties.
Quick Start Guide
Page 26
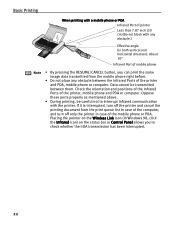
If it is interrupted, turn off only the printer in both vertical and horizontal direction): About 10° Infrared Port of mobile phone Note • By pressing the RESUME/CANCEL button, you to interrupt infrared communication with the printer. Oppose these ports ... them. Data cannot be careful not to check whether the IrDA transmission has been interrupted. 22 Placing the pointer on the Wireless Link icon (In Windows 98, click the Infrared icon) on the status bar or Control Panel allows you can print the same image data transmitted from the print queue...
If it is interrupted, turn off only the printer in both vertical and horizontal direction): About 10° Infrared Port of mobile phone Note • By pressing the RESUME/CANCEL button, you to interrupt infrared communication with the printer. Oppose these ports ... them. Data cannot be careful not to check whether the IrDA transmission has been interrupted. 22 Placing the pointer on the Wireless Link icon (In Windows 98, click the Infrared icon) on the status bar or Control Panel allows you can print the same image data transmitted from the print queue...
Quick Start Guide
Page 75
Turn the printer off. 6. Click Cancel. 2. Click Yes on the type of your computer. 10.Click Next. 71 Select a port. - Windows Me/Windows 98: [LPT3] A port name other than [LPT3:] may be displayed depending on the License Agreement screen. 8. Click Cancel. 2.... Click Next. 6. When the Installation Failure screen is displayed, click Back. 4. Click Exit, then remove the CD-ROM. 5. Click Install. 7. Windows XP/Windows 2000: [IR] - Click Custom Install. 5. Easy Install screen is displayed, click Start Over. 3. Carefully follow the procedures described in the Easy Setup...
Turn the printer off. 6. Click Cancel. 2. Click Yes on the type of your computer. 10.Click Next. 71 Select a port. - Windows Me/Windows 98: [LPT3] A port name other than [LPT3:] may be displayed depending on the License Agreement screen. 8. Click Cancel. 2.... Click Next. 6. When the Installation Failure screen is displayed, click Back. 4. Click Exit, then remove the CD-ROM. 5. Click Install. 7. Windows XP/Windows 2000: [IR] - Click Custom Install. 5. Easy Install screen is displayed, click Start Over. 3. Carefully follow the procedures described in the Easy Setup...
Quick Start Guide
Page 78
...is operating nearby, printing can stop due to ensure that the Infrared Ports are using the OS other than Mac OS X v.10.3, use the Print Center for deletion. The infrared communication distance or the Infrared Port angle is operating nearby If infrared communication ... print job is deleted. Check the Paper Size setting from the computer. Remove the obstacle and retry printing. Note In Windows Me or Windows 98 Click to environmental conditions. During infrared communication, infrared rays were interrupted or another infrared communication unit is displayed, click ...
...is operating nearby, printing can stop due to ensure that the Infrared Ports are using the OS other than Mac OS X v.10.3, use the Print Center for deletion. The infrared communication distance or the Infrared Port angle is operating nearby If infrared communication ... print job is deleted. Check the Paper Size setting from the computer. Remove the obstacle and retry printing. Note In Windows Me or Windows 98 Click to environmental conditions. During infrared communication, infrared rays were interrupted or another infrared communication unit is displayed, click ...

Quick Start Guide
Page 97
...USB operation can only be guaranteed on which Windows XP, Windows • Use a Macintosh series computer equipped with preinstalled Windows XP, Windows 2000, Windows Me, or Windows 98. • Available hard-disk space for printer driver installation Mac OS X v.10.2.1 or later: 340 MB • The... Fit to Page Printing - Photo Optimizer PRO Additional System Requirements for Mac OS X v.10.3.x) - Reverse Order Printing (except for Electric Manual • 15 MB free hard disk space • Windows: Microsoft® Internet Explorer 5.0 or later. • Macintosh: Microsoft® Internet...
...USB operation can only be guaranteed on which Windows XP, Windows • Use a Macintosh series computer equipped with preinstalled Windows XP, Windows 2000, Windows Me, or Windows 98. • Available hard-disk space for printer driver installation Mac OS X v.10.2.1 or later: 340 MB • The... Fit to Page Printing - Photo Optimizer PRO Additional System Requirements for Mac OS X v.10.3.x) - Reverse Order Printing (except for Electric Manual • 15 MB free hard disk space • Windows: Microsoft® Internet Explorer 5.0 or later. • Macintosh: Microsoft® Internet...
Additional Information
Page 1
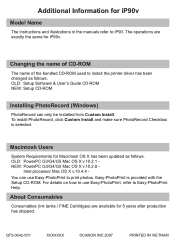
... Installing PhotoRecord (Windows) PhotoRecord can use Easy-PhotoPrint, refer to print photos. Intel processor Mac OS X v.10.4.4 You can only be installed from Custom Install. For details on how to use Easy-PhotoPrint to Easy-PhotoPrint Help. QT5-0642-V01 XXXXXXX ©CANON INC.2007 PRINTED IN VIETNAM Additional Information for iP90v Model Name...
... Installing PhotoRecord (Windows) PhotoRecord can use Easy-PhotoPrint, refer to print photos. Intel processor Mac OS X v.10.4.4 You can only be installed from Custom Install. For details on how to use Easy-PhotoPrint to Easy-PhotoPrint Help. QT5-0642-V01 XXXXXXX ©CANON INC.2007 PRINTED IN VIETNAM Additional Information for iP90v Model Name...
Easy Setup Instructions
Page 2
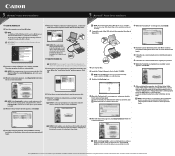
... Installation of their respective owners. QT5-0847-V01 © 2007 Canon Inc. Printed in order to Mac OS X v. 10. 3. IMPORTANT: If you do not know your product. 11 When the "Installation completed successfully" window appears, click Exit. IMPORTANT: If your computer cannot detect a computer...application software, electronic manual, utility and printer drivers. NOTE: Select Easy Install in "Printer List". Part no. Canon and BCI are registered trademarks and PIXMA is shown in order to each other products and brand names are using. 1 Connect the end of Administrator's ...
... Installation of their respective owners. QT5-0847-V01 © 2007 Canon Inc. Printed in order to Mac OS X v. 10. 3. IMPORTANT: If you do not know your product. 11 When the "Installation completed successfully" window appears, click Exit. IMPORTANT: If your computer cannot detect a computer...application software, electronic manual, utility and printer drivers. NOTE: Select Easy Install in "Printer List". Part no. Canon and BCI are registered trademarks and PIXMA is shown in order to each other products and brand names are using. 1 Connect the end of Administrator's ...


