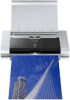
Quick Start Guide
Page 6
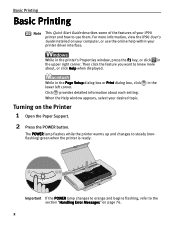
The POWER lamp flashes while the printer warms up and changes to the section "Handling Error Messages" on the Printer 1 Open the Paper Support. 2 Press the POWER button. in the Turning on page 76. 2 Basic Printing Basic Printing Note This Quick Start Guide describes some of ...
The POWER lamp flashes while the printer warms up and changes to the section "Handling Error Messages" on the Printer 1 Open the Paper Support. 2 Press the POWER button. in the Turning on page 76. 2 Basic Printing Basic Printing Note This Quick Start Guide describes some of ...
Quick Start Guide
Page 9
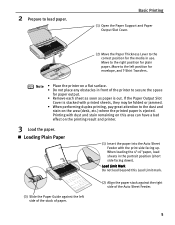
... the stack of the Auto Sheet Feeder. 5 Move to the right position for the media in the portrait position (short side facing down). Basic Printing (1) Open the Paper Support and Paper Output Slot Cover. (2) Move the Paper Thickness Lever to the dust and stain on the printing result and printer. 3 Load...
... the stack of the Auto Sheet Feeder. 5 Move to the right position for the media in the portrait position (short side facing down). Basic Printing (1) Open the Paper Support and Paper Output Slot Cover. (2) Move the Paper Thickness Lever to the dust and stain on the printing result and printer. 3 Load...
Quick Start Guide
Page 14
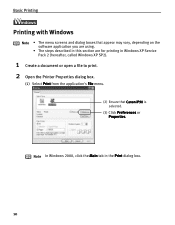
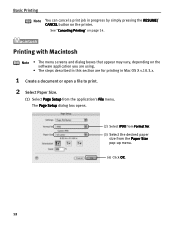
Basic Printing l Printing with Windows Note • The menu screens and dialog boxes that Canon iP90 is selected. (3) Click Preferences or Properties. Note In Windows 2000, click the Main tab in Windows XP Service Pack 2 (hereafter, called Windows XP SP2). 1 Create a document or open a file to print. 2 Open the Printer Properties dialog box. (1) Select Print from the application's File menu. (2) Ensure that appear may vary, depending on the software application you are using. • The steps described in this section are for printing in the Print dialog box. 10
Basic Printing l Printing with Windows Note • The menu screens and dialog boxes that Canon iP90 is selected. (3) Click Preferences or Properties. Note In Windows 2000, click the Main tab in Windows XP Service Pack 2 (hereafter, called Windows XP SP2). 1 Create a document or open a file to print. 2 Open the Printer Properties dialog box. (1) Select Print from the application's File menu. (2) Ensure that appear may vary, depending on the software application you are using. • The steps described in this section are for printing in the Print dialog box. 10
Quick Start Guide
Page 16
... using. • The steps described in this section are for . (3) Select the desired paper size from the application's File menu. The Page Setup dialog box opens. (2) Select iP90 from Format for printing in progress by simply pressing the RESUME/ CANCEL button on page 14. Basic Printing Note You can cancel a print... job in Mac OS X v.10.3.x. 1 Create a document or open a file to print. 2 Select Paper Size. (1) Select Page Setup from the Paper Size pop-up menu. (4) Click OK. 12
... using. • The steps described in this section are for . (3) Select the desired paper size from the application's File menu. The Page Setup dialog box opens. (2) Select iP90 from Format for printing in progress by simply pressing the RESUME/ CANCEL button on page 14. Basic Printing Note You can cancel a print... job in Mac OS X v.10.3.x. 1 Create a document or open a file to print. 2 Select Paper Size. (1) Select Page Setup from the Paper Size pop-up menu. (4) Click OK. 12
Quick Start Guide
Page 18
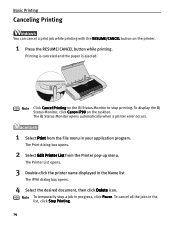
... Monitor, click Canon iP90 on the printer. 1 Press the RESUME/CANCEL button while printing. The BJ Status Monitor opens automatically when a printer error occurs. 1 Select Print from the Printer pop-up menu. To cancel all the jobs in your application program. The Print dialog box opens. 2 Select ...Edit Printer List from the File menu in the list, click Stop Printing. 14 The Printer List opens. 3 Double-click the printer name displayed in progress, click Pause. Note To temporarily...
... Monitor, click Canon iP90 on the printer. 1 Press the RESUME/CANCEL button while printing. The BJ Status Monitor opens automatically when a printer error occurs. 1 Select Print from the Printer pop-up menu. To cancel all the jobs in your application program. The Print dialog box opens. 2 Select ...Edit Printer List from the File menu in the list, click Stop Printing. 14 The Printer List opens. 3 Double-click the printer name displayed in progress, click Pause. Note To temporarily...
Quick Start Guide
Page 21
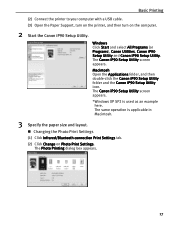
... in Macintosh. 3 Specify the paper size and layout. Windows Click Start and select All Programs (or Programs), Canon Utilities, Canon iP90 Setup Utility and Canon iP90 Setup Utility. Basic Printing (2) Connect the printer to your computer with a USB cable. (3) Open the Paper Support, turn on the printer, and then turn on Photo Print Settings.
... in Macintosh. 3 Specify the paper size and layout. Windows Click Start and select All Programs (or Programs), Canon Utilities, Canon iP90 Setup Utility and Canon iP90 Setup Utility. Basic Printing (2) Connect the printer to your computer with a USB cable. (3) Open the Paper Support, turn on the printer, and then turn on Photo Print Settings.
Quick Start Guide
Page 25
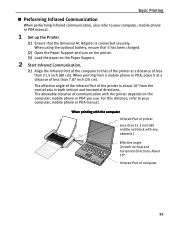
.... (1) Ensure that of the printer at a distance of less than 31.5 inch (80 cm). When using the optional battery, ensure that it has been charged. (2) Open the Paper Support and turn on the printer. (3) Load the paper on the computer, mobile phone or PDA you use. When printing with the computer...
.... (1) Ensure that of the printer at a distance of less than 31.5 inch (80 cm). When using the optional battery, ensure that it has been charged. (2) Open the Paper Support and turn on the printer. (3) Load the paper on the computer, mobile phone or PDA you use. When printing with the computer...
Quick Start Guide
Page 28
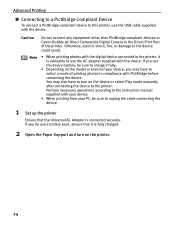
...printing from your PC, be sure to unplug the cable connecting the device. 1 Set up the printer Ensure that it is fully charged. 2 Open the Paper Support and turn on the printer. 24 Perform necessary operations according to the instruction manual supplied with PictBridge before connecting the device. Advanced...to this printer, use the USB cable supplied with the device. Caution Do not connect any equipment other than PictBridge compliant devices or Canon Bubble Jet Direct Compatible Digital Camera to the device could result. You may have to turn on the device or select Play mode ...
...printing from your PC, be sure to unplug the cable connecting the device. 1 Set up the printer Ensure that it is fully charged. 2 Open the Paper Support and turn on the printer. 24 Perform necessary operations according to the instruction manual supplied with PictBridge before connecting the device. Advanced...to this printer, use the USB cable supplied with the device. Caution Do not connect any equipment other than PictBridge compliant devices or Canon Bubble Jet Direct Compatible Digital Camera to the device could result. You may have to turn on the device or select Play mode ...
Quick Start Guide
Page 33
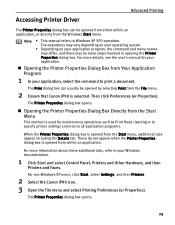
... dialog box is selected. The Print dialog box can be opened by selecting Print from the File menu. 2 Ensure that Canon iP90 is opened from the Start menu, additional tabs appear including the Details tab. Opening the Printer Properties Dialog Box Directly from the Start Menu This... method is opened from Your Application Program 1 In your Windows documentation. 1 Click...
... dialog box is selected. The Print dialog box can be opened by selecting Print from the File menu. 2 Ensure that Canon iP90 is opened from the Start menu, additional tabs appear including the Details tab. Opening the Printer Properties Dialog Box Directly from the Start Menu This... method is opened from Your Application Program 1 In your Windows documentation. 1 Click...
Quick Start Guide
Page 34
...paper, Photo Paper Pro, and so on). Many of these features are covered in the User's Guide. PIXMA iP90 automatically adjusts printer settings to "Printing Media" in this printer. See"Opening the Printer Properties Dialog Box from Your Application Program" on your photographs. For more about. • Click... control the quality and output of your printed images: Paper and Ink Using recommended Canon paper, speciality media and ink for this chapter. See inside the back cover for a list of Canon media and inks for printing photographs can be controlled with the printer driver. You ...
...paper, Photo Paper Pro, and so on). Many of these features are covered in the User's Guide. PIXMA iP90 automatically adjusts printer settings to "Printing Media" in this printer. See"Opening the Printer Properties Dialog Box from Your Application Program" on your photographs. For more about. • Click... control the quality and output of your printed images: Paper and Ink Using recommended Canon paper, speciality media and ink for this chapter. See inside the back cover for a list of Canon media and inks for printing photographs can be controlled with the printer driver. You ...

Quick Start Guide
Page 35
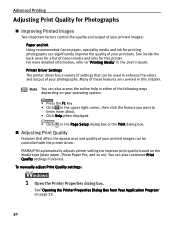
Advanced Printing 2 Select Custom in Print Quality, then click Set to open the Set Print Quality dialog box. 3 Move the slide bar to adjust the Print Quality. 4 When the process is complete, click OK. 1 Open the Print dialog box. See "Printing with Macintosh" on page 12. 2 Select Quality & Media from the pop-up menu, and then click Detailed Setting. 3 Move the slide bar to adjust the Print Quality. 4 When the process is complete, click OK. 31
Advanced Printing 2 Select Custom in Print Quality, then click Set to open the Set Print Quality dialog box. 3 Move the slide bar to adjust the Print Quality. 4 When the process is complete, click OK. 1 Open the Print dialog box. See "Printing with Macintosh" on page 12. 2 Select Quality & Media from the pop-up menu, and then click Detailed Setting. 3 Move the slide bar to adjust the Print Quality. 4 When the process is complete, click OK. 31

Quick Start Guide
Page 36
Advanced Printing To automatically optimize the image: Photo Optimizer PRO automatically adjusts the photographic image created with a digital camera. Use this feature to compensate for unsatisfactory color balance and over- See"Opening the Printer Properties Dialog Box from Your Application Program" on page 29. 2 Click the Effects tab. 3 Select the Photo Optimizer PRO check box. 4 Click OK. 32 or under-exposure before printing. 1 Open the Printer Properties dialog box.
Advanced Printing To automatically optimize the image: Photo Optimizer PRO automatically adjusts the photographic image created with a digital camera. Use this feature to compensate for unsatisfactory color balance and over- See"Opening the Printer Properties Dialog Box from Your Application Program" on page 29. 2 Click the Effects tab. 3 Select the Photo Optimizer PRO check box. 4 Click OK. 32 or under-exposure before printing. 1 Open the Printer Properties dialog box.
Quick Start Guide
Page 39
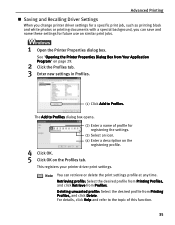
... from Your Application Program" on page 29. 2 Click the Profiles tab. 3 Enter new settings in Profiles. (1) Click Add to Profiles. See "Opening the Printer Properties Dialog Box from Profiles. Note You can save and name these settings for registering the settings. (3) Select an icon. (4) Enter a... description on the registering profile. 4 Click OK. 5 Click OK on similar print jobs. 1 Open the Printer Properties dialog box. The Add to the topic of profile for future use on the Profiles tab. Deleting unwanted profile: Select the desired...
... from Your Application Program" on page 29. 2 Click the Profiles tab. 3 Enter new settings in Profiles. (1) Click Add to Profiles. See "Opening the Printer Properties Dialog Box from Profiles. Note You can save and name these settings for registering the settings. (3) Select an icon. (4) Enter a... description on the registering profile. 4 Click OK. 5 Click OK on similar print jobs. 1 Open the Printer Properties dialog box. The Add to the topic of profile for future use on the Profiles tab. Deleting unwanted profile: Select the desired...
Quick Start Guide
Page 40
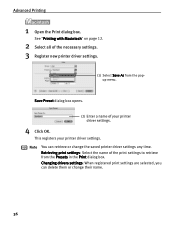
Advanced Printing 1 Open the Print dialog box. This registers your printer driver settings. 4 Click OK. Changing drivers settings: When registered print settings are selected, you can retrieve or ... settings to retrieve from the popup menu. Note You can delete them or change the saved printer driver settings any time. Save Preset dialog box opens. (2) Enter a name of your printer driver settings.
Advanced Printing 1 Open the Print dialog box. This registers your printer driver settings. 4 Click OK. Changing drivers settings: When registered print settings are selected, you can retrieve or ... settings to retrieve from the popup menu. Note You can delete them or change the saved printer driver settings any time. Save Preset dialog box opens. (2) Enter a name of your printer driver settings.
Quick Start Guide
Page 46
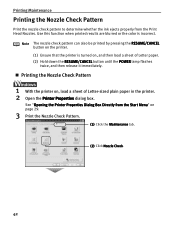
... the Nozzle Check Pattern 1 With the printer on , and then load a sheet of Letter-sized plain paper in the printer. 2 Open the Printer Properties dialog box. Printing Maintenance Printing the Nozzle Check Pattern Print the nozzle check pattern to determine whether the ink ejects properly ...from the Start Menu" on page 29. 3 Print the Nozzle Check Pattern. (1) Click the Maintenance tab. (2) Click Nozzle Check. 42 See "Opening the Printer Properties Dialog Box Directly from the Print Head Nozzles. Note The nozzle check pattern can also be printed by pressing the RESUME/CANCEL...
... the Nozzle Check Pattern 1 With the printer on , and then load a sheet of Letter-sized plain paper in the printer. 2 Open the Printer Properties dialog box. Printing Maintenance Printing the Nozzle Check Pattern Print the nozzle check pattern to determine whether the ink ejects properly ...from the Start Menu" on page 29. 3 Print the Nozzle Check Pattern. (1) Click the Maintenance tab. (2) Click Nozzle Check. 42 See "Opening the Printer Properties Dialog Box Directly from the Print Head Nozzles. Note The nozzle check pattern can also be printed by pressing the RESUME/CANCEL...
Quick Start Guide
Page 47
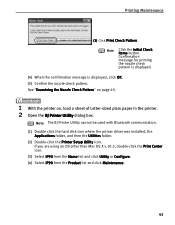
... Maintenance. 43 See "Examining the Nozzle Check Pattern" on page 45. 1 With the printer on, load a sheet of Letter-sized plain paper in the printer. 2 Open the BJ Printer Utility dialog box. Printing Maintenance (3) Click Print Check Pattern. Note Click the Initial Check Items button.
... Maintenance. 43 See "Examining the Nozzle Check Pattern" on page 45. 1 With the printer on, load a sheet of Letter-sized plain paper in the printer. 2 Open the BJ Printer Utility dialog box. Printing Maintenance (3) Click Print Check Pattern. Note Click the Initial Check Items button.
Quick Start Guide
Page 51
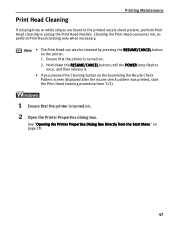
...Head can also be cleaned by pressing the RESUME/CANCEL button on page 29. 47 Ensure that the printer is turned on . 2 Open the Printer Properties dialog box. Cleaning the Print Head consumes ink, so perform Print Head cleaning only when necessary. Hold down the RESUME/...screen displayed after the nozzle check pattern was printed, start the Print Head cleaning procedure from the Start Menu" on the printer. 1. See "Opening the Printer Properties Dialog Box Directly from 3-(3). 1 Ensure that the printer is turned on . 2. Print Head Cleaning Printing Maintenance If missing lines...
...Head can also be cleaned by pressing the RESUME/CANCEL button on page 29. 47 Ensure that the printer is turned on . 2 Open the Printer Properties dialog box. Cleaning the Print Head consumes ink, so perform Print Head cleaning only when necessary. Hold down the RESUME/...screen displayed after the nozzle check pattern was printed, start the Print Head cleaning procedure from the Start Menu" on the printer. 1. See "Opening the Printer Properties Dialog Box Directly from 3-(3). 1 Ensure that the printer is turned on . 2. Print Head Cleaning Printing Maintenance If missing lines...
Quick Start Guide
Page 53
... the printer driver was installed, the Applications folder, and the Utilities folder. (2) Double-click the Printer Setup Utility icon. See "Print Head Deep Cleaning" on . 2 Open the BJ Printer Utility dialog box. Do not perform any operation until printing of the nozzle check pattern is turned on page 52. 1 Ensure that...
... the printer driver was installed, the Applications folder, and the Utilities folder. (2) Double-click the Printer Setup Utility icon. See "Print Head Deep Cleaning" on . 2 Open the BJ Printer Utility dialog box. Do not perform any operation until printing of the nozzle check pattern is turned on page 52. 1 Ensure that...
Quick Start Guide
Page 56
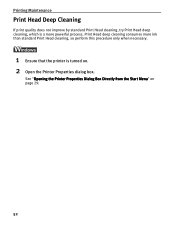
See "Opening the Printer Properties Dialog Box Directly from the Start Menu" on . 2 Open the Printer Properties dialog box. Print Head deep cleaning consumes more ink than standard Print Head cleaning, so perform this procedure only when necessary. 1 Ensure that the printer is a more powerful process. Printing Maintenance Print Head Deep Cleaning If print quality does not improve by standard Print Head cleaning, try Print Head deep cleaning, which is turned on page 29. 52
See "Opening the Printer Properties Dialog Box Directly from the Start Menu" on . 2 Open the Printer Properties dialog box. Print Head deep cleaning consumes more ink than standard Print Head cleaning, so perform this procedure only when necessary. 1 Ensure that the printer is a more powerful process. Printing Maintenance Print Head Deep Cleaning If print quality does not improve by standard Print Head cleaning, try Print Head deep cleaning, which is turned on page 29. 52
Quick Start Guide
Page 58
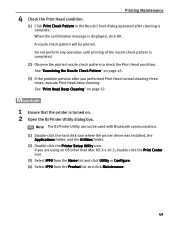
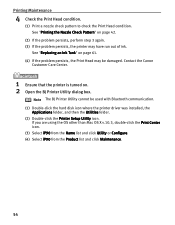
...from the Product list and click Maintenance. 54 Note The BJ Printer Utility cannot be damaged. See "Printing the Nozzle Check Pattern" on . 2 Open the BJ Printer Utility dialog box. Printing Maintenance 4 Check the Print Head condition. (1) Print a nozzle check pattern to check the Print Head ...condition. Contact the Canon Customer Care Center. 1 Ensure that the printer is turned on page 42. (2) If the problem persists, perform step 3 again. (3) If the...
...from the Product list and click Maintenance. 54 Note The BJ Printer Utility cannot be damaged. See "Printing the Nozzle Check Pattern" on . 2 Open the BJ Printer Utility dialog box. Printing Maintenance 4 Check the Print Head condition. (1) Print a nozzle check pattern to check the Print Head ...condition. Contact the Canon Customer Care Center. 1 Ensure that the printer is turned on page 42. (2) If the problem persists, perform step 3 again. (3) If the...


