Quick Start Guide
Page 4
... guide to your Canon PIXMA iP90 Photo Printer. As an ENERGY STAR partner, Canon U.S.A., Inc., has determined that it will be an easy-to be, representation or warranties concerning the products described. and other countries. • Microsoft® and Windows® are registered trademarks of Canon U.S.A., Inc. © 2005 Canon U.S.A., Inc. is a trademark of Canon Inc. •...
... guide to your Canon PIXMA iP90 Photo Printer. As an ENERGY STAR partner, Canon U.S.A., Inc., has determined that it will be an easy-to be, representation or warranties concerning the products described. and other countries. • Microsoft® and Windows® are registered trademarks of Canon U.S.A., Inc. © 2005 Canon U.S.A., Inc. is a trademark of Canon Inc. •...
Quick Start Guide
Page 5
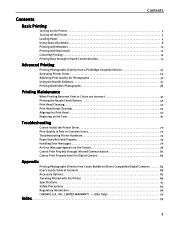
... Contents Basic Printing Turning on the Printer 2 Turning off the Printer 3 Loading Paper 4 Using Speciality Media 8 Printing with Windows 10 Printing with Macintosh 12 Canceling Printing 14 Printing Data through Infrared Communication 15 Advanced Printing Printing Photographs Directly from a PictBridge Compliant...Print Properly through Infrared Communication 81 Cannot Print Properly from the Digital Camera 82 Appendix Printing Photographs Directly from Canon Bubble Jet Direct Compatible Digital Cameras 84 User's Guide Table of Contents 86 Accessory Options 87 Traveling Abroad with...
... Contents Basic Printing Turning on the Printer 2 Turning off the Printer 3 Loading Paper 4 Using Speciality Media 8 Printing with Windows 10 Printing with Macintosh 12 Canceling Printing 14 Printing Data through Infrared Communication 15 Advanced Printing Printing Photographs Directly from a PictBridge Compliant...Print Properly through Infrared Communication 81 Cannot Print Properly from the Digital Camera 82 Appendix Printing Photographs Directly from Canon Bubble Jet Direct Compatible Digital Cameras 84 User's Guide Table of Contents 86 Accessory Options 87 Traveling Abroad with...
Quick Start Guide
Page 6
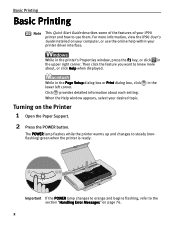
... Page Setup dialog box or Print dialog box, click lower left corner. Click provides detailed information about , or click Help when displayed. When the Help window appears, select your iP90 printer and how to know more information, view the iP90 User's Guide installed on the Printer 1 Open the Paper Support. 2 Press...
... Page Setup dialog box or Print dialog box, click lower left corner. Click provides detailed information about , or click Help when displayed. When the Help window appears, select your iP90 printer and how to know more information, view the iP90 User's Guide installed on the Printer 1 Open the Paper Support. 2 Press...
Quick Start Guide
Page 10
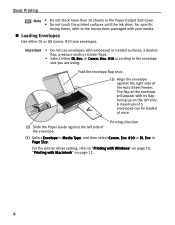
Env. #10 according to "Printing with Windows" on page 10, "Printing with embossed or treated surfaces, a double flap, pressure seals or sticker flaps. • Select either DL or US Comm. #10 size ...
Env. #10 according to "Printing with Windows" on page 10, "Printing with embossed or treated surfaces, a double flap, pressure seals or sticker flaps. • Select either DL or US Comm. #10 size ...
Quick Start Guide
Page 11
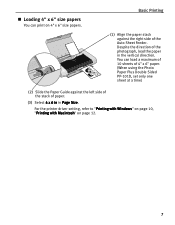
... print on page 12. 7 Despite the direction of the photograph, load the paper in Page Size. For the printer driver setting, refer to "Printing with Windows" on page 10, "Printing with Macintosh" on 4" x 6" size papers. Loading 4" x 6" size papers You can load a maximum of 10 sheets of 4" x 6" paper. (When using the Photo...
... print on page 12. 7 Despite the direction of the photograph, load the paper in Page Size. For the printer driver setting, refer to "Printing with Windows" on page 10, "Printing with Macintosh" on 4" x 6" size papers. Loading 4" x 6" size papers You can load a maximum of 10 sheets of 4" x 6" paper. (When using the Photo...
Quick Start Guide
Page 13
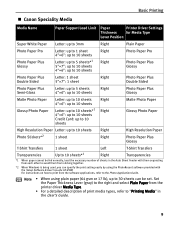
... Paper from the printer driver Media Type. • For a detailed description of sheets in the User's Guide. 9 Basic Printing Canon Speciality Media Media Name Paper Support Load Limit Paper Printer Driver Settings Thickness for Media Type Lever Position Super White Paper Letter: up to...Transparencies Up to 10 sheets*1 Right Transparencies *1 When paper cannot be set. For instructions on how to print from sticking together. *2 When Windows is being used, you can be fed normally, load the necessary number of print media types, refer to the Photo Application Guide. Note...
... Paper from the printer driver Media Type. • For a detailed description of sheets in the User's Guide. 9 Basic Printing Canon Speciality Media Media Name Paper Support Load Limit Paper Printer Driver Settings Thickness for Media Type Lever Position Super White Paper Letter: up to...Transparencies Up to 10 sheets*1 Right Transparencies *1 When paper cannot be set. For instructions on how to print from sticking together. *2 When Windows is being used, you can be fed normally, load the necessary number of print media types, refer to the Photo Application Guide. Note...
Quick Start Guide
Page 14
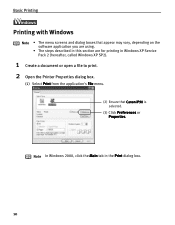
Note In Windows 2000, click the Main tab in Windows XP Service Pack 2 (hereafter, called Windows XP SP2). 1 Create a document or open a file to print. 2 Open the Printer Properties dialog box. (1) Select Print from the application's File menu. (2) Ensure that Canon iP90 is selected. (3) Click Preferences or Properties. Basic Printing l Printing with Windows Note • The menu screens and dialog boxes that appear may vary, depending on the software application you are using. • The steps described in this section are for printing in the Print dialog box. 10
Note In Windows 2000, click the Main tab in Windows XP Service Pack 2 (hereafter, called Windows XP SP2). 1 Create a document or open a file to print. 2 Open the Printer Properties dialog box. (1) Select Print from the application's File menu. (2) Ensure that Canon iP90 is selected. (3) Click Preferences or Properties. Basic Printing l Printing with Windows Note • The menu screens and dialog boxes that appear may vary, depending on the software application you are using. • The steps described in this section are for printing in the Print dialog box. 10
Quick Start Guide
Page 15
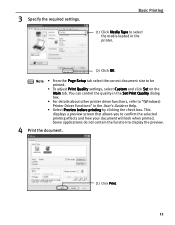
... allows you to display the preview. 4 Print the document. (1) Click Print. 11 Note • From the Page Setup tab select the correct document size to "(Windows) Printer Driver Functions" in the printer. (2) Click OK.
... allows you to display the preview. 4 Print the document. (1) Click Print. 11 Note • From the Page Setup tab select the correct document size to "(Windows) Printer Driver Functions" in the printer. (2) Click OK.
Quick Start Guide
Page 19
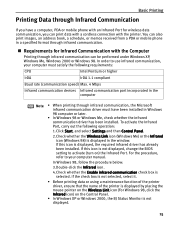
...communication, you have been installed in a specified format through infrared communication. In order to use infrared communication, your computer manual. In Windows 98, follow the procedure below: 3.Double-click the Infrared icon. 4.Check whether the Enable infrared communication check box is displayed by placing... the mouse pointer on the Wireless Link icon (For Windows 98, click the Infrared icon) on ) the Infrared Port. To activate the Infrared Port, carry out the following requirements: CPU...
...communication, you have been installed in a specified format through infrared communication. In order to use infrared communication, your computer manual. In Windows 98, follow the procedure below: 3.Double-click the Infrared icon. 4.Check whether the Enable infrared communication check box is displayed by placing... the mouse pointer on the Wireless Link icon (For Windows 98, click the Infrared icon) on ) the Infrared Port. To activate the Infrared Port, carry out the following requirements: CPU...
Quick Start Guide
Page 21
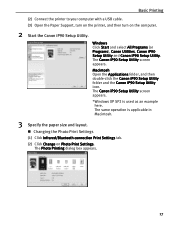
... Start and select All Programs (or Programs), Canon Utilities, Canon iP90 Setup Utility and Canon iP90 Setup Utility. The Canon iP90 Setup Utility screen appears. *Windows XP SP2 is applicable in Macintosh. 3 Specify the paper size and layout. The same operation is used as an example here. Macintosh Open the Applications ...
... Start and select All Programs (or Programs), Canon Utilities, Canon iP90 Setup Utility and Canon iP90 Setup Utility. The Canon iP90 Setup Utility screen appears. *Windows XP SP2 is applicable in Macintosh. 3 Specify the paper size and layout. The same operation is used as an example here. Macintosh Open the Applications ...
Quick Start Guide
Page 26
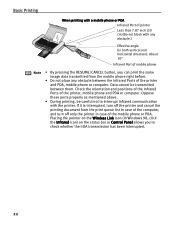
... computer. Check the orientation and positions of the Infrared Ports of the mobile phone or PDA. Placing the pointer on the Wireless Link icon (In Windows 98, click the Infrared icon) on the status bar or Control Panel allows you can print the same image data transmitted from the print queue...
... computer. Check the orientation and positions of the Infrared Ports of the mobile phone or PDA. Placing the pointer on the Wireless Link icon (In Windows 98, click the Infrared icon) on the status bar or Control Panel allows you can print the same image data transmitted from the print queue...
Quick Start Guide
Page 33
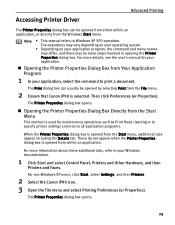
...the Details tab. The operations may vary depending on your operating system. • Depending on your application, select the command to Windows XP SP2 operation. Then click Preferences (or Properties). The Print dialog box can be opened from either within an application. Opening ... Click Start and select Control Panel, Printers and Other Hardware, and then Printers and Faxes. For non-Windows XP users, click Start, select Settings, and then Printers. 2 Select the Canon iP90 icon. 3 Open the File menu and select Printing Preferences (or Properties). The Printer Properties dialog ...
...the Details tab. The operations may vary depending on your operating system. • Depending on your application, select the command to Windows XP SP2 operation. Then click Preferences (or Properties). The Print dialog box can be opened from either within an application. Opening ... Click Start and select Control Panel, Printers and Other Hardware, and then Printers and Faxes. For non-Windows XP users, click Start, select Settings, and then Printers. 2 Select the Canon iP90 icon. 3 Open the File menu and select Printing Preferences (or Properties). The Printer Properties dialog ...
Quick Start Guide
Page 37
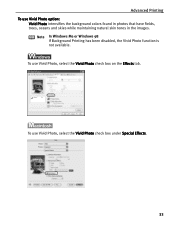
Note In Windows Me or Windows 98 If Background Printing has been disabled, the Vivid Photo function is not available. To use Vivid Photo option: Vivid Photo intensifies the background colors found in photos that have fields, trees, oceans and skies while maintaining natural skin tones in the images. Advanced Printing To use Vivid Photo, select the Vivid Photo check box on the Effects tab. To use Vivid Photo, select the Vivid Photo check box under Special Effects. 33
Note In Windows Me or Windows 98 If Background Printing has been disabled, the Vivid Photo function is not available. To use Vivid Photo option: Vivid Photo intensifies the background colors found in photos that have fields, trees, oceans and skies while maintaining natural skin tones in the images. Advanced Printing To use Vivid Photo, select the Vivid Photo check box on the Effects tab. To use Vivid Photo, select the Vivid Photo check box under Special Effects. 33
Quick Start Guide
Page 38
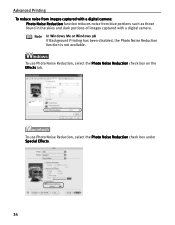
To use Photo Noise Reduction, select the Photo Noise Reduction check box under Special Effects. 34 To use Photo Noise Reduction, select the Photo Noise Reduction check box on the Effects tab. Advanced Printing To reduce noise from images captured with a digital camera: Photo Noise Reduction function reduces noise from blue portions such as those found in the skies and dark portions of images captured with a digital camera. Note In Windows Me or Windows 98 If Background Printing has been disabled, the Photo Noise Reduction function is not available.
To use Photo Noise Reduction, select the Photo Noise Reduction check box under Special Effects. 34 To use Photo Noise Reduction, select the Photo Noise Reduction check box on the Effects tab. Advanced Printing To reduce noise from images captured with a digital camera: Photo Noise Reduction function reduces noise from blue portions such as those found in the skies and dark portions of images captured with a digital camera. Note In Windows Me or Windows 98 If Background Printing has been disabled, the Photo Noise Reduction function is not available.
Quick Start Guide
Page 41
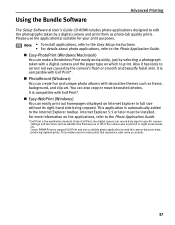
...camera was in full size without its right-hand side being cropped. This application is the worldwide standard. For more accurately. 37 Canon PIXMA Printers support Exif Print and use the application(s) suitable for specific camera settings and functions such as frame, background, and clip-art...-ROM includes photo applications designed to edit the photographs taken by the camera's flash or smooth and beautify facial skin. Easy-PhotoPrint (Windows/Macintosh) You can also copy or move decorated photos. Under Exif Print, the digital camera can create fun and unique photo albums ...
...camera was in full size without its right-hand side being cropped. This application is the worldwide standard. For more accurately. 37 Canon PIXMA Printers support Exif Print and use the application(s) suitable for specific camera settings and functions such as frame, background, and clip-art...-ROM includes photo applications designed to edit the photographs taken by the camera's flash or smooth and beautify facial skin. Easy-PhotoPrint (Windows/Macintosh) You can also copy or move decorated photos. Under Exif Print, the digital camera can create fun and unique photo albums ...
Quick Start Guide
Page 42
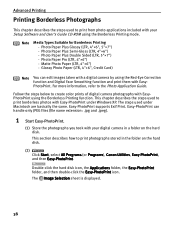
... steps below to print photographs stored in a folder on the hard disk. (2) Click Start, select All Programs (or Programs), Canon Utilities, Easy-PhotoPrint, and then Easy-PhotoPrint. The steps used under Windows XP. Easy-PhotoPrint can edit images taken with a digital camera by using the Red-Eye Correction function and Digital Face...
... steps below to print photographs stored in a folder on the hard disk. (2) Click Start, select All Programs (or Programs), Canon Utilities, Easy-PhotoPrint, and then Easy-PhotoPrint. The steps used under Windows XP. Easy-PhotoPrint can edit images taken with a digital camera by using the Red-Eye Correction function and Digital Face...
Quick Start Guide
Page 43
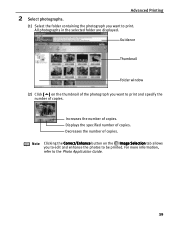
All photographs in the selected folder are displayed. Displays the specified number of copies. 2 Select photographs. Guidance Thumbnail Folder window (2) Click [ ] on the Image Selection tab allows you to edit and enhance the photos to print. Increases the number of copies. Decreases the number of ...
All photographs in the selected folder are displayed. Displays the specified number of copies. 2 Select photographs. Guidance Thumbnail Folder window (2) Click [ ] on the Image Selection tab allows you to edit and enhance the photos to print. Increases the number of copies. Decreases the number of ...
Quick Start Guide
Page 50
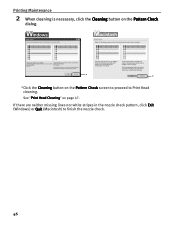
See "Print Head Cleaning" on the Pattern Check screen to proceed to finish the nozzle check. 46 Printing Maintenance 2 When cleaning is necessary, click the Cleaning button on the Pattern Check dialog. * * *Click the Cleaning button on page 47. If there are neither missing lines nor white stripes in the nozzle check pattern, click Exit (Windows) or Quit (Macintosh) to Print Head cleaning.
See "Print Head Cleaning" on the Pattern Check screen to proceed to finish the nozzle check. 46 Printing Maintenance 2 When cleaning is necessary, click the Cleaning button on the Pattern Check dialog. * * *Click the Cleaning button on page 47. If there are neither missing lines nor white stripes in the nozzle check pattern, click Exit (Windows) or Quit (Macintosh) to Print Head cleaning.
Quick Start Guide
Page 68
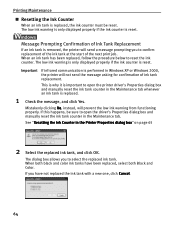
... ink tank has been replaced, follow the procedure below to open the driver's Properties dialog box and manually reset the ink tank counter in Windows XP or Windows 2000, the printer will prevent the low ink warning from functioning properly. If this happens, be reset. If you to confirm replacement of the...
... ink tank has been replaced, follow the procedure below to open the driver's Properties dialog box and manually reset the ink tank counter in Windows XP or Windows 2000, the printer will prevent the low ink warning from functioning properly. If this happens, be reset. If you to confirm replacement of the...

Quick Start Guide
Page 73
... falls into one of the following categories. The message may vary depending on page 82 When an Error Occurs When an error occurs in Windows XP or Windows 2000, a BJ Status Monitor screen is displayed automatically. In this chapter you will find the most common printing problems. Refer to the User's Guide...
... falls into one of the following categories. The message may vary depending on page 82 When an Error Occurs When an error occurs in Windows XP or Windows 2000, a BJ Status Monitor screen is displayed automatically. In this chapter you will find the most common printing problems. Refer to the User's Guide...


