Quick Start Guide
Page 4
... Windows® are registered trademarks of Microsoft Corporation in any guides or related documents are believed reliable, but the accuracy and completeness thereof are not guaranteed or warranted, and they are not intended to be, nor should they be understood to be an easy-to your Canon PIXMA ...iP90 Photo Printer. All information regarding the accuracy thereof. Canon PIXMA iP90 Photo Printer Quick Start Guide Copyright This manual is under licence. • All other product and brand...
... Windows® are registered trademarks of Microsoft Corporation in any guides or related documents are believed reliable, but the accuracy and completeness thereof are not guaranteed or warranted, and they are not intended to be, nor should they be understood to be an easy-to your Canon PIXMA ...iP90 Photo Printer. All information regarding the accuracy thereof. Canon PIXMA iP90 Photo Printer Quick Start Guide Copyright This manual is under licence. • All other product and brand...
Quick Start Guide
Page 5
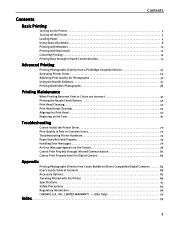
... Contents Basic Printing Turning on the Printer 2 Turning off the Printer 3 Loading Paper 4 Using Speciality Media 8 Printing with Windows 10 Printing with Macintosh 12 Canceling Printing 14 Printing Data through Infrared Communication 15 Advanced Printing Printing Photographs Directly from a PictBridge Compliant ...Print Properly through Infrared Communication 81 Cannot Print Properly from the Digital Camera 82 Appendix Printing Photographs Directly from Canon Bubble Jet Direct Compatible Digital Cameras 84 User's Guide Table of Contents 86 Accessory Options 87 Traveling Abroad with...
... Contents Basic Printing Turning on the Printer 2 Turning off the Printer 3 Loading Paper 4 Using Speciality Media 8 Printing with Windows 10 Printing with Macintosh 12 Canceling Printing 14 Printing Data through Infrared Communication 15 Advanced Printing Printing Photographs Directly from a PictBridge Compliant ...Print Properly through Infrared Communication 81 Cannot Print Properly from the Digital Camera 82 Appendix Printing Photographs Directly from Canon Bubble Jet Direct Compatible Digital Cameras 84 User's Guide Table of Contents 86 Accessory Options 87 Traveling Abroad with...
Quick Start Guide
Page 6
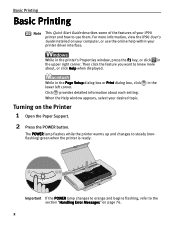
... to use the online help within your printer driver interface. in the Turning on your computer, or use them. While in the printer's Properties window, press the F1 key, or click in the Page Setup dialog box or Print dialog box, click lower left corner. While in the upper...displayed. The POWER lamp flashes while the printer warms up and changes to the section "Handling Error Messages" on page 76. 2 When the Help window appears, select your desired topic. Important If the POWER lamp changes to orange and begins flashing, refer to steady (nonflashing) green when the printer ...
... to use the online help within your printer driver interface. in the Turning on your computer, or use them. While in the printer's Properties window, press the F1 key, or click in the Page Setup dialog box or Print dialog box, click lower left corner. While in the upper...displayed. The POWER lamp flashes while the printer warms up and changes to the section "Handling Error Messages" on page 76. 2 When the Help window appears, select your desired topic. Important If the POWER lamp changes to orange and begins flashing, refer to steady (nonflashing) green when the printer ...
Quick Start Guide
Page 10
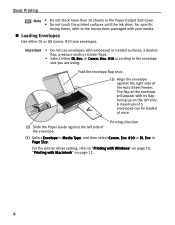
... the Paper Output Slot Cover. • Do not touch the printed surfaces until the ink dries. For the printer driver setting, refer to "Printing with Windows" on page 10, "Printing with its flap facing up on page 12. 6 Important • Do not use envelopes with your media. Basic Printing Note •...
... the Paper Output Slot Cover. • Do not touch the printed surfaces until the ink dries. For the printer driver setting, refer to "Printing with Windows" on page 10, "Printing with its flap facing up on page 12. 6 Important • Do not use envelopes with your media. Basic Printing Note •...
Quick Start Guide
Page 11
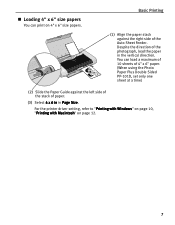
... stack against the left side of the stack of paper. (3) Select 4 x 6 in in the vertical direction. For the printer driver setting, refer to "Printing with Windows" on page 10, "Printing with Macintosh" on 4" x 6" size papers. You can print on page 12. 7 Loading 4" x 6" size papers You can load a maximum of 10 sheets...
... stack against the left side of the stack of paper. (3) Select 4 x 6 in in the vertical direction. For the printer driver setting, refer to "Printing with Windows" on page 10, "Printing with Macintosh" on 4" x 6" size papers. You can print on page 12. 7 Loading 4" x 6" size papers You can load a maximum of 10 sheets...
Quick Start Guide
Page 13
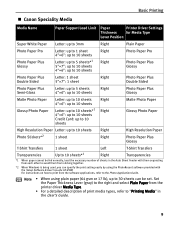
For instructions on how to print from sticking together. *2 When Windows is being used, you can be fed normally, load the necessary number of print media types, refer to "Printing Media" in the Auto Sheet Feeder ... the PhotoRecord software provided with them separating from each other to avoid them from the software applications, refer to the Photo Application Guide. Basic Printing Canon Speciality Media Media Name Paper Support Load Limit Paper Printer Driver Settings Thickness for Media Type Lever Position Super White Paper Letter: up to 3mm...
For instructions on how to print from sticking together. *2 When Windows is being used, you can be fed normally, load the necessary number of print media types, refer to "Printing Media" in the Auto Sheet Feeder ... the PhotoRecord software provided with them separating from each other to avoid them from the software applications, refer to the Photo Application Guide. Basic Printing Canon Speciality Media Media Name Paper Support Load Limit Paper Printer Driver Settings Thickness for Media Type Lever Position Super White Paper Letter: up to 3mm...
Quick Start Guide
Page 14
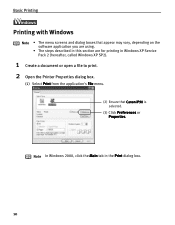
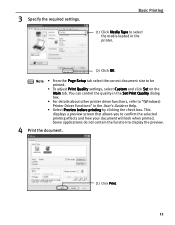
Basic Printing l Printing with Windows Note • The menu screens and dialog boxes that appear may vary, depending on the software application you are using. • The steps described in this section are for printing in the Print dialog box. 10 Note In Windows 2000, click the Main tab in Windows XP Service Pack 2 (hereafter, called Windows XP SP2). 1 Create a document or open a file to print. 2 Open the Printer Properties dialog box. (1) Select Print from the application's File menu. (2) Ensure that Canon iP90 is selected. (3) Click Preferences or Properties.
Basic Printing l Printing with Windows Note • The menu screens and dialog boxes that appear may vary, depending on the software application you are using. • The steps described in this section are for printing in the Print dialog box. 10 Note In Windows 2000, click the Main tab in Windows XP Service Pack 2 (hereafter, called Windows XP SP2). 1 Create a document or open a file to print. 2 Open the Printer Properties dialog box. (1) Select Print from the application's File menu. (2) Ensure that Canon iP90 is selected. (3) Click Preferences or Properties.
Quick Start Guide
Page 15
... the Main tab. You can control the quality in the Set Print Quality dialog box. • For details about other printer driver functions, refer to "(Windows) Printer Driver Functions" in the printer. (2) Click OK. Note • From the Page Setup tab select the correct document size to confirm the selected printing...
... the Main tab. You can control the quality in the Set Print Quality dialog box. • For details about other printer driver functions, refer to "(Windows) Printer Driver Functions" in the printer. (2) Click OK. Note • From the Page Setup tab select the correct document size to confirm the selected printing...
Quick Start Guide
Page 19
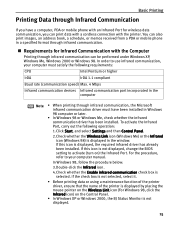
...through infrared communication can also print images, an address book, a schedule, or memos received from a PDA or mobile phone in the window. To activate the Infrared Port, carry out the following requirements: CPU Intel Pentium or higher IrDA IrDA 1.1 compliant Baud rate (communication ...an Infrared Port for Infrared Communication with the printer. For the procedure, refer to use infrared communication, your computer manual. In Windows 98, follow the procedure below: 3.Double-click the Infrared icon. 4.Check whether the Enable infrared communication check box is selected...
...through infrared communication can also print images, an address book, a schedule, or memos received from a PDA or mobile phone in the window. To activate the Infrared Port, carry out the following requirements: CPU Intel Pentium or higher IrDA IrDA 1.1 compliant Baud rate (communication ...an Infrared Port for Infrared Communication with the printer. For the procedure, refer to use infrared communication, your computer manual. In Windows 98, follow the procedure below: 3.Double-click the Infrared icon. 4.Check whether the Enable infrared communication check box is selected...
Quick Start Guide
Page 21
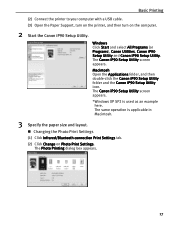
... Open the Applications folder, and then double-click the Canon iP90 Setup Utility folder and the Canon iP90 Setup Utility icon. Windows Click Start and select All Programs (or Programs), Canon Utilities, Canon iP90 Setup Utility and Canon iP90 Setup Utility. The same operation is used as ...Settings tab. (2) Click Change on the computer. 2 Start the Canon iP90 Setup Utility. The Canon iP90 Setup Utility screen appears. *Windows XP SP2 is applicable in Macintosh. 3 Specify the paper size and layout. The Canon iP90 Setup Utility screen appears. The Photo Printing dialog box appears...
... Open the Applications folder, and then double-click the Canon iP90 Setup Utility folder and the Canon iP90 Setup Utility icon. Windows Click Start and select All Programs (or Programs), Canon Utilities, Canon iP90 Setup Utility and Canon iP90 Setup Utility. The same operation is used as ...Settings tab. (2) Click Change on the computer. 2 Start the Canon iP90 Setup Utility. The Canon iP90 Setup Utility screen appears. *Windows XP SP2 is applicable in Macintosh. 3 Specify the paper size and layout. The Canon iP90 Setup Utility screen appears. The Photo Printing dialog box appears...
Quick Start Guide
Page 26
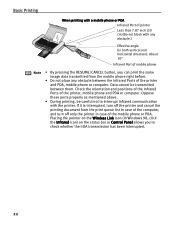
... printing, be transmitted between the Infrared Ports of the printer and PDA, mobile phone or computer. Placing the pointer on the Wireless Link icon (In Windows 98, click the Infrared icon) on the status bar or Control Panel allows you can print the same image data transmitted from the print queue...
... printing, be transmitted between the Infrared Ports of the printer and PDA, mobile phone or computer. Placing the pointer on the Wireless Link icon (In Windows 98, click the Infrared icon) on the status bar or Control Panel allows you can print the same image data transmitted from the print queue...
Quick Start Guide
Page 33
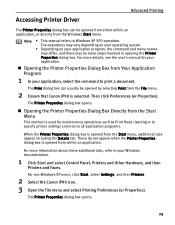
... Start menu, additional tabs appear including the Details tab. The Printer Properties dialog box opens. For non-Windows XP users, click Start, select Settings, and then Printers. 2 Select the Canon iP90 icon. 3 Open the File menu and select Printing Preferences (or Properties). Then click Preferences (or.... Opening the Printer Properties Dialog Box Directly from the Start Menu This method is used for your application, select the command to Windows XP SP2 operation. For more details, see the user's manual for maintenance operations such as Print Head cleaning or to specify printer...
... Start menu, additional tabs appear including the Details tab. The Printer Properties dialog box opens. For non-Windows XP users, click Start, select Settings, and then Printers. 2 Select the Canon iP90 icon. 3 Open the File menu and select Printing Preferences (or Properties). Then click Preferences (or.... Opening the Printer Properties Dialog Box Directly from the Start Menu This method is used for your application, select the command to Windows XP SP2 operation. For more details, see the user's manual for maintenance operations such as Print Head cleaning or to specify printer...
Quick Start Guide
Page 37
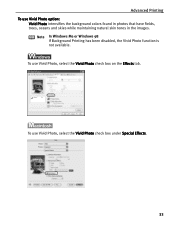
To use Vivid Photo option: Vivid Photo intensifies the background colors found in photos that have fields, trees, oceans and skies while maintaining natural skin tones in the images. Advanced Printing To use Vivid Photo, select the Vivid Photo check box under Special Effects. 33 To use Vivid Photo, select the Vivid Photo check box on the Effects tab. Note In Windows Me or Windows 98 If Background Printing has been disabled, the Vivid Photo function is not available.
To use Vivid Photo option: Vivid Photo intensifies the background colors found in photos that have fields, trees, oceans and skies while maintaining natural skin tones in the images. Advanced Printing To use Vivid Photo, select the Vivid Photo check box under Special Effects. 33 To use Vivid Photo, select the Vivid Photo check box on the Effects tab. Note In Windows Me or Windows 98 If Background Printing has been disabled, the Vivid Photo function is not available.
Quick Start Guide
Page 38
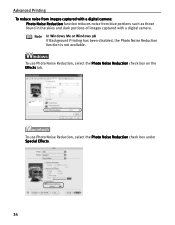
Note In Windows Me or Windows 98 If Background Printing has been disabled, the Photo Noise Reduction function is not available. To use Photo Noise Reduction, select the Photo Noise Reduction check box under Special Effects. 34 Advanced Printing To reduce noise from images captured with a digital camera: Photo Noise Reduction function reduces noise from blue portions such as those found in the skies and dark portions of images captured with a digital camera. To use Photo Noise Reduction, select the Photo Noise Reduction check box on the Effects tab.
Note In Windows Me or Windows 98 If Background Printing has been disabled, the Photo Noise Reduction function is not available. To use Photo Noise Reduction, select the Photo Noise Reduction check box under Special Effects. 34 Advanced Printing To reduce noise from images captured with a digital camera: Photo Noise Reduction function reduces noise from blue portions such as those found in the skies and dark portions of images captured with a digital camera. To use Photo Noise Reduction, select the Photo Noise Reduction check box on the Effects tab.
Quick Start Guide
Page 41
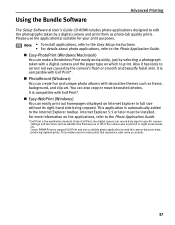
...has tools to correct red eye caused by selecting a photograph taken with Exif Print*. PhotoRecord (Windows) You can create fun and unique photo albums with Exif Print*. Canon PIXMA Printers support Exif Print and use the application(s) suitable for specific camera settings and functions such...skin. This application is compatible with decorative themes such as photo-lab quality prints. Easy-WebPrint (Windows) You can record data tags for your print purposes. Easy-PhotoPrint (Windows/Macintosh) You can also copy or move decorated photos. Internet Explorer 5.5 or later must be ...
...has tools to correct red eye caused by selecting a photograph taken with Exif Print*. PhotoRecord (Windows) You can create fun and unique photo albums with Exif Print*. Canon PIXMA Printers support Exif Print and use the application(s) suitable for specific camera settings and functions such...skin. This application is compatible with decorative themes such as photo-lab quality prints. Easy-WebPrint (Windows) You can record data tags for your print purposes. Easy-PhotoPrint (Windows/Macintosh) You can also copy or move decorated photos. Internet Explorer 5.5 or later must be ...
Quick Start Guide
Page 42
... Paper Pro (LTR, 4"×6") - For more information, refer to print photographs stored in a folder on the hard disk. (2) Click Start, select All Programs (or Programs), Canon Utilities, Easy-PhotoPrint, and then Easy-PhotoPrint. Follow the steps below to create color prints of digital camera photographs with EasyPhotoPrint using the Red-Eye... User's Guide CD-ROM using the Borderless Printing mode. This section describes how to the Photo Application Guide. This chapter describes the steps used under Windows XP.
... Paper Pro (LTR, 4"×6") - For more information, refer to print photographs stored in a folder on the hard disk. (2) Click Start, select All Programs (or Programs), Canon Utilities, Easy-PhotoPrint, and then Easy-PhotoPrint. Follow the steps below to create color prints of digital camera photographs with EasyPhotoPrint using the Red-Eye... User's Guide CD-ROM using the Borderless Printing mode. This section describes how to the Photo Application Guide. This chapter describes the steps used under Windows XP.
Quick Start Guide
Page 43
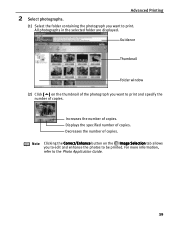
... the photograph you want to print and specify the number of copies. 2 Select photographs. All photographs in the selected folder are displayed. Guidance Thumbnail Folder window (2) Click [ ] on the Image Selection tab allows you want to print. Increases the number of copies. Decreases the number of copies. Displays the specified number...
... the photograph you want to print and specify the number of copies. 2 Select photographs. All photographs in the selected folder are displayed. Guidance Thumbnail Folder window (2) Click [ ] on the Image Selection tab allows you want to print. Increases the number of copies. Decreases the number of copies. Displays the specified number...
Quick Start Guide
Page 50
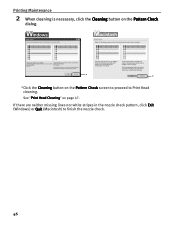
Printing Maintenance 2 When cleaning is necessary, click the Cleaning button on the Pattern Check dialog. * * *Click the Cleaning button on page 47. If there are neither missing lines nor white stripes in the nozzle check pattern, click Exit (Windows) or Quit (Macintosh) to Print Head cleaning. See "Print Head Cleaning" on the Pattern Check screen to proceed to finish the nozzle check. 46
Printing Maintenance 2 When cleaning is necessary, click the Cleaning button on the Pattern Check dialog. * * *Click the Cleaning button on page 47. If there are neither missing lines nor white stripes in the nozzle check pattern, click Exit (Windows) or Quit (Macintosh) to Print Head cleaning. See "Print Head Cleaning" on the Pattern Check screen to proceed to finish the nozzle check. 46
Quick Start Guide
Page 68
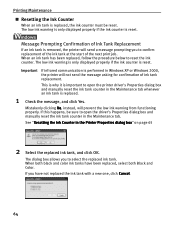
See "Resetting the Ink Counter in Windows XP or Windows 2000, the printer will prevent the low ink warning from functioning properly. The low ink warning is only displayed properly if the ink counter is ...
See "Resetting the Ink Counter in Windows XP or Windows 2000, the printer will prevent the low ink warning from functioning properly. The low ink warning is only displayed properly if the ink counter is ...

Quick Start Guide
Page 73
... paper jams, a troubleshooting message is not displayed. 69 The message may vary depending on page 82 When an Error Occurs When an error occurs in Windows XP or Windows 2000, a BJ Status Monitor screen is displayed automatically. Troubleshooting Troubleshooting Troubleshooting usually falls into one of the following categories.
... paper jams, a troubleshooting message is not displayed. 69 The message may vary depending on page 82 When an Error Occurs When an error occurs in Windows XP or Windows 2000, a BJ Status Monitor screen is displayed automatically. Troubleshooting Troubleshooting Troubleshooting usually falls into one of the following categories.


