iP90 Easy Setup Instructions
Page 1
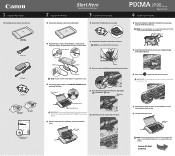
... by aligning the mark with the mark. Wait until the process is closed. Connect the DC plug to register the product. 3 Lift open the Print Head Cover. NOTE: You will initialize. IMPORTANT: For correct printer operation, make sure ink tanks are secure in on side two. Power Cord 3...the gray Lock Lever. 1 Unpack the Printer 1 Carefully remove all items from its package, and pull off the Protective Cap. PIXMA iP90 Photo Printer Power Cord AC Adapter Print Head BCI-15 Black Ink Tanks BCI-16 Color Ink Tanks Documentation and Software Kit 2 Prepare the Printer Start Here Easy Setup...
... by aligning the mark with the mark. Wait until the process is closed. Connect the DC plug to register the product. 3 Lift open the Print Head Cover. NOTE: You will initialize. IMPORTANT: For correct printer operation, make sure ink tanks are secure in on side two. Power Cord 3...the gray Lock Lever. 1 Unpack the Printer 1 Carefully remove all items from its package, and pull off the Protective Cap. PIXMA iP90 Photo Printer Power Cord AC Adapter Print Head BCI-15 Black Ink Tanks BCI-16 Color Ink Tanks Documentation and Software Kit 2 Prepare the Printer Start Here Easy Setup...

iP90 Easy Setup Instructions
Page 2
... the "Printer Connection" window appears, connect the USB cable to the computer and the other software. NOTE: If print quality is a trademark of their respective owners. Canon and BCI are registered trademarks and PIXMA is not satisfactory after installing the printer, you may differ depending on the operating system you to use Mac...
... the "Printer Connection" window appears, connect the USB cable to the computer and the other software. NOTE: If print quality is a trademark of their respective owners. Canon and BCI are registered trademarks and PIXMA is not satisfactory after installing the printer, you may differ depending on the operating system you to use Mac...

iP90 Quick Start Guide
Page 5
... Not Feed Properly 75 Handling Error Messages 76 An Error Message Appears on the Screen 78 Cannot Print Properly through Infrared Communication 81 Cannot Print Properly from the Digital Camera 82 Appendix Printing Photographs Directly from Canon Bubble Jet Direct Compatible Digital Cameras 84 User's Guide Table of Contents 86 Accessory Options 87 Traveling...
... Not Feed Properly 75 Handling Error Messages 76 An Error Message Appears on the Screen 78 Cannot Print Properly through Infrared Communication 81 Cannot Print Properly from the Digital Camera 82 Appendix Printing Photographs Directly from Canon Bubble Jet Direct Compatible Digital Cameras 84 User's Guide Table of Contents 86 Accessory Options 87 Traveling...
iP90 Quick Start Guide
Page 6
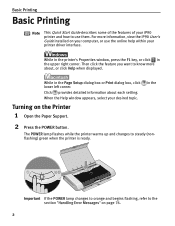
... the printer's Properties window, press the F1 key, or click in the Page Setup dialog box or Print dialog box, click lower left corner. When the Help window appears, select your iP90 printer and how to the section "Handling Error Messages" on the Printer 1 Open the Paper Support. ... your printer driver interface. in the Turning on page 76. 2 Click provides detailed information about , or click Help when displayed. Basic Printing Basic Printing Note This Quick Start Guide describes some of the features of your desired topic. Then click the feature you want to steady (nonflashing)...
... the printer's Properties window, press the F1 key, or click in the Page Setup dialog box or Print dialog box, click lower left corner. When the Help window appears, select your iP90 printer and how to the section "Handling Error Messages" on the Printer 1 Open the Paper Support. ... your printer driver interface. in the Turning on page 76. 2 Click provides detailed information about , or click Help when displayed. Basic Printing Basic Printing Note This Quick Start Guide describes some of the features of your desired topic. Then click the feature you want to steady (nonflashing)...

iP90 Quick Start Guide
Page 7
Turning off the Printer 1 To turn off . Basic Printing Important About the Power Plug When removing the power plug after turning off the printer, be unable to check that the POWER lamp is not lit. If the power plug is turned off the printer, press the POWER button. When the POWER lamp stops blinking, the printer is removed from the wall outlet with the POWER lamp lit or blinking, the printer cannot protect its print heads and may be sure to print. 3
Turning off the Printer 1 To turn off . Basic Printing Important About the Power Plug When removing the power plug after turning off the printer, be unable to check that the POWER lamp is not lit. If the power plug is turned off the printer, press the POWER button. When the POWER lamp stops blinking, the printer is removed from the wall outlet with the POWER lamp lit or blinking, the printer cannot protect its print heads and may be sure to print. 3

iP90 Quick Start Guide
Page 8
... or malfunction. • Folded, curled or wrinkled paper • Damp paper • Paper that is too thin (less than 105 gsm or 28 lb) *non-Canon branded paper • Picture postcards • Postcards with an affixed photo or sticker • Envelopes with a double flap • Envelopes with pressure seals • Envelopes... than 64 gsm or 17 lb) • Paper that is curled, gently bend them in the User's Guide for detailed instructions on page 8. • Consult "Printing Media" in the opposite direction until the paper becomes completely flat. 4
... or malfunction. • Folded, curled or wrinkled paper • Damp paper • Paper that is too thin (less than 105 gsm or 28 lb) *non-Canon branded paper • Picture postcards • Postcards with an affixed photo or sticker • Envelopes with a double flap • Envelopes with pressure seals • Envelopes... than 64 gsm or 17 lb) • Paper that is curled, gently bend them in the User's Guide for detailed instructions on page 8. • Consult "Printing Media" in the opposite direction until the paper becomes completely flat. 4

iP90 Quick Start Guide
Page 9
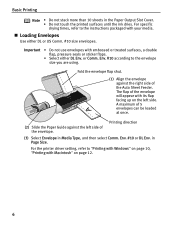
... the correct position for the media in the portrait position (short side facing down). If the Paper Output Slot Cover is stacked with the print side facing up. When loading the 4"×6"paper, load sheets in use. Note • Place the printer on the area (desk, etc.) where...bad effect on this Load Limit mark. (3) Slide the Paper Guide against the left position for envelope, and T-Shirt Transfers. Move to load paper. Basic Printing (1) Open the Paper Support and Paper Output Slot Cover. (2) Move the Paper Thickness Lever to the left side of the stack of paper. (2) Align ...
... the correct position for the media in the portrait position (short side facing down). If the Paper Output Slot Cover is stacked with the print side facing up. When loading the 4"×6"paper, load sheets in use. Note • Place the printer on the area (desk, etc.) where...bad effect on this Load Limit mark. (3) Slide the Paper Guide against the left position for envelope, and T-Shirt Transfers. Move to load paper. Basic Printing (1) Open the Paper Support and Paper Output Slot Cover. (2) Move the Paper Thickness Lever to the left side of the stack of paper. (2) Align ...
iP90 Quick Start Guide
Page 10
Basic Printing Note • Do not stack more than 10 sheets in Media Type, and then select Comm. Important ... DL or US Comm. #10 size envelopes. For the printer driver setting, refer to "Printing with Windows" on page 10, "Printing with your media. „ Loading Envelopes Use either DL Env. Printing direction (3) Select Envelope in the Paper Output Slot Cover. • Do not touch the... printed surfaces until the ink dries. Env. #10 according to the instructions packaged with Macintosh" on the left ...
Basic Printing Note • Do not stack more than 10 sheets in Media Type, and then select Comm. Important ... DL or US Comm. #10 size envelopes. For the printer driver setting, refer to "Printing with Windows" on page 10, "Printing with your media. „ Loading Envelopes Use either DL Env. Printing direction (3) Select Envelope in the Paper Output Slot Cover. • Do not touch the... printed surfaces until the ink dries. Env. #10 according to the instructions packaged with Macintosh" on the left ...
iP90 Quick Start Guide
Page 11
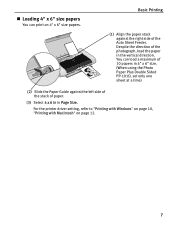
Despite the direction of the photograph, load the paper in the vertical direction. You can print on page 12. 7 For the printer driver setting, refer to "Printing with Windows" on page 10, "Printing with Macintosh" on 4" x 6" size papers. Basic Printing (1) Align the paper stack against the left side of the stack of paper. (3) Select 4 x 6 in...
Despite the direction of the photograph, load the paper in the vertical direction. You can print on page 12. 7 For the printer driver setting, refer to "Printing with Windows" on page 10, "Printing with Macintosh" on 4" x 6" size papers. Basic Printing (1) Align the paper stack against the left side of the stack of paper. (3) Select 4 x 6 in...

iP90 Quick Start Guide
Page 12
Basic Printing Using Speciality Media Canon recommends that you use genuine Canon media to ensure optimal print quality. „ Photo Quality Media • Photo Paper Pro „ Media Suited to Business Documents • Photo Paper Plus Glossy • High Resolution Paper • Photo Paper Plus Double Sided • Transparencies • Photo Paper Plus Semi-Gloss • Matte Photo Paper • Glossy Photo Paper 8
Basic Printing Using Speciality Media Canon recommends that you use genuine Canon media to ensure optimal print quality. „ Photo Quality Media • Photo Paper Pro „ Media Suited to Business Documents • Photo Paper Plus Glossy • High Resolution Paper • Photo Paper Plus Double Sided • Transparencies • Photo Paper Plus Semi-Gloss • Matte Photo Paper • Glossy Photo Paper 8
iP90 Quick Start Guide
Page 13
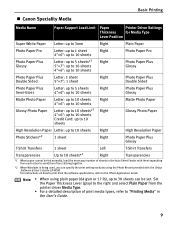
...with them separating from each other to avoid them from the software applications, refer to "Printing Media" in the Auto Sheet Feeder with the Setup Software & User's Guide CD-ROM. Basic Printing „ Canon Speciality Media Media Name Paper Support Load Limit Paper Printer Driver Settings Thickness for Media ...Card: up to 10 sheets Right Right Matte Photo Paper Glossy Photo Paper High Resolution Paper Letter: up to 30 sheets can specify the print setting easily by using plain paper (64 gsm or 17 lb), up to 10 sheets Photo Stickers*2 1 sheet Right Right High Resolution...
...with them separating from each other to avoid them from the software applications, refer to "Printing Media" in the Auto Sheet Feeder with the Setup Software & User's Guide CD-ROM. Basic Printing „ Canon Speciality Media Media Name Paper Support Load Limit Paper Printer Driver Settings Thickness for Media ...Card: up to 10 sheets Right Right Matte Photo Paper Glossy Photo Paper High Resolution Paper Letter: up to 30 sheets can specify the print setting easily by using plain paper (64 gsm or 17 lb), up to 10 sheets Photo Stickers*2 1 sheet Right Right High Resolution...
iP90 Quick Start Guide
Page 14
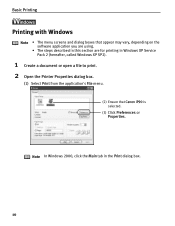
Note In Windows 2000, click the Main tab in Windows XP Service Pack 2 (hereafter, called Windows XP SP2). 1 Create a document or open a file to print. 2 Open the Printer Properties dialog box. (1) Select Print from the application's File menu. (2) Ensure that appear may vary, depending on the software application you are using. • The steps described in this section are for printing in the Print dialog box. 10 Basic Printing l Printing with Windows Note • The menu screens and dialog boxes that Canon iP90 is selected. (3) Click Preferences or Properties.
Note In Windows 2000, click the Main tab in Windows XP Service Pack 2 (hereafter, called Windows XP SP2). 1 Create a document or open a file to print. 2 Open the Printer Properties dialog box. (1) Select Print from the application's File menu. (2) Ensure that appear may vary, depending on the software application you are using. • The steps described in this section are for printing in the Print dialog box. 10 Basic Printing l Printing with Windows Note • The menu screens and dialog boxes that Canon iP90 is selected. (3) Click Preferences or Properties.

iP90 Quick Start Guide
Page 15
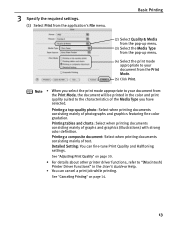
...about other printer driver functions, refer to select the media loaded in the User's Guide or Help. • Select Preview before printing by clicking the check box. Basic Printing (1) Click Media Type to "(Windows) Printer Driver Functions" in the printer. (2) Click OK. This displays a preview screen that... allows you to be printed. • To adjust Print Quality settings, select Custom and click Set on the Main tab. Note • From the Page Setup tab select the correct document...
...about other printer driver functions, refer to select the media loaded in the User's Guide or Help. • Select Preview before printing by clicking the check box. Basic Printing (1) Click Media Type to "(Windows) Printer Driver Functions" in the printer. (2) Click OK. This displays a preview screen that... allows you to be printed. • To adjust Print Quality settings, select Custom and click Set on the Main tab. Note • From the Page Setup tab select the correct document...

iP90 Quick Start Guide
Page 16
... application's File menu. The Page Setup dialog box opens. (2) Select iP90 from Format for printing in progress by simply pressing the RESUME/ CANCEL button on page 14. Basic Printing Note You can cancel a print job in Mac OS X v.10.3.x. 1 Create a document or open a file to print. 2 Select Paper Size. (1) Select Page Setup from the Paper...
... application's File menu. The Page Setup dialog box opens. (2) Select iP90 from Format for printing in progress by simply pressing the RESUME/ CANCEL button on page 14. Basic Printing Note You can cancel a print job in Mac OS X v.10.3.x. 1 Create a document or open a file to print. 2 Select Paper Size. (1) Select Page Setup from the Paper...
iP90 Quick Start Guide
Page 17
... mainly of photographs and graphics featuring fine color gradation. See "Adjusting Print Quality" on page 14. 13 Printing a top-quality photo: Select when printing documents consisting mainly of text. Detailed Setting: You can cancel a print job while printing. Printing tables and charts: Select when printing documents consisting mainly of the Media Type you have selected. Note •...
... mainly of photographs and graphics featuring fine color gradation. See "Adjusting Print Quality" on page 14. 13 Printing a top-quality photo: Select when printing documents consisting mainly of text. Detailed Setting: You can cancel a print job while printing. Printing tables and charts: Select when printing documents consisting mainly of the Media Type you have selected. Note •...

iP90 Quick Start Guide
Page 18
... Status Monitor opens automatically when a printer error occurs. 1 Select Print from the Printer pop-up menu. Basic Printing Canceling Printing You can cancel a print job while printing with the RESUME/CANCEL button on the taskbar. Note To temporarity stop printing. To display the BJ Status Monitor, click Canon iP90 on the printer. 1 Press the RESUME/CANCEL button while...
... Status Monitor opens automatically when a printer error occurs. 1 Select Print from the Printer pop-up menu. Basic Printing Canceling Printing You can cancel a print job while printing with the RESUME/CANCEL button on the taskbar. Note To temporarity stop printing. To display the BJ Status Monitor, click Canon iP90 on the printer. 1 Press the RESUME/CANCEL button while...
iP90 Quick Start Guide
Page 19
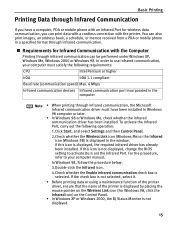
... rate (communication speed) Max. 4 Mbps Infrared communication devices Infrared communication port incorporated in the computer Note • When printing through infrared communication, the Microsoft infrared communication driver must satisfy the following operation: 1.Click Start, and select Settings and then...required infrared driver has already been installed. For the procedure, refer to use infrared communication, your computer manual. Basic Printing Printing Data through Infrared Communication If you have been installed in Windows 98 computer or later. • In Windows 98 ...
... rate (communication speed) Max. 4 Mbps Infrared communication devices Infrared communication port incorporated in the computer Note • When printing through infrared communication, the Microsoft infrared communication driver must satisfy the following operation: 1.Click Start, and select Settings and then...required infrared driver has already been installed. For the procedure, refer to use infrared communication, your computer manual. Basic Printing Printing Data through Infrared Communication If you have been installed in Windows 98 computer or later. • In Windows 98 ...
iP90 Quick Start Guide
Page 20
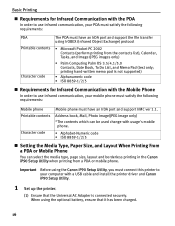
..., Mail, Photo image(JPEG image only) *The contents which can select the media type, page size, layout and borderless printing in the Canon iP90 Setup Utility when printing from the contacts list), Calendar, Tasks, and Image (JPEG images only) • Palm Computing Palm OS 3.5/4.1/5.0 Contacts, ...file transfer using IrOBEX (Infrared Object Exchange) protocol • Microsoft Pocket PC 2002 Contacts (perform printing from a PDA or mobile phone. Important Before using the Canon iP90 Setup Utility, you must connect this printer to use infrared communication, your PDA must satisfy the ...
..., Mail, Photo image(JPEG image only) *The contents which can select the media type, page size, layout and borderless printing in the Canon iP90 Setup Utility when printing from the contacts list), Calendar, Tasks, and Image (JPEG images only) • Palm Computing Palm OS 3.5/4.1/5.0 Contacts, ...file transfer using IrOBEX (Infrared Object Exchange) protocol • Microsoft Pocket PC 2002 Contacts (perform printing from a PDA or mobile phone. Important Before using the Canon iP90 Setup Utility, you must connect this printer to use infrared communication, your PDA must satisfy the ...
iP90 Quick Start Guide
Page 21
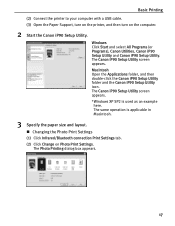
... the Applications folder, and then double-click the Canon iP90 Setup Utility folder and the Canon iP90 Setup Utility icon. The Canon iP90 Setup Utility screen appears. *Windows XP SP2 is applicable in Macintosh. 3 Specify the paper size and layout. „ Changing the Photo Print Settings (1) Click Infrared/Bluetooth connection Print Settings tab. (2) Click Change on the computer...
... the Applications folder, and then double-click the Canon iP90 Setup Utility folder and the Canon iP90 Setup Utility icon. The Canon iP90 Setup Utility screen appears. *Windows XP SP2 is applicable in Macintosh. 3 Specify the paper size and layout. „ Changing the Photo Print Settings (1) Click Infrared/Bluetooth connection Print Settings tab. (2) Click Change on the computer...

iP90 Quick Start Guide
Page 22
...the printer. - For details about printing from a PDA or mobile phone with a Paper (×16) border. Borderless Printing... Specifies whether to perform borderless printing or not. *Refer to specify the media type, paper size, layout, and borderless printing. - Basic Printing (3) Select a desired layout for ...layout. Note Click Custom if you want to the User's Guide for printing. 4×6 Prints a photo on Photo Paper Plus Glossy 4"×6"/101.6×152.4 mm (Standard) paper without a border. 5×7 Prints a photo on Photo Paper Plus Glossy Credit Card 2.13"×3.39"/...
...the printer. - For details about printing from a PDA or mobile phone with a Paper (×16) border. Borderless Printing... Specifies whether to perform borderless printing or not. *Refer to specify the media type, paper size, layout, and borderless printing. - Basic Printing (3) Select a desired layout for ...layout. Note Click Custom if you want to the User's Guide for printing. 4×6 Prints a photo on Photo Paper Plus Glossy 4"×6"/101.6×152.4 mm (Standard) paper without a border. 5×7 Prints a photo on Photo Paper Plus Glossy Credit Card 2.13"×3.39"/...


